阅读完需:约 13 分钟
1.SecurityContextHolder:是安全上下文容器,可以在此得知操作的用户是谁,该用户是否已经被认证,他拥有哪些角色权限…这些都被保存在SecurityContextHolder中。
Object principal = SecurityContextHolder.getContext().getAuthentication().getPrincipal();
if (principal instanceof UserDetails) {
String username = ((UserDetails)principal).getUsername();
} else {
String username = principal.toString();上面的代码是通过SecurityContextHolder来获取到信息,其中getAuthentication()返回了认证信息,再次getPrincipal()返回了身份信息,UserDetails便是Spring对身份信息封装的一个接口。
2.Authentication:源码如下:
package org.springframework.security.core;

import java.io.Serializable;
import java.security.Principal;
import java.util.Collection;

public interface Authentication extends Principal, Serializable {
    Collection<? extends GrantedAuthority> getAuthorities();

    Object getCredentials();

    Object getDetails();

    Object getPrincipal();

    boolean isAuthenticated();

    void setAuthenticated(boolean var1) throws IllegalArgumentException;
}-
getAuthorities(),权限信息列表,默认是
GrantedAuthority接口的一些实现类,通常是代表权限信息的一系列字符串。 - getCredentials(),密码信息,用户输入的密码字符串,在认证过后通常会被移除,用于保障安全。
-
getDetails(),细节信息,web应用中的实现接口通常为
WebAuthenticationDetails,它记录了访问者的ip地址和sessionId的值。 -
getPrincipal(),敲黑板!!!最重要的身份信息,大部分情况下返回的是
UserDetails接口的实现类,也是框架中的常用接口之一。
3.AuthenticationManager:顾名思义,它是认证的一个管理者他是一个接口,里面有个方法authenticate接受Authentication这个参数来完成验证;
4.ProviderManager实现AuthenticationManager这个接口,完成验证工作。部分源码:
public class ProviderManager implements AuthenticationManager, MessageSourceAware,
        InitializingBean {
    // 维护一个AuthenticationProvider列表
    private List<AuthenticationProvider> providers = Collections.emptyList();


public Authentication authenticate(Authentication authentication) throws AuthenticationException {
    Class<? extends Authentication> toTest = authentication.getClass();
    AuthenticationException lastException = null;
    Authentication result = null;
    boolean debug = logger.isDebugEnabled();
    Iterator var6 = this.getProviders().iterator();
   //依次来认证
    while(var6.hasNext()) {
        AuthenticationProvider provider = (AuthenticationProvider)var6.next();
        if (provider.supports(toTest)) {
            if (debug) {
                logger.debug("Authentication attempt using " + provider.getClass().getName());
            }

            try {
         // 如果有Authentication信息,则直接返回
                result = provider.authenticate(authentication);
                if (result != null) {
                    this.copyDetails(authentication, result);
                    break;
                }
            } catch (AccountStatusException var11) {
                this.prepareException(var11, authentication);
                throw var11;
            } catch (InternalAuthenticationServiceException var12) {
                this.prepareException(var12, authentication);
                throw var12;
            } catch (AuthenticationException var13) {
                lastException = var13;
            }
        }
    }
}5.DaoAuthenticationProvider:它是AuthenticationProvider的的一个实现类,非常重要,它主要完成了两个工作,
一个是retrieveUser方法,它返回UserDetails类,看看它的源码:
protected final UserDetails retrieveUser(String username, UsernamePasswordAuthenticationToken authentication) throws AuthenticationException {
    UserDetails loadedUser;
    try {
     //记住loadUserByUsername这个方法;
loadedUser = this.getUserDetailsService().loadUserByUsername(username);
    } catch (UsernameNotFoundException var6) {
        if (authentication.getCredentials() != null) {
            String presentedPassword = authentication.getCredentials().toString();
            this.passwordEncoder.isPasswordValid(this.userNotFoundEncodedPassword, presentedPassword, (Object)null);
        }

        throw var6;
    } catch (Exception var7) {
        throw new InternalAuthenticationServiceException(var7.getMessage(), var7);
    }

    if (loadedUser == null) {
        throw new InternalAuthenticationServiceException("UserDetailsService returned null, which is an interface contract violation");
    } else {
        return loadedUser;
    }
}
它还有一个重要的方法是
protected void additionalAuthenticationChecks(UserDetails userDetails, UsernamePasswordAuthenticationToken authentication) throws AuthenticationException {
    Object salt = null;
    if (this.saltSource != null) {、
      //此方法在你的配置文件中去配置实现的  也是spring security加密的关键    ------划重点
        salt = this.saltSource.getSalt(userDetails);
    }

    if (authentication.getCredentials() == null) {
        this.logger.debug("Authentication failed: no credentials provided");
        throw new BadCredentialsException(this.messages.getMessage("AbstractUserDetailsAuthenticationProvider.badCredentials", "Bad credentials"));
    } else {
        String presentedPassword = authentication.getCredentials().toString();
        if (!this.passwordEncoder.isPasswordValid(userDetails.getPassword(), presentedPassword, salt)) {
            this.logger.debug("Authentication failed: password does not match stored value");
            throw new BadCredentialsException(this.messages.getMessage("AbstractUserDetailsAuthenticationProvider.badCredentials", "Bad credentials"));
        }
    }
}这个方法的坑点还是挺多的,主要的意思就是拿到通过用户姓名获得的该用户的信息(密码等)和用户输入的密码加密后对比,如果不正确就会报错Bad credentials的错误。为什么说这个方法坑,因为注意到
this.passwordEncoder.isPasswordValid(userDetails.getPassword(), presentedPassword, salt)
这里面他自带的一个方法用的是MD5的加密帮你加密在和你存入这个用户时的密码对比,
public boolean isPasswordValid(String encPass, String rawPass, Object salt) {
    String pass1 = encPass + "";
    String pass2 = this.mergePasswordAndSalt(rawPass, salt, false);
    if (this.ignorePasswordCase) {
        pass1 = pass1.toLowerCase(Locale.ENGLISH);
        pass2 = pass2.toLowerCase(Locale.ENGLISH);
    }

    return PasswordEncoderUtils.equals(pass1, pass2);
}
可以注意到在生成pass2的时候传入了salt对象,这个salt对象可以通过配置文件去实现,也可以自己写一个实现类来完成。可以说是是和用户输入密码匹配的关键点所在。
6.UserDetails与UserDetailsService,这两个接口在上面都出现了,先看UserDetails是什么:
package org.springframework.security.core.userdetails;

import java.io.Serializable;
import java.util.Collection;
import org.springframework.security.core.GrantedAuthority;

public interface UserDetails extends Serializable {
    Collection<? extends GrantedAuthority> getAuthorities();

    String getPassword();

    String getUsername();

    boolean isAccountNonExpired();

    boolean isAccountNonLocked();

    boolean isCredentialsNonExpired();

    boolean isEnabled();
}有没有发现它和前面的Authentication接口很像,比如它们都拥有username,authorities,区分他们也是本文的重点内容之一。
Authentication的getCredentials()与UserDetails中的getPassword()需要被区分对待,前者是用户提交的密码凭证,后者是用户正确的密码,
认证器其实就是对这两者的比对。Authentication中的getAuthorities()实际是由UserDetails的getAuthorities()传递而形成的。
还记得Authentication接口中的getUserDetails()方法吗?其中的UserDetails用户详细信息便是经过了AuthenticationProvider之后被填充的。
public interface UserDetailsService {
   UserDetails loadUserByUsername(String username) throws UsernameNotFoundException;
}UserDetailsService和AuthenticationProvider两者的职责常常被人们搞混,关于他们的问题在文档的FAQ和issues中屡见不鲜。记住一点即可,敲黑板!!!UserDetailsService只负责从特定的地方(通常是数据库)加载用户信息,仅此而已,记住这一点,可以避免走很多弯路。UserDetailsService常见的实现类有JdbcDaoImpl,InMemoryUserDetailsManager,前者从数据库加载用户,后者从内存中加载用户,也可以自己实现UserDetailsService,通常这更加灵活。
ok,到此我们可以来走一遍流程了。
首先我们得有一个pojo对象,去实现UserDetail得接口,继承一下几个方法
@Override
public Collection<? extends GrantedAuthority> getAuthorities() {
    if(roles == null || roles.size()<=0){
        return null;
    }
    List<SimpleGrantedAuthority> authorities = new ArrayList<SimpleGrantedAuthority>();
    for(Role r:roles){
        authorities.add(new SimpleGrantedAuthority(r.getRoleValue()));
    }
    return authorities;
}

public String getPassword() {
    return password;
}

@Override
public String getUsername() {
    return email;
}

@Override
public boolean isAccountNonExpired() {
    return true;
}

@Override
public boolean isAccountNonLocked() {
    return true;
}

@Override
public boolean isCredentialsNonExpired() {
    return true;
}

@Override
public boolean isEnabled() {
    if(StringUtils.isNotBlank(state) && "1".equals(state) && StringUtils.isNotBlank(enable) && "1".equals(enable)){
        return true;
    }
    return false;
}

@Override
public boolean equals(Object obj) {
    if (obj instanceof User) {
        return getEmail().equals(((User)obj).getEmail())||getUsername().equals(((User)obj).getUsername());
    }
    return false;
}
@Override
public int hashCode() {
    return getUsername().hashCode();
}
(1)其中 getAuthorities 方法是获取用户角色信息的方法,用于授权。不同的角色可以拥有不同的权限。
(2)账户未过期、账户未锁定和密码未过期我们这里没有用到,直接返回 True,你也可以根据自己的应用场景写自己的业务逻辑。
(3)为了区分是否是同一个用户,重写 equals 和 hashCode 方法。
因为实现接口之后可以获得数据库中的真是存在的信息;
使用这个框架之间我们要引入它,首先要在web.xml文件中引入它
<filter>
    <filter-name>springSecurityFilterChain</filter-name>
    <filter-class>org.springframework.web.filter.DelegatingFilterProxy</filter-class>
</filter>
<filter-mapping>
    <filter-name>springSecurityFilterChain</filter-name>
    <url-pattern>/*</url-pattern>
</filter-mapping>然后UsernamePasswordAuthenticationFilter这个过滤器会接受到此方法,在源码里面已经帮我们实现获得密码以及用户名的操作,并且规定post请求方法 具体代码如下:
public Authentication attemptAuthentication(HttpServletRequest request, HttpServletResponse response) throws AuthenticationException {
    if (this.postOnly && !request.getMethod().equals("POST")) {
        throw new AuthenticationServiceException("Authentication method not supported: " + request.getMethod());
    } else {
        String username = this.obtainUsername(request);
        String password = this.obtainPassword(request);
        if (username == null) {
            username = "";
        }

        if (password == null) {
            password = "";
        }

        username = username.trim();
        UsernamePasswordAuthenticationToken authRequest = new UsernamePasswordAuthenticationToken(username, password);
        this.setDetails(request, authRequest);
        return this.getAuthenticationManager().authenticate(authRequest);
    }
}
在现实生活中,开发中可以增加的逻辑很多,所以一般都会重写这个方法;我们要建一个自己的类去继承这个类:
public class AccountAuthenticationFilter extends UsernamePasswordAuthenticationFilter {
    private String codeParameter = "code";

    @Override
    public Authentication attemptAuthentication(HttpServletRequest request, HttpServletResponse response) throws AuthenticationException {
        String username = this.obtainUsername(request);
        String password = this.obtainPassword(request);
        String code = this.obtainCode(request);
        String caChecode = (String)request.getSession().getAttribute("VERCODE_KEY");
        boolean flag = CodeValidate.validateCode(code,caChecode);
        if(!flag){
            throw new UsernameNotFoundException("验证码错误");
        }
        if(username == null) {
            username = "";
        }
        if(password == null) {
            password = "";
        }
        username = username.trim();
        //通过构造方法实例化一个 UsernamePasswordAuthenticationToken 对象,此时调用的是 UsernamePasswordAuthenticationToken 的两个参数的构造函数
        //其中 super(null) 调用的是父类的构造方法,传入的是权限集合,因为目前还没有认证通过,所以不知道有什么权限信息,这里设置为 null,然后将用户名和密码分别赋值给
        // principal 和 credentials,同样因为此时还未进行身份认证,所以 setAuthenticated(false)。
        UsernamePasswordAuthenticationToken authRequest = new UsernamePasswordAuthenticationToken(username, password);
        //setDetails(request, authRequest) 是将当前的请求信息设置到 UsernamePasswordAuthenticationToken 中。
        this.setDetails(request, authRequest);
        //通过调用 getAuthenticationManager() 来获取 AuthenticationManager,通过调用它的 authenticate 方法来查找支持该
        // token(UsernamePasswordAuthenticationToken) 认证方式的 provider,然后调用该 provider 的 authenticate 方法进行认证)。
        return this.getAuthenticationManager().authenticate(authRequest);
    }

    protected String obtainCode(HttpServletRequest request) {
        return request.getParameter(this.codeParameter);
    }
}里面我们完成了一个验证码的验证工作,并且把仅为post请求给屏蔽,获取到用户名和用户密码后,我们把它放在了UsernamePasswordAuthenticationToken类里,进去之后看到了
public UsernamePasswordAuthenticationToken(Object principal, Object credentials) {
    super((Collection)null);
    this.principal = principal;
    this.credentials = credentials;
    this.setAuthenticated(false);
}
代码中给予了注释,然后setDetails将其存入UsernamePasswordAuthenticationToken之中,然后我们通过getAuthenticationManager()
获取AuthenticationManager这个接口,在调用接口里的方法,我们继续查找会发现AuthenticationManager这个类实现了这个接口的方法,
在方法中它又调用了AuthenticationProvide这个接口,那AuthenticationProvide这个接口的实现类是AbstractUserDetailsAuthenticationProvider
并且实现了authenticate方法,在这个方法里面引用了两个重要的方法additionalAuthenticationChecks(user,(UsernamePasswordAuthenticationToken) authentication);
和user = retrieveUser(username,(UsernamePasswordAuthenticationToken) authentication); 那这两个方法在子类DaoAuthenticationProvider中实现,两个方法上面都有代码,但是我们再看一下其中重点的方法
protected final UserDetails retrieveUser(String username, UsernamePasswordAuthenticationToken authentication) throws AuthenticationException {
    UserDetails loadedUser;
    try {
    //很关键
        loadedUser = this.getUserDetailsService().loadUserByUsername(username);
    } catch (UsernameNotFoundException var6) {
        if (authentication.getCredentials() != null) {
            String presentedPassword = authentication.getCredentials().toString();
            this.passwordEncoder.isPasswordValid(this.userNotFoundEncodedPassword, presentedPassword, (Object)null);
        }

        throw var6;
    } catch (Exception var7) {
        throw new InternalAuthenticationServiceException(var7.getMessage(), var7);
    }

    if (loadedUser == null) {
        throw new InternalAuthenticationServiceException("UserDetailsService returned null, which is an interface contract violation");
    } else {
        return loadedUser;
    }
}
那个注释的地方是要获得一个UserDetails,上面有说到UserDetailsService常见的实现类有JdbcDaoImpl,InMemoryUserDetailsManager,为了简化我们自己写一个实现类,
因为结合我们pojo对象实现了UserDetails的接口,所以我们创建如下类:
public class AccountDetailsService implements UserDetailsService{
    @Autowired
    private UserService userService;
    @Autowired
    private RoleService roleService;
    @Override
    public UserDetails loadUserByUsername(String username) throws UsernameNotFoundException {
        User user = userService.findByEmail(username);
        if(user == null){
            throw new UsernameNotFoundException("用户名或密码错误");
        }
        List<Role> roles = roleService.findByUid(user.getId());
        user.setRoles(roles);
        return user;
    }
}实现了loadByUsername的方法。到此为止我们我们在逆向的回到了UsernamePasswordAuthenticationFilter上,且返回了一个Authentication对象。 我们在第一个关键词SecurityContextHolder中将其取出,做一些自己的业务逻辑。
工作到此还没有结束,我们还要去授权,对认证通过的人去授权,这里我们可以xml去配置这些信息:我们前面留了一个问题就是salt加密密码验证,我们前面还不知道salt 对象是什么,所以需要配置一下
<!-- 认证管理器,使用自定义的accountService,并对密码采用md5加密 -->
<security:authentication-manager alias="authenticationManager">
    <security:authentication-provider user-service-ref="accountService">
        <security:password-encoder hash="md5">
            <security:salt-source user-property="username"></security:salt-source>
        </security:password-encoder>
    </security:authentication-provider>
</security:authentication-manager>
其实salt可以自己代码去配置,通过这个xml去配置也行,最紧要的还是要和你原来数据库密码的加密方式有关系,我这里是用了pojo对象里的用户名作为salt对象, 所以我的密码加密方式就是username+password再用MD5加密了。那还有一个重要的工作就是授权配置
<security:http security="none" pattern="/css/**" />
<security:http security="none" pattern="/js/**" />
<security:http security="none" pattern="/images/**" />
<security:intercept-url pattern="/" access="permitAll"/>
<security:intercept-url pattern="/index**" access="permitAll"/>
<security:intercept-url pattern="/**" access="hasRole('ROLE_USER')"/>
这些都是基础的一些授权操作,还有配置在我们的AccountAuthenticationFilter类中是不是通过了验证
<bean id="authenticationFilter" class="***.***.**.**.AccountAuthenticationFilter">
    <property name="filterProcessesUrl" value="/doLogin"></property>
    <property name="authenticationManager" ref="authenticationManager"></property>
    <property name="sessionAuthenticationStrategy" ref="sessionStrategy"></property>
    <property name="authenticationSuccessHandler">
        <bean class="org.springframework.security.web.authentication.SavedRequestAwareAuthenticationSuccessHandler">
            <property name="defaultTargetUrl" value="/list"></property>
        </bean>
    </property>
    <property name="authenticationFailureHandler">
        <bean class="org.springframework.security.web.authentication.SimpleUrlAuthenticationFailureHandler">
            <property name="defaultFailureUrl" value="/login.jsp?error=fail"></property>
        </bean>
    </property>
</bean>
其中defaultTargetUrl和defaultFailureUrl是通过和不通过的一些采取措施,通常是一些页面跳转。
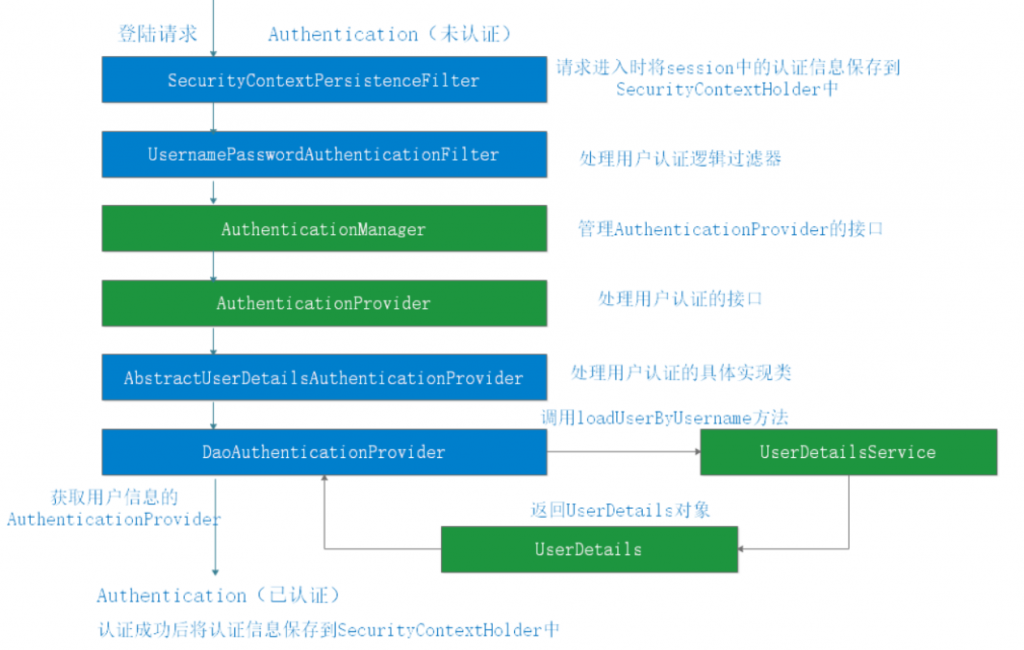
最后:用一张图大致的总结下它的具体流程


