
阅读完需:约 94 分钟
AOP切面
到本节我们将要从 IOC 的实现,转入到关于 AOP(Aspect Oriented Programming) 内容的开发。在软件行业,AOP 意为:面向切面编程,通过预编译的方式和运行期间动态代理实现程序功能功能的统一维护。其实 AOP 也是 OOP 的延续,在 Spring 框架中是一个非常重要的内容,使用 AOP 可以对业务逻辑的各个部分进行隔离,从而使各模块间的业务逻辑耦合度降低,提高代码的可复用性,同时也能提高开发效率。
这里的代码与内容接着上节IOC容器的构建
关于 AOP 的核心技术实现主要是动态代理的使用,就像你可以给一个接口的实现类,使用代理的方式替换掉这个实现类,使用代理类来处理你需要的逻辑。比如:
@Test
public void test_proxy_class() {
    IUserService userService = (IUserService) Proxy.newProxyInstance(Thread.currentThread().getContextClassLoader(), new Class[]{IUserService.class}, (proxy, method, args) -> "你被代理了!");
    String result = userService.queryUserInfo();
    System.out.println("测试结果:" + result);
}
代理类的实现基本都大家都见过,那么有了一个基本的思路后,接下来就需要考虑下怎么给方法做代理呢,而不是代理类。另外怎么去代理所有符合某些规则的所有类中方法呢。如果可以代理掉所有类的方法,就可以做一个方法拦截器,给所有被代理的方法添加上一些自定义处理,比如打印日志、记录耗时、监控异常等。
在把 AOP 整个切面设计融合到 Spring 前,我们需要解决两个问题,包括:如何给符合规则的方法做代理,以及做完代理方法的案例后,把类的职责拆分出来。而这两个功能点的实现,都是以切面的思想进行设计和开发。如果不是很清楚 AOP 是啥,你可以把切面理解为用刀切韭菜,一根一根切总是有点慢,那么用手(代理)把韭菜捏成一把,用菜刀或者斧头这样不同的拦截操作来处理。而程序中其实也是一样,只不过韭菜变成了方法,菜刀变成了拦截方法。整体设计结构如下图:
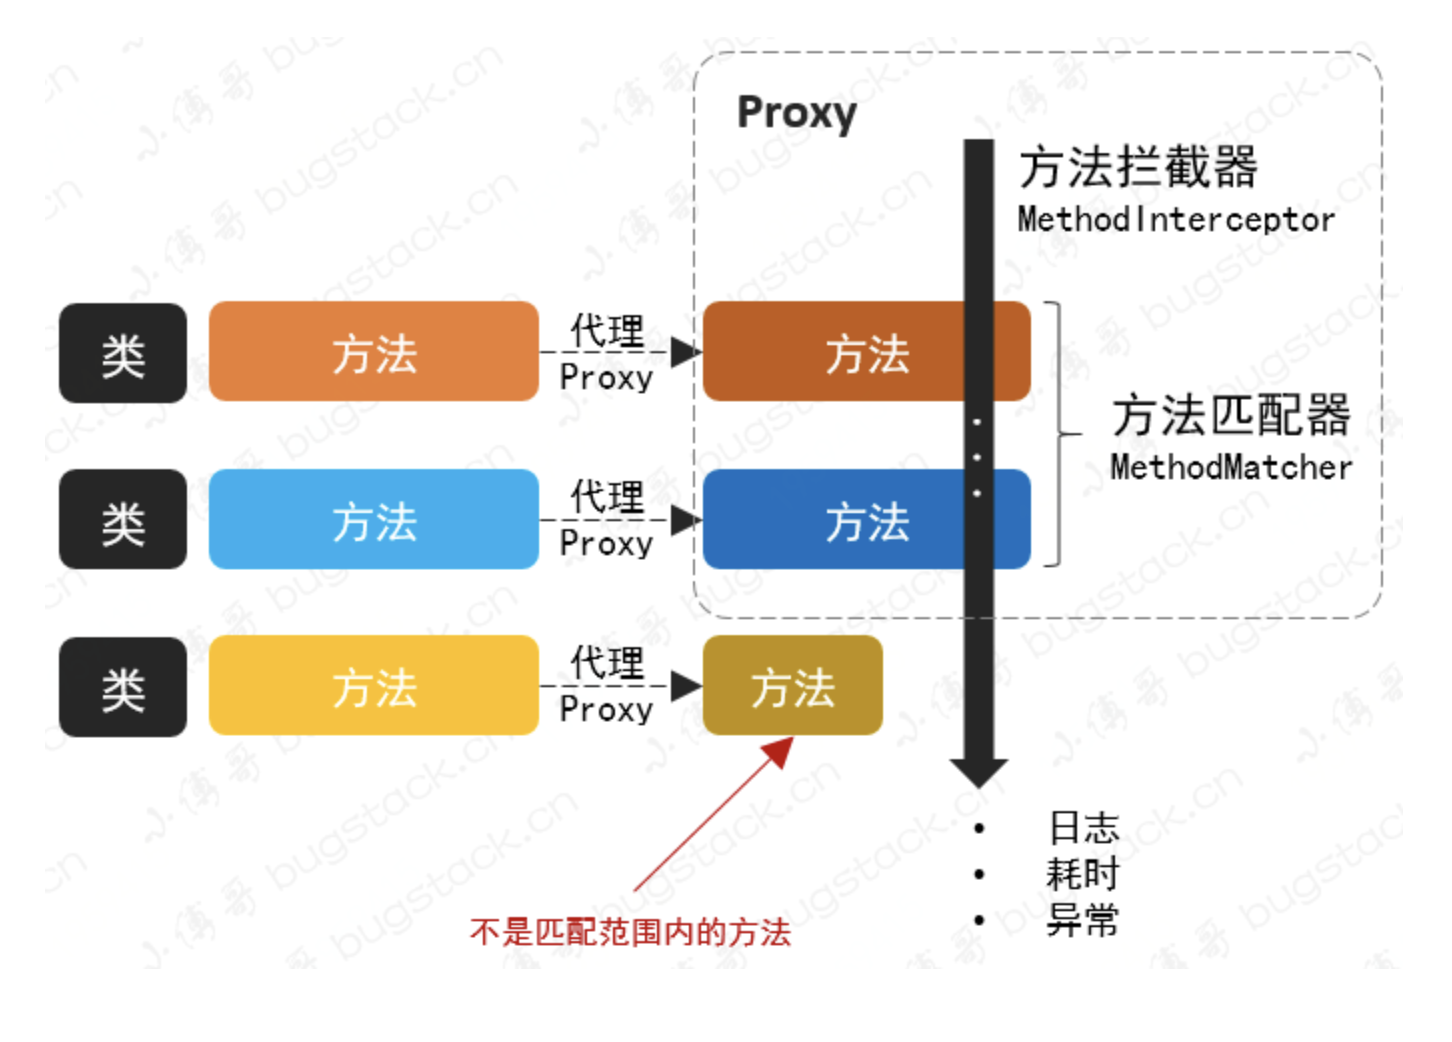
- 就像你在使用 Spring 的 AOP 一样,只处理一些需要被拦截的方法。在拦截方法后,执行你对方法的扩展操作。
- 那么我们就需要先来实现一个可以代理方法的
Proxy,其实代理方法主要是使用到方法拦截器类处理方法的调用MethodInterceptor#invoke,而不是直接使用 invoke 方法中的入参 Method method 进行method.invoke(targetObj, args)这块是整个使用时的差异。 - 除了以上的核心功能实现,还需要使用到
org.aspectj.weaver.tools.PointcutParser处理拦截表达式"execution(* cn.bugstack.springframework.test.bean.IUserService.*(..))",有了方法代理和处理拦截,我们就可以完成设计出一个 AOP 的雏形了。
└── src
    ├── main
    │   └── java
    │       └── cn.bugstack.springframework
    │           ├── aop
    │           │   ├── aspectj
    │           │   │   └── AspectJExpressionPointcut.java
    │           │   ├── framework
    │           │   │   ├── AopProxy.java
    │           │   │   ├── Cglib2AopProxy.java
    │           │   │   ├── JdkDynamicAopProxy.java
    │           │   │   └── ReflectiveMethodInvocation.java
    │           │   ├── AdvisedSupport.java
    │           │   ├── ClassFilter.java
    │           │   ├── MethodMatcher.java
    │           │   ├── Pointcut.java
    │           │   └── TargetSource.java
    │           ├── beans
    │           │   ├── factory
    │           │   │   ├── config
    │           │   │   │   ├── AutowireCapableBeanFactory.java
    │           │   │   │   ├── BeanDefinition.java
    │           │   │   │   ├── BeanFactoryPostProcessor.java
    │           │   │   │   ├── BeanPostProcessor.java
    │           │   │   │   ├── BeanReference.java
    │           │   │   │   ├── ConfigurableBeanFactory.java
    │           │   │   │   └── SingletonBeanRegistry.java
    │           │   │   ├── support
    │           │   │   │   ├── AbstractAutowireCapableBeanFactory.java
    │           │   │   │   ├── AbstractBeanDefinitionReader.java
    │           │   │   │   ├── AbstractBeanFactory.java
    │           │   │   │   ├── BeanDefinitionReader.java
    │           │   │   │   ├── BeanDefinitionRegistry.java
    │           │   │   │   ├── CglibSubclassingInstantiationStrategy.java
    │           │   │   │   ├── DefaultListableBeanFactory.java
    │           │   │   │   ├── DefaultSingletonBeanRegistry.java
    │           │   │   │   ├── DisposableBeanAdapter.java
    │           │   │   │   ├── FactoryBeanRegistrySupport.java
    │           │   │   │   ├── InstantiationStrategy.java
    │           │   │   │   └── SimpleInstantiationStrategy.java
    │           │   │   ├── support
    │           │   │   │   └── XmlBeanDefinitionReader.java
    │           │   │   ├── Aware.java
    │           │   │   ├── BeanClassLoaderAware.java
    │           │   │   ├── BeanFactory.java
    │           │   │   ├── BeanFactoryAware.java
    │           │   │   ├── BeanNameAware.java
    │           │   │   ├── ConfigurableListableBeanFactory.java
    │           │   │   ├── DisposableBean.java
    │           │   │   ├── FactoryBean.java
    │           │   │   ├── HierarchicalBeanFactory.java
    │           │   │   ├── InitializingBean.java
    │           │   │   └── ListableBeanFactory.java
    │           │   ├── BeansException.java
    │           │   ├── PropertyValue.java
    │           │   └── PropertyValues.java
    │           ├── context
    │           │   ├── event
    │           │   │   ├── AbstractApplicationEventMulticaster.java
    │           │   │   ├── ApplicationContextEvent.java
    │           │   │   ├── ApplicationEventMulticaster.java
    │           │   │   ├── ContextClosedEvent.java
    │           │   │   ├── ContextRefreshedEvent.java
    │           │   │   └── SimpleApplicationEventMulticaster.java
    │           │   ├── support
    │           │   │   ├── AbstractApplicationContext.java
    │           │   │   ├── AbstractRefreshableApplicationContext.java
    │           │   │   ├── AbstractXmlApplicationContext.java
    │           │   │   ├── ApplicationContextAwareProcessor.java
    │           │   │   └── ClassPathXmlApplicationContext.java
    │           │   ├── ApplicationContext.java
    │           │   ├── ApplicationContextAware.java
    │           │   ├── ApplicationEvent.java
    │           │   ├── ApplicationEventPublisher.java
    │           │   ├── ApplicationListener.java
    │           │   └── ConfigurableApplicationContext.java
    │           ├── core.io
    │           │   ├── ClassPathResource.java
    │           │   ├── DefaultResourceLoader.java
    │           │   ├── FileSystemResource.java
    │           │   ├── Resource.java
    │           │   ├── ResourceLoader.java
    │           │   └── UrlResource.java
    │           └── utils
    │               └── ClassUtils.java
    └── test
        └── java
            └── cn.bugstack.springframework.test
                ├── bean
                │   ├── IUserService.java
                │   ├── UserService.java
                │   └── UserServiceInterceptor.java
                └── ApiTest.java
-
AspectJExpressionPointcut的核心功能主要依赖于aspectj组件并处理Pointcut、ClassFilter,、MethodMatcher接口实现,专门用于处理类和方法的匹配过滤操作。 -
AopProxy是代理的抽象对象,它的实现主要是基于 JDK 的代理和 Cglib 代理。在前面章节关于对象的实例化CglibSubclassingInstantiationStrategy,我们也使用过Cglib提供的功能。
代理方法案例
在实现 AOP 的核心功能之前,我们先做一个代理方法的案例,通过这样一个可以概括代理方法的核心全貌,可以让大家更好的理解后续拆解各个方法,设计成解耦功能的 AOP 实现过程。
@Test
    public void test_proxy_method() {
        // 目标对象(可以替换成任何的目标对象)
        Object targetObj = new UserService();

        // AOP 代理
        IUserService proxy = (IUserService) Proxy.newProxyInstance(Thread.currentThread().getContextClassLoader(), targetObj.getClass().getInterfaces(), new InvocationHandler() {
            // 方法匹配器
            MethodMatcher methodMatcher = new AspectJExpressionPointcut("execution(* cn.bugstack.springframework.test.bean.IUserService.*(..))");

            @Override
            public Object invoke(Object proxy, Method method, Object[] args) throws Throwable {
                if (methodMatcher.matches(method, targetObj.getClass())) {
                    // 方法拦截器
                    MethodInterceptor methodInterceptor = invocation -> {
                        long start = System.currentTimeMillis();
                        try {
                            return invocation.proceed();
                        } finally {
                            System.out.println("监控 - Begin By AOP");
                            System.out.println("方法名称:" + invocation.getMethod().getName());
                            System.out.println("方法耗时:" + (System.currentTimeMillis() - start) + "ms");
                            System.out.println("监控 - End\r\n");
                        }
                    };
                    // 反射调用
                    return methodInterceptor.invoke(new ReflectiveMethodInvocation(targetObj, method, args));
                }
                return method.invoke(targetObj, args);
            }
        });

        String result = proxy.queryUserInfo();
        System.out.println("测试结果:" + result);

}- 首先整个案例的目标是给一个
UserService当成目标对象,对类中的所有方法进行拦截添加监控信息打印处理。 - 从案例中你可以看到有代理的实现
Proxy.newProxyInstance,有方法的匹配MethodMatcher,有反射的调用invoke(Object proxy, Method method, Object[] args),也用用户自己拦截方法后的操作。这样一看其实和我们使用的 AOP 就非常类似了,只不过你在使用 AOP 的时候是框架已经提供更好的功能,这里是把所有的核心过程给你展示出来了。
结果
监控 - Begin By AOP
方法名称:queryUserInfo
方法耗时:91ms
监控 - End

测试结果:小小小,100001,杭州

Process finished with exit code 0- 从测试结果可以看到我们已经对 UserService#queryUserInfo 方法进行了拦截监控操作,其实后面我们实现的 AOP 就是现在体现出的结果,只不过我们需要把这部分测试的案例解耦为更具有扩展性的各个模块实现。
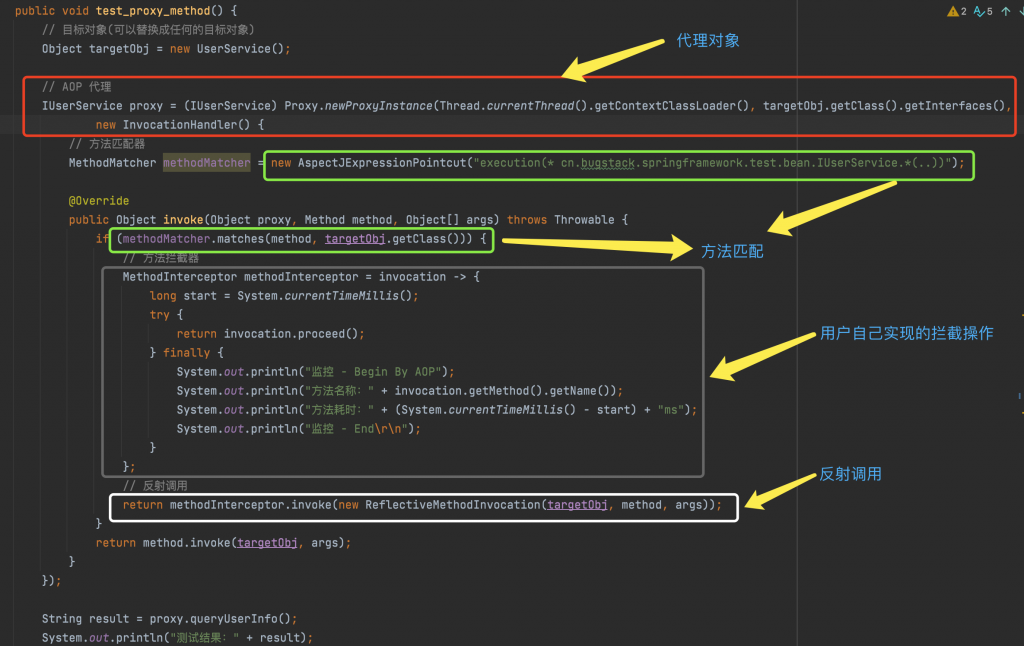
- 拆解过程可以参考截图,我们需要把代理对象拆解出来,因为它可以是 JDK 的实现也可以是 Cglib 的处理。
- 方法匹配器操作其实已经是一个单独的实现类了,不过我们还需要把传入的目标对象、方法匹配、拦截方法,都进行统一的包装,方便外部调用时进行一个入参透传。
- 最后其实是
ReflectiveMethodInvocation的使用,它目前已经是实现MethodInvocation接口的一个包装后的类,参数信息包括:调用的对象、调用的方法、调用的入参。
切点表达式
public interface Pointcut {

    /**
     * Return the ClassFilter for this pointcut.
     *
     * @return the ClassFilter (never <code>null</code>)
     */
    ClassFilter getClassFilter();

    /**
     * Return the MethodMatcher for this pointcut.
     *
     * @return the MethodMatcher (never <code>null</code>)
     */
    MethodMatcher getMethodMatcher();

}
- 切入点接口,定义用于获取
ClassFilter、MethodMatcher的两个类,这两个接口获取都是切点表达式提供的内容。
public interface ClassFilter {

    /**
     * Should the pointcut apply to the given interface or target class?
     * @param clazz the candidate target class
     * @return whether the advice should apply to the given target class
     */
    boolean matches(Class<?> clazz);

}
- 定义类匹配类,用于切点找到给定的接口和目标类。
public interface MethodMatcher {

    /**
     * Perform static checking whether the given method matches. If this
     * @return whether or not this method matches statically
     */
    boolean matches(Method method, Class<?> targetClass);

}
- 方法匹配,找到表达式范围内匹配下的目标类和方法。在上文的案例中有所体现:
methodMatcher.matches(method, targetObj.getClass())
实现切点表达式类
public class AspectJExpressionPointcut implements Pointcut, ClassFilter, MethodMatcher {

    private static final Set<PointcutPrimitive> SUPPORTED_PRIMITIVES = new HashSet<PointcutPrimitive>();

    static {
        SUPPORTED_PRIMITIVES.add(PointcutPrimitive.EXECUTION);
    }

    private final PointcutExpression pointcutExpression;

    public AspectJExpressionPointcut(String expression) {
        PointcutParser pointcutParser = PointcutParser.getPointcutParserSupportingSpecifiedPrimitivesAndUsingSpecifiedClassLoaderForResolution(SUPPORTED_PRIMITIVES, this.getClass().getClassLoader());
        pointcutExpression = pointcutParser.parsePointcutExpression(expression);
    }

    @Override
    public boolean matches(Class<?> clazz) {
        return pointcutExpression.couldMatchJoinPointsInType(clazz);
    }

    @Override
    public boolean matches(Method method, Class<?> targetClass) {
        return pointcutExpression.matchesMethodExecution(method).alwaysMatches();
    }

    @Override
    public ClassFilter getClassFilter() {
        return this;
    }

    @Override
    public MethodMatcher getMethodMatcher() {
        return this;
    }

}
- 切点表达式实现了
Pointcut、ClassFilter、MethodMatcher,三个接口定义方法,同时这个类主要是对 aspectj 包提供的表达式校验方法使用。 - 匹配 matches:
pointcutExpression.couldMatchJoinPointsInType(clazz)、pointcutExpression.matchesMethodExecution(method).alwaysMatches(),这部分内容可以单独测试验证。
匹配验证
    @Test
    public void test_aop() throws NoSuchMethodException {
        AspectJExpressionPointcut pointcut = new AspectJExpressionPointcut("execution(* cn.bugstack.springframework.test.bean.UserService.*(..))");

        Class<UserService> clazz = UserService.class;
        Method method = clazz.getDeclaredMethod("queryUserInfo");

        System.out.println(pointcut.matches(clazz));
        System.out.println(pointcut.matches(method, clazz));
    }

// true
// true- 这里单独提供出来一个匹配方法的验证测试,可以看看你拦截的方法与对应的对象是否匹配。
包装切面通知信息
/**
* 被代理的目标对象
*/
public class TargetSource {

    private final Object target;

    public TargetSource(Object target) {
        this.target = target;
    }

    /**
     * Return the type of targets returned by this {@link TargetSource}.
     * <p>Can return <code>null</code>, although certain usages of a
     * <code>TargetSource</code> might just work with a predetermined
     * target class.
     * @return the type of targets returned by this {@link TargetSource}
     */
    public Class<?>[] getTargetClass(){
        return this.target.getClass().getInterfaces();
    }

    /**
     * Return a target instance. Invoked immediately before the
     * AOP framework calls the "target" of an AOP method invocation.
     * @return the target object, which contains the joinpoint
     * @throws Exception if the target object can't be resolved
     */
    public Object getTarget(){
        return this.target;
    }

}
public class AdvisedSupport {

    // 被代理的目标对象
    private TargetSource targetSource;
    // 方法拦截器
    private MethodInterceptor methodInterceptor;
    // 方法匹配器(检查目标方法是否符合通知条件)
    private MethodMatcher methodMatcher;

    public TargetSource getTargetSource() {
        return targetSource;
    }

    public void setTargetSource(TargetSource targetSource) {
        this.targetSource = targetSource;
    }

    public MethodInterceptor getMethodInterceptor() {
        return methodInterceptor;
    }

    public void setMethodInterceptor(MethodInterceptor methodInterceptor) {
        this.methodInterceptor = methodInterceptor;
    }

    public MethodMatcher getMethodMatcher() {
        return methodMatcher;
    }

    public void setMethodMatcher(MethodMatcher methodMatcher) {
        this.methodMatcher = methodMatcher;
    }
}
-
AdvisedSupport,主要是用于把代理、拦截、匹配的各项属性包装到一个类中,方便在 Proxy 实现类进行使用。这和你的业务开发中包装入参是一个道理 -
TargetSource,是一个目标对象,在目标对象类中提供 Object 入参属性,以及获取目标类 TargetClass 信息。 -
MethodInterceptor,是一个具体拦截方法实现类,由用户自己实现MethodInterceptor#invoke方法,做具体的处理。像我们本文的案例中是做方法监控处理 -
MethodMatcher,是一个匹配方法的操作,这个对象由AspectJExpressionPointcut提供服务。
代理抽象实现(JDK&Cglib)
定义接口
public interface AopProxy {

    Object getProxy();

}
- 定义一个标准接口,用于获取代理类。因为具体实现代理的方式可以有 JDK 方式,也可以是 Cglib 方式,所以定义接口会更加方便管理实现类。
public class JdkDynamicAopProxy implements AopProxy, InvocationHandler {

    private final AdvisedSupport advised;

    public JdkDynamicAopProxy(AdvisedSupport advised) {
        this.advised = advised;
    }

    @Override
    public Object getProxy() {
        return Proxy.newProxyInstance(Thread.currentThread().getContextClassLoader(), advised.getTargetSource().getTargetClass(), this);
    }

    @Override
    public Object invoke(Object proxy, Method method, Object[] args) throws Throwable {
        if (advised.getMethodMatcher().matches(method, advised.getTargetSource().getTarget().getClass())) {
            MethodInterceptor methodInterceptor = advised.getMethodInterceptor();
            return methodInterceptor.invoke(new ReflectiveMethodInvocation(advised.getTargetSource().getTarget(), method, args));
        }
        return method.invoke(advised.getTargetSource().getTarget(), args);
    }

}
- 基于 JDK 实现的代理类,需要实现接口
AopProxy、InvocationHandler,这样就可以把代理对象getProxy和反射调用方法invoke分开处理了。 -
getProxy方法中的是代理一个对象的操作,需要提供入参ClassLoader、AdvisedSupport、和当前这个类 this,因为这个类提供了invoke方法。 -
invoke方法中主要处理匹配的方法后,使用用户自己提供的方法拦截实现,做反射调用methodInterceptor.invoke。 - 这里还有一个
ReflectiveMethodInvocation,其他它就是一个入参的包装信息,提供了入参对象:目标对象、方法、入参。
public class Cglib2AopProxy implements AopProxy {

    private final AdvisedSupport advised;

    public Cglib2AopProxy(AdvisedSupport advised) {
        this.advised = advised;
    }

    @Override
    public Object getProxy() {
        Enhancer enhancer = new Enhancer();
        enhancer.setSuperclass(advised.getTargetSource().getTarget().getClass());
        enhancer.setInterfaces(advised.getTargetSource().getTargetClass());
        enhancer.setCallback(new DynamicAdvisedInterceptor(advised));
        return enhancer.create();
    }

    private static class DynamicAdvisedInterceptor implements MethodInterceptor {

        private final AdvisedSupport advised;

        public DynamicAdvisedInterceptor(AdvisedSupport advised) {
            this.advised = advised;
        }

        @Override
        public Object intercept(Object o, Method method, Object[] objects, MethodProxy methodProxy) throws Throwable {
            CglibMethodInvocation methodInvocation = new CglibMethodInvocation(advised.getTargetSource().getTarget(), method, objects, methodProxy);
            if (advised.getMethodMatcher().matches(method, advised.getTargetSource().getTarget().getClass())) {
                return advised.getMethodInterceptor().invoke(methodInvocation);
            }
            return methodInvocation.proceed();
        }
    }

    private static class CglibMethodInvocation extends ReflectiveMethodInvocation {

        private final MethodProxy methodProxy;

        public CglibMethodInvocation(Object target, Method method, Object[] arguments, MethodProxy methodProxy) {
            super(target, method, arguments);
            this.methodProxy = methodProxy;
        }

        @Override
        public Object proceed() throws Throwable {
            return this.methodProxy.invoke(this.target, this.arguments);
        }

    }

}
- 基于 Cglib 使用 Enhancer 代理的类可以在运行期间为接口使用底层 ASM 字节码增强技术处理对象的代理对象生成,因此被代理类不需要实现任何接口。
- 关于扩展进去的用户拦截方法,主要是在
Enhancer#setCallback中处理,用户自己的新增的拦截处理。这里可以看到DynamicAdvisedInterceptor#intercept匹配方法后做了相应的反射操作。
测试
public interface IUserService {

    String queryUserInfo();

    String register(String userName);
}
public class UserService implements IUserService {

    public String queryUserInfo() {
        try {
            Thread.sleep(new Random(1).nextInt(100));
        } catch (InterruptedException e) {
            e.printStackTrace();
        }
        return "小小小,100001,杭州";
    }

    public String register(String userName) {
        try {
            Thread.sleep(new Random(1).nextInt(100));
        } catch (InterruptedException e) {
            e.printStackTrace();
        }
        return "注册用户:" + userName + " success!";
    }

}
- 在 UserService 中提供了2个不同方法,另外你还可以增加新的类来加入测试。后面我们的测试过程,会给这个两个方法添加我们的拦截处理,打印方法执行耗时。
自定义拦截方法
public class UserServiceInterceptor implements MethodInterceptor {

    @Override
    public Object invoke(MethodInvocation invocation) throws Throwable {
        long start = System.currentTimeMillis();
        try {
            return invocation.proceed();
        } finally {
            System.out.println("监控 - Begin By AOP");
            System.out.println("方法名称:" + invocation.getMethod());
            System.out.println("方法耗时:" + (System.currentTimeMillis() - start) + "ms");
            System.out.println("监控 - End\r\n");
        }
    }

}
    @Test
    public void test_dynamic() {
        // 目标对象
        IUserService userService = new UserService();
        // 组装代理信息
        AdvisedSupport advisedSupport = new AdvisedSupport();
        advisedSupport.setTargetSource(new TargetSource(userService));
        advisedSupport.setMethodInterceptor(new UserServiceInterceptor());
        advisedSupport.setMethodMatcher(new AspectJExpressionPointcut("execution(* cn.bugstack.springframework.test.bean.IUserService.*(..))"));

        // 代理对象(JdkDynamicAopProxy)
        IUserService proxy_jdk = (IUserService) new JdkDynamicAopProxy(advisedSupport).getProxy();
        // 测试调用
        System.out.println("测试结果:" + proxy_jdk.queryUserInfo());

        // 代理对象(Cglib2AopProxy)
        IUserService proxy_cglib = (IUserService) new Cglib2AopProxy(advisedSupport).getProxy();
        // 测试调用
        System.out.println("测试结果:" + proxy_cglib.register("花花"));
}- 整个案例测试了 AOP 在于 Spring 结合前的核心代码,包括什么是目标对象、怎么组装代理信息、如何调用代理对象。
-
AdvisedSupport,包装了目标对象、用户自己实现的拦截方法以及方法匹配表达式。 - 之后就是分别调用
JdkDynamicAopProxy、Cglib2AopProxy,两个不同方式实现的代理类,看看是否可以成功拦截方法
结果
监控 - Begin By AOP
方法名称:public abstract java.lang.String cn.bugstack.springframework.test.bean.IUserService.queryUserInfo()
方法耗时:91ms
监控 - End

测试结果:小小小,100001,杭州
监控 - Begin By AOP
方法名称:public java.lang.String cn.bugstack.springframework.test.bean.UserService.register(java.lang.String)
方法耗时:106ms
监控 - End

测试结果:注册用户:花花 success!

Process finished with exit code 0- 如 AOP 功能定义一样,我们可以通过这样的代理方式、方法匹配和拦截后,在对应的目标方法下,做了拦截操作进行监控信息打印。
从本文对 Proxy#newProxyInstance、MethodInterceptor#invoke,的使用验证切面核心原理以及再把功能拆解到 Spring 框架实现中,可以看到一个貌似复杂的技术其实核心内容往往没有太多,但因为需要为了满足后续更多的扩展就需要进行职责解耦和包装,通过这样设计模式的使用,以此让调用方能更加简化,自身也可以不断按需扩展。
AOP 的功能实现目前还没有与 Spring 结合,只是对切面技术的一个具体实现,你可以先学习到如何处理代理对象、过滤方法、拦截方法,以及使用 Cglib 和 JDK 代理的区别,其实这与的技术不只是在 Spring 框架中有所体现,在其他各类需要减少人工硬编码的场景下,都会用到。比如RPC、Mybatis、MQ、分布式任务
AOP动态代理,融入到Bean的生命周期
我们通过基于 Proxy.newProxyInstance 代理操作中处理方法匹配和方法拦截,对匹配的对象进行自定义的处理操作。并把这样的技术核心内容拆解到 Spring 中,用于实现 AOP 部分,通过拆分后基本可以明确各个类的职责,包括你的代理目标对象属性、拦截器属性、方法匹配属性,以及两种不同的代理操作 JDK 和 CGlib 的方式。
再有了一个 AOP 核心功能的实现后,我们可以通过单元测试的方式进行验证切面功能对方法进行拦截,但如果这是一个面向用户使用的功能,就不太可能让用户这么复杂且没有与 Spring 结合的方式单独使用 AOP,虽然可以满足需求,但使用上还是过去分散。
因此我们需要在本章节完成 AOP 核心功能与 Spring 框架的整合,最终能通过在 Spring 配置的方式完成切面的操作。
其实在有了AOP的核心功能实现后,把这部分功能服务融入到 Spring 其实也不难,只不过要解决几个问题,包括:怎么借着 BeanPostProcessor 把动态代理融入到 Bean 的生命周期中,以及如何组装各项切点、拦截、前置的功能和适配对应的代理器。整体设计结构如下图:

- 为了可以让对象创建过程中,能把xml中配置的代理对象也就是切面的一些类对象实例化,就需要用到
BeanPostProcessor提供的方法,因为这个类的中的方法可以分别作用与 Bean 对象执行初始化前后修改 Bean 的对象的扩展信息。但这里需要集合于BeanPostProcessor实现新的接口和实现类,这样才能定向获取对应的类信息。 - 但因为创建的是代理对象不是之前流程里的普通对象,所以我们需要前置于其他对象的创建,所以在实际开发的过程中,需要在
AbstractAutowireCapableBeanFactory#createBean优先完成 Bean 对象的判断,是否需要代理,有则直接返回代理对象。在Spring的源码中会有createBean 和 doCreateBean的方法拆分 - 这里还包括要解决方法拦截器的具体功能,提供一些
BeforeAdvice、AfterAdvice的实现,让用户可以更简化的使用切面功能。除此之外还包括需要包装切面表达式以及拦截方法的整合,以及提供不同类型的代理方式的代理工厂,来包装我们的切面服务。
└── src
    ├── main
    │   └── java
    │       └── cn.bugstack.springframework
    │           ├── aop
    │           │   ├── aspectj
    │           │   │   └── AspectJExpressionPointcut.java
    │           │   │   └── AspectJExpressionPointcutAdvisor.java
    │           │   ├── framework
    │           │   │   ├── adapter
    │           │   │   │   └── MethodBeforeAdviceInterceptor.java
    │           │   │   ├── autoproxy
    │           │   │   │   └── MethodBeforeAdviceInterceptor.java
    │           │   │   ├── AopProxy.java
    │           │   │   ├── Cglib2AopProxy.java
    │           │   │   ├── JdkDynamicAopProxy.java
    │           │   │   ├── ProxyFactory.java
    │           │   │   └── ReflectiveMethodInvocation.java
    │           │   ├── AdvisedSupport.java
    │           │   ├── Advisor.java
    │           │   ├── BeforeAdvice.java
    │           │   ├── ClassFilter.java
    │           │   ├── MethodBeforeAdvice.java
    │           │   ├── MethodMatcher.java
    │           │   ├── Pointcut.java
    │           │   ├── PointcutAdvisor.java
    │           │   └── TargetSource.java
    │           ├── beans
    │           │   ├── factory
    │           │   │   ├── config
    │           │   │   │   ├── AutowireCapableBeanFactory.java
    │           │   │   │   ├── BeanDefinition.java
    │           │   │   │   ├── BeanFactoryPostProcessor.java
    │           │   │   │   ├── BeanPostProcessor.java
    │           │   │   │   ├── BeanReference.java
    │           │   │   │   ├── ConfigurableBeanFactory.java
    │           │   │   │   ├── InstantiationAwareBeanPostProcessor.java
    │           │   │   │   └── SingletonBeanRegistry.java
    │           │   │   ├── support
    │           │   │   │   ├── AbstractAutowireCapableBeanFactory.java
    │           │   │   │   ├── AbstractBeanDefinitionReader.java
    │           │   │   │   ├── AbstractBeanFactory.java
    │           │   │   │   ├── BeanDefinitionReader.java
    │           │   │   │   ├── BeanDefinitionRegistry.java
    │           │   │   │   ├── CglibSubclassingInstantiationStrategy.java
    │           │   │   │   ├── DefaultListableBeanFactory.java
    │           │   │   │   ├── DefaultSingletonBeanRegistry.java
    │           │   │   │   ├── DisposableBeanAdapter.java
    │           │   │   │   ├── FactoryBeanRegistrySupport.java
    │           │   │   │   ├── InstantiationStrategy.java
    │           │   │   │   └── SimpleInstantiationStrategy.java
    │           │   │   ├── support
    │           │   │   │   └── XmlBeanDefinitionReader.java
    │           │   │   ├── Aware.java
    │           │   │   ├── BeanClassLoaderAware.java
    │           │   │   ├── BeanFactory.java
    │           │   │   ├── BeanFactoryAware.java
    │           │   │   ├── BeanNameAware.java
    │           │   │   ├── ConfigurableListableBeanFactory.java
    │           │   │   ├── DisposableBean.java
    │           │   │   ├── FactoryBean.java
    │           │   │   ├── HierarchicalBeanFactory.java
    │           │   │   ├── InitializingBean.java
    │           │   │   └── ListableBeanFactory.java
    │           │   ├── BeansException.java
    │           │   ├── PropertyValue.java
    │           │   └── PropertyValues.java
    │           ├── context
    │           │   ├── event
    │           │   │   ├── AbstractApplicationEventMulticaster.java
    │           │   │   ├── ApplicationContextEvent.java
    │           │   │   ├── ApplicationEventMulticaster.java
    │           │   │   ├── ContextClosedEvent.java
    │           │   │   ├── ContextRefreshedEvent.java
    │           │   │   └── SimpleApplicationEventMulticaster.java
    │           │   ├── support
    │           │   │   ├── AbstractApplicationContext.java
    │           │   │   ├── AbstractRefreshableApplicationContext.java
    │           │   │   ├── AbstractXmlApplicationContext.java
    │           │   │   ├── ApplicationContextAwareProcessor.java
    │           │   │   └── ClassPathXmlApplicationContext.java
    │           │   ├── ApplicationContext.java
    │           │   ├── ApplicationContextAware.java
    │           │   ├── ApplicationEvent.java
    │           │   ├── ApplicationEventPublisher.java
    │           │   ├── ApplicationListener.java
    │           │   └── ConfigurableApplicationContext.java
    │           ├── core.io
    │           │   ├── ClassPathResource.java
    │           │   ├── DefaultResourceLoader.java
    │           │   ├── FileSystemResource.java
    │           │   ├── Resource.java
    │           │   ├── ResourceLoader.java
    │           │   └── UrlResource.java
    │           └── utils
    │               └── ClassUtils.java
    └── test
        └── java
            └── cn.bugstack.springframework.test
                ├── bean
                │   ├── IUserService.java
                │   ├── UserService.java
                │   └── UserServiceInterceptor.java
                └── ApiTest.java
- 在以
BeanPostProcessor接口实现继承的InstantiationAwareBeanPostProcessor接口后,做了一个自动代理创建的类DefaultAdvisorAutoProxyCreator,这个类的就是用于处理整个 AOP 代理融入到 Bean 生命周期中的核心类。 -
DefaultAdvisorAutoProxyCreator会依赖于拦截器、代理工厂和Pointcut与Advisor的包装服务AspectJExpressionPointcutAdvisor,由它提供切面、拦截方法和表达式。 - Spring 的 AOP 把 Advice 细化了
BeforeAdvice、AfterAdvice、AfterReturningAdvice、ThrowsAdvice,目前我们做的测试案例中只用到了BeforeAdvice,这部分可以对照 Spring 的源码进行补充测试。
上节代码做一些辅助修改
public abstract class AbstractAutowireCapableBeanFactory extends AbstractBeanFactory implements AutowireCapableBeanFactory {

    private InstantiationStrategy instantiationStrategy = new CglibSubclassingInstantiationStrategy();

    @Override
    protected Object createBean(String beanName, BeanDefinition beanDefinition, Object[] args) throws BeansException {
        Object bean = null;
        try {
            // 判断是否返回代理 Bean 对象
            bean = resolveBeforeInstantiation(beanName, beanDefinition);
            if (null != bean) {
                return bean;
            }
            // 实例化 Bean
            bean = createBeanInstance(beanDefinition, beanName, args);
            // 给 Bean 填充属性
            applyPropertyValues(beanName, bean, beanDefinition);
            // 执行 Bean 的初始化方法和 BeanPostProcessor 的前置和后置处理方法
            bean = initializeBean(beanName, bean, beanDefinition);
        } catch (Exception e) {
            throw new BeansException("Instantiation of bean failed", e);
        }

        // 注册实现了 DisposableBean 接口的 Bean 对象
        registerDisposableBeanIfNecessary(beanName, bean, beanDefinition);

        // 判断 SCOPE_SINGLETON、SCOPE_PROTOTYPE
        if (beanDefinition.isSingleton()) {
            registerSingleton(beanName, bean);
        }
        return bean;
    }

    protected Object resolveBeforeInstantiation(String beanName, BeanDefinition beanDefinition) {
        Object bean = applyBeanPostProcessorsBeforeInstantiation(beanDefinition.getBeanClass(), beanName);
        if (null != bean) {
            bean = applyBeanPostProcessorsAfterInitialization(bean, beanName);
        }
        return bean;
    }

    protected Object applyBeanPostProcessorsBeforeInstantiation(Class<?> beanClass, String beanName) {
        for (BeanPostProcessor beanPostProcessor : getBeanPostProcessors()) {
            if (beanPostProcessor instanceof InstantiationAwareBeanPostProcessor) {
                Object result = ((InstantiationAwareBeanPostProcessor) beanPostProcessor).postProcessBeforeInstantiation(beanClass, beanName);
                if (null != result) return result;
            }
        }
        return null;
    }

    protected void registerDisposableBeanIfNecessary(String beanName, Object bean, BeanDefinition beanDefinition) {
        // 非 Singleton 类型的 Bean 不执行销毁方法
        if (!beanDefinition.isSingleton()) return;

        if (bean instanceof DisposableBean || StrUtil.isNotEmpty(beanDefinition.getDestroyMethodName())) {
            registerDisposableBean(beanName, new DisposableBeanAdapter(bean, beanName, beanDefinition));
        }
    }

    protected Object createBeanInstance(BeanDefinition beanDefinition, String beanName, Object[] args) {
        Constructor constructorToUse = null;
        Class<?> beanClass = beanDefinition.getBeanClass();
        Constructor<?>[] declaredConstructors = beanClass.getDeclaredConstructors();
        for (Constructor ctor : declaredConstructors) {
            if (null != args && ctor.getParameterTypes().length == args.length) {
                constructorToUse = ctor;
                break;
            }
        }
        return getInstantiationStrategy().instantiate(beanDefinition, beanName, constructorToUse, args);
    }

    /**
     * Bean 属性填充
     */
    protected void applyPropertyValues(String beanName, Object bean, BeanDefinition beanDefinition) {
        try {
            PropertyValues propertyValues = beanDefinition.getPropertyValues();
            for (PropertyValue propertyValue : propertyValues.getPropertyValues()) {

                String name = propertyValue.getName();
                Object value = propertyValue.getValue();

                if (value instanceof BeanReference) {
                    // A 依赖 B,获取 B 的实例化
                    BeanReference beanReference = (BeanReference) value;
                    value = getBean(beanReference.getBeanName());
                }
                // 属性填充
                BeanUtil.setFieldValue(bean, name, value);
            }
        } catch (Exception e) {
            throw new BeansException("Error setting property values:" + beanName);
        }
    }

    public InstantiationStrategy getInstantiationStrategy() {
        return instantiationStrategy;
    }

    public void setInstantiationStrategy(InstantiationStrategy instantiationStrategy) {
        this.instantiationStrategy = instantiationStrategy;
    }

    private Object initializeBean(String beanName, Object bean, BeanDefinition beanDefinition) {

        // invokeAwareMethods
        if (bean instanceof Aware) {
            if (bean instanceof BeanFactoryAware) {
                ((BeanFactoryAware) bean).setBeanFactory(this);
            }
            if (bean instanceof BeanClassLoaderAware) {
                ((BeanClassLoaderAware) bean).setBeanClassLoader(getBeanClassLoader());
            }
            if (bean instanceof BeanNameAware) {
                ((BeanNameAware) bean).setBeanName(beanName);
            }
        }

        // 1. 执行 BeanPostProcessor Before 处理
        Object wrappedBean = applyBeanPostProcessorsBeforeInitialization(bean, beanName);

        // 执行 Bean 对象的初始化方法
        try {
            invokeInitMethods(beanName, wrappedBean, beanDefinition);
        } catch (Exception e) {
            throw new BeansException("Invocation of init method of bean[" + beanName + "] failed", e);
        }

        // 2. 执行 BeanPostProcessor After 处理
        wrappedBean = applyBeanPostProcessorsAfterInitialization(wrappedBean, beanName);
        return wrappedBean;
    }

    private void invokeInitMethods(String beanName, Object bean, BeanDefinition beanDefinition) throws Exception {
        // 1. 实现接口 InitializingBean
        if (bean instanceof InitializingBean) {
            ((InitializingBean) bean).afterPropertiesSet();
        }

        // 2. 注解配置 init-method {判断是为了避免二次执行销毁}
        String initMethodName = beanDefinition.getInitMethodName();
        if (StrUtil.isNotEmpty(initMethodName)) {
            Method initMethod = beanDefinition.getBeanClass().getMethod(initMethodName);
            if (null == initMethod) {
                throw new BeansException("Could not find an init method named '" + initMethodName + "' on bean with name '" + beanName + "'");
            }
            initMethod.invoke(bean);
        }
    }

    @Override
    public Object applyBeanPostProcessorsBeforeInitialization(Object existingBean, String beanName) throws BeansException {
        Object result = existingBean;
        for (BeanPostProcessor processor : getBeanPostProcessors()) {
            Object current = processor.postProcessBeforeInitialization(result, beanName);
            if (null == current) return result;
            result = current;
        }
        return result;
    }

    @Override
    public Object applyBeanPostProcessorsAfterInitialization(Object existingBean, String beanName) throws BeansException {
        Object result = existingBean;
        for (BeanPostProcessor processor : getBeanPostProcessors()) {
            Object current = processor.postProcessAfterInitialization(result, beanName);
            if (null == current) return result;
            result = current;
        }
        return result;
    }

}
定义Advice拦截器链
public interface BeforeAdvice extends Advice {

}
public interface MethodBeforeAdvice extends BeforeAdvice {

    /**
     * Callback before a given method is invoked.
     *
     * @param method method being invoked
     * @param args   arguments to the method
     * @param target target of the method invocation. May be <code>null</code>.
     * @throws Throwable if this object wishes to abort the call.
     *                   Any exception thrown will be returned to the caller if it's
     *                   allowed by the method signature. Otherwise the exception
     *                   will be wrapped as a runtime exception.
     */
    void before(Method method, Object[] args, Object target) throws Throwable;

}
- 在 Spring 框架中,Advice 都是通过方法拦截器
MethodInterceptor实现的。环绕 Advice 类似一个拦截器的链路,Before Advice、After advice等,不过暂时我们需要那么多就只定义了一个MethodBeforeAdvice的接口定义。
定义 Advisor 访问者
public interface Advisor {

    /**
     * Return the advice part of this aspect. An advice may be an
     * interceptor, a before advice, a throws advice, etc.
     * @return the advice that should apply if the pointcut matches
     * @see org.aopalliance.intercept.MethodInterceptor
     * @see BeforeAdvice
     */
    Advice getAdvice();

}
public interface PointcutAdvisor extends Advisor {

    /**
     * Get the Pointcut that drives this advisor.
     */
    Pointcut getPointcut();

}
- Advisor 承担了 Pointcut 和 Advice 的组合,Pointcut 用于获取 JoinPoint,而 Advice 决定于 JoinPoint 执行什么操作。
public class AspectJExpressionPointcutAdvisor implements PointcutAdvisor {

    // 切面
    private AspectJExpressionPointcut pointcut;
    // 具体的拦截方法
    private Advice advice;
    // 表达式
    private String expression;

    public void setExpression(String expression){
        this.expression = expression;
    }

    @Override
    public Pointcut getPointcut() {
        if (null == pointcut) {
            pointcut = new AspectJExpressionPointcut(expression);
        }
        return pointcut;
    }

    @Override
    public Advice getAdvice() {
        return advice;
    }

    public void setAdvice(Advice advice){
        this.advice = advice;
    }

}
-
AspectJExpressionPointcutAdvisor实现了PointcutAdvisor接口,把切面 pointcut、拦截方法 advice 和具体的拦截表达式包装在一起。这样就可以在 xml 的配置中定义一个pointcutAdvisor切面拦截器了。
方法拦截器
public class MethodBeforeAdviceInterceptor implements MethodInterceptor {

    private MethodBeforeAdvice advice;

    public MethodBeforeAdviceInterceptor() {
    }

    public MethodBeforeAdviceInterceptor(MethodBeforeAdvice advice) {
        this.advice = advice;
    }

    @Override
    public Object invoke(MethodInvocation methodInvocation) throws Throwable {
        this.advice.before(methodInvocation.getMethod(), methodInvocation.getArguments(), methodInvocation.getThis());
        return methodInvocation.proceed();
    }

}-
MethodBeforeAdviceInterceptor实现了MethodInterceptor接口,在 invoke 方法中调用 advice 中的 before 方法,传入对应的参数信息。 - 而这个
advice.before则是用于自己实现MethodBeforeAdvice接口后做的相应处理。其实可以看到具体的MethodInterceptor实现类,其实和我们之前做的测试是一样的,只不过现在交给了 Spring 来处理
代理工厂
public class AdvisedSupport {

    // ProxyConfig
    private boolean proxyTargetClass = false;

    // 被代理的目标对象
    private TargetSource targetSource;
    // 方法拦截器
    private MethodInterceptor methodInterceptor;
    // 方法匹配器(检查目标方法是否符合通知条件)
    private MethodMatcher methodMatcher;

    public boolean isProxyTargetClass() {
        return proxyTargetClass;
    }

    public void setProxyTargetClass(boolean proxyTargetClass) {
        this.proxyTargetClass = proxyTargetClass;
    }

    public TargetSource getTargetSource() {
        return targetSource;
    }

    public void setTargetSource(TargetSource targetSource) {
        this.targetSource = targetSource;
    }

    public MethodInterceptor getMethodInterceptor() {
        return methodInterceptor;
    }

    public void setMethodInterceptor(MethodInterceptor methodInterceptor) {
        this.methodInterceptor = methodInterceptor;
    }

    public MethodMatcher getMethodMatcher() {
        return methodMatcher;
    }

    public void setMethodMatcher(MethodMatcher methodMatcher) {
        this.methodMatcher = methodMatcher;
    }
}
新增了 isProxyTargetClass() 方法
public class ProxyFactory {

    private AdvisedSupport advisedSupport;

    public ProxyFactory(AdvisedSupport advisedSupport) {
        this.advisedSupport = advisedSupport;
    }

    public Object getProxy() {
        return createAopProxy().getProxy();
    }

    private AopProxy createAopProxy() {
        if (advisedSupport.isProxyTargetClass()) {
            return new Cglib2AopProxy(advisedSupport);
        }

        return new JdkDynamicAopProxy(advisedSupport);
    }

}
- 其实这个代理工厂主要解决的是关于 JDK 和 Cglib 两种代理的选择问题,有了代理工厂就可以按照不同的创建需求进行控制。
融入Bean生命周期的自动代理创建者
public class DefaultAdvisorAutoProxyCreator implements InstantiationAwareBeanPostProcessor, BeanFactoryAware {

    private DefaultListableBeanFactory beanFactory;

    @Override
    public void setBeanFactory(BeanFactory beanFactory) throws BeansException {
        this.beanFactory = (DefaultListableBeanFactory) beanFactory;
    }

    @Override
    public Object postProcessBeforeInstantiation(Class<?> beanClass, String beanName) throws BeansException {

        if (isInfrastructureClass(beanClass)) return null;

        Collection<AspectJExpressionPointcutAdvisor> advisors = beanFactory.getBeansOfType(AspectJExpressionPointcutAdvisor.class).values();

        for (AspectJExpressionPointcutAdvisor advisor : advisors) {
            ClassFilter classFilter = advisor.getPointcut().getClassFilter();
            if (!classFilter.matches(beanClass)) continue;

            AdvisedSupport advisedSupport = new AdvisedSupport();

            TargetSource targetSource = null;
            try {
                targetSource = new TargetSource(beanClass.getDeclaredConstructor().newInstance());
            } catch (Exception e) {
                e.printStackTrace();
            }
            advisedSupport.setTargetSource(targetSource);
            advisedSupport.setMethodInterceptor((MethodInterceptor) advisor.getAdvice());
            advisedSupport.setMethodMatcher(advisor.getPointcut().getMethodMatcher());
            advisedSupport.setProxyTargetClass(false);

            return new ProxyFactory(advisedSupport).getProxy();

        }

        return null;
    }

    private boolean isInfrastructureClass(Class<?> beanClass) {
        return Advice.class.isAssignableFrom(beanClass) || Pointcut.class.isAssignableFrom(beanClass) || Advisor.class.isAssignableFrom(beanClass);
    }

    @Override
    public Object postProcessBeforeInitialization(Object bean, String beanName) throws BeansException {
        return bean;
    }

    @Override
    public Object postProcessAfterInitialization(Object bean, String beanName) throws BeansException {
        return bean;
    }

}
- 这个
DefaultAdvisorAutoProxyCreator类的主要核心实现在于postProcessBeforeInstantiation方法中,从通过beanFactory.getBeansOfType获取AspectJExpressionPointcutAdvisor开始。 - 获取了
advisors以后就可以遍历相应的AspectJExpressionPointcutAdvisor填充对应的属性信息,包括:目标对象、拦截方法、匹配器,之后返回代理对象即可。 - 那么现在调用方获取到的这个 Bean 对象就是一个已经被切面注入的对象了,当调用方法的时候,则会被按需拦截,处理用户需要的信息。
测试
public interface IUserService {

    String queryUserInfo();

    String register(String userName);
}
public class UserService implements IUserService {

    public String queryUserInfo() {
        try {
            Thread.sleep(new Random(1).nextInt(100));
        } catch (InterruptedException e) {
            e.printStackTrace();
        }
        return "小小小,100001,浙江";
    }

    public String register(String userName) {
        try {
            Thread.sleep(new Random(1).nextInt(100));
        } catch (InterruptedException e) {
            e.printStackTrace();
        }
        return "注册用户:" + userName + " success!";
    }

}
public class UserServiceInterceptor implements MethodInterceptor {

    @Override
    public Object invoke(MethodInvocation invocation) throws Throwable {
        long start = System.currentTimeMillis();
        try {
            return invocation.proceed();
        } finally {
            System.out.println("监控 - Begin By AOP");
            System.out.println("方法名称:" + invocation.getMethod());
            System.out.println("方法耗时:" + (System.currentTimeMillis() - start) + "ms");
            System.out.println("监控 - End\r\n");
        }
    }

}- 在 UserService 中提供了2个不同方法,另外你还可以增加新的类来加入测试。后面我们的测试过程,会给这个两个方法添加我们的拦截处理,打印方法执行耗时。
自定义拦截方法
public class UserServiceBeforeAdvice implements MethodBeforeAdvice {

    @Override
    public void before(Method method, Object[] args, Object target) throws Throwable {
        System.out.println("拦截方法:" + method.getName());
    }

}
- 我们不在是实现
MethodInterceptor接口,而是实现MethodBeforeAdvice环绕拦截。在这个方法中我们可以获取到方法的一些信息,如果还开发了它的MethodAfterAdvice则可以两个接口一起实现。
spring.xml 配置 AOP
<?xml version="1.0" encoding="UTF-8"?>
<beans>

    <bean id="userService" class="cn.bugstack.springframework.test.bean.UserService"/>

    <bean class="cn.bugstack.springframework.aop.framework.autoproxy.DefaultAdvisorAutoProxyCreator"/>

    <bean id="beforeAdvice" class="cn.bugstack.springframework.test.bean.UserServiceBeforeAdvice"/>

    <bean id="methodInterceptor" class="cn.bugstack.springframework.aop.framework.adapter.MethodBeforeAdviceInterceptor">
        <property name="advice" ref="beforeAdvice"/>
    </bean>

    <bean id="pointcutAdvisor" class="cn.bugstack.springframework.aop.aspectj.AspectJExpressionPointcutAdvisor">
        <property name="expression" value="execution(* cn.bugstack.springframework.test.bean.IUserService.*(..))"/>
        <property name="advice" ref="methodInterceptor"/>
    </bean>

</beans>- 这回再使用 AOP 就可以像 Spring 中一样,通过在 xml 中配置即可。因为我们已经把 AOP 的功能融合到 Bean 的生命周期里去了,你的新增拦截方法都会被自动处理。
    @Test
    public void test_aop() {
        ClassPathXmlApplicationContext applicationContext = new ClassPathXmlApplicationContext("classpath:spring.xml");

        IUserService userService = applicationContext.getBean("userService", IUserService.class);
        System.out.println("测试结果:" + userService.queryUserInfo());
    }
结果
拦截方法:queryUserInfo
测试结果:小小小,100001,浙江

Process finished with exit code 0
实现 AOP 功能的外在体现主要是把以前自己在单元测试中的切面拦截,交给 Spring 的 xml 配置了,也就不需要自己手动处理了。那么这里有一个非常重要的知识点,就是把相应的功能如何与 Spring 的 Bean 生命周期结合起来,本章节用到的 BeanPostProcessor,因为它可以解决在 Bean 对象执行初始化方法之前,用于修改新实例化 Bean 对象的扩展点,所以我们也就可以处理自己的 AOP 代理对象逻辑了。
一个功能的实现往往包括核心部分、组装部分、链接部分,为了这些各自职责的分工,则需要创建接口和类,由不同关系的继承、实现进行组装。只有明确了各个职责分工,才好灵活的扩展相应的功能逻辑,否则很难驾驭大型系统的开发和建设,也就是那种不好把握的感觉。
目前我们实现的 AOP 与 Spring 源码中的核心逻辑是类似的,但更会偏简单一些,也不会考虑更多的复杂场景遇到的问题,包括是否有构造函数、是否为代理中的切面等。
自动扫描的方式完成Bean对象的注册
本节我们已经把关于 IOC 和 AOP 全部核心内容都已经实现完成了,只不过在使用上还有点像早期的 Spring 版本,需要一个一个在 spring.xml 中进行配置。这与实际的目前使用的 Spring 框架还是有蛮大的差别,而这种差别其实都是在核心功能逻辑之上建设的在更少的配置下,做到更简化的使用。
这其中就包括:包的扫描注册、注解配置的使用、占位符属性的填充等等,而我们的目标就是在目前的核心逻辑上填充一些自动化的功能,让大家可以学习到这部分的设计和实现,从中体会到一些关于代码逻辑的实现过程,总结一些编码经验。
为了可以简化 Bean 对象的配置,让整个 Bean 对象的注册都是自动扫描的,那么基本需要的元素包括:扫描路径入口、XML解 析扫描信息、给需要扫描的Bean对象做注解标记、扫描Class对象摘取Bean注册的基本信息,组装注册信息、注册成Bean对象。那么在这些条件元素的支撑下,就可以实现出通过自定义注解和配置扫描路径的情况下,完成 Bean 对象的注册。除此之外再顺带解决一个配置中占位符属性的知识点,比如可以通过 ${token} 给 Bean 对象注入进去属性信息,那么这个操作需要用到 BeanFactoryPostProcessor,因为它可以处理 在所有的 BeanDefinition 加载完成后,实例化 Bean 对象之前,提供修改 BeanDefinition 属性的机制 而实现这部分内容是为了后续把此类内容结合到自动化配置处理中。整体设计结构如下图:
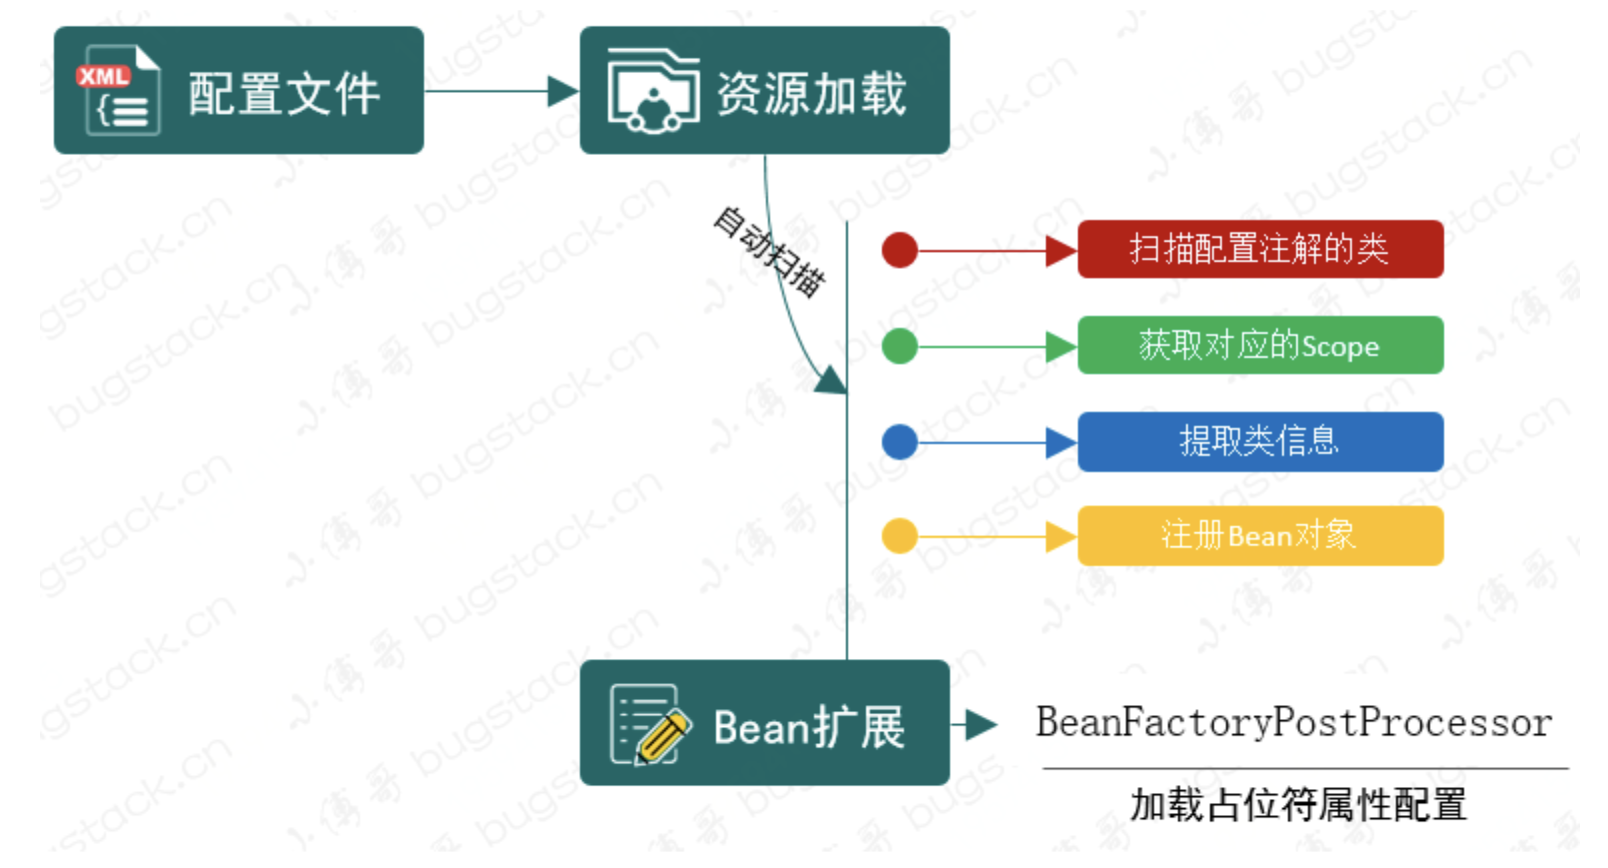
结合bean的生命周期,包扫描只不过是扫描特定注解的类,提取类的相关信息组装成BeanDefinition注册到容器中。
在XmlBeanDefinitionReader中解析<context:component-scan />标签,扫描类组装BeanDefinition然后注册到容器中的操作在ClassPathBeanDefinitionScanner#doScan中实现。
- 自动扫描注册主要是扫描添加了自定义注解的类,在xml加载过程中提取类的信息,组装
BeanDefinition注册到 Spring 容器中。 - 所以我们会用到
<context:component-scan />配置包路径并在XmlBeanDefinitionReader解析并做相应的处理。这里的处理会包括对类的扫描、获取注解信息等 - 最后还包括了一部分关于
BeanFactoryPostProcessor的使用,因为我们需要完成对占位符配置信息的加载,所以需要使用到BeanFactoryPostProcessor在所有的BeanDefinition加载完成后,实例化 Bean 对象之前,修改BeanDefinition的属性信息。这一部分的实现也为后续处理关于占位符配置到注解上做准备
└── src
    ├── main
    │   └── java
    │       └── cn.bugstack.springframework
    │           ├── aop
    │           │   ├── aspectj
    │           │   │   └── AspectJExpressionPointcut.java
    │           │   │   └── AspectJExpressionPointcutAdvisor.java
    │           │   ├── framework
    │           │   │   ├── adapter
    │           │   │   │   └── MethodBeforeAdviceInterceptor.java
    │           │   │   ├── autoproxy
    │           │   │   │   └── MethodBeforeAdviceInterceptor.java
    │           │   │   ├── AopProxy.java
    │           │   │   ├── Cglib2AopProxy.java
    │           │   │   ├── JdkDynamicAopProxy.java
    │           │   │   ├── ProxyFactory.java
    │           │   │   └── ReflectiveMethodInvocation.java
    │           │   ├── AdvisedSupport.java
    │           │   ├── Advisor.java
    │           │   ├── BeforeAdvice.java
    │           │   ├── ClassFilter.java
    │           │   ├── MethodBeforeAdvice.java
    │           │   ├── MethodMatcher.java
    │           │   ├── Pointcut.java
    │           │   ├── PointcutAdvisor.java
    │           │   └── TargetSource.java
    │           ├── beans
    │           │   ├── factory
    │           │   │   ├── config
    │           │   │   │   ├── AutowireCapableBeanFactory.java
    │           │   │   │   ├── BeanDefinition.java
    │           │   │   │   ├── BeanFactoryPostProcessor.java
    │           │   │   │   ├── BeanPostProcessor.java
    │           │   │   │   ├── BeanReference.java
    │           │   │   │   ├── ConfigurableBeanFactory.java
    │           │   │   │   ├── InstantiationAwareBeanPostProcessor.java
    │           │   │   │   └── SingletonBeanRegistry.java
    │           │   │   ├── support
    │           │   │   │   ├── AbstractAutowireCapableBeanFactory.java
    │           │   │   │   ├── AbstractBeanDefinitionReader.java
    │           │   │   │   ├── AbstractBeanFactory.java
    │           │   │   │   ├── BeanDefinitionReader.java
    │           │   │   │   ├── BeanDefinitionRegistry.java
    │           │   │   │   ├── CglibSubclassingInstantiationStrategy.java
    │           │   │   │   ├── DefaultListableBeanFactory.java
    │           │   │   │   ├── DefaultSingletonBeanRegistry.java
    │           │   │   │   ├── DisposableBeanAdapter.java
    │           │   │   │   ├── FactoryBeanRegistrySupport.java
    │           │   │   │   ├── InstantiationStrategy.java
    │           │   │   │   └── SimpleInstantiationStrategy.java
    │           │   │   ├── support
    │           │   │   │   └── XmlBeanDefinitionReader.java
    │           │   │   ├── Aware.java
    │           │   │   ├── BeanClassLoaderAware.java
    │           │   │   ├── BeanFactory.java
    │           │   │   ├── BeanFactoryAware.java
    │           │   │   ├── BeanNameAware.java
    │           │   │   ├── ConfigurableListableBeanFactory.java
    │           │   │   ├── DisposableBean.java
    │           │   │   ├── FactoryBean.java
    │           │   │   ├── HierarchicalBeanFactory.java
    │           │   │   ├── InitializingBean.java
    │           │   │   ├── ListableBeanFactory.java
    │           │   │   └── PropertyPlaceholderConfigurer.java
    │           │   ├── BeansException.java
    │           │   ├── PropertyValue.java
    │           │   └── PropertyValues.java
    │           ├── context
    │           │   ├── annotation
    │           │   │   ├── ClassPathBeanDefinitionScanner.java
    │           │   │   ├── ClassPathScanningCandidateComponentProvider.java
    │           │   │   └── Scope.java
    │           │   ├── event
    │           │   │   ├── AbstractApplicationEventMulticaster.java
    │           │   │   ├── ApplicationContextEvent.java
    │           │   │   ├── ApplicationEventMulticaster.java
    │           │   │   ├── ContextClosedEvent.java
    │           │   │   ├── ContextRefreshedEvent.java
    │           │   │   └── SimpleApplicationEventMulticaster.java
    │           │   ├── support
    │           │   │   ├── AbstractApplicationContext.java
    │           │   │   ├── AbstractRefreshableApplicationContext.java
    │           │   │   ├── AbstractXmlApplicationContext.java
    │           │   │   ├── ApplicationContextAwareProcessor.java
    │           │   │   └── ClassPathXmlApplicationContext.java
    │           │   ├── ApplicationContext.java
    │           │   ├── ApplicationContextAware.java
    │           │   ├── ApplicationEvent.java
    │           │   ├── ApplicationEventPublisher.java
    │           │   ├── ApplicationListener.java
    │           │   └── ConfigurableApplicationContext.java
    │           ├── core.io
    │           │   ├── ClassPathResource.java
    │           │   ├── DefaultResourceLoader.java
    │           │   ├── FileSystemResource.java
    │           │   ├── Resource.java
    │           │   ├── ResourceLoader.java
    │           │   └── UrlResource.java
    │           ├── stereotype
    │           │   └── Component.java
    │           └── utils
    │               └── ClassUtils.java
    └── test
        └── java
            └── cn.bugstack.springframework.test
                ├── bean
                │   ├── IUserService.java
                │   └── UserService.java
                └── ApiTest.java
- 整个类的关系结构来看,其实涉及的内容并不多,主要包括的就是 xml 解析类
XmlBeanDefinitionReader对ClassPathBeanDefinitionScanner#doScan的使用。 - 在
doScan方法中处理所有指定路径下添加了注解的类,拆解出类的信息:名称、作用范围等,进行创建BeanDefinition好用于 Bean 对象的注册操作。 -
PropertyPlaceholderConfigurer目前看上去像一块单独的内容,后续会把这块的内容与自动加载 Bean 对象进行整合,也就是可以在注解上使用占位符配置一些在配置文件里的属性信息。
处理占位符配置
public class PropertyPlaceholderConfigurer implements BeanFactoryPostProcessor {

    /**
     * Default placeholder prefix: {@value}
     */
    public static final String DEFAULT_PLACEHOLDER_PREFIX = "${";

    /**
     * Default placeholder suffix: {@value}
     */
    public static final String DEFAULT_PLACEHOLDER_SUFFIX = "}";

    private String location;

    @Override
    public void postProcessBeanFactory(ConfigurableListableBeanFactory beanFactory) throws BeansException {
        // 加载属性文件
        try {
            DefaultResourceLoader resourceLoader = new DefaultResourceLoader();
            Resource resource = resourceLoader.getResource(location);
            Properties properties = new Properties();
            properties.load(resource.getInputStream());

            String[] beanDefinitionNames = beanFactory.getBeanDefinitionNames();
            for (String beanName : beanDefinitionNames) {
                BeanDefinition beanDefinition = beanFactory.getBeanDefinition(beanName);

                PropertyValues propertyValues = beanDefinition.getPropertyValues();
                for (PropertyValue propertyValue : propertyValues.getPropertyValues()) {
                    Object value = propertyValue.getValue();
                    if (!(value instanceof String)) continue;
                    String strVal = (String) value;
                    StringBuilder buffer = new StringBuilder(strVal);
                    int startIdx = strVal.indexOf(DEFAULT_PLACEHOLDER_PREFIX);
                    int stopIdx = strVal.indexOf(DEFAULT_PLACEHOLDER_SUFFIX);
                    if (startIdx != -1 && stopIdx != -1 && startIdx < stopIdx) {
                        String propKey = strVal.substring(startIdx + 2, stopIdx);
                        String propVal = properties.getProperty(propKey);
                        buffer.replace(startIdx, stopIdx + 1, propVal);
                        propertyValues.addPropertyValue(new PropertyValue(propertyValue.getName(), buffer.toString()));
                    }
                }
            }
        } catch (IOException e) {
            throw new BeansException("Could not load properties", e);
        }
    }

    public void setLocation(String location) {
        this.location = location;
    }

}
- 依赖于
BeanFactoryPostProcessor在 Bean 生命周期的属性,可以在 Bean 对象实例化之前,改变属性信息。所以这里通过实现BeanFactoryPostProcessor接口,完成对配置文件的加载以及摘取占位符中的在属性文件里的配置。 - 这样就可以把提取到的配置信息放置到属性配置中了,
buffer.replace(startIdx, stopIdx + 1, propVal); propertyValues.addPropertyValue
定义拦截注解
@Target({ElementType.TYPE, ElementType.METHOD})
@Retention(RetentionPolicy.RUNTIME)
@Documented
public @interface Scope {

    String value() default "singleton";

}
- 用于配置作用域的自定义注解,方便通过配置Bean对象注解的时候,拿到Bean对象的作用域。不过一般都使用默认的 singleton
@Target(ElementType.TYPE)
@Retention(RetentionPolicy.RUNTIME)
@Documented
public @interface Component {

    String value() default "";

}
- Component 自定义注解大家都非常熟悉了,用于配置到 Class 类上的。除此之外还有 Service、Controller,不过所有的处理方式基本一致,这里就只展示一个 Component 即可。
处理对象扫描装配
public class ClassPathScanningCandidateComponentProvider {

    public Set<BeanDefinition> findCandidateComponents(String basePackage) {
        Set<BeanDefinition> candidates = new LinkedHashSet<>();
        Set<Class<?>> classes = ClassUtil.scanPackageByAnnotation(basePackage, Component.class);
        for (Class<?> clazz : classes) {
            candidates.add(new BeanDefinition(clazz));
        }
        return candidates;
    }

}
- 这里先要提供一个可以通过配置路径
basePackage=cn.bugstack.springframework.test.bean,解析出 classes 信息的工具方法 findCandidateComponents,通过这个方法就可以扫描到所有 @Component 注解的 Bean 对象了。
public class ClassPathBeanDefinitionScanner extends ClassPathScanningCandidateComponentProvider {

    private BeanDefinitionRegistry registry;

    public ClassPathBeanDefinitionScanner(BeanDefinitionRegistry registry) {
        this.registry = registry;
    }

    public void doScan(String... basePackages) {
        for (String basePackage : basePackages) {
            Set<BeanDefinition> candidates = findCandidateComponents(basePackage);
            for (BeanDefinition beanDefinition : candidates) {
                // 解析 Bean 的作用域 singleton、prototype
                String beanScope = resolveBeanScope(beanDefinition);
                if (StrUtil.isNotEmpty(beanScope)) {
                    beanDefinition.setScope(beanScope);
                }
                registry.registerBeanDefinition(determineBeanName(beanDefinition), beanDefinition);
            }
        }
    }

    private String resolveBeanScope(BeanDefinition beanDefinition) {
        Class<?> beanClass = beanDefinition.getBeanClass();
        Scope scope = beanClass.getAnnotation(Scope.class);
        if (null != scope) return scope.value();
        return StrUtil.EMPTY;
    }

    private String determineBeanName(BeanDefinition beanDefinition) {
        Class<?> beanClass = beanDefinition.getBeanClass();
        Component component = beanClass.getAnnotation(Component.class);
        String value = component.value();
        if (StrUtil.isEmpty(value)) {
            value = StrUtil.lowerFirst(beanClass.getSimpleName());
        }
        return value;
    }

}
-
ClassPathBeanDefinitionScanner是继承自ClassPathScanningCandidateComponentProvider的具体扫描包处理的类,在 doScan 中除了获取到扫描的类信息以后,还需要获取 Bean 的作用域和类名,如果不配置类名基本都是把首字母缩写。
解析xml中调用扫描
public class XmlBeanDefinitionReader extends AbstractBeanDefinitionReader {

    public XmlBeanDefinitionReader(BeanDefinitionRegistry registry) {
        super(registry);
    }

    public XmlBeanDefinitionReader(BeanDefinitionRegistry registry, ResourceLoader resourceLoader) {
        super(registry, resourceLoader);
    }

    @Override
    public void loadBeanDefinitions(Resource resource) throws BeansException {
        try {
            try (InputStream inputStream = resource.getInputStream()) {
                doLoadBeanDefinitions(inputStream);
            }
        } catch (IOException | ClassNotFoundException | DocumentException e) {
            throw new BeansException("IOException parsing XML document from " + resource, e);
        }
    }

    @Override
    public void loadBeanDefinitions(Resource... resources) throws BeansException {
        for (Resource resource : resources) {
            loadBeanDefinitions(resource);
        }
    }

    @Override
    public void loadBeanDefinitions(String location) throws BeansException {
        ResourceLoader resourceLoader = getResourceLoader();
        Resource resource = resourceLoader.getResource(location);
        loadBeanDefinitions(resource);
    }

    @Override
    public void loadBeanDefinitions(String... locations) throws BeansException {
        for (String location : locations) {
            loadBeanDefinitions(location);
        }
    }

    protected void doLoadBeanDefinitions(InputStream inputStream) throws ClassNotFoundException, DocumentException {
        SAXReader reader = new SAXReader();
        Document document = reader.read(inputStream);
        Element root = document.getRootElement();

        // 解析 context:component-scan 标签,扫描包中的类并提取相关信息,用于组装 BeanDefinition
        Element componentScan = root.element("component-scan");
        if (null != componentScan) {
            String scanPath = componentScan.attributeValue("base-package");
            if (StrUtil.isEmpty(scanPath)) {
                throw new BeansException("The value of base-package attribute can not be empty or null");
            }
            scanPackage(scanPath);
        }

        List<Element> beanList = root.elements("bean");
        for (Element bean : beanList) {

            String id = bean.attributeValue("id");
            String name = bean.attributeValue("name");
            String className = bean.attributeValue("class");
            String initMethod = bean.attributeValue("init-method");
            String destroyMethodName = bean.attributeValue("destroy-method");
            String beanScope = bean.attributeValue("scope");

            // 获取 Class,方便获取类中的名称
            Class<?> clazz = Class.forName(className);
            // 优先级 id > name
            String beanName = StrUtil.isNotEmpty(id) ? id : name;
            if (StrUtil.isEmpty(beanName)) {
                beanName = StrUtil.lowerFirst(clazz.getSimpleName());
            }

            // 定义Bean
            BeanDefinition beanDefinition = new BeanDefinition(clazz);
            beanDefinition.setInitMethodName(initMethod);
            beanDefinition.setDestroyMethodName(destroyMethodName);

            if (StrUtil.isNotEmpty(beanScope)) {
                beanDefinition.setScope(beanScope);
            }

            List<Element> propertyList = bean.elements("property");
            // 读取属性并填充
            for (Element property : propertyList) {
                // 解析标签:property
                String attrName = property.attributeValue("name");
                String attrValue = property.attributeValue("value");
                String attrRef = property.attributeValue("ref");
                // 获取属性值:引入对象、值对象
                Object value = StrUtil.isNotEmpty(attrRef) ? new BeanReference(attrRef) : attrValue;
                // 创建属性信息
                PropertyValue propertyValue = new PropertyValue(attrName, value);
                beanDefinition.getPropertyValues().addPropertyValue(propertyValue);
            }
            if (getRegistry().containsBeanDefinition(beanName)) {
                throw new BeansException("Duplicate beanName[" + beanName + "] is not allowed");
            }
            // 注册 BeanDefinition
            getRegistry().registerBeanDefinition(beanName, beanDefinition);
        }
    }

    private void scanPackage(String scanPath) {
        String[] basePackages = StrUtil.splitToArray(scanPath, ',');
        ClassPathBeanDefinitionScanner scanner = new ClassPathBeanDefinitionScanner(getRegistry());
        scanner.doScan(basePackages);
    }

}
- 关于
XmlBeanDefinitionReader中主要是在加载配置文件后,处理新增的自定义配置属性component-scan,解析后调用scanPackage方法,其实也就是我们在ClassPathBeanDefinitionScanner#doScan功能。 - 另外这里需要注意,为了可以方便的加载和解析xml,
XmlBeanDefinitionReader已经全部替换为dom4j的方式进行解析处理。
测试
public interface IUserService {

    String queryUserInfo();

    String register(String userName);
}
@Component("userService")
public class UserService implements IUserService {

    private String token;

    public String queryUserInfo() {
        try {
            Thread.sleep(new Random(1).nextInt(100));
        } catch (InterruptedException e) {
            e.printStackTrace();
        }
        return "小小小,100001,大大大";
    }

    public String register(String userName) {
        try {
            Thread.sleep(new Random(1).nextInt(100));
        } catch (InterruptedException e) {
            e.printStackTrace();
        }
        return "注册用户:" + userName + " success!";
    }

    @Override
    public String toString() {
        return "UserService#token = { " + token + " }";
    }

    public String getToken() {
        return token;
    }

    public void setToken(String token) {
        this.token = token;
    }
}
- 给 UserService 类添加一个自定义注解
@Component("userService")和一个属性信息String token。这是为了分别测试包扫描和占位符属性。
属性配置文件
token.properties
token=RejDlI78hu223Opo983Ds- 这里配置一个 token 的属性信息,用于通过占位符的方式进行获取
spring.xml 配置对象
spring-property.xml
<?xml version="1.0" encoding="UTF-8"?>
<beans xmlns="http://www.springframework.org/schema/beans"
       xmlns:xsi="http://www.w3.org/2001/XMLSchema-instance"
       xmlns:context="http://www.springframework.org/schema/context"
       xsi:schemaLocation="http://www.springframework.org/schema/beans
	         http://www.springframework.org/schema/beans/spring-beans.xsd
		 http://www.springframework.org/schema/context">

    <bean class="cn.bugstack.springframework.beans.factory.PropertyPlaceholderConfigurer">
        <property name="location" value="classpath:token.properties"/>
    </bean>

    <bean id="userService" class="cn.bugstack.springframework.test.bean.UserService">
        <property name="token" value="${token}"/>
    </bean>

</beans>- 加载
classpath:token.properties设置占位符属性值${token}
spring-scan.xml
<?xml version="1.0" encoding="UTF-8"?>
<beans xmlns="http://www.springframework.org/schema/beans"
       xmlns:xsi="http://www.w3.org/2001/XMLSchema-instance"
       xmlns:context="http://www.springframework.org/schema/context"
       xsi:schemaLocation="http://www.springframework.org/schema/beans
	         http://www.springframework.org/schema/beans/spring-beans.xsd
		 http://www.springframework.org/schema/context">

    <context:component-scan base-package="cn.bugstack.springframework.test.bean"/>

</beans>- 添加
component-scan属性,设置包扫描根路径
单元测试(占位符)
    @Test
    public void test_property() {
        ClassPathXmlApplicationContext applicationContext = new ClassPathXmlApplicationContext("classpath:spring-property.xml");
        IUserService userService = applicationContext.getBean("userService", IUserService.class);
        System.out.println("测试结果:" + userService);
    }
结果
测试结果:UserService#token = { RejDlI78hu223Opo983Ds }

Process finished with exit code 0
- 通过测试结果可以看到 UserService 中的 token 属性已经通过占位符的方式设置进去配置文件里的
token.properties的属性值了。
单元测试(包扫描)
    @Test
    public void test_scan() {
        ClassPathXmlApplicationContext applicationContext = new ClassPathXmlApplicationContext("classpath:spring-scan.xml");
        IUserService userService = applicationContext.getBean("userService", IUserService.class);
        System.out.println("测试结果:" + userService.queryUserInfo());
    }
结果
测试结果:小小小,100001,大大大

Process finished with exit code 0
- 通过这个测试结果可以看出来,现在使用注解的方式就可以让 Class 注册完成 Bean 对象了。
目前的功能添加其实已经不复杂了,都是在 IOC 和 AOP 核心的基础上来补全功能。这些补全的功能也是在完善 Bean 的生命周期,让整个功能使用也越来越容易。
在你不断的实现着 Spring 的各项功能时,也可以把自己在平常使用 Spring 的一些功能想法融入进来,比如像 Spring 是如何动态切换数据源的,线程池是怎么提供配置的,这些内容虽然不是最基础的核心范围,但也非常重要。
通过注解给属性注入配置和Bean对象
在目前 IOC、AOP 两大核心功能模块的支撑下,完全可以管理 Bean 对象的注册和获取,不过这样的使用方式总感觉像是刀耕火种有点难用。因此在上一章节我们解决需要手动配置 Bean 对象到 spring.xml 文件中,改为可以自动扫描带有注解 @Component 的对象完成自动装配和注册到 Spring 容器的操作。
那么在自动扫描包注册 Bean 对象之后,就需要把原来在配置文件中通过 property name="token" 配置属性和Bean的操作,也改为可以自动注入。这就像我们使用 Spring 框架中 @Autowired、@Value 注解一样,完成我们对属性和对象的注入操作。
其实从我们在完成 Bean 对象的基础功能后,后续陆续添加的功能都是围绕着 Bean 的生命周期进行的,比如修改 Bean 的定义 BeanFactoryPostProcessor,处理 Bean 的属性要用到 BeanPostProcessor,完成个性的属性操作则专门继承 BeanPostProcessor 提供新的接口,因为这样才能通过 instanceof 判断出具有标记性的接口。所以关于 Bean 等等的操作,以及监听 Aware、获取 BeanFactory,都需要在 Bean 的生命周期中完成。那么我们在设计属性和 Bean 对象的注入时候,也会用到 BeanPostProcessor 来完成在设置 Bean 属性之前,允许 BeanPostProcessor 修改属性值。整体设计结构如下图:

- 要处理自动扫描注入,包括属性注入、对象注入,则需要在对象属性
applyPropertyValues填充之前 ,把属性信息写入到PropertyValues的集合中去。这一步的操作相当于是解决了以前在spring.xml配置属性的过程。 - 而在属性的读取中,需要依赖于对 Bean 对象的类中属性的配置了注解的扫描,
field.getAnnotation(Value.class);依次拿出符合的属性并填充上相应的配置信息。这里有一点 ,属性的配置信息需要依赖于BeanFactoryPostProcessor的实现类PropertyPlaceholderConfigurer,把值写入到AbstractBeanFactory的embeddedValueResolvers集合中,这样才能在属性填充中利用beanFactory获取相应的属性值 - 还有一个是关于
@Autowired对于对象的注入,其实这一个和属性注入的唯一区别是对于对象的获取beanFactory.getBean(fieldType),其他就没有什么差一点了。 - 当所有的属性被设置到
PropertyValues完成以后,接下来就到了创建对象的下一步,属性填充,而此时就会把我们一一获取到的配置和对象填充到属性上,也就实现了自动注入的功能。
└── src
    ├── main
    │   └── java
    │       └── cn.bugstack.springframework
    │           ├── aop
    │           │   ├── aspectj
    │           │   │   └── AspectJExpressionPointcut.java
    │           │   │   └── AspectJExpressionPointcutAdvisor.java
    │           │   ├── framework
    │           │   │   ├── adapter
    │           │   │   │   └── MethodBeforeAdviceInterceptor.java
    │           │   │   ├── autoproxy
    │           │   │   │   └── MethodBeforeAdviceInterceptor.java
    │           │   │   ├── AopProxy.java
    │           │   │   ├── Cglib2AopProxy.java
    │           │   │   ├── JdkDynamicAopProxy.java
    │           │   │   ├── ProxyFactory.java
    │           │   │   └── ReflectiveMethodInvocation.java
    │           │   ├── AdvisedSupport.java
    │           │   ├── Advisor.java
    │           │   ├── BeforeAdvice.java
    │           │   ├── ClassFilter.java
    │           │   ├── MethodBeforeAdvice.java
    │           │   ├── MethodMatcher.java
    │           │   ├── Pointcut.java
    │           │   ├── PointcutAdvisor.java
    │           │   └── TargetSource.java
    │           ├── beans
    │           │   ├── factory
    │           │   │   ├── annotation
    │           │   │   │   ├── Autowired.java
    │           │   │   │   ├── AutowiredAnnotationBeanPostProcessor.java
    │           │   │   │   ├── Qualifier.java
    │           │   │   │   └── Value.java
    │           │   │   ├── config
    │           │   │   │   ├── AutowireCapableBeanFactory.java
    │           │   │   │   ├── BeanDefinition.java
    │           │   │   │   ├── BeanFactoryPostProcessor.java
    │           │   │   │   ├── BeanPostProcessor.java
    │           │   │   │   ├── BeanReference.java
    │           │   │   │   ├── ConfigurableBeanFactory.java
    │           │   │   │   ├── InstantiationAwareBeanPostProcessor.java
    │           │   │   │   └── SingletonBeanRegistry.java
    │           │   │   ├── support
    │           │   │   │   ├── AbstractAutowireCapableBeanFactory.java
    │           │   │   │   ├── AbstractBeanDefinitionReader.java
    │           │   │   │   ├── AbstractBeanFactory.java
    │           │   │   │   ├── BeanDefinitionReader.java
    │           │   │   │   ├── BeanDefinitionRegistry.java
    │           │   │   │   ├── CglibSubclassingInstantiationStrategy.java
    │           │   │   │   ├── DefaultListableBeanFactory.java
    │           │   │   │   ├── DefaultSingletonBeanRegistry.java
    │           │   │   │   ├── DisposableBeanAdapter.java
    │           │   │   │   ├── FactoryBeanRegistrySupport.java
    │           │   │   │   ├── InstantiationStrategy.java
    │           │   │   │   └── SimpleInstantiationStrategy.java
    │           │   │   ├── support
    │           │   │   │   └── XmlBeanDefinitionReader.java
    │           │   │   ├── Aware.java
    │           │   │   ├── BeanClassLoaderAware.java
    │           │   │   ├── BeanFactory.java
    │           │   │   ├── BeanFactoryAware.java
    │           │   │   ├── BeanNameAware.java
    │           │   │   ├── ConfigurableListableBeanFactory.java
    │           │   │   ├── DisposableBean.java
    │           │   │   ├── FactoryBean.java
    │           │   │   ├── HierarchicalBeanFactory.java
    │           │   │   ├── InitializingBean.java
    │           │   │   ├── ListableBeanFactory.java
    │           │   │   └── PropertyPlaceholderConfigurer.java
    │           │   ├── BeansException.java
    │           │   ├── PropertyValue.java
    │           │   └── PropertyValues.java
    │           ├── context
    │           │   ├── annotation
    │           │   │   ├── ClassPathBeanDefinitionScanner.java
    │           │   │   ├── ClassPathScanningCandidateComponentProvider.java
    │           │   │   └── Scope.java
    │           │   ├── event
    │           │   │   ├── AbstractApplicationEventMulticaster.java
    │           │   │   ├── ApplicationContextEvent.java
    │           │   │   ├── ApplicationEventMulticaster.java
    │           │   │   ├── ContextClosedEvent.java
    │           │   │   ├── ContextRefreshedEvent.java
    │           │   │   └── SimpleApplicationEventMulticaster.java
    │           │   ├── support
    │           │   │   ├── AbstractApplicationContext.java
    │           │   │   ├── AbstractRefreshableApplicationContext.java
    │           │   │   ├── AbstractXmlApplicationContext.java
    │           │   │   ├── ApplicationContextAwareProcessor.java
    │           │   │   └── ClassPathXmlApplicationContext.java
    │           │   ├── ApplicationContext.java
    │           │   ├── ApplicationContextAware.java
    │           │   ├── ApplicationEvent.java
    │           │   ├── ApplicationEventPublisher.java
    │           │   ├── ApplicationListener.java
    │           │   └── ConfigurableApplicationContext.java
    │           ├── core.io
    │           │   ├── ClassPathResource.java
    │           │   ├── DefaultResourceLoader.java
    │           │   ├── FileSystemResource.java
    │           │   ├── Resource.java
    │           │   ├── ResourceLoader.java
    │           │   └── UrlResource.java
    │           ├── stereotype
    │           │   └── Component.java
    │           └── utils
    │               ├── ClassUtils.java
    │               └── StringValueResolver.java
    └── test
        └── java
            └── cn.bugstack.springframework.test
                ├── bean
                │   ├── IUserService.java
                │   └── UserService.java
                └── ApiTest.java

- 在整个类图中以围绕实现接口
InstantiationAwareBeanPostProcessor的类AutowiredAnnotationBeanPostProcessor作为入口点,被AbstractAutowireCapableBeanFactory创建 Bean 对象过程中调用扫描整个类的属性配置中含有自定义注解Value、Autowired、Qualifier,的属性值。 - 这里稍有变动的是关于属性值信息的获取,在注解配置的属性字段扫描到信息注入时,包括了占位符从配置文件获取信息也包括 Bean 对象,Bean 对象可以直接获取,但配置信息需要在
AbstractBeanFactory中添加新的属性集合embeddedValueResolvers,由PropertyPlaceholderConfigurer#postProcessBeanFactory进行操作填充到属性集合中。
把读取到属性填充到容器
定义解析字符串接口
public interface StringValueResolver {

    String resolveStringValue(String strVal);

}
- 接口
StringValueResolver是一个解析字符串操作的接口
填充字符串
public class PropertyPlaceholderConfigurer implements BeanFactoryPostProcessor {

    /**
     * Default placeholder prefix: {@value}
     */
    public static final String DEFAULT_PLACEHOLDER_PREFIX = "${";

    /**
     * Default placeholder suffix: {@value}
     */
    public static final String DEFAULT_PLACEHOLDER_SUFFIX = "}";

    private String location;

    @Override
    public void postProcessBeanFactory(ConfigurableListableBeanFactory beanFactory) throws BeansException {
        try {
            // 加载属性文件
            DefaultResourceLoader resourceLoader = new DefaultResourceLoader();
            Resource resource = resourceLoader.getResource(location);

            // 占位符替换属性值
            Properties properties = new Properties();
            properties.load(resource.getInputStream());

            String[] beanDefinitionNames = beanFactory.getBeanDefinitionNames();
            for (String beanName : beanDefinitionNames) {
                BeanDefinition beanDefinition = beanFactory.getBeanDefinition(beanName);

                PropertyValues propertyValues = beanDefinition.getPropertyValues();
                for (PropertyValue propertyValue : propertyValues.getPropertyValues()) {
                    Object value = propertyValue.getValue();
                    if (!(value instanceof String)) continue;
                    value = resolvePlaceholder((String) value, properties);
                    propertyValues.addPropertyValue(new PropertyValue(propertyValue.getName(), value));
                }
            }

            // 向容器中添加字符串解析器,供解析@Value注解使用
            StringValueResolver valueResolver = new PlaceholderResolvingStringValueResolver(properties);
            beanFactory.addEmbeddedValueResolver(valueResolver);

        } catch (IOException e) {
            throw new BeansException("Could not load properties", e);
        }
    }

    private String resolvePlaceholder(String value, Properties properties) {
        String strVal = value;
        StringBuilder buffer = new StringBuilder(strVal);
        int startIdx = strVal.indexOf(DEFAULT_PLACEHOLDER_PREFIX);
        int stopIdx = strVal.indexOf(DEFAULT_PLACEHOLDER_SUFFIX);
        if (startIdx != -1 && stopIdx != -1 && startIdx < stopIdx) {
            String propKey = strVal.substring(startIdx + 2, stopIdx);
            String propVal = properties.getProperty(propKey);
            buffer.replace(startIdx, stopIdx + 1, propVal);
        }
        return buffer.toString();
    }

    public void setLocation(String location) {
        this.location = location;
    }

    private class PlaceholderResolvingStringValueResolver implements StringValueResolver {

        private final Properties properties;

        public PlaceholderResolvingStringValueResolver(Properties properties) {
            this.properties = properties;
        }

        @Override
        public String resolveStringValue(String strVal) {
            return PropertyPlaceholderConfigurer.this.resolvePlaceholder(strVal, properties);
        }

    }

}
- 在解析属性配置的类
PropertyPlaceholderConfigurer中,最主要的其实就是这行代码的操作beanFactory.addEmbeddedValueResolver(valueResolver)这是把属性值写入到了 AbstractBeanFactory 的 embeddedValueResolvers 中。 - 这里说明下,
embeddedValueResolvers是AbstractBeanFactory类新增加的集合List<StringValueResolver> embeddedValueResolversString resolvers to apply e.g. to annotation attribute values
自定义属性注入注解
@Retention(RetentionPolicy.RUNTIME)
@Target({ElementType.CONSTRUCTOR, ElementType.FIELD, ElementType.METHOD})
public @interface Autowired {
}

@Target({ElementType.FIELD, ElementType.METHOD, ElementType.PARAMETER, ElementType.TYPE, ElementType.ANNOTATION_TYPE})
@Retention(RetentionPolicy.RUNTIME)
@Inherited
@Documented
public @interface Qualifier {

    String value() default "";

}

@Target({ElementType.FIELD, ElementType.METHOD, ElementType.PARAMETER})
@Retention(RetentionPolicy.RUNTIME)
@Documented
public @interface Value {

    /**
     * The actual value expression: e.g. "#{systemProperties.myProp}".
     */
    String value();

}
- 3个注解在我们日常使用 Spring 也是非常常见的,注入对象、注入属性,而 Qualifier 一般与 Autowired 配合使用。
扫描自定义注解
public class AutowiredAnnotationBeanPostProcessor implements InstantiationAwareBeanPostProcessor, BeanFactoryAware {

    private ConfigurableListableBeanFactory beanFactory;

    @Override
    public void setBeanFactory(BeanFactory beanFactory) throws BeansException {
        this.beanFactory = (ConfigurableListableBeanFactory) beanFactory;
    }

    @Override
    public PropertyValues postProcessPropertyValues(PropertyValues pvs, Object bean, String beanName) throws BeansException {
        // 1. 处理注解 @Value
        Class<?> clazz = bean.getClass();
        clazz = ClassUtils.isCglibProxyClass(clazz) ? clazz.getSuperclass() : clazz;

        Field[] declaredFields = clazz.getDeclaredFields();

        for (Field field : declaredFields) {
            Value valueAnnotation = field.getAnnotation(Value.class);
            if (null != valueAnnotation) {
                String value = valueAnnotation.value();
                value = beanFactory.resolveEmbeddedValue(value);
                BeanUtil.setFieldValue(bean, field.getName(), value);
            }
        }

        // 2. 处理注解 @Autowired
        for (Field field : declaredFields) {
            Autowired autowiredAnnotation = field.getAnnotation(Autowired.class);
            if (null != autowiredAnnotation) {
                Class<?> fieldType = field.getType();
                String dependentBeanName = null;
                Qualifier qualifierAnnotation = field.getAnnotation(Qualifier.class);
                Object dependentBean = null;
                if (null != qualifierAnnotation) {
                    dependentBeanName = qualifierAnnotation.value();
                    dependentBean = beanFactory.getBean(dependentBeanName, fieldType);
                } else {
                    dependentBean = beanFactory.getBean(fieldType);
                }
                BeanUtil.setFieldValue(bean, field.getName(), dependentBean);
            }
        }

        return pvs;
    }

    @Override
    public Object postProcessBeforeInstantiation(Class<?> beanClass, String beanName) throws BeansException {
        return null;
    }

    @Override
    public Object postProcessBeforeInitialization(Object bean, String beanName) throws BeansException {
        return null;
    }

    @Override
    public Object postProcessAfterInitialization(Object bean, String beanName) throws BeansException {
        return null;
    }
}
-
AutowiredAnnotationBeanPostProcessor是实现接口InstantiationAwareBeanPostProcessor的一个用于在 Bean 对象实例化完成后,设置属性操作前的处理属性信息的类和操作方法。只有实现了 BeanPostProcessor 接口才有机会在 Bean 的生命周期中处理初始化信息 - 核心方法
postProcessPropertyValues,主要用于处理类含有@Value、@Autowired注解的属性,进行属性信息的提取和设置。 - 这里需要注意一点因为我们在
AbstractAutowireCapableBeanFactory类中使用的是CglibSubclassingInstantiationStrategy进行类的创建,所以在AutowiredAnnotationBeanPostProcessor#postProcessPropertyValues中需要判断是否为CGlib创建对象,否则是不能正确拿到类信息的。ClassUtils.isCglibProxyClass(clazz) ? clazz.getSuperclass() : clazz;
在Bean的生命周期中调用属性注入
public abstract class AbstractAutowireCapableBeanFactory extends AbstractBeanFactory implements AutowireCapableBeanFactory {

    private InstantiationStrategy instantiationStrategy = new CglibSubclassingInstantiationStrategy();

    @Override
    protected Object createBean(String beanName, BeanDefinition beanDefinition, Object[] args) throws BeansException {
        Object bean = null;
        try {
            // 判断是否返回代理 Bean 对象
            bean = resolveBeforeInstantiation(beanName, beanDefinition);
            if (null != bean) {
                return bean;
            }
            // 实例化 Bean
            bean = createBeanInstance(beanDefinition, beanName, args);
            // 在设置 Bean 属性之前,允许 BeanPostProcessor 修改属性值
            applyBeanPostProcessorsBeforeApplyingPropertyValues(beanName, bean, beanDefinition);
            // 给 Bean 填充属性
            applyPropertyValues(beanName, bean, beanDefinition);
            // 执行 Bean 的初始化方法和 BeanPostProcessor 的前置和后置处理方法
            bean = initializeBean(beanName, bean, beanDefinition);
        } catch (Exception e) {
            throw new BeansException("Instantiation of bean failed", e);
        }

        // 注册实现了 DisposableBean 接口的 Bean 对象
        registerDisposableBeanIfNecessary(beanName, bean, beanDefinition);

        // 判断 SCOPE_SINGLETON、SCOPE_PROTOTYPE
        if (beanDefinition.isSingleton()) {
            registerSingleton(beanName, bean);
        }
        return bean;
    }

    /**
     * 在设置 Bean 属性之前,允许 BeanPostProcessor 修改属性值
     *
     * @param beanName
     * @param bean
     * @param beanDefinition
     */
    protected void applyBeanPostProcessorsBeforeApplyingPropertyValues(String beanName, Object bean, BeanDefinition beanDefinition) {
        for (BeanPostProcessor beanPostProcessor : getBeanPostProcessors()) {
            if (beanPostProcessor instanceof InstantiationAwareBeanPostProcessor){
                PropertyValues pvs = ((InstantiationAwareBeanPostProcessor) beanPostProcessor).postProcessPropertyValues(beanDefinition.getPropertyValues(), bean, beanName);
                if (null != pvs) {
                    for (PropertyValue propertyValue : pvs.getPropertyValues()) {
                        beanDefinition.getPropertyValues().addPropertyValue(propertyValue);
                    }
                }
            }
        }
    }

    protected Object resolveBeforeInstantiation(String beanName, BeanDefinition beanDefinition) {
        Object bean = applyBeanPostProcessorsBeforeInstantiation(beanDefinition.getBeanClass(), beanName);
        if (null != bean) {
            bean = applyBeanPostProcessorsAfterInitialization(bean, beanName);
        }
        return bean;
    }

    protected Object applyBeanPostProcessorsBeforeInstantiation(Class<?> beanClass, String beanName) {
        for (BeanPostProcessor beanPostProcessor : getBeanPostProcessors()) {
            if (beanPostProcessor instanceof InstantiationAwareBeanPostProcessor) {
                Object result = ((InstantiationAwareBeanPostProcessor) beanPostProcessor).postProcessBeforeInstantiation(beanClass, beanName);
                if (null != result) return result;
            }
        }
        return null;
    }

    protected void registerDisposableBeanIfNecessary(String beanName, Object bean, BeanDefinition beanDefinition) {
        // 非 Singleton 类型的 Bean 不执行销毁方法
        if (!beanDefinition.isSingleton()) return;

        if (bean instanceof DisposableBean || StrUtil.isNotEmpty(beanDefinition.getDestroyMethodName())) {
            registerDisposableBean(beanName, new DisposableBeanAdapter(bean, beanName, beanDefinition));
        }
    }

    protected Object createBeanInstance(BeanDefinition beanDefinition, String beanName, Object[] args) {
        Constructor constructorToUse = null;
        Class<?> beanClass = beanDefinition.getBeanClass();
        Constructor<?>[] declaredConstructors = beanClass.getDeclaredConstructors();
        for (Constructor ctor : declaredConstructors) {
            if (null != args && ctor.getParameterTypes().length == args.length) {
                constructorToUse = ctor;
                break;
            }
        }
        return getInstantiationStrategy().instantiate(beanDefinition, beanName, constructorToUse, args);
    }

    /**
     * Bean 属性填充
     */
    protected void applyPropertyValues(String beanName, Object bean, BeanDefinition beanDefinition) {
        try {
            PropertyValues propertyValues = beanDefinition.getPropertyValues();
            for (PropertyValue propertyValue : propertyValues.getPropertyValues()) {

                String name = propertyValue.getName();
                Object value = propertyValue.getValue();

                if (value instanceof BeanReference) {
                    // A 依赖 B,获取 B 的实例化
                    BeanReference beanReference = (BeanReference) value;
                    value = getBean(beanReference.getBeanName());
                }
                // 属性填充
                BeanUtil.setFieldValue(bean, name, value);
            }
        } catch (Exception e) {
            throw new BeansException("Error setting property values:" + beanName);
        }
    }

    public InstantiationStrategy getInstantiationStrategy() {
        return instantiationStrategy;
    }

    public void setInstantiationStrategy(InstantiationStrategy instantiationStrategy) {
        this.instantiationStrategy = instantiationStrategy;
    }

    private Object initializeBean(String beanName, Object bean, BeanDefinition beanDefinition) {

        // invokeAwareMethods
        if (bean instanceof Aware) {
            if (bean instanceof BeanFactoryAware) {
                ((BeanFactoryAware) bean).setBeanFactory(this);
            }
            if (bean instanceof BeanClassLoaderAware) {
                ((BeanClassLoaderAware) bean).setBeanClassLoader(getBeanClassLoader());
            }
            if (bean instanceof BeanNameAware) {
                ((BeanNameAware) bean).setBeanName(beanName);
            }
        }

        // 1. 执行 BeanPostProcessor Before 处理
        Object wrappedBean = applyBeanPostProcessorsBeforeInitialization(bean, beanName);

        // 执行 Bean 对象的初始化方法
        try {
            invokeInitMethods(beanName, wrappedBean, beanDefinition);
        } catch (Exception e) {
            throw new BeansException("Invocation of init method of bean[" + beanName + "] failed", e);
        }

        // 2. 执行 BeanPostProcessor After 处理
        wrappedBean = applyBeanPostProcessorsAfterInitialization(wrappedBean, beanName);
        return wrappedBean;
    }

    private void invokeInitMethods(String beanName, Object bean, BeanDefinition beanDefinition) throws Exception {
        // 1. 实现接口 InitializingBean
        if (bean instanceof InitializingBean) {
            ((InitializingBean) bean).afterPropertiesSet();
        }

        // 2. 注解配置 init-method {判断是为了避免二次执行销毁}
        String initMethodName = beanDefinition.getInitMethodName();
        if (StrUtil.isNotEmpty(initMethodName)) {
            Method initMethod = beanDefinition.getBeanClass().getMethod(initMethodName);
            if (null == initMethod) {
                throw new BeansException("Could not find an init method named '" + initMethodName + "' on bean with name '" + beanName + "'");
            }
            initMethod.invoke(bean);
        }
    }

    @Override
    public Object applyBeanPostProcessorsBeforeInitialization(Object existingBean, String beanName) throws BeansException {
        Object result = existingBean;
        for (BeanPostProcessor processor : getBeanPostProcessors()) {
            Object current = processor.postProcessBeforeInitialization(result, beanName);
            if (null == current) return result;
            result = current;
        }
        return result;
    }

    @Override
    public Object applyBeanPostProcessorsAfterInitialization(Object existingBean, String beanName) throws BeansException {
        Object result = existingBean;
        for (BeanPostProcessor processor : getBeanPostProcessors()) {
            Object current = processor.postProcessAfterInitialization(result, beanName);
            if (null == current) return result;
            result = current;
        }
        return result;
    }

}
-
AbstractAutowireCapableBeanFactory#createBean方法中有这一条新增加的方法调用,就是在设置 Bean 属性之前,允许 BeanPostProcessor 修改属性值的操作applyBeanPostProcessorsBeforeApplyingPropertyValues - 那么这个
applyBeanPostProcessorsBeforeApplyingPropertyValues方法中,首先就是获取已经注入的BeanPostProcessor集合并从中筛选出继承接口InstantiationAwareBeanPostProcessor的实现类。 - 最后就是调用相应的
postProcessPropertyValues方法以及循环设置属性值信息,beanDefinition.getPropertyValues().addPropertyValue(propertyValue);
测试
public interface IUserService {

    String queryUserInfo();

    String register(String userName);
}
@Component
public class UserDao {

    private static Map<String, String> hashMap = new HashMap<>();

    static {
        hashMap.put("10001", "RateLimiter");
        hashMap.put("10002", "limitreq");
        hashMap.put("10003", "Semaphore");
    }

    public String queryUserName(String uId) {
        return hashMap.get(uId);
    }

}
- 给类配置上一个自动扫描注册 Bean 对象的注解
@Component,接下来会把这个类注入到 UserService 中。
@Component("userService")
public class UserService implements IUserService {

    @Value("${token}")
    private String token;

    @Autowired
    private UserDao userDao;

    public String queryUserInfo() {
        try {
            Thread.sleep(new Random(1).nextInt(100));
        } catch (InterruptedException e) {
            e.printStackTrace();
        }
        return userDao.queryUserName("10001") + "," + token;
    }

    public String register(String userName) {
        try {
            Thread.sleep(new Random(1).nextInt(100));
        } catch (InterruptedException e) {
            e.printStackTrace();
        }
        return "注册用户:" + userName + " success!";
    }

    @Override
    public String toString() {
        return "UserService#token = { " + token + " }";
    }

    public String getToken() {
        return token;
    }

    public void setToken(String token) {
        this.token = token;
    }

    public UserDao getUserDao() {
        return userDao;
    }

    public void setUserDao(UserDao userDao) {
        this.userDao = userDao;
    }
}
- 这里包括了两种类型的注入,一个是占位符注入属性信息
@Value("${token}"),另外一个是注入对象信息@Autowired
属性配置文件
token.properties
token=RejDlI78hu223Opo983Dsspring.xml
<?xml version="1.0" encoding="UTF-8"?>
<beans xmlns="http://www.springframework.org/schema/beans"
       xmlns:xsi="http://www.w3.org/2001/XMLSchema-instance"
       xmlns:context="http://www.springframework.org/schema/context"
       xsi:schemaLocation="http://www.springframework.org/schema/beans
	         http://www.springframework.org/schema/beans/spring-beans.xsd
		 http://www.springframework.org/schema/context">

    <bean class="cn.bugstack.springframework.beans.factory.PropertyPlaceholderConfigurer">
        <property name="location" value="classpath:token.properties"/>
    </bean>

    <context:component-scan base-package="cn.bugstack.springframework.test.bean"/>

</beans>- 在 spring.xml 中配置了扫描属性信息和自动扫描包路径范围。
单元测试
    @Test
    public void test_scan() {
        ClassPathXmlApplicationContext applicationContext = new ClassPathXmlApplicationContext("classpath:spring.xml");
        IUserService userService = applicationContext.getBean("userService", IUserService.class);
        System.out.println("测试结果:" + userService.queryUserInfo());
    }
- 单元测试时候就可以完整的测试一个类注入到 Spring 容器,同时这个属性信息也可以被自动扫描填充上。
结果
测试结果:RateLimiter,RejDlI78hu223Opo983Ds

Process finished with exit code 0- 从测试结果可以看到现在我们的使用方式已经通过了,有自动扫描类,有注解注入属性。这与使用 Spring 框架越来越像了。
从整个注解信息扫描注入的实现内容来看,我们一直是围绕着在 Bean 的生命周期中进行处理,就像 BeanPostProcessor 用于修改新实例化 Bean 对象的扩展点,提供的接口方法可以用于处理 Bean 对象实例化前后进行处理操作。而有时候需要做一些差异化的控制,所以还需要继承 BeanPostProcessor 接口,定义新的接口 InstantiationAwareBeanPostProcessor 这样就可以区分出不同扩展点的操作了。
像是接口用 instanceof 判断,注解用 Field.getAnnotation(Value.class); 获取,都是相当于在类上做的一些标识性信息,便于可以用一些方法找到这些功能点,以便进行处理。所以在我们日常开发设计的组件中,也可以运用上这些特点。
当你思考把你的实现融入到一个已经细分好的 Bean 生命周期中,你会发现它的设计是如此的好,可以让你在任何初始化的时间点上,任何面上,都能做你需要的扩展或者改变,这也是我们做程序设计时追求的灵活性。
给代理对象的属性设置值
本节要解决的问题就是关于如何给代理对象中的属性填充相应的值,因为在之前把 AOP 动态代理,融入到 Bean 的生命周期时,创建代理对象是在整个创建Bean 对象之前,也就是说这个代理对象的创建并不是在 Bean 生命周期中。
所以本章节中我们要把代理对象的创建融入到 Bean 的生命周期中,也就是需 要把创建代理对象的逻辑迁移到 Bean 对象执行初始化方法之后,在执行代理 对象的创建。
按照创建代理对象的操作 DefaultAdvisorAutoProxyCreator 实现的 InstantiationAwareBeanPostProcessor 接口,那么原本在 Before 中的操作则需要放到 After 中处理。整体设计如下:
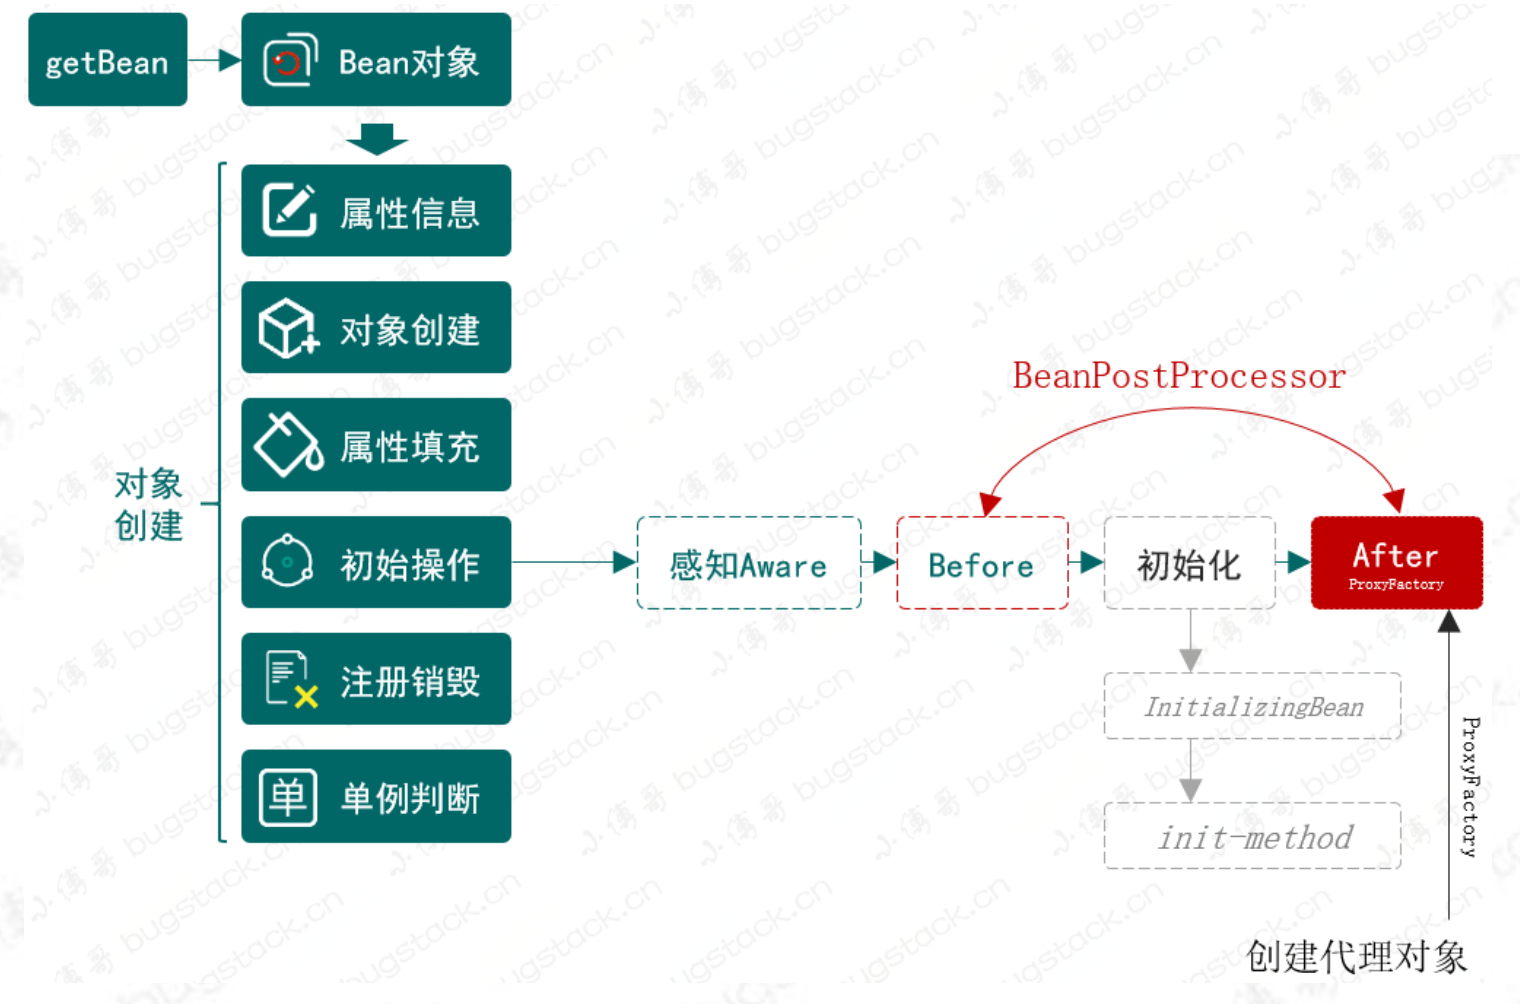
- 在创建 Bean 对象 createBean 的生命周期中,有一个阶段是在 Bean 对象属 性填充完成以后,执行 Bean 的初始化方法和
BeanPostProcessor的前置和后置 处理,例如:感知 Aware 对象、处理 init-method 方法等。那么在这个阶段的BeanPostProcessor After就可以用于创建代理对象操作。 - 在
DefaultAdvisorAutoProxyCreator用于创建代理对象的操作中,需要把创建操作 从postProcessBeforeInstantiation方法中迁移到postProcessAfterInitialization,这 样才能满足 Bean 属性填充后的创建操作。
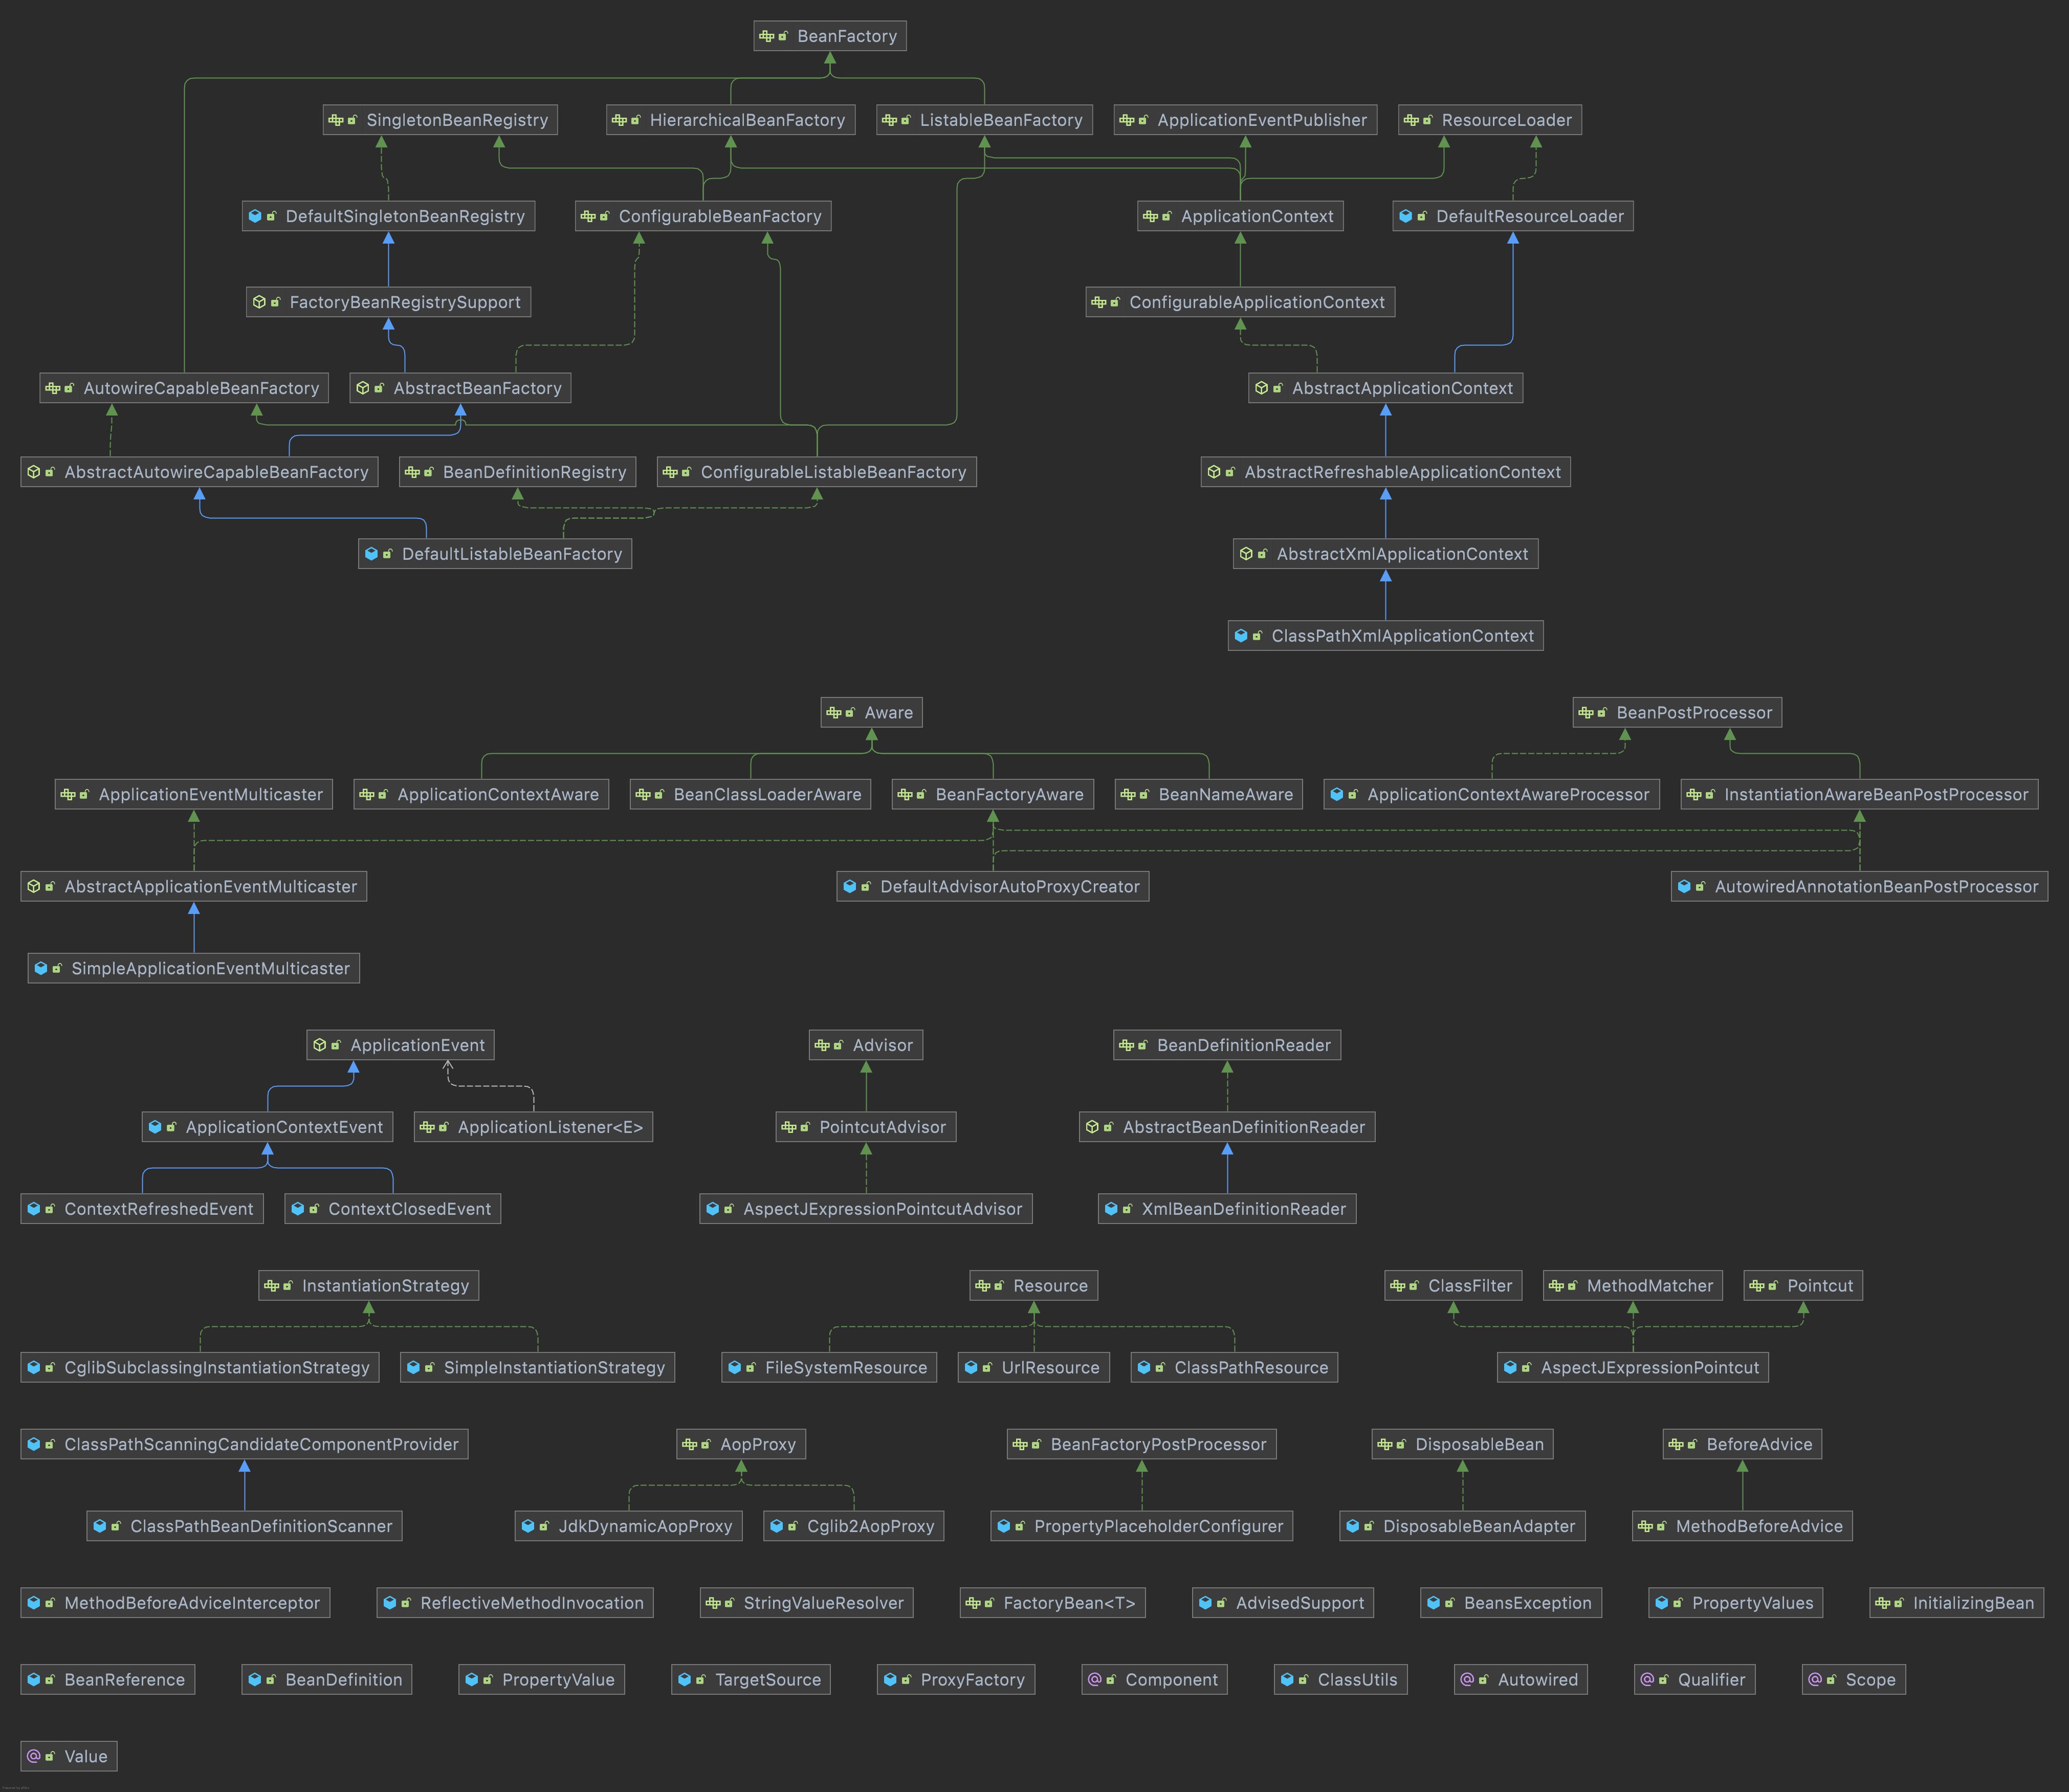
- 虽然本节要完成的是关于代理对象中属性的填充问题,但实际解决的思路是处理 在 Bean 的生命周期中合适的位置(
初始化 initializeBean)中处理代理类 的创建。 - 所以以上的改动并不会涉及太多内容,主要包括:
DefaultAdvisorAutoProxyCreator类创建代理对象的操作放置在postProcessAfterInitialization方法中以及对应在AbstractAutowireCapableBeanFactory完成初始化方法的调用操作。 - 另外还有一点要注意,就是目前我们在 Spring 框架中,
AbstractAutowireCapableBeanFactory类里使用的是CglibSubclassingInstantiationStrategy创建对象,所以有需要判断对象获取接口的 方法中,也都需要判断是否为 CGlib 创建,否则是不能正确获取到接口的。如:ClassUtils.isCglibProxyClass(clazz) ? clazz.getSuperclass() : clazz;
判断 CGlib 对象
public class TargetSource {

    private final Object target;

    public TargetSource(Object target) {
        this.target = target;
    }

    /**
     * Return the type of targets returned by this {@link TargetSource}.
     * <p>Can return <code>null</code>, although certain usages of a
     * <code>TargetSource</code> might just work with a predetermined
     * target class.
     *
     * @return the type of targets returned by this {@link TargetSource}
     */
    public Class<?>[] getTargetClass() {
        Class<?> clazz = this.target.getClass();
        clazz = ClassUtils.isCglibProxyClass(clazz) ? clazz.getSuperclass() : clazz;
        return clazz.getInterfaces();
    }

    /**
     * Return a target instance. Invoked immediately before the
     * AOP framework calls the "target" of an AOP method invocation.
     *
     * @return the target object, which contains the joinpoint
     * @throws Exception if the target object can't be resolved
     */
    public Object getTarget() {
        return this.target;
    }

}
- 在
TargetSource#getTargetClass是用于获取 target 对象的接口信息的,那么这 个 target 可能是 JDK 代理 创建也可能是 CGlib 创建,为了保证都能正确的 获取到结果,这里需要增加判读ClassUtils.isCglibProxyClass(clazz)
迁移创建 AOP 代理方法
public class DefaultAdvisorAutoProxyCreator implements InstantiationAwareBeanPostProcessor, BeanFactoryAware {

    private DefaultListableBeanFactory beanFactory;

    @Override
    public void setBeanFactory(BeanFactory beanFactory) throws BeansException {
        this.beanFactory = (DefaultListableBeanFactory) beanFactory;
    }

    @Override
    public Object postProcessBeforeInstantiation(Class<?> beanClass, String beanName) throws BeansException {
        return null;
    }

    @Override
    public boolean postProcessAfterInstantiation(Object bean, String beanName) throws BeansException {
        return true;
    }

    private boolean isInfrastructureClass(Class<?> beanClass) {
        return Advice.class.isAssignableFrom(beanClass) || Pointcut.class.isAssignableFrom(beanClass) || Advisor.class.isAssignableFrom(beanClass);
    }

    @Override
    public Object postProcessBeforeInitialization(Object bean, String beanName) throws BeansException {
        return bean;
    }

    @Override
    public Object postProcessAfterInitialization(Object bean, String beanName) throws BeansException {

        if (isInfrastructureClass(bean.getClass())) return bean;

        Collection<AspectJExpressionPointcutAdvisor> advisors = beanFactory.getBeansOfType(AspectJExpressionPointcutAdvisor.class).values();

        for (AspectJExpressionPointcutAdvisor advisor : advisors) {
            ClassFilter classFilter = advisor.getPointcut().getClassFilter();
            // 过滤匹配类
            if (!classFilter.matches(bean.getClass())) continue;

            AdvisedSupport advisedSupport = new AdvisedSupport();

            TargetSource targetSource = new TargetSource(bean);
            advisedSupport.setTargetSource(targetSource);
            advisedSupport.setMethodInterceptor((MethodInterceptor) advisor.getAdvice());
            advisedSupport.setMethodMatcher(advisor.getPointcut().getMethodMatcher());
            advisedSupport.setProxyTargetClass(false);

            // 返回代理对象
            return new ProxyFactory(advisedSupport).getProxy();
        }

        return bean;
    }


    @Override
    public PropertyValues postProcessPropertyValues(PropertyValues pvs, Object bean, String beanName) throws BeansException {
        return pvs;
    }

}
- 关于
DefaultAdvisorAutoProxyCreator类的操作主要就是把创建 AOP 代理的操作 从postProcessBeforeInstantiation移动到postProcessAfterInitialization中去。 - 通过设置一些 AOP 的必备参数后,返回代理对象
new ProxyFactory(advisedSupport).getProxy()这个代理对象中就包括间 接调用了TargetSource中对getTargetClass()的获取。
在 Bean 的生命周期中初始化执行
public abstract class AbstractAutowireCapableBeanFactory extends AbstractBeanFactory implements AutowireCapableBeanFactory {

    private InstantiationStrategy instantiationStrategy = new CglibSubclassingInstantiationStrategy();

    @Override
    protected Object createBean(String beanName, BeanDefinition beanDefinition, Object[] args) throws BeansException {
        Object bean = null;
        try {
            // 判断是否返回代理 Bean 对象
            bean = resolveBeforeInstantiation(beanName, beanDefinition);
            if (null != bean) {
                return bean;
            }
            // 实例化 Bean
            bean = createBeanInstance(beanDefinition, beanName, args);
            // 实例化后判断
            boolean continueWithPropertyPopulation = applyBeanPostProcessorsAfterInstantiation(beanName, bean);
            if (!continueWithPropertyPopulation) {
                return bean;
            }
            // 在设置 Bean 属性之前,允许 BeanPostProcessor 修改属性值
            applyBeanPostProcessorsBeforeApplyingPropertyValues(beanName, bean, beanDefinition);
            // 给 Bean 填充属性
            applyPropertyValues(beanName, bean, beanDefinition);
            // 执行 Bean 的初始化方法和 BeanPostProcessor 的前置和后置处理方法
            bean = initializeBean(beanName, bean, beanDefinition);
        } catch (Exception e) {
            throw new BeansException("Instantiation of bean failed", e);
        }

        // 注册实现了 DisposableBean 接口的 Bean 对象
        registerDisposableBeanIfNecessary(beanName, bean, beanDefinition);

        // 判断 SCOPE_SINGLETON、SCOPE_PROTOTYPE
        if (beanDefinition.isSingleton()) {
            registerSingleton(beanName, bean);
        }
        return bean;
    }

    /**
     * Bean 实例化后对于返回 false 的对象,不在执行后续设置 Bean 对象属性的操作
     *
     * @param beanName
     * @param bean
     * @return
     */
    private boolean applyBeanPostProcessorsAfterInstantiation(String beanName, Object bean) {
        boolean continueWithPropertyPopulation = true;
        for (BeanPostProcessor beanPostProcessor : getBeanPostProcessors()) {
            if (beanPostProcessor instanceof InstantiationAwareBeanPostProcessor) {
                InstantiationAwareBeanPostProcessor instantiationAwareBeanPostProcessor = (InstantiationAwareBeanPostProcessor) beanPostProcessor;
                if (!instantiationAwareBeanPostProcessor.postProcessAfterInstantiation(bean, beanName)) {
                    continueWithPropertyPopulation = false;
                    break;
                }
            }
        }
        return continueWithPropertyPopulation;
    }

    /**
     * 在设置 Bean 属性之前,允许 BeanPostProcessor 修改属性值
     *
     * @param beanName
     * @param bean
     * @param beanDefinition
     */
    protected void applyBeanPostProcessorsBeforeApplyingPropertyValues(String beanName, Object bean, BeanDefinition beanDefinition) {
        for (BeanPostProcessor beanPostProcessor : getBeanPostProcessors()) {
            if (beanPostProcessor instanceof InstantiationAwareBeanPostProcessor) {
                PropertyValues pvs = ((InstantiationAwareBeanPostProcessor) beanPostProcessor).postProcessPropertyValues(beanDefinition.getPropertyValues(), bean, beanName);
                if (null != pvs) {
                    for (PropertyValue propertyValue : pvs.getPropertyValues()) {
                        beanDefinition.getPropertyValues().addPropertyValue(propertyValue);
                    }
                }
            }
        }
    }

    protected Object resolveBeforeInstantiation(String beanName, BeanDefinition beanDefinition) {
        Object bean = applyBeanPostProcessorsBeforeInstantiation(beanDefinition.getBeanClass(), beanName);
        if (null != bean) {
            bean = applyBeanPostProcessorsAfterInitialization(bean, beanName);
        }
        return bean;
    }

    protected Object applyBeanPostProcessorsBeforeInstantiation(Class<?> beanClass, String beanName) {
        for (BeanPostProcessor beanPostProcessor : getBeanPostProcessors()) {
            if (beanPostProcessor instanceof InstantiationAwareBeanPostProcessor) {
                Object result = ((InstantiationAwareBeanPostProcessor) beanPostProcessor).postProcessBeforeInstantiation(beanClass, beanName);
                if (null != result) return result;
            }
        }
        return null;
    }

    protected void registerDisposableBeanIfNecessary(String beanName, Object bean, BeanDefinition beanDefinition) {
        // 非 Singleton 类型的 Bean 不执行销毁方法
        if (!beanDefinition.isSingleton()) return;

        if (bean instanceof DisposableBean || StrUtil.isNotEmpty(beanDefinition.getDestroyMethodName())) {
            registerDisposableBean(beanName, new DisposableBeanAdapter(bean, beanName, beanDefinition));
        }
    }

    protected Object createBeanInstance(BeanDefinition beanDefinition, String beanName, Object[] args) {
        Constructor constructorToUse = null;
        Class<?> beanClass = beanDefinition.getBeanClass();
        Constructor<?>[] declaredConstructors = beanClass.getDeclaredConstructors();
        for (Constructor ctor : declaredConstructors) {
            if (null != args && ctor.getParameterTypes().length == args.length) {
                constructorToUse = ctor;
                break;
            }
        }
        return getInstantiationStrategy().instantiate(beanDefinition, beanName, constructorToUse, args);
    }

    /**
     * Bean 属性填充
     */
    protected void applyPropertyValues(String beanName, Object bean, BeanDefinition beanDefinition) {
        try {
            PropertyValues propertyValues = beanDefinition.getPropertyValues();
            for (PropertyValue propertyValue : propertyValues.getPropertyValues()) {

                String name = propertyValue.getName();
                Object value = propertyValue.getValue();

                if (value instanceof BeanReference) {
                    // A 依赖 B,获取 B 的实例化
                    BeanReference beanReference = (BeanReference) value;
                    value = getBean(beanReference.getBeanName());
                }
                // 属性填充
                BeanUtil.setFieldValue(bean, name, value);
            }
        } catch (Exception e) {
            throw new BeansException("Error setting property values:" + beanName);
        }
    }

    public InstantiationStrategy getInstantiationStrategy() {
        return instantiationStrategy;
    }

    public void setInstantiationStrategy(InstantiationStrategy instantiationStrategy) {
        this.instantiationStrategy = instantiationStrategy;
    }

    private Object initializeBean(String beanName, Object bean, BeanDefinition beanDefinition) {

        // invokeAwareMethods
        if (bean instanceof Aware) {
            if (bean instanceof BeanFactoryAware) {
                ((BeanFactoryAware) bean).setBeanFactory(this);
            }
            if (bean instanceof BeanClassLoaderAware) {
                ((BeanClassLoaderAware) bean).setBeanClassLoader(getBeanClassLoader());
            }
            if (bean instanceof BeanNameAware) {
                ((BeanNameAware) bean).setBeanName(beanName);
            }
        }

        // 1. 执行 BeanPostProcessor Before 处理
        Object wrappedBean = applyBeanPostProcessorsBeforeInitialization(bean, beanName);

        // 执行 Bean 对象的初始化方法
        try {
            invokeInitMethods(beanName, wrappedBean, beanDefinition);
        } catch (Exception e) {
            throw new BeansException("Invocation of init method of bean[" + beanName + "] failed", e);
        }

        // 2. 执行 BeanPostProcessor After 处理
        wrappedBean = applyBeanPostProcessorsAfterInitialization(wrappedBean, beanName);
        return wrappedBean;
    }

    private void invokeInitMethods(String beanName, Object bean, BeanDefinition beanDefinition) throws Exception {
        // 1. 实现接口 InitializingBean
        if (bean instanceof InitializingBean) {
            ((InitializingBean) bean).afterPropertiesSet();
        }

        // 2. 注解配置 init-method {判断是为了避免二次执行销毁}
        String initMethodName = beanDefinition.getInitMethodName();
        if (StrUtil.isNotEmpty(initMethodName)) {
            Method initMethod = beanDefinition.getBeanClass().getMethod(initMethodName);
            if (null == initMethod) {
                throw new BeansException("Could not find an init method named '" + initMethodName + "' on bean with name '" + beanName + "'");
            }
            initMethod.invoke(bean);
        }
    }

    @Override
    public Object applyBeanPostProcessorsBeforeInitialization(Object existingBean, String beanName) throws BeansException {
        Object result = existingBean;
        for (BeanPostProcessor processor : getBeanPostProcessors()) {
            Object current = processor.postProcessBeforeInitialization(result, beanName);
            if (null == current) return result;
            result = current;
        }
        return result;
    }

    @Override
    public Object applyBeanPostProcessorsAfterInitialization(Object existingBean, String beanName) throws BeansException {
        Object result = existingBean;
        for (BeanPostProcessor processor : getBeanPostProcessors()) {
            Object current = processor.postProcessAfterInitialization(result, beanName);
            if (null == current) return result;
            result = current;
        }
        return result;
    }

}
- 在
AbstractAutowireCapableBeanFactory#createBean方法中,其实关注点就在于initializeBean->applyBeanPostProcessorsAfterInitialization这一块逻辑的调用,最终完成 AOP 代理对象的创建操作。
测试
public interface IUserService {

    String queryUserInfo();

    String register(String userName);
}
public class UserService implements IUserService {

    private String token;

    public String queryUserInfo() {
        try {
            Thread.sleep(new Random(1).nextInt(100));
        } catch (InterruptedException e) {
            e.printStackTrace();
        }
        return "大大大,100001,深圳," + token;
    }

    public String register(String userName) {
        try {
            Thread.sleep(new Random(1).nextInt(100));
        } catch (InterruptedException e) {
            e.printStackTrace();
        }
        return "注册用户:" + userName + " success!";
    }

    public String getToken() {
        return token;
    }

    public void setToken(String token) {
        this.token = token;
    }
}
- token 是在 UserService 中新增的属性信息,用于测试代理对象的属性填充操作。
public class UserServiceBeforeAdvice implements MethodBeforeAdvice {

    @Override
    public void before(Method method, Object[] args, Object target) throws Throwable {
        System.out.println("拦截方法:" + method.getName());
    }

}
属性配置文件
token.properties
token=RejDlI78hu223Opo983Dsspring.xml
<?xml version="1.0" encoding="UTF-8"?>
<beans xmlns="http://www.springframework.org/schema/beans"
       xmlns:xsi="http://www.w3.org/2001/XMLSchema-instance"
       xsi:schemaLocation="http://www.springframework.org/schema/beans
	         http://www.springframework.org/schema/beans/spring-beans.xsd">

    <bean id="userService" class="cn.bugstack.springframework.test.bean.UserService">
        <property name="token" value="RejDlI78hu223Opo983Ds"/>
    </bean>

    <bean class="cn.bugstack.springframework.aop.framework.autoproxy.DefaultAdvisorAutoProxyCreator"/>

    <bean id="beforeAdvice" class="cn.bugstack.springframework.test.bean.UserServiceBeforeAdvice"/>

    <bean id="methodInterceptor" class="cn.bugstack.springframework.aop.framework.adapter.MethodBeforeAdviceInterceptor">
        <property name="advice" ref="beforeAdvice"/>
    </bean>

    <bean id="pointcutAdvisor" class="cn.bugstack.springframework.aop.aspectj.AspectJExpressionPointcutAdvisor">
        <property name="expression" value="execution(* cn.bugstack.springframework.test.bean.IUserService.*(..))"/>
        <property name="advice" ref="methodInterceptor"/>
    </bean>

</beans>- 我们对 AOP 的测试来说,唯一新增加的就是 property 的配置:
<property name="token" value="RejDlI78hu223Opo983Ds"/>
单元测试
    @Test
    public void test_autoProxy() {
        ClassPathXmlApplicationContext applicationContext = new ClassPathXmlApplicationContext("classpath:spring.xml");
        IUserService userService = applicationContext.getBean("userService", IUserService.class);
        System.out.println("测试结果:" + userService.queryUserInfo());
    }
结果
拦截方法:queryUserInfo
测试结果:大大大,100001,深圳,RejDlI78hu223Opo983Ds

Process finished with exit code 0
- 从测试结果可以看到,通过对 Bean 生命周期的调整,在创建 AOP 代理对象就可 以把代理对象的属性信息填充进去了。
- 另外这里还有一块是关于在
TargetSource#getTargetClass中关于是否为 CGlib 的 方法判断,只有这样操作才可以获取到争取的类信息。
本章节的核心知识内容主要是完善了 Bean 的生命周期,在创建类的操作中完成代 理对象的创建,通过这样的方式就可以让代理对象中的属性也可以随着创建过程被 填充进去。
除了核心功能的实现外也要关注到对象的初始化操作是 CglibSubclassingInstantiationStrategy、SimpleInstantiationStrategy,这两种方式中 的 CGlib 创建对象,会影响到很多地方用于接口获取的操作,因为 CGlib 创建对 象走的是 ASM 字节码生成的操作,所以和普通的 JDK 代理生成对象是不一样, 需要注意。
三级缓存处理循环依赖
目前我们实现的 Spring 框架,是可以满足一个基本需求的,但如果你配 置了 A、B 两个 Bean 对象互相依赖,那么立马会抛出 java.lang.StackOverflowError,为什么呢?因为 A 创建时需要依赖 B 创建,而 B 的创建又依赖于 A 创建,就这样死循环了。 而这个循环依赖基本也可以说是 Spring 中非常经典的实现了,所要解决的场 景主要有以下三种情况:
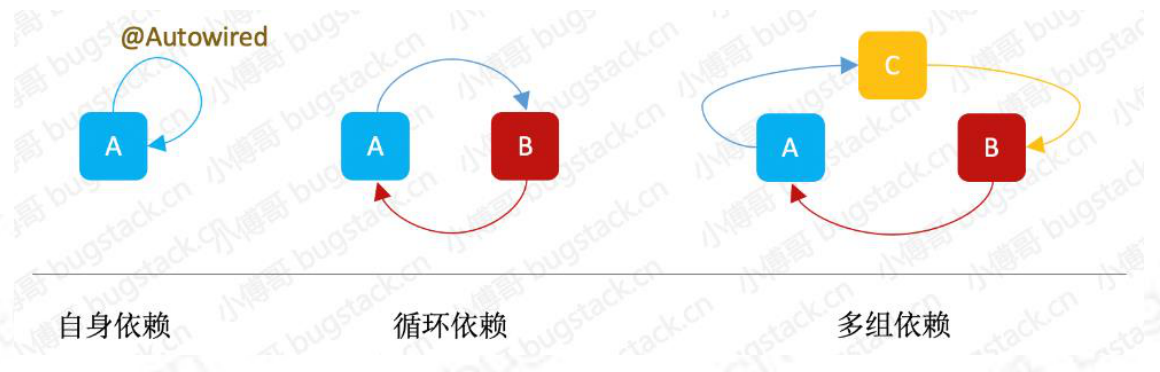
- 循环依赖主要分为这三种,自身依赖于自身、互相循环依赖、多组循环依赖。
- 但无论循环依赖的数量有多少,循环依赖的本质是一样的。就是你的完整创建依赖 于我,而我的完整创建也依赖于你,但我们互相没法解耦,最终导致依赖创建失 败。
- 所以需要 Spring 提供了除了构造函数注入和原型注入外的,setter 循环依赖注入 解决方案。
用于解决循环依赖需要用到三个缓存,这三个缓存 分别存放了成品对象、半成品对象(未填充属性值)、代理对象,分阶段存放对象内容,来解决循环依赖问题。
那么,这里我们需要知道一个核心的原理,就是用于解决循环依赖就必须是三级缓存呢,二级行吗?一级可以不?其实都能解决,只不过 Spring 框架的实现要保证几个事情,如只有一级缓存处理流程没法拆分,复杂度也会增加,同时半成品对象可能会有空指针异常。而将半成品与成品对象分开,处理起来也更加优雅、简单、易扩展。另外 Spring 的两大特性中不仅有 IOC 还有 AOP, 也就是基于字节码增强后的方法,该存放到哪,而三级缓存最主要,要解决的循环依赖就是对 AOP 的处理,但如果把 AOP 代理对象的创建提前,那么二级缓存也一样可以解决。但是,这就违背了 Spring 创建对象的原则,Spring 更喜欢把所有的普通 Bean 都初始化完成,在处理代理对象的初始化。
不过,没关系我们可以先尝试仅适用一级缓存来解决循环依赖,通过这样的方 式从中学习到处理循环依赖的最核心原来,也就是那 20%的地方。
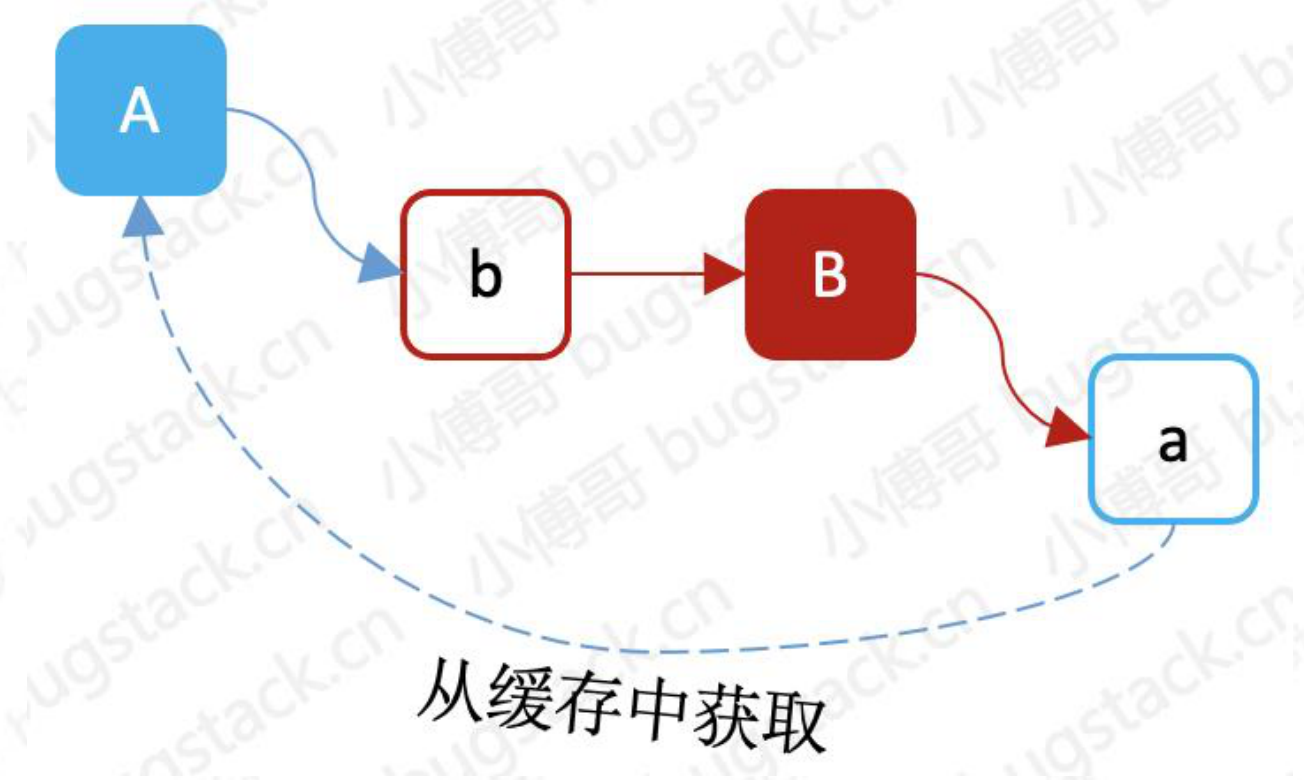
- 如果仅以一级缓存解决循环依赖,那么在实现上可以通过在 A 对象
newInstance创建且未填充属性后,直接放入缓存中。 - 在 A 对象的属性填充 B 对象时,如果缓存中不能获取到 B 对象,则开始创建 B 对象,同样创建完成后,把 B 对象填充到缓存中去。
- 接下来就开始对 B 对象的属性进行填充,恰好这会可以从缓存中拿到半成品的 A 对象,那么这个时候 B 对象的属性就填充完了。
- 最后返回来继续完成 A 对象的属性填充,把实例化后并填充了属性的 B 对象赋值 给 A 对象的 b 属性,这样就完成了一个循环依赖操作。
代码实现
public class CircleTest {

    private final static Map<String, Object> singletonObjects = new ConcurrentHashMap<>(256);

    public static void main(String[] args) throws Exception {
        System.out.println(getBean(B.class).getA());
        System.out.println(getBean(A.class).getB());
    }

    private static <T> T getBean(Class<T> beanClass) throws Exception {
        String beanName = beanClass.getSimpleName().toLowerCase();
        if (singletonObjects.containsKey(beanName)) {
            return (T) singletonObjects.get(beanName);
        }
        // 实例化对象入缓存
        Object obj = beanClass.newInstance();
        singletonObjects.put(beanName, obj);
        // 属性填充补全对象
        Field[] fields = obj.getClass().getDeclaredFields();
        for (Field field : fields) {
            field.setAccessible(true);
            Class<?> fieldClass = field.getType();
            String fieldBeanName = fieldClass.getSimpleName().toLowerCase();
            field.set(obj, singletonObjects.containsKey(fieldBeanName) ? singletonObjects.get(fieldBeanName) : getBean(fieldClass));
            field.setAccessible(false);
        }
        return (T) obj;
    }

}

class A {

    private B b;

    public B getB() {
        return b;
    }

    public void setB(B b) {
        this.b = b;
    }
}

class B {

    private A a;

    public A getA() {
        return a;
    }

    public void setA(A a) {
        this.a = a;
    }
}
- 使用一级缓存存放对象的方式,就是这样简单的实现过程,只要是创建完对象,立马塞到缓存里去。这样就可以在其他对象创建时候获取到属性需要填充的对象了。
测试结果
cn.bugstack.springframework.test.A@60e53b93
cn.bugstack.springframework.test.B@5e2de80c

Process finished with exit code 0- 一级缓存也可以解决简单场景的循环依赖问题。
-
其实 getBean,是整个解决循环依赖的核心内容,A 创建后填充属性时依赖 B, 那么就去创建 B,在创建 B 开始填充时发现依赖于 A,但此时 A 这个半成品对 象已经存放在缓存到
singletonObjects中了,所以 B 可以正常创建,在通 过递归把 A 也创建完整了。
有了以上这部分关于循环依赖的处理内容,在理解循环依赖就没那么复杂了。 接下来我们带着这个感觉去思考如果有对象不只是简单的对象,还有代理对 象,还有 AOP 应用,要怎么处理这样的依赖问题。

- 关于循环依赖在我们目前的 Spring 框架中扩展起来也并不会太复杂,主要就是对于创建对象的提前暴露,如果是工厂对象则会使用
getEarlyBeanReference逻辑 提前将工厂对象存放到三级缓存中。等到后续获取对象的时候实际拿到的是工厂对象中 getObject,这个才是最终的实际对象。 - 在创建对象的
AbstractAutowireCapableBeanFactory#doCreateBean方法中,提前暴露对象以后,就可以通过接下来的流程,getSingleton从三个缓存 中以此寻找对象,一级、二级如果有则直接取走,如果对象是三级缓存中则会从三 级缓存中获取后并删掉工厂对象,把实际对象放到二级缓存中。 - 最后是关于单例的对象的注册操作,这个注册操作就是把真实的实际对象放到一级 缓存中,因为此时它已经是一个成品对象了。

- 循环依赖的核心功能实现主要包括
DefaultSingletonBeanRegistry提供三级缓存:singletonObjects、earlySingletonObjects、 singletonFactories,分别存放成品对象、半成品对象和工厂对象。同时包装三个缓存提供方法:getSingleton、registerSingleton、addSingletonFactory,这样使用方就可以分别在不同时间段存放和获取对应的对象了。 - 在
AbstractAutowireCapableBeanFactory的doCreateBean方法中,提供了关于 提前暴露对象的操作,addSingletonFactory(beanName, () -> getEarlyBeanReference(beanName, beanDefinition, finalBean));,以及后续获取对象和注册对象的操作,exposedObject = getSingleton(beanName);、registerSingleton(beanName, exposedObject);,经过这样的处理就可以完成对复杂场景循环依赖的操作。 - 另外在
DefaultAdvisorAutoProxyCreator提供的切面服务中,也需要实现接口InstantiationAwareBeanPostProcessor新增的getEarlyBeanReference方法,便于 把依赖的切面对象也能存放到三级缓存中,处理对应的循环依赖。
设置三级缓存
public class DefaultSingletonBeanRegistry implements SingletonBeanRegistry {

    /**
     * Internal marker for a null singleton object:
     * used as marker value for concurrent Maps (which don't support null values).
     */
    protected static final Object NULL_OBJECT = new Object();

    // 一级缓存,普通对象
    /**
     * Cache of singleton objects: bean name --> bean instance
     */
    private Map<String, Object> singletonObjects = new ConcurrentHashMap<>();

    // 二级缓存,提前暴漏对象,没有完全实例化的对象
    /**
     * Cache of early singleton objects: bean name --> bean instance
     */
    protected final Map<String, Object> earlySingletonObjects = new HashMap<String, Object>();

    // 三级缓存,存放代理对象
    /**
     * Cache of singleton factories: bean name --> ObjectFactory
     */
    private final Map<String, ObjectFactory<?>> singletonFactories = new HashMap<String, ObjectFactory<?>>();

    private final Map<String, DisposableBean> disposableBeans = new LinkedHashMap<>();

    @Override
    public Object getSingleton(String beanName) {
        Object singletonObject = singletonObjects.get(beanName);
        if (null == singletonObject) {
            singletonObject = earlySingletonObjects.get(beanName);
            // 判断二级缓存中是否有对象,这个对象就是代理对象,因为只有代理对象才会放到三级缓存中
            if (null == singletonObject) {
                ObjectFactory<?> singletonFactory = singletonFactories.get(beanName);
                if (singletonFactory != null) {
                    singletonObject = singletonFactory.getObject();
                    // 把三级缓存中的代理对象中的真实对象获取出来,放入二级缓存中
                    earlySingletonObjects.put(beanName, singletonObject);
                    singletonFactories.remove(beanName);
                }
            }
        }
        return singletonObject;
    }

    public void registerSingleton(String beanName, Object singletonObject) {
        singletonObjects.put(beanName, singletonObject);
        earlySingletonObjects.remove(beanName);
        singletonFactories.remove(beanName);
    }

    protected void addSingletonFactory(String beanName, ObjectFactory<?> singletonFactory){
        if (!this.singletonObjects.containsKey(beanName)) {
            this.singletonFactories.put(beanName, singletonFactory);
            this.earlySingletonObjects.remove(beanName);
        }
    }

    public void registerDisposableBean(String beanName, DisposableBean bean) {
        disposableBeans.put(beanName, bean);
    }

    public void destroySingletons() {
        Set<String> keySet = this.disposableBeans.keySet();
        Object[] disposableBeanNames = keySet.toArray();

        for (int i = disposableBeanNames.length - 1; i >= 0; i--) {
            Object beanName = disposableBeanNames[i];
            DisposableBean disposableBean = disposableBeans.remove(beanName);
            try {
                disposableBean.destroy();
            } catch (Exception e) {
                throw new BeansException("Destroy method on bean with name '" + beanName + "' threw an exception", e);
            }
        }
    }

}
- 在用于提供单例对象注册的操作的
DefaultSingletonBeanRegistry类中,共有三个 缓存对象的属性;singletonObjects、earlySingletonObjects、singletonFactories, 如它们的名字一样,用于存放不同类型的对象(单例对象、早期的半成品单例对象、单例工厂对象)。 - 紧接着在这三个缓存对象下提供了获取、添加和注册不同对象的方法,包括:
getSingleton、registerSingleton、addSingletonFactory,其实后面这两个方法都比较简单,主要是 getSingleton 的操作,它是在一层层处理不同时期的单例对象, 直至拿到有效的对象。
提前暴露对象
public abstract class AbstractAutowireCapableBeanFactory extends AbstractBeanFactory implements AutowireCapableBeanFactory {

    private InstantiationStrategy instantiationStrategy = new SimpleInstantiationStrategy();

    @Override
    protected Object createBean(String beanName, BeanDefinition beanDefinition, Object[] args) throws BeansException {
        // 判断是否返回代理 Bean 对象
        Object bean = resolveBeforeInstantiation(beanName, beanDefinition);
        if (null != bean) {
            return bean;
        }

        return doCreateBean(beanName, beanDefinition, args);
    }

    protected Object doCreateBean(String beanName, BeanDefinition beanDefinition, Object[] args) {
        Object bean = null;
        try {
            // 实例化 Bean
            bean = createBeanInstance(beanDefinition, beanName, args);

            // 处理循环依赖,将实例化后的Bean对象提前放入缓存中暴露出来
            if (beanDefinition.isSingleton()) {
                Object finalBean = bean;
                addSingletonFactory(beanName, () -> getEarlyBeanReference(beanName, beanDefinition, finalBean));
            }

            // 实例化后判断
            boolean continueWithPropertyPopulation = applyBeanPostProcessorsAfterInstantiation(beanName, bean);
            if (!continueWithPropertyPopulation) {
                return bean;
            }
            // 在设置 Bean 属性之前,允许 BeanPostProcessor 修改属性值
            applyBeanPostProcessorsBeforeApplyingPropertyValues(beanName, bean, beanDefinition);
            // 给 Bean 填充属性
            applyPropertyValues(beanName, bean, beanDefinition);
            // 执行 Bean 的初始化方法和 BeanPostProcessor 的前置和后置处理方法
            bean = initializeBean(beanName, bean, beanDefinition);
        } catch (Exception e) {
            throw new BeansException("Instantiation of bean failed", e);
        }

        // 注册实现了 DisposableBean 接口的 Bean 对象
        registerDisposableBeanIfNecessary(beanName, bean, beanDefinition);

        // 判断 SCOPE_SINGLETON、SCOPE_PROTOTYPE
        Object exposedObject = bean;
        if (beanDefinition.isSingleton()) {
            // 获取代理对象
            exposedObject = getSingleton(beanName);
            registerSingleton(beanName, exposedObject);
        }
        return exposedObject;

    }

    protected Object getEarlyBeanReference(String beanName, BeanDefinition beanDefinition, Object bean) {
        Object exposedObject = bean;
        for (BeanPostProcessor beanPostProcessor : getBeanPostProcessors()) {
            if (beanPostProcessor instanceof InstantiationAwareBeanPostProcessor) {
                exposedObject = ((InstantiationAwareBeanPostProcessor) beanPostProcessor).getEarlyBeanReference(exposedObject, beanName);
                if (null == exposedObject) return exposedObject;
            }
        }

        return exposedObject;
    }

    /**
     * Bean 实例化后对于返回 false 的对象,不在执行后续设置 Bean 对象属性的操作
     *
     * @param beanName
     * @param bean
     * @return
     */
    private boolean applyBeanPostProcessorsAfterInstantiation(String beanName, Object bean) {
        boolean continueWithPropertyPopulation = true;
        for (BeanPostProcessor beanPostProcessor : getBeanPostProcessors()) {
            if (beanPostProcessor instanceof InstantiationAwareBeanPostProcessor) {
                InstantiationAwareBeanPostProcessor instantiationAwareBeanPostProcessor = (InstantiationAwareBeanPostProcessor) beanPostProcessor;
                if (!instantiationAwareBeanPostProcessor.postProcessAfterInstantiation(bean, beanName)) {
                    continueWithPropertyPopulation = false;
                    break;
                }
            }
        }
        return continueWithPropertyPopulation;
    }

    /**
     * 在设置 Bean 属性之前,允许 BeanPostProcessor 修改属性值
     *
     * @param beanName
     * @param bean
     * @param beanDefinition
     */
    protected void applyBeanPostProcessorsBeforeApplyingPropertyValues(String beanName, Object bean, BeanDefinition beanDefinition) {
        for (BeanPostProcessor beanPostProcessor : getBeanPostProcessors()) {
            if (beanPostProcessor instanceof InstantiationAwareBeanPostProcessor) {
                PropertyValues pvs = ((InstantiationAwareBeanPostProcessor) beanPostProcessor).postProcessPropertyValues(beanDefinition.getPropertyValues(), bean, beanName);
                if (null != pvs) {
                    for (PropertyValue propertyValue : pvs.getPropertyValues()) {
                        beanDefinition.getPropertyValues().addPropertyValue(propertyValue);
                    }
                }
            }
        }
    }

    protected Object resolveBeforeInstantiation(String beanName, BeanDefinition beanDefinition) {
        Object bean = applyBeanPostProcessorsBeforeInstantiation(beanDefinition.getBeanClass(), beanName);
        if (null != bean) {
            bean = applyBeanPostProcessorsAfterInitialization(bean, beanName);
        }
        return bean;
    }

    protected Object applyBeanPostProcessorsBeforeInstantiation(Class<?> beanClass, String beanName) {
        for (BeanPostProcessor beanPostProcessor : getBeanPostProcessors()) {
            if (beanPostProcessor instanceof InstantiationAwareBeanPostProcessor) {
                Object result = ((InstantiationAwareBeanPostProcessor) beanPostProcessor).postProcessBeforeInstantiation(beanClass, beanName);
                if (null != result) return result;
            }
        }
        return null;
    }

    protected void registerDisposableBeanIfNecessary(String beanName, Object bean, BeanDefinition beanDefinition) {
        // 非 Singleton 类型的 Bean 不执行销毁方法
        if (!beanDefinition.isSingleton()) return;

        if (bean instanceof DisposableBean || StrUtil.isNotEmpty(beanDefinition.getDestroyMethodName())) {
            registerDisposableBean(beanName, new DisposableBeanAdapter(bean, beanName, beanDefinition));
        }
    }

    protected Object createBeanInstance(BeanDefinition beanDefinition, String beanName, Object[] args) {
        Constructor constructorToUse = null;
        Class<?> beanClass = beanDefinition.getBeanClass();
        Constructor<?>[] declaredConstructors = beanClass.getDeclaredConstructors();
        for (Constructor ctor : declaredConstructors) {
            if (null != args && ctor.getParameterTypes().length == args.length) {
                constructorToUse = ctor;
                break;
            }
        }
        return getInstantiationStrategy().instantiate(beanDefinition, beanName, constructorToUse, args);
    }

    /**
     * Bean 属性填充
     */
    protected void applyPropertyValues(String beanName, Object bean, BeanDefinition beanDefinition) {
        try {
            PropertyValues propertyValues = beanDefinition.getPropertyValues();
            for (PropertyValue propertyValue : propertyValues.getPropertyValues()) {

                String name = propertyValue.getName();
                Object value = propertyValue.getValue();

                if (value instanceof BeanReference) {
                    // A 依赖 B,获取 B 的实例化
                    BeanReference beanReference = (BeanReference) value;
                    value = getBean(beanReference.getBeanName());
                }

                // 反射设置属性填充
                BeanUtil.setFieldValue(bean, name, value);
            }
        } catch (Exception e) {
            throw new BeansException("Error setting property values:" + beanName);
        }
    }

    public InstantiationStrategy getInstantiationStrategy() {
        return instantiationStrategy;
    }

    public void setInstantiationStrategy(InstantiationStrategy instantiationStrategy) {
        this.instantiationStrategy = instantiationStrategy;
    }

    private Object initializeBean(String beanName, Object bean, BeanDefinition beanDefinition) {

        // invokeAwareMethods
        if (bean instanceof Aware) {
            if (bean instanceof BeanFactoryAware) {
                ((BeanFactoryAware) bean).setBeanFactory(this);
            }
            if (bean instanceof BeanClassLoaderAware) {
                ((BeanClassLoaderAware) bean).setBeanClassLoader(getBeanClassLoader());
            }
            if (bean instanceof BeanNameAware) {
                ((BeanNameAware) bean).setBeanName(beanName);
            }
        }

        // 1. 执行 BeanPostProcessor Before 处理
        Object wrappedBean = applyBeanPostProcessorsBeforeInitialization(bean, beanName);

        // 执行 Bean 对象的初始化方法
        try {
            invokeInitMethods(beanName, wrappedBean, beanDefinition);
        } catch (Exception e) {
            throw new BeansException("Invocation of init method of bean[" + beanName + "] failed", e);
        }

        // 2. 执行 BeanPostProcessor After 处理
        wrappedBean = applyBeanPostProcessorsAfterInitialization(wrappedBean, beanName);
        return wrappedBean;
    }

    private void invokeInitMethods(String beanName, Object bean, BeanDefinition beanDefinition) throws Exception {
        // 1. 实现接口 InitializingBean
        if (bean instanceof InitializingBean) {
            ((InitializingBean) bean).afterPropertiesSet();
        }

        // 2. 注解配置 init-method {判断是为了避免二次执行销毁}
        String initMethodName = beanDefinition.getInitMethodName();
        if (StrUtil.isNotEmpty(initMethodName)) {
            Method initMethod = beanDefinition.getBeanClass().getMethod(initMethodName);
            if (null == initMethod) {
                throw new BeansException("Could not find an init method named '" + initMethodName + "' on bean with name '" + beanName + "'");
            }
            initMethod.invoke(bean);
        }
    }

    @Override
    public Object applyBeanPostProcessorsBeforeInitialization(Object existingBean, String beanName) throws BeansException {
        Object result = existingBean;
        for (BeanPostProcessor processor : getBeanPostProcessors()) {
            Object current = processor.postProcessBeforeInitialization(result, beanName);
            if (null == current) return result;
            result = current;
        }
        return result;
    }

    @Override
    public Object applyBeanPostProcessorsAfterInitialization(Object existingBean, String beanName) throws BeansException {
        Object result = existingBean;
        for (BeanPostProcessor processor : getBeanPostProcessors()) {
            Object current = processor.postProcessAfterInitialization(result, beanName);
            if (null == current) return result;
            result = current;
        }
        return result;
    }

}
- 在
AbstractAutowireCapableBeanFactory#doCreateBean的方法中主要是扩展了对 象的提前暴露addSingletonFactory了,和单例对象的获取getSingleton以及注册操作registerSingleton。 - 这里提到一点
getEarlyBeanReference就是定义在如 AOP 切面中这样的代理对 象,可以参考源码中接口InstantiationAwareBeanPostProcessor#getEarlyBeanReference方法的实现。
测试
老公
public class Husband {

    private Wife wife;

    public String queryWife(){
        return "Husband.wife";
    }

    public Wife getWife() {
        return wife;
    }

    public void setWife(Wife wife) {
        this.wife = wife;
    }

}
媳妇
public class Wife {

    private Husband husband;
    private IMother mother; // 婆婆

    public String queryHusband() {
        return "Wife.husband、Mother.callMother:" + mother.callMother();
    }

    public Husband getHusband() {
        return husband;
    }

    public void setHusband(Husband husband) {
        this.husband = husband;
    }

    public IMother getMother() {
        return mother;
    }

    public void setMother(IMother mother) {
        this.mother = mother;
    }

}
婆婆,代理了媳妇原来妈妈的职责的类
public interface IMother {

    String callMother();

}
/**
 * 代理类
 */
public class HusbandMother implements FactoryBean<IMother> {

    @Override
    public IMother getObject() throws Exception {
        return (IMother) Proxy.newProxyInstance(Thread.currentThread().getContextClassLoader(), new Class[]{IMother.class}, (proxy, method, args) -> "婚后媳妇妈妈的职责被婆婆代理了!" + method.getName());
    }

    @Override
    public Class<?> getObjectType() {
        return IMother.class;
    }

    @Override
    public boolean isSingleton() {
        return true;
    }

}
public class SpouseAdvice implements MethodBeforeAdvice {
@Override
public void before(Method method, Object[] args, Object target) throws Throwable {
System.out.println("关怀小两口(切面):" + method);
}
}
配置文件
spring.xml
<?xml version="1.0" encoding="UTF-8"?>
<beans xmlns="http://www.springframework.org/schema/beans"
       xmlns:xsi="http://www.w3.org/2001/XMLSchema-instance"
       xsi:schemaLocation="http://www.springframework.org/schema/beans
	         http://www.springframework.org/schema/beans/spring-beans.xsd">

    <bean id="husband" class="cn.bugstack.springframework.test.bean.Husband">
        <property name="wife" ref="wife"/>
    </bean>

    <bean id="wife" class="cn.bugstack.springframework.test.bean.Wife">
        <property name="husband" ref="husband"/>
        <property name="mother" ref="husbandMother"/>
    </bean>

    <bean id="husbandMother" class="cn.bugstack.springframework.test.bean.HusbandMother"/>

    <!-- AOP 配置,验证三级缓存 -->
    <bean class="cn.bugstack.springframework.aop.framework.autoproxy.DefaultAdvisorAutoProxyCreator"/>

    <bean id="beforeAdvice" class="cn.bugstack.springframework.test.bean.SpouseAdvice"/>

    <bean id="methodInterceptor" class="cn.bugstack.springframework.aop.framework.adapter.MethodBeforeAdviceInterceptor">
        <property name="advice" ref="beforeAdvice"/>
    </bean>

    <bean id="pointcutAdvisor" class="cn.bugstack.springframework.aop.aspectj.AspectJExpressionPointcutAdvisor">
        <property name="expression" value="execution(* cn.bugstack.springframework.test.bean.Wife.*(..))"/>
        <property name="advice" ref="methodInterceptor"/>
    </bean>

</beans>- 这个里的配置就很简单了,配置 husband 依赖 wife,配置 wife 依赖 husband 和 mother,最后是关于 AOP 切面的依赖使用。
单元测试
    @Test
    public void test_circular() {
        ClassPathXmlApplicationContext applicationContext = new ClassPathXmlApplicationContext("classpath:spring.xml");
        Husband husband = applicationContext.getBean("husband", Husband.class);
        Wife wife = applicationContext.getBean("wife", Wife.class);
        System.out.println("老公的媳妇:" + husband.queryWife());
        System.out.println("媳妇的老公:" + wife.queryHusband());
    }
结果
老公的媳妇:Husband.wife
关怀小两口(切面):public java.lang.String cn.bugstack.springframework.test.bean.Wife.queryHusband()
媳妇的老公:Wife.husband、Mother.callMother:婚后媳妇妈妈的职责被婆婆代理了!callMother
Spring 中所有的功能都是以解决 Java 编程中的特性而存在的,就像我们本节处 理的循环依赖,如果没有 Spring 框架的情况下,可能我们也会尽可能避免写出循 环依赖的操作,因为在没有经过加工处理后,这样的依赖关系肯定会报错的。那么 这也就是程序从能用到好用的升级
在解决循环依赖的核心流程中,主要是提前暴露对象的设计,以及建立三级缓存的 数据结构来存放不同时期的对象,如果说没有如切面和工厂中的代理对象,那么二 级缓存也就可以解决了,哪怕是只有一级缓存。但为了设计上的合理和可扩展性, 所以创建了三级缓存来放置不同时期的对象。
