
阅读完需:约 8 分钟
在 SpringSecurity 中有很多种定义用户的方式,尝试不同的用户定义可以有助于我们更好的理解SpringSecurity的源码部分!
基于 SpringSecurity 多个过滤器链来展示:
结构目录
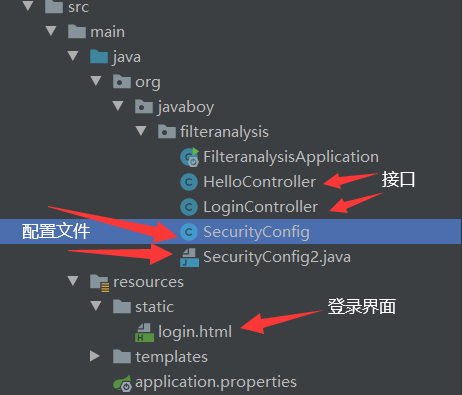
LoginController(暂时无用)
HelloController
@RestController
public class HelloController {
    @GetMapping("/foo/hello")
    public String hello() {
        System.out.println("\"hello\" = " + "hello");
        return "hello";
    }

    @GetMapping("/bar/pp")
    public String bar() {
        System.out.println("\"bar\" = " + "bar");
        return "bar";
    }
}
login.html
<!DOCTYPE html>
<html lang="en">
<head>
    <meta charset="UTF-8">
    <title>Title</title>
    <script src="https://ajax.aspnetcdn.com/ajax/jquery/jquery-3.5.1.min.js"></script>
</head>
<body>
<form action="/foo/doLogin" method="post">
    <div class="input">
        <label for="name">用户名</label>
        <input type="text" name="username" id="name">
        <span class="spin"></span>
    </div>
    <div class="input">
        <label for="pass">密码</label>
        <input type="password" name="password" id="pass">
        <span class="spin"></span>
    </div>
    <div class="button login">
        <button type="submit">
            <span>登录</span>
            <i class="fa fa-check"></i>
        </button>
    </div>
</form>
</body>
</html>
一、全局可用
SecurityConfig2————重头戏
@Configuration
public class SecurityConfig2 {
    /**
     * 全局的用户定义
     */
    @Bean
    UserDetailsService us() {
        InMemoryUserDetailsManager manager = new InMemoryUserDetailsManager();
        manager.createUser(User.withUsername("sang").password("{noop}123").roles("admin","user").build());
        return manager;
    }

    @Configuration
    @Order(2)
    static class DefaultWebSecurityConfig extends WebSecurityConfigurerAdapter {

        UserDetailsService us1() {
            InMemoryUserDetailsManager manager = new InMemoryUserDetailsManager();
            manager.createUser(User.withUsername("javaboy").password("{noop}123").roles("admin", "aaa", "bbb").build());
            return manager;
        }

        @Override
        protected void configure(HttpSecurity http) throws Exception {
            http.antMatcher("/foo/**").authorizeRequests().anyRequest()
                    .hasRole("admin")
                    .and()
                    .formLogin()
                    .loginPage("/login.html")
                    .loginProcessingUrl("/foo/doLogin")
                    .usernameParameter("username")
                    .passwordParameter("password")
                    .permitAll()
                    .and()
                    .userDetailsService(us1())
                    .csrf().disable();
        }
    }

    @Configuration
    @Order(1)
    static class DefaultWebSecurityConfig2 extends WebSecurityConfigurerAdapter {
        UserDetailsService us2() {
            InMemoryUserDetailsManager manager = new InMemoryUserDetailsManager();
            manager.createUser(User.withUsername("xjh").password("{noop}123").roles("user", "aaa", "bbb").build());
            return manager;
        }


        @Override
        protected void configure(HttpSecurity http) throws Exception {
            http.antMatcher("/bar/**").authorizeRequests().anyRequest().hasRole("user")
                    .and()
                    .formLogin()
                    //登录页面
                    .loginPage("/login.html")
                    //登录处理网址 主要处理账户密码
                    .loginProcessingUrl("/bar/doLogin")
                    //可以自定义 账号,密码,默认是username,password
                    .usernameParameter("username")
                    .passwordParameter("password")
                    .permitAll()
                    .and()
                    .csrf().disable()
                    .userDetailsService(us2());
        }
    }
}
相信看了多过滤器链的人都能理解为什么要这么配置!
但是,在每一个过滤器链中,我都提供了一个 UserDetailsService 实例,然后在 configure(HttpSecurity http) 方法中,配置这个 UserDetailsService 实例。除了每一个过滤器链中都配置一个 UserDetailsService 之外,我还提供了一个 UserDetailsService 的 Bean,所以这里前前后后相当于一共有三个用户,那么我们登录时候,使用哪个用户可以登录成功呢?
先说结论:
- 如果登录地址是 /foo/login,那么通过 sang 和 javaboy 两个用户可以登录成功。
- 如果登录地址是 /bar/login,那么通过 sang 和 xjh 两个用户可以登录成功。
也就是说,那个全局的,公共的 UserDetailsService 总是有效的,而针对不同过滤器链配置的 UserDetailsService 则只针对当前过滤器链生效。
这里的 UserDetailsService 是基于内存的,当然我们可以去基于数据库查询。
分析
1.全局 AuthenticationManager
虽然我定义了两个过滤器链,但是在两个过滤器链的定义中,我都没有重写 configure(AuthenticationManagerBuilder auth) 方法,没有重写这个方法,就意味著 AuthenticationConfiguration 中提供的全局 AuthenticationManager 是有效的,也就是说,系统默认提供的 AuthenticationManager 将作为其他局部 AuthenticationManager 的 parent。
那么我们来看下全局的 AuthenticationManager 配置都配了啥?
public AuthenticationManager getAuthenticationManager() throws Exception {
	if (this.authenticationManagerInitialized) {
		return this.authenticationManager;
	}
	AuthenticationManagerBuilder authBuilder = this.applicationContext.getBean(AuthenticationManagerBuilder.class);
	if (this.buildingAuthenticationManager.getAndSet(true)) {
		return new AuthenticationManagerDelegator(authBuilder);
	}
	for (GlobalAuthenticationConfigurerAdapter config : globalAuthConfigurers) {
		authBuilder.apply(config);
	}
	authenticationManager = authBuilder.build();
	if (authenticationManager == null) {
		authenticationManager = getAuthenticationManagerBean();
	}
	this.authenticationManagerInitialized = true;
	return authenticationManager;
}
全局的配置中,有一步就是遍历 globalAuthConfigurers,遍历全局的 xxxConfigurer,并进行配置。全局的 xxxConfigurer 一共有三个,分别是:
- EnableGlobalAuthenticationAutowiredConfigurer
- InitializeUserDetailsBeanManagerConfigurer
- InitializeAuthenticationProviderBeanManagerConfigurer
其中 InitializeUserDetailsBeanManagerConfigurer,看名字就是用来配置 UserDetailsService 的,我们来看下:
@Order(InitializeUserDetailsBeanManagerConfigurer.DEFAULT_ORDER)
class InitializeUserDetailsBeanManagerConfigurer
		extends GlobalAuthenticationConfigurerAdapter {
	@Override
	public void init(AuthenticationManagerBuilder auth) throws Exception {
		auth.apply(new InitializeUserDetailsManagerConfigurer());
	}
	class InitializeUserDetailsManagerConfigurer
			extends GlobalAuthenticationConfigurerAdapter {
		@Override
		public void configure(AuthenticationManagerBuilder auth) throws Exception {
			if (auth.isConfigured()) {
				return;
			}
			UserDetailsService userDetailsService = getBeanOrNull(
					UserDetailsService.class);
			if (userDetailsService == null) {
				return;
			}
			PasswordEncoder passwordEncoder = getBeanOrNull(PasswordEncoder.class);
			UserDetailsPasswordService passwordManager = getBeanOrNull(UserDetailsPasswordService.class);
			DaoAuthenticationProvider provider = new DaoAuthenticationProvider();
			provider.setUserDetailsService(userDetailsService);
			if (passwordEncoder != null) {
				provider.setPasswordEncoder(passwordEncoder);
			}
			if (passwordManager != null) {
				provider.setUserDetailsPasswordService(passwordManager);
			}
			provider.afterPropertiesSet();
			auth.authenticationProvider(provider);
		}
	}
}
可以看到,InitializeUserDetailsBeanManagerConfigurer 中定义了内部类,在其内部类的 configure 方法中,通过 getBeanOrNull 去从容器中查找 UserDetailsService 实例,查找到之后,创建 DaoAuthenticationProvider,并最终配置给 auth 对象。
这里的 getBeanOrNull 方法从容器中查找到的,实际上就是 Spring 容器中的 Bean,也就是我们一开始配置了 sang 用户的那个 Bean,这个 Bean 被交给了全局的 AuthenticationManager,也就是所有局部 AuthenticationManager 的 parent。
2.局部 AuthenticationManager
我们知道了所有 HttpSecurity 在构建的过程中,都会传递一个局部的 AuthenticationManagerBuilder 进来,这个局部的 AuthenticationManagerBuilder 一旦传进来就存入了共享对象中,以后需要用的时候再从共享对象中取出来,部分代码如下所示:
public HttpSecurity(ObjectPostProcessor<Object> objectPostProcessor,
		AuthenticationManagerBuilder authenticationBuilder,
		Map<Class<?>, Object> sharedObjects) {
	super(objectPostProcessor);
	Assert.notNull(authenticationBuilder, "authenticationBuilder cannot be null");
	setSharedObject(AuthenticationManagerBuilder.class, authenticationBuilder);
	//省略
}
private AuthenticationManagerBuilder getAuthenticationRegistry() {
	return getSharedObject(AuthenticationManagerBuilder.class);
}
所以,我们在 HttpSecurity 中配置 UserDetailsService,实际上是给这个 AuthenticationManagerBuilder 配置的:
public HttpSecurity userDetailsService(UserDetailsService userDetailsService)
		throws Exception {
	getAuthenticationRegistry().userDetailsService(userDetailsService);
	return this;
}
也就是局部 AuthenticationManager。
至此,整个流程就很清晰了。
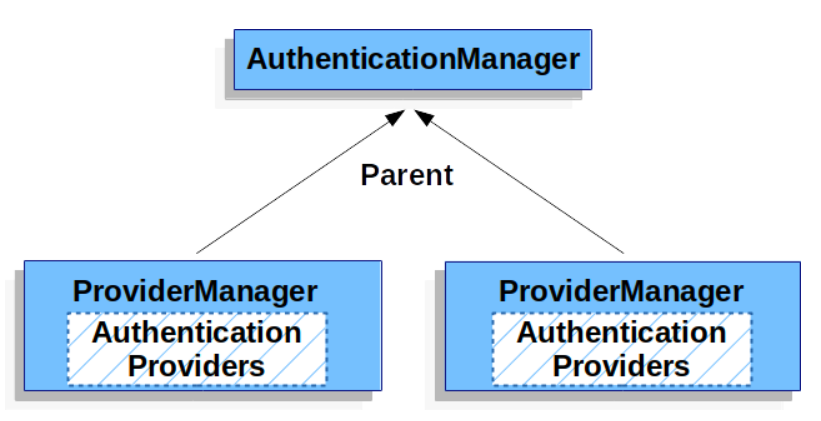
每一个过滤器链都会绑定一个自己的 ProviderManager(即 AuthenticationManager 的实现),而每一个 ProviderManager 中都通过 DaoAuthenticationProvider 持有一个 UserDetailsService 对象,你可以简单理解为一个 ProviderManager 管理了一个 UserDetailsService,当我们开始认证的时候,首先由过滤器链所持有的局部 ProviderManager 去认证,要是认证失败了,则调用 ProviderManager 的 parent 再去认证,此时就会用到全局 AuthenticationManager 所持有的 UserDetailsService 对象了。
结合一开始的案例,例如你的登录地址是 /foo/login,如果你的登录用户是 sang/123,那么先去 HttpSecurity 的局部 ProviderManager 中去验证,结果验证失败(局部的 ProviderManager 中对应的用户是 javaboy),此时就会进入全局 ProviderManager 的 parent 中去认证,也就是全局认证,全局的 ProviderManager 中对应的用户就是 sang 了,此时就认证成功。
二、全局不可用
再次修改 SecurityConfig 的定义
@Configuration
public class SecurityConfig {
    @Bean
    UserDetailsService us() {
        InMemoryUserDetailsManager manager = new InMemoryUserDetailsManager();
        manager.createUser(User.withUsername("sang").password("{noop}123").roles("admin").build());
        return manager;
    }

    @Configuration
    @Order(1)
    static class DefaultWebSecurityConfig extends WebSecurityConfigurerAdapter {
        UserDetailsService us1() {
            InMemoryUserDetailsManager manager = new InMemoryUserDetailsManager();
            manager.createUser(User.withUsername("javaboy").password("{noop}123").roles("admin", "aaa", "bbb").build());
            return manager;
        }

        @Override
        protected void configure(AuthenticationManagerBuilder auth) throws Exception {
            auth.userDetailsService(us1());
        }

        @Override
        protected void configure(HttpSecurity http) throws Exception {
            http.antMatcher("/foo/**")
                    .authorizeRequests()
                    .anyRequest().hasRole("admin")
                    .and()
                    .formLogin()
                    .loginPage("/login.html")
                    .loginProcessingUrl("/foo/doLogin")
                    .usernameParameter("username")
                    .passwordParameter("password")
                    .permitAll()
                    .and()
                    .csrf().disable();
        }
    }

    @Configuration
    @Order(2)
    static class DefaultWebSecurityConfig2 extends WebSecurityConfigurerAdapter {
        UserDetailsService us2() {
            InMemoryUserDetailsManager manager = new InMemoryUserDetailsManager();
            manager.createUser(User.withUsername("xjh").password("{noop}123").roles("user", "aaa", "bbb").build());
            return manager;
        }

        @Override
        protected void configure(AuthenticationManagerBuilder auth) throws Exception {
            auth.userDetailsService(us2());
        }

        @Override
        protected void configure(HttpSecurity http) throws Exception {
            http.antMatcher("/bar/**")
                    .authorizeRequests()
                    .anyRequest().hasRole("user")
                    .and()
                    .formLogin()
                    .loginPage("/login.html")
                    .loginProcessingUrl("/bar/doLogin")
                    .usernameParameter("username")
                    .passwordParameter("password")
                    .permitAll()
                    .and()
                    .csrf().disable();
        }
    }
}
和前面相比,这段代码的核心变化,就是我重写了 configure(AuthenticationManagerBuilder auth) 方法,重写了该方法之后,全局的 AuthenticationMananger 定义就失效了,也就意味着 sang 这个用户定义失效了,换言之,无论是 /foo/login 还是 /bar/login,使用 sang/123 现在都无法登录了。
在每一个 HttpSecurity 过滤器链中,我都重写了 configure(AuthenticationManagerBuilder auth) 方法,并且重新配置了 UserDetailsService,这个重写,相当于我在定义 parent 级别的 ProviderManager。而每一个 HttpSecurity 过滤器链则不再包含 UserDetailsService。
当用户登录时,先去找到 HttpSecurity 过滤器链中的 ProviderManager 去认证,结果认证失败,然后再找到 ProviderManager 的 parent 去认证,就成功了。
