
阅读完需:约 47 分钟
我们知道,当我们对SpringMVC控制的资源发起请求时,这些请求都会被SpringMVC的DispatcherServlet处理。接着它会根据请求的URL经过HandlerMapping处理,匹配上一个最合适的HandlerExecutionChain(它是一个拦截器+handler的组合)。
然后再通过Handler拿到一个HandlerAdapter,HandlerAdapter再对Handler进行执行、处理之后会统一返回一个ModelAndView对象。
在获得了ModelAndView对象之后,SpringMVC就需要把该View渲染给用户,即返回给浏览器。在这个渲染的过程中,发挥作用的就是ViewResolver和View,本文就是讲解ViewResolver。
当Handler返回的ModelAndView中不包含真正的视图,只返回一个逻辑视图(比如返回一个字符串)名称的时候,ViewResolver就会把该逻辑视图名称解析为真正的视图View对象。
View是真正的进行视图渲染(对response里写东西),把结果返回给浏览器的。
版本 : Spring-webmvc : 5.3.7
ViewResolver
SpringMVC 用于处理视图最重要的两个接口是 ViewResolver 和 View ,ViewResolver 的主要作用是把一个逻辑上的视图名称解析为一个真正的视图(View )。SpringMVC 中用于把 View 对象呈现给客户端的是 View 对象本身,而 ViewResolver 只是把逻辑视图名称解析为对象的View对象。 View 接口的主要作用是用于处理视图,然后返回给客户端。
Spring MVC为我们定义了非常多的视图解析器,下面重点就是看看该接口本身以及它的实现类们:
// 这个接口非常简单,就一个方法:把一个逻辑视图viewName解析为一个真正的视图View,Local表示国际化相关内容~
public interface ViewResolver {
	@Nullable
	View resolveViewName(String viewName, Locale locale) throws Exception;
}
ViewResolver的继承树
这里如果对比Spring4.X,可以发现velocity在Spring5里面已经被完全抛弃了。根本原因在于velocity社区太不活跃了,上十年都不更新。
现在推荐使用新一代高性能渲染引擎:Thymeleaf,这也是SpringBoot的推荐
AbstractCachingViewResolver
这个抽象类是非常重要的,这种视图解析器会把它曾经解析过的视图缓存起来(从命名caching也能看出来)。然后每次要解析视图的时候先从缓存里面找,如果找到了对应的视图就直接返回,如果没有就创建一个新的视图对象,然后把它放到一个用于缓存的 map 中,接着再把新建的视图返回。
使用这种视图缓存的方式可以把解析视图的性能问题降到最低,所以它是Spring MVC最为主要的渲染方式
// 该首相类完成的主要是缓存的相关逻辑~~~
public abstract class AbstractCachingViewResolver extends WebApplicationObjectSupport implements ViewResolver {

	// Map的最大值,1024我觉得还是挺大的了~
	/** Default maximum number of entries for the view cache: 1024. */
	public static final int DEFAULT_CACHE_LIMIT = 1024;

	// 表示没有被解析过的View~~~
	private static final View UNRESOLVED_VIEW = new View() {
		@Override
		@Nullable
		public String getContentType() {
			return null;
		}
		@Override
		public void render(@Nullable Map<String, ?> model, HttpServletRequest request, HttpServletResponse response) {
		}
	};
	private volatile int cacheLimit = DEFAULT_CACHE_LIMIT;
	private boolean cacheUnresolved = true;
	// 此处使用的是ConcurrentHashMap,key是Object
	private final Map<Object, View> viewAccessCache = new ConcurrentHashMap<>(DEFAULT_CACHE_LIMIT);

	// 通过它来实现缓存最大值: removeEldestEntry表示当你往里put成为为true的时候,会执行它
	// 此处可以看到,当size大于1024时,会把Map里面最老的那个值给remove掉~~~viewAccessCache.remove(eldest.getKey());
	private final Map<Object, View> viewCreationCache =
			new LinkedHashMap<Object, View>(DEFAULT_CACHE_LIMIT, 0.75f, true) {
				@Override
				protected boolean removeEldestEntry(Map.Entry<Object, View> eldest) {
					if (size() > getCacheLimit()) {
						viewAccessCache.remove(eldest.getKey());
						return true;
					}
					else {
						return false;
					}
				}
			};

	...

	// 通过逻辑视图,来找到一个View真正的视图~~~~
	@Override
	@Nullable
	public View resolveViewName(String viewName, Locale locale) throws Exception {
		if (!isCache()) {
			return createView(viewName, locale);
		} else {
			// cacheKey其实就是 viewName + '_' + locale
			Object cacheKey = getCacheKey(viewName, locale);
			View view = this.viewAccessCache.get(cacheKey);
			if (view == null) {
				synchronized (this.viewCreationCache) {
					view = this.viewCreationCache.get(cacheKey);
					if (view == null) {
						// Ask the subclass to create the View object.
						// 具体的创建视图的逻辑  交给子类的去完成~~~~
						view = createView(viewName, locale);
						// 此处需要注意:若调用者返回的是null,并且cacheUnresolved,那就返回一个未经处理的视图~~~~
						if (view == null && this.cacheUnresolved) {
							view = UNRESOLVED_VIEW;
						}
						// 缓存起来~~~~
						if (view != null) {
							this.viewAccessCache.put(cacheKey, view);
							this.viewCreationCache.put(cacheKey, view);
						}
					}
				}
			}
			else {
				if (logger.isTraceEnabled()) {
					logger.trace(formatKey(cacheKey) + "served from cache");
				}
			}

			// 这个很重要,因为没有被解析过  都会返回null
			// 而再真正责任链处理的时候,第一个不返回null的view,最终就会被返回了~~~
			return (view != UNRESOLVED_VIEW ? view : null);
		}
	}

	// 逻辑比较简单~~~
	public void removeFromCache(String viewName, Locale locale) {
		...
	}
	public void clearCache() {
		logger.debug("Clearing all views from the cache");
		synchronized (this.viewCreationCache) {
			this.viewAccessCache.clear();
			this.viewCreationCache.clear();
		}
	}
}
此抽象类完成的是缓存相关的维护逻辑,而子类只需要专注在createView这件事情上了
UrlBasedViewResolver
它是对 ViewResolver 的一种简单实现,而且继承了AbstractCachingViewResolver ,主要就是提供的一种拼接 URL 的方式来解析视图,它可以让我们通过 prefix 属性指定一个指定的前缀,通过 suffix 属性指定一个指定的后缀,然后把返回的逻辑视图名称加上指定的前缀和后缀就是指定的视图 URL 了。
如 prefix=/WEB-INF/jsps/ , suffix=.jsp ,返回的视图名称 viewName=test/indx ,则 UrlBasedViewResolver 解析出来的视图 URL 就是 /WEB-INF/jsps/test/index.jsp
public class UrlBasedViewResolver extends AbstractCachingViewResolver implements Ordered {
	//  ”redirect:” 前缀 包装成一个RedirectView  最终调用 HttpServletResponse 对象的 sendRedirect 方法进行重定向
	public static final String REDIRECT_URL_PREFIX = "redirect:";
	//  forword: 前缀的视图名称将会被封装成一个 InternalResourceView 对象  服务器端利用 `RequestDispatcher`的forword方式跳转到指定的地址
	public static final String FORWARD_URL_PREFIX = "forward:";

	// 这个三个属性是最重要的~~~
	@Nullable
	private Class<?> viewClass;
	private String prefix = "";
	private String suffix = "";

	// 其它属性值非常多
	// the content type for all views,若view自己设置了此值就用自己的,否则是它
	@Nullable
	private String contentType;
	//重定向的时候,是否把/解释为相对当前ServletContext的路径
	// 直接关系RedirectView#setContextRelative这个值
	private boolean redirectContextRelative = true;
	// 设置重定向是否应与HTTP 1.0客户端保持兼容
	private boolean redirectHttp10Compatible = true;
	// 配置与应用程序关联的一个或多个主机  @since 4.3
	@Nullable
	private String[] redirectHosts;
	// Set the name of the RequestContext attribute for all views
	@Nullable
	private String requestContextAttribute;

	/** Map of static attributes, keyed by attribute name (String). */
	// 保存一些全局属性~~~
	private final Map<String, Object> staticAttributes = new HashMap<>();

	// 指定此解析程序解析的视图是否应向模型添加路径变量
	// {@code true} - all Views resolved by this resolver will expose path variables
	// {@code false} - no Views resolved by this resolver will expose path variables
	// {@code null} - individual Views can decide for themselves (this is used by the default)  默认值是这个
	@Nullable
	private Boolean exposePathVariables;

	// 设置是否将应用程序上下文中的所有SpringBean作为请求属性进行访问
	// This will make all such beans accessible in plain {@code ${...}} expressions in a JSP 2.0 page, as well as in JSTL's {@code c:out} value expressions
	//AbstractView#setExposeContextBeansAsAttributes 默认值是false
	@Nullable
	private Boolean exposeContextBeansAsAttributes;
	// 在应该公开的上下文中指定bean的名称 如果不为空,则只有指定的bean才有资格作为属性进行暴露
	@Nullable
	private String[] exposedContextBeanNames;
	// Set the view names (or name patterns) that can be handled by this ViewResolver
	// View names can contain simple wildcards such that 'my*', '*Report' and '*Repo*' will all match the view name 'myReport'.
	@Nullable
	private String[] viewNames;

	// 你指定的viewClass必须是AbstractUrlBasedView的子类
	protected Class<?> requiredViewClass() {
		return AbstractUrlBasedView.class;
	}

	// 把Properties 保存起来,放在群居的map里
	public void setAttributes(Properties props) {
		CollectionUtils.mergePropertiesIntoMap(props, this.staticAttributes);
	}
	public void setAttributesMap(@Nullable Map<String, ?> attributes) {
		if (attributes != null) {
			this.staticAttributes.putAll(attributes);
		}
	}

	// 从这里可以看出viewClass属性,如果你在Spring容器里面使用,它是必须的~~~
	@Override
	protected void initApplicationContext() {
		super.initApplicationContext();
		if (getViewClass() == null) {
			throw new IllegalArgumentException("Property 'viewClass' is required");
		}
	}

	// 这个方法注意:复写的是父类的crateView方法,而不是loadView方法(loadView才是抽象方法~~~)注意这个涉及技巧~~~   分层次进行处理
	@Override
	protected View createView(String viewName, Locale locale) throws Exception {
		// canHandle表示:viewNames没配置  或者  匹配上了 就返回true
		if (!canHandle(viewName, locale)) {
			return null;
		}

		// Check for special "redirect:" prefix.
		// 最终被转换成一个RedirectView,可以看到这里很多属性都是为它而准备的~~~比如getRedirectHosts这种属性值~~~
		if (viewName.startsWith(REDIRECT_URL_PREFIX)) {
			String redirectUrl = viewName.substring(REDIRECT_URL_PREFIX.length());
			RedirectView view = new RedirectView(redirectUrl, isRedirectContextRelative(), isRedirectHttp10Compatible());
			String[] hosts = getRedirectHosts();
			if (hosts != null) {
				view.setHosts(hosts);
			}
			return applyLifecycleMethods(REDIRECT_URL_PREFIX, view);
		}

		// Check for special "forward:" prefix.
		// forward打头的用的就是`InternalResourceView `
		if (viewName.startsWith(FORWARD_URL_PREFIX)) {
			String forwardUrl = viewName.substring(FORWARD_URL_PREFIX.length());
			InternalResourceView view = new InternalResourceView(forwardUrl);
			return applyLifecycleMethods(FORWARD_URL_PREFIX, view);
		}

		// Else fall back to superclass implementation: calling loadView.
		return super.createView(viewName, locale);
	}

	// 执行容器内此Bean的声明周期方法,也就是view的声明周期方法。比如@Postconstruct、XXXAware这种方法
	// 可议看到它调用的是initializeBean,可议知道我们的View并不需要交给容器管理,但我们却能够享受它的一些声明周期方法~~~~~
	protected View applyLifecycleMethods(String viewName, AbstractUrlBasedView view) {
		ApplicationContext context = getApplicationContext();
		if (context != null) {
			Object initialized = context.getAutowireCapableBeanFactory().initializeBean(view, viewName);
			if (initialized instanceof View) {
				return (View) initialized;
			}
		}
		return view;
	}

	// 实现了父类的loadView方法~
	@Override
	protected View loadView(String viewName, Locale locale) throws Exception {
		AbstractUrlBasedView view = buildView(viewName);
		View result = applyLifecycleMethods(viewName, view);

		// 这一步非常关键,它调用了view的checkResource方法,而这个方法的默认实现是永远返回true的
		// 所以请注意:特别是在你自定义视图的时候,注意重写此方法。只有资源真的存在的时候,你才去返回,否则让返回null,交给别的视图解析器继续去处理~~~
		// 自己处理不了的,自己就不要勉强了~~~~
		return (view.checkResource(locale) ? result : null);
	}

	// 构建一个View,注意此处的返回值为AbstractUrlBasedView~~ 合理主要工作就是把属性都设置进去~~~
	protected AbstractUrlBasedView buildView(String viewName) throws Exception {
		// 我们必须配置的viewClass属性~~~~ 然后反射创建一个实例~~
		Class<?> viewClass = getViewClass();
		Assert.state(viewClass != null, "No view class");

		AbstractUrlBasedView view = (AbstractUrlBasedView) BeanUtils.instantiateClass(viewClass);
		view.setUrl(getPrefix() + viewName + getSuffix());

		String contentType = getContentType();
		if (contentType != null) {
			view.setContentType(contentType);
		}
		view.setRequestContextAttribute(getRequestContextAttribute());
		view.setAttributesMap(getAttributesMap());
		Boolean exposePathVariables = getExposePathVariables();
		if (exposePathVariables != null) {
			view.setExposePathVariables(exposePathVariables);
		}
		Boolean exposeContextBeansAsAttributes = getExposeContextBeansAsAttributes();
		if (exposeContextBeansAsAttributes != null) {
			view.setExposeContextBeansAsAttributes(exposeContextBeansAsAttributes);
		}
		String[] exposedContextBeanNames = getExposedContextBeanNames();
		if (exposedContextBeanNames != null) {
			view.setExposedContextBeanNames(exposedContextBeanNames);
		}

		return view;
	}
}
使用 UrlBasedViewResolver 的时候必须指定属性viewClass,表示解析成哪种视图,一般使用较多的就是InternalResourceView ,利用它来展现 jsp 。但是当我们要使用 JSTL 的时候我们必须使用 JstlView(JstlView是InternalResourceView的子类)
ScriptTemplateViewResolver
脚本渲染有关的一个处理器。处理成ScriptTemplateView(自定义前缀、后缀)
// @since 4.2   是一个非常新的View处理器~~~
public class ScriptTemplateViewResolver extends UrlBasedViewResolver {
	public ScriptTemplateViewResolver() {
		setViewClass(requiredViewClass());
	}
	public ScriptTemplateViewResolver(String prefix, String suffix) {
		this();
		setPrefix(prefix);
		setSuffix(suffix);
	}
	// ScriptTemplateView的父类是AbstractUrlBasedView
	@Override
	protected Class<?> requiredViewClass() {
		return ScriptTemplateView.class;
	}
}
InternalResourceViewResolver
这个视图处理器最为重要,它也是Spring MVC默认给装配的视图解析器。
public class InternalResourceViewResolver extends UrlBasedViewResolver {

	// 如果你导入了JSTL的相关的包,这个解析器也会支持JSTLView的~~~~
	private static final boolean jstlPresent = ClassUtils.isPresent(
			"javax.servlet.jsp.jstl.core.Config", InternalResourceViewResolver.class.getClassLoader());

	// 指定是否始终包含视图而不是转发到视图
	// 默认值为“false”。打开此标志以强制使用servlet include,即使可以进行转发
	// InternalResourceView#setAlwaysInclude
	@Nullable
	private Boolean alwaysInclude;

	@Override
	protected Class<?> requiredViewClass() {
		return InternalResourceView.class;
	}

	// 默认情况下,它可能会设置一个JstlView 或者 InternalResourceView
	public InternalResourceViewResolver() {
		Class<?> viewClass = requiredViewClass();
		if (InternalResourceView.class == viewClass && jstlPresent) {
			viewClass = JstlView.class;
		}
		setViewClass(viewClass);
	}
	public InternalResourceViewResolver(String prefix, String suffix) {
		this(); // 先调用空构造
		setPrefix(prefix);
		setSuffix(suffix);
	}

	// 在父类实现的记仇上,设置上了alwaysInclude,并且view.setPreventDispatchLoop(true)
	@Override
	protected AbstractUrlBasedView buildView(String viewName) throws Exception {
		InternalResourceView view = (InternalResourceView) super.buildView(viewName);
		if (this.alwaysInclude != null) {
			view.setAlwaysInclude(this.alwaysInclude);
		}
		view.setPreventDispatchLoop(true);
		return view;
	}

}
因为它是默认就被装配进去的,所以啥都不说了,这么写:
    @GetMapping("/index")
    public String index() {
        return "index.jsp";
    }
理论上我们的JSP页面都应该放在WEB-INF目录下,避免直接访问。
Spring提供了两种支持JSP视图的方式:
-
InternalResourceViewResolver会将视图名解析为JSP文件。另外,如果在你的JSP页面中使用了JSP标准标签库 (JavaServer Pages Standard Tag Library,JSTL)的 话,InternalResourceViewResolver能够将视图名解析为JstlView形式的JSP文件,从而将JSTL本地化和资源bundle变量暴露给JSTL的格式化(formatting)和信息(message)标签。 - Spring提供了
两个JSP标签库,一个用于表单到模型的绑定,另一 个提供了通用的工具类特性。-
<%@ taglib uri="http://www.springframework.org/tags/form" prefix="sf" %>:绑定标签库。如:<sf:checkbox>、<sf:checkboxes>、<sf:errors>、<sf:form>、<sf:input>、<sf:select>...等等 -
<%@ taglib uri="http://www.springframework.org/tags" prefix="s" %>:通用标签库。<s:bind>、<s:escapeBody>、<s:htmlEscape>、<s:message>、<s:url>、<s:url>...等等
-
XsltViewResolver
将视图名解析为一个指定XSLT样式表的URL文件。比如解析成Excel表格形式、 World形式等等。
AbstractTemplateViewResolver
继承自UrlBasedViewResolver,重写了buildView方法,主要就是构造AbstractTemplateView以及为它设置相应的属性。从命名中也能看出,它提供的是一种模版技术
// 模板视图解析程序的抽象基类,尤其是FreeMarker视图的抽象基类
// @since 1.1  对应的View是AbstractTemplateView
public class AbstractTemplateViewResolver extends UrlBasedViewResolver {

	// 是否吧所有热request里面的attributes都加入合并到模版的Model,默认是false
	private boolean exposeRequestAttributes = false;
	// 是否允许request里面的属性,当name相同的时候,复写model里面的 默认是false
	private boolean allowRequestOverride = false;

	// session相关,语义同上
	private boolean exposeSessionAttributes = false;
	private boolean allowSessionOverride = false;

	// Set whether to expose a RequestContext for use by Spring's macro library 默认值是true
	private boolean exposeSpringMacroHelpers = true;

	// 它只会处理AbstractTemplateView 比如FreeMarkerView是它的实现类
	@Override
	protected Class<?> requiredViewClass() {
		return AbstractTemplateView.class;
	}

	// 模版操作:其实就是多设置了一些开关属性~~~~
	@Override
	protected AbstractUrlBasedView buildView(String viewName) throws Exception {
		AbstractTemplateView view = (AbstractTemplateView) super.buildView(viewName);
		view.setExposeRequestAttributes(this.exposeRequestAttributes);
		view.setAllowRequestOverride(this.allowRequestOverride);
		view.setExposeSessionAttributes(this.exposeSessionAttributes);
		view.setAllowSessionOverride(this.allowSessionOverride);
		view.setExposeSpringMacroHelpers(this.exposeSpringMacroHelpers);
		return view;
	}
}
VelocityViewResolver也是继承自此AbstractTemplateViewResolver
ThymeleafViewResolver并没有继承自AbstractTemplateViewResolver,而是直接继承AbstractCachingViewResolver的
GroovyMarkupViewResolver:略
FreeMarkerViewResolver
	@Override
	protected Class<?> requiredViewClass() {
		return FreeMarkerView.class;
}逻辑很简单。FreeMarker是个老牌的模版引擎,整体性能也还不错,所以一直以来口碑还不错。但在新时代的发展下,显然还是有点乏力了的
BeanNameViewResolver
它是对ViewResolver的一个比较简单的实现,在Spring第一个版本就推出了。通过把返回的逻辑视图名称去匹配定义好的视图 bean 对象。(也就是说如果你返回的逻辑视图名称为test,那么它就会去容器内找到这个View,然后返回)
public class BeanNameViewResolver extends WebApplicationObjectSupport implements ViewResolver, Ordered {

	// 默认排序最小值~~~
	private int order = Ordered.LOWEST_PRECEDENCE;  // default: same as non-Ordered
	public void setOrder(int order) {
		this.order = order;
	}
	@Override
	public int getOrder() {
		return this.order;
	}

	@Override
	@Nullable
	public View resolveViewName(String viewName, Locale locale) throws BeansException {
		// 可见它和容器强关联,若容器里没有这个Bean,他就直接返回null了~~~
		ApplicationContext context = obtainApplicationContext();
		if (!context.containsBean(viewName)) {
			// Allow for ViewResolver chaining...
			return null;
		}
		// 可见不仅仅要含有此Bean,还必须是view类型的~~~~  否则也是返回null
		if (!context.isTypeMatch(viewName, View.class)) {
			if (logger.isDebugEnabled()) {
				logger.debug("Found bean named '" + viewName + "' but it does not implement View");
			}
			return null;
		}
		// 拿出这个View就这直接返回了~~~
		return context.getBean(viewName, View.class);
	}
}
ViewResolverComposite
里面讲过HandlerMethodReturnValueHandlerComposite,这个类就无需多说了。
// @since 4.1
public class ViewResolverComposite implements ViewResolver, Ordered, InitializingBean, ApplicationContextAware, ServletContextAware {

	private final List<ViewResolver> viewResolvers = new ArrayList<>();
	private int order = Ordered.LOWEST_PRECEDENCE;

	// 若直接set了,就以自己的set为主
	public void setViewResolvers(List<ViewResolver> viewResolvers) {
		this.viewResolvers.clear();
		if (!CollectionUtils.isEmpty(viewResolvers)) {
			this.viewResolvers.addAll(viewResolvers);
		}
	}

	// 为每一个实现了接口ApplicationContextAware的 都设置一个 下面还有其它的
	@Override
	public void setApplicationContext(ApplicationContext applicationContext) throws BeansException {
		for (ViewResolver viewResolver : this.viewResolvers) {
			if (viewResolver instanceof ApplicationContextAware) {
				((ApplicationContextAware)viewResolver).setApplicationContext(applicationContext);
			}
		}
	}
	...


	// 这是核心   遍历所有的viewResolvers,第一个不返回null的,就标出处理了~~~~
	@Override
	@Nullable
	public View resolveViewName(String viewName, Locale locale) throws Exception {
		for (ViewResolver viewResolver : this.viewResolvers) {
			View view = viewResolver.resolveViewName(viewName, locale);
			if (view != null) {
				return view;
			}
		}
		return null;
	}

}
它用于WebMvcConfigurationSupport配置的时候,会配置上这个ViewResolverComposite用于对所有的View解析器做聚合。
Demo:使用BeanNameViewResolver做一个自定义的视图
@Component
public class HelloView implements View {

    @Override
    public String getContentType() {
        return MediaType.TEXT_HTML_VALUE;
    }

    // 这里渲染,就向控制台写一句话即可~~~~
    @Override
    public void render(Map<String, ?> model, HttpServletRequest request,
                       HttpServletResponse response) throws Exception {
        response.getWriter().print("Welcome to View:" + new Date());
    }
}

@Controller
public class MyView {
    @RequestMapping(value="/testBeanNameViewResolver")
    public String testView(){
        System.out.println("testBeanNameViewResolver");
        return "helloView";
    }
}

// 把BeanNameViewResolver 配置进容器
@Configuration
@EnableWebMvc
public class WebMvcConfig extends WebMvcConfigurerAdapter {

    @Override
    public void configureViewResolvers(ViewResolverRegistry registry) {
        BeanNameViewResolver viewResolver = new BeanNameViewResolver();
        viewResolver.setOrder(10); // 这样能保证在InternalResourceViewResolver之前执行
        registry.viewResolver(viewResolver);
    }

    // 这是错误的注册方式~~~会让ViewResolverComposite可能失效~~
    //@Bean
    //public ViewResolver viewResolver() {
    //    BeanNameViewResolver viewResolver = new BeanNameViewResolver();
    //    viewResolver.setOrder(10); // 这样能保证在InternalResourceViewResolver之前执行
    //    return viewResolver;
    //}
这样我们访问:http://localhost:8080/XXXXXXXX/testBeanNameViewResolver就会自动到我们自定义的view上去。
备注:这个视图解析器的使用场景:一般用于自定义视图,然后通过这个视图解析器指过去
最后需要注意的是,这么多处理器,都实现了Order接口,因此自己向Spring MVC注册view解析器的时候,务必注意他们的顺序问题(因为DispatcherServlet初始化的时候,会根据Order排序的)
Spring MVC默认装配的视图解析器们
开启注解:@EnableWebMvc。如下截图可以看到默认只会装配InternalResourceViewResolver这一个视图解析器,且是直接new InternalResourceViewResolver()的,都是默认值
不开启注解:@EnableWebMvc。默认装配的也是它(在DispatcherServlet.properties配置文件里)
由此可见默认情况下,它是支持jsp文件解析、访问的。若你想扩展一些别的视图解析,可以自己扩展注册
Spring MVC把视图解析、渲染这块完全隔离了。同一份数据,若想改变暂展示的方式,只需要改配置即可,完全做到了模块化、可插拔化
这里讲解了几乎所有的解析器(除了ContentNegotiatingViewResolver、ResourceBundleViewResolver没讲,因为可以把它单独抽取抽来讲解),然后更重要的是了解View视图、渲染方面
ResourceBundleViewResolver解析器已经被Spring5.X给废弃了
View
View是用于MVC交互的Web视图。实现负责呈现内容,并公开模型。单个视图可显示多个模型属性
视图实现可能差异很大,比如我们最基础的实现:JSP就是一种视图展示方式。当然还有后面的Jstl以及FreeMarker等。此接口旨在避免限制可能的实现范围
视图应该是bean(但不一定需要放进容器)。它们很可能被
viewresolver实例化为bean。由于这个接口是无状态的,视图实现应该是线程安全的。
public interface View {

	// @since 3.0
	// HttpStatus的key,可议根据此key去获取。备注:并不是每个视图都需要实现的。目前只有`RedirectView`有处理
	String RESPONSE_STATUS_ATTRIBUTE = View.class.getName() + ".responseStatus";

	// @since 3.1  也会这样去拿:request.getAttribute(View.PATH_VARIABLES)
	String PATH_VARIABLES = View.class.getName() + ".pathVariables";

	// The {@link org.springframework.http.MediaType} selected during content negotiation
	// @since 3.2
	// MediaType mediaType = (MediaType) request.getAttribute(View.SELECTED_CONTENT_TYPE)
	String SELECTED_CONTENT_TYPE = View.class.getName() + ".selectedContentType";


	// Return the content type of the view, if predetermined(预定的)
	@Nullable
	default String getContentType() {
		return null;
	}

	// 这是最重要的 根据model里面的数据,request等  把渲染好的数据写进response里~
	void render(@Nullable Map<String, ?> model, HttpServletRequest request, HttpServletResponse response) throws Exception;
}
View的继承树
可以看出来它只有两个分支:AbstractView和SmartView,而SmartView的唯一实现为:RedirectView并且它也继承自AbstractView。
Spring MVC内置的所有的View都是AbstractView的子类
AbstractView
AbstractView实现了render方法,主要做的操作是将model中的参数和request中的参数全部都放到Request中,然后就转发Request就可以了
public abstract class AbstractView extends WebApplicationObjectSupport implements View, BeanNameAware {
	/** Default content type. Overridable as bean property. */
	public static final String DEFAULT_CONTENT_TYPE = "text/html;charset=ISO-8859-1";
	/** Initial size for the temporary output byte array (if any). */
	private static final int OUTPUT_BYTE_ARRAY_INITIAL_SIZE = 4096;

	// 这几个属性值,没有陌生的。在视图解析器章节里面都有解释过~~~
	@Nullable
	private String contentType = DEFAULT_CONTENT_TYPE;
	@Nullable
	private String requestContextAttribute;
	// "Static" attributes are fixed attributes that are specified in the View instance configuration
	// "Dynamic" attributes, on the other hand,are values passed in as part of the model.
	private final Map<String, Object> staticAttributes = new LinkedHashMap<>();
	private boolean exposePathVariables = true;
	private boolean exposeContextBeansAsAttributes = false;
	@Nullable
	private Set<String> exposedContextBeanNames;

	@Nullable
	private String beanName;

	// 把你传进俩的Properties 都合并进来~~~
	public void setAttributes(Properties attributes) {
		CollectionUtils.mergePropertiesIntoMap(attributes, this.staticAttributes);
	}
	...

	@Override
	public void render(@Nullable Map<String, ?> model, HttpServletRequest request, HttpServletResponse response) throws Exception {
		// 合并staticAttributes、pathVars、model数据到一个Map里来
		// 其中:后者覆盖前者的值(若有相同key的话~~)也就是所谓的model的值优先级最高~~~~
		// 最终还会暴露RequestContext对象到Model里,因此model里可以直接访问RequestContext对象哦~~~~
		Map<String, Object> mergedModel = createMergedOutputModel(model, request, response);
		// 默认实现为设置几个响应头~~~
		// 备注:默认情况下pdf的view、xstl的view会触发下载~~~
		prepareResponse(request, response);
		// getRequestToExpose表示吧request暴露成:ContextExposingHttpServletRequest(和容器相关,以及容器内的BeanNames)
		// renderMergedOutputModel是个抽象方法 由子类去实现~~~~
		renderMergedOutputModel(mergedModel, getRequestToExpose(request), response);
	}

	//================下面是一些方法,父类提供  子类可以直接使用的方法==============
	// 一个temp输出流,缓冲区大小为4096  字节流
	protected ByteArrayOutputStream createTemporaryOutputStream() {
		return new ByteArrayOutputStream(OUTPUT_BYTE_ARRAY_INITIAL_SIZE);
	}

	// 把字节流写进response里面~~~
	protected void writeToResponse(HttpServletResponse response, ByteArrayOutputStream baos) throws IOException {
		// Write content type and also length (determined via byte array).
		response.setContentType(getContentType());
		response.setContentLength(baos.size());

		// Flush byte array to servlet output stream.
		ServletOutputStream out = response.getOutputStream();
		baos.writeTo(out);
		out.flush();
	}

	// 相当于如果request.getAttribute(View.SELECTED_CONTENT_TYPE) 指定了就以它为准~
	protected void setResponseContentType(HttpServletRequest request, HttpServletResponse response) {
		MediaType mediaType = (MediaType) request.getAttribute(View.SELECTED_CONTENT_TYPE);
		if (mediaType != null && mediaType.isConcrete()) {
			response.setContentType(mediaType.toString());
		}
		else {
			response.setContentType(getContentType());
		}
	}
	...
}
该抽象类主要是提供了对render方法的模版实现,以及提供一些基础方法供给子类来使用,比如createTemporaryOutputStream()等等
AbstractJackson2View
这个是一个比较新的Viw(@since 4.1),它是基于Jackson渲染的视图。
//@since 4.1
// Compatible with Jackson 2.6 and higher, as of Spring 4.3.
public abstract class AbstractJackson2View extends AbstractView {
	private ObjectMapper objectMapper;
	private JsonEncoding encoding = JsonEncoding.UTF8;
	@Nullable
	private Boolean prettyPrint;
	private boolean disableCaching = true;
	protected boolean updateContentLength = false;

	// 唯一构造函数,并且还是protected的~~
	protected AbstractJackson2View(ObjectMapper objectMapper, String contentType) {
		this.objectMapper = objectMapper;
		configurePrettyPrint();
		setContentType(contentType);
		setExposePathVariables(false);
	}
	... // get/set方法

	// 复写了父类的此方法~~~   setResponseContentType是父类的哟~~~~
	@Override
	protected void prepareResponse(HttpServletRequest request, HttpServletResponse response) {
		setResponseContentType(request, response);
		// 设置编码格式,默认是UTF-8
		response.setCharacterEncoding(this.encoding.getJavaName());
		if (this.disableCaching) {
			response.addHeader("Cache-Control", "no-store");
		}
	}


	// 实现了父类的渲染方法~~~~
	@Override
	protected void renderMergedOutputModel(Map<String, Object> model, HttpServletRequest request,
			HttpServletResponse response) throws Exception {

		ByteArrayOutputStream temporaryStream = null;
		OutputStream stream;

		// 注意此处:updateContentLength默认值是false   所以会直接从response里面吧输出流拿出来   而不用temp流
		if (this.updateContentLength) {
			temporaryStream = createTemporaryOutputStream();
			stream = temporaryStream;
		}
		else {
			stream = response.getOutputStream();
		}

		Object value = filterAndWrapModel(model, request);
		// value是最终的从model中出来的~~~~这里就是把value值写进去~~~~
		// 先通过stream得到一个JsonGenerator,然后先writePrefix(generator, object)
		// 然后objectMapper.writerWithView
		// 最后writeSuffix(generator, object);  然后flush即可~
		writeContent(stream, value);

		if (temporaryStream != null) {
			writeToResponse(response, temporaryStream);
		}
	}

	// 筛选Model并可选地将其包装在@link mappingjacksonvalue容器中
	protected Object filterAndWrapModel(Map<String, Object> model, HttpServletRequest request) {
		// filterModel抽象方法,从指定的model中筛选出不需要的属性值~~~~~
		Object value = filterModel(model);

		// 把这两个属性值,选择性的放进container容器里面  最终返回~~~~
		Class<?> serializationView = (Class<?>) model.get(JsonView.class.getName());
		FilterProvider filters = (FilterProvider) model.get(FilterProvider.class.getName());
		if (serializationView != null || filters != null) {
			MappingJacksonValue container = new MappingJacksonValue(value);
			if (serializationView != null) {
				container.setSerializationView(serializationView);
			}
			if (filters != null) {
				container.setFilters(filters);
			}
			value = container;
		}
		return value;
	}

}
MappingJackson2JsonView
// @since 3.1.2 可议看到它出现得还是比较早的~
public class MappingJackson2JsonView extends AbstractJackson2View {

	public static final String DEFAULT_CONTENT_TYPE = "application/json";
	@Nullable
	private String jsonPrefix;
	@Nullable
	private Set<String> modelKeys;
	private boolean extractValueFromSingleKeyModel = false;

	@Override
	protected Object filterModel(Map<String, Object> model) {
		Map<String, Object> result = new HashMap<>(model.size());
		Set<String> modelKeys = (!CollectionUtils.isEmpty(this.modelKeys) ? this.modelKeys : model.keySet());

		// 遍历model所有内容~
		model.forEach((clazz, value) -> {
			// 符合下列条件的会给排除掉~~~
			// 不是BindingResult类型 并且  modelKeys包含此key 并且此key不是JsonView和FilterProvider  这种key就排除掉~~~
			if (!(value instanceof BindingResult) && modelKeys.contains(clazz) &&
					!clazz.equals(JsonView.class.getName()) &&
					!clazz.equals(FilterProvider.class.getName())) {
				result.put(clazz, value);
			}
		});
		// 如果只需要排除singleKey,那就返回第一个即可,否则result全部返回
		return (this.extractValueFromSingleKeyModel && result.size() == 1 ? result.values().iterator().next() : result);
	}

	// 如果配置了前缀,把前缀写进去~~~
	@Override
	protected void writePrefix(JsonGenerator generator, Object object) throws IOException {
		if (this.jsonPrefix != null) {
			generator.writeRaw(this.jsonPrefix);
		}
	}
}
此视图是专门来处理作为一个json视图格式进行返回的。那么接下里有必要举例说明一下,Spring MVC返回Json格式数据的多种方式:
Spring MVC返回json的三种方式
1. 使用MappingJackson2JsonView,其实它是相对来说比较新的一种返回json数据的放置,主要是用到了这个视图的能力。
直接使用它相对来说还是比较麻烦点的,一般都需要结合内容协商视图解析器来使用(比如把它设置默认处理json的视图),但是本文就做一个Demo,所以还是简单的处理一下吧:使用BeanNameViewResolver执行我们定义的这个视图去即可:
    @RequestMapping(value = "/json")
    public String testView(Model model) {
        // 注意Model不添加数据,将会是一个空的JSON串
        model.addAttribute("name", "fsx");
        model.addAttribute("age", 18);
        return "mappingJackson2JsonView";
    }

// 配置视图:
@Configuration
@EnableWebMvc
public class WebMvcConfig extends WebMvcConfigurerAdapter {

	// 此处为配置了一个前缀,发现前缀可以解决jsonp的问题~~~
    @Bean
    public MappingJackson2JsonView mappingJackson2JsonView() {
        MappingJackson2JsonView mappingJackson2JsonView = new MappingJackson2JsonView();
        mappingJackson2JsonView.setJsonPrefix("prefix");
        return mappingJackson2JsonView;
    }

    @Override
    public void configureViewResolvers(ViewResolverRegistry registry) {
        BeanNameViewResolver viewResolver = new BeanNameViewResolver();
        viewResolver.setOrder(10); // 这样能保证在InternalResourceViewResolver之前执行
        registry.viewResolver(viewResolver);
    }
}
浏览器访问:http://localhost:3000/api/json 可看到如下:
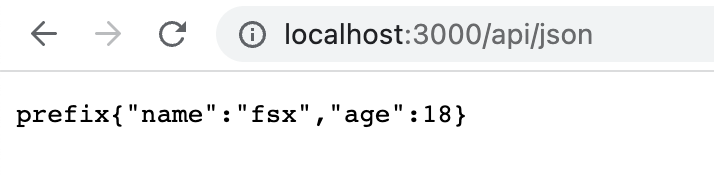
它提供的前缀能力,在某些特殊的场景会有用
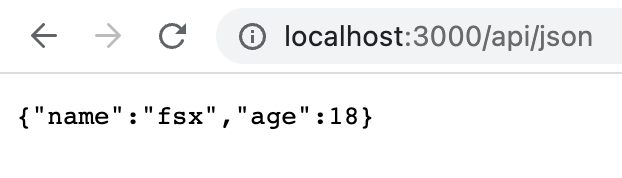
2. 利用HttpServletResponse,然后获取response.getOutputStream()或response.getWriter()自己写json串
    @RequestMapping(value = "/json")
    public void testView(PrintWriter printWriter) {
        printWriter.write("{\"name\":\"fsx\",\"age\":18}");
    }
这样啥处理器都不需要,直接写输出流即可。访问看浏览器:
3. @ResponseBody这种方式是当下平时我们书写使用最多的方式–略
MappingJackson2XmlView
它主要处理:
public static final String DEFAULT_CONTENT_TYPE = "application/xml";大致逻辑是同上。只不过它用的是XmlMapper而已
AbstractPdfView
处理PDF:"application/pdf"。依赖jar是com.lowagie
MarshallingView
Marshaller在国内使用非常少,忽略
AbstractXlsView
这个依赖于Apache的POI库,处理Excel等。
Spring MVC 中对于输出格式为pdf和xsl的view,提供了两个abstract的view类供继承分别为AbstractPdfView和AbstractXlsView。
AbstractFeedView
和com.rometools包的WireFeed有关,忽略。
FastJsonJsonView
它不是位于Spring包内,位于aliabba包内。因为它也是一个json视图,所以没有太多可说的:
public class FastJsonJsonView extends AbstractView {
	public static final String DEFAULT_CONTENT_TYPE = "application/json;charset=UTF-8";
	// 这个是专门处理jsonp的
    public static final String DEFAULT_JSONP_CONTENT_TYPE = "application/javascript";
    private static final Pattern CALLBACK_PARAM_PATTERN = Pattern.compile("[0-9A-Za-z_\\.]*");

	...
    @Override
    protected void renderMergedOutputModel(Map<String, Object> model, //
                                           HttpServletRequest request, //
                                           HttpServletResponse response) throws Exception {
        Object value = filterModel(model);
        String jsonpParameterValue = getJsonpParameterValue(request);
        if (jsonpParameterValue != null) {
            JSONPObject jsonpObject = new JSONPObject(jsonpParameterValue);
            jsonpObject.addParameter(value);
            value = jsonpObject;
        }

        ByteArrayOutputStream outnew = new ByteArrayOutputStream();

		// 它依赖的是这个静态方法,把value值写进去的~~~~
        int len = JSON.writeJSONString(outnew, //
                fastJsonConfig.getCharset(), //
                value, //
                fastJsonConfig.getSerializeConfig(), //
                fastJsonConfig.getSerializeFilters(), //
                fastJsonConfig.getDateFormat(), //
                JSON.DEFAULT_GENERATE_FEATURE, //
                fastJsonConfig.getSerializerFeatures());

        if (this.updateContentLength) {
            // Write content length (determined via byte array).
            response.setContentLength(len);
        }

        // Flush byte array to servlet output stream.
        ServletOutputStream out = response.getOutputStream();
        outnew.writeTo(out);
        outnew.close();
        out.flush();
    }
}
AbstractUrlBasedView
下面来到我们最为重要的一个分支:AbstractUrlBasedView。因为前面讲到过UrlBasedViewResolver这个分支是最重要的视图处理器,所以自然而然这个相关的视图也是最为重要的
AbstractPdfStamperView
这个和AbstractPdfView有点类似,不过它出来相对较晚。因为它可以基于URL去渲染PDF,它也是个抽象类,Spring MVC并没有PDF的具体的视图实现
RedirectView(SmartView)
这个视图和SmartView一起讲解一下。首先SmartView是一个子接口,增加了一个方法:
// @since 3.1 接口出来较晚,但是RedirectView早就有了的~~~
public interface SmartView extends View {
	boolean isRedirectView();
}
顾名思义RedirectView是用于页面跳转使用的。重定向我们都不陌生,因此我们下面主要看看RedirectView它的实现:
重定向在浏览器可议看到两个毫不相关的request请求。跳转的请求会丢失原请求的所有数据,一般的解决方法是将原请求中的数据放到跳转请求的URL中这样来传递,下面来看看RediectView是怎么优雅的帮我们解决这个问题的
我们的重定向例子:
    @GetMapping("/index")
    public Object index(Model model) {
        RedirectView redirectView = new RedirectView("/index.jsp");
        redirectView.setContextRelative(true); //因为我们希望加上ServletContext  所以这个设置为true  并且以/打头
        redirectView.setHttp10Compatible(false); //不需要兼容http1.0  所以http状态码一般返回303

        // 给些参数 最终会拼接到URL后面去~
        model.addAttribute("name", "fsx");
        model.addAttribute("age", 18);
        return redirectView;
    }
源码分析:
public class RedirectView extends AbstractUrlBasedView implements SmartView {

	private static final Pattern URI_TEMPLATE_VARIABLE_PATTERN = Pattern.compile("\\{([^/]+?)\\}");

	private boolean contextRelative = false;
	// 是否兼容http1.0
	private boolean http10Compatible = true;
	private boolean exposeModelAttributes = true;
	// 如果你不设置,默认就是ISO-8859-1
	@Nullable
	private String encodingScheme;
	@Nullable
	private HttpStatus statusCode;
	private boolean expandUriTemplateVariables = true;
	// 当设置为@code true时,将追加当前URL的查询字符串,从而传播到重定向的URL。
	private boolean propagateQueryParams = false;
	@Nullable
	private String[] hosts;

	// 此处exposePathVariables设置为了true
	public RedirectView() {
		setExposePathVariables(false);
	}

	// 此处需要注意的是:给定的URL将被视为相对于Web服务器,而不是相对于当前Servletcontext
	public RedirectView(String url) {
		super(url);
		setExposePathVariables(false);
	}

	// contextRelative:true表示为将URL解释为相对于当前ServletContext上下文  它的默认这是false
	public RedirectView(String url, boolean contextRelative) {
		super(url);
		this.contextRelative = contextRelative;
		setExposePathVariables(false);
	}
	...
	// 配置与应用程序关联的一个或多个主机。所有其他主机都将被视为外部主机。
	public void setHosts(@Nullable String... hosts) {
		this.hosts = hosts;
	}

	// 显然此复写 永远返回true
	@Override
	public boolean isRedirectView() {
		return true;
	}

	// 父类ApplicationObjectSupport的方法
	// 此视图并不要求有ApplicationContext
	@Override
	protected boolean isContextRequired() {
		return false;
	}

	// 这个就是吧Model里的数据  转换到 request parameters去~
	@Override
	protected void renderMergedOutputModel(Map<String, Object> model, HttpServletRequest request, HttpServletResponse response) throws IOException {

		// 构建目标URL,若以/开头并且contextRelative=true,那就自动会拼上getContextPath(request)前缀 否则不拼
		// encoding以自己set的为准,否则以request的为准,若都为null。那就取值:WebUtils.DEFAULT_CHARACTER_ENCODING
		// 2、从当前request里面拿到UriVariables,然后fill到新的url里面去~
		// 3、把当前request的url后的参数追加到新的url后面(默认是不会追加的~~~)  把propagateQueryParams属性值set为true就会追加了~~
		// 4、exposeModelAttributes默认值是true,会吧model里的参数都合理的拼接到URL后面去~~~(这步非常重要,处理逻辑也是较为复杂的)
		// 注意Bean的名字必须叫RequestContextUtils.REQUEST_DATA_VALUE_PROCESSOR_BEAN_NAME  否则此处也不会执行的~~~
		String targetUrl = createTargetUrl(model, request);

		// 它主要是找Spring容器里是否有`RequestDataValueProcessor`的实现类,然后`processUrl`处理一下
		// 备注Spring环境默认没有它的实现,但是`Spring Security`对他是有实现的。比如大名鼎鼎的:`CsrfRequestDataValueProcessor`
		targetUrl = updateTargetUrl(targetUrl, model, request, response);

		// Save flash attributes
		// 此处因为request.getAttribute(DispatcherServlet.OUTPUT_FLASH_MAP_ATTRIBUTE)拿到的Map都是空的,所以此处也不会像里放了
		// FlashMap主要是用来解决`post/redrect/get`问题的,而现在都是ajax所以用得很少了~但Spring3.1之后提出了这个方案还是很优秀的
		RequestContextUtils.saveOutputFlashMap(targetUrl, request, response);

		// Redirect
		sendRedirect(request, response, targetUrl, this.http10Compatible);
	}

	protected void sendRedirect(HttpServletRequest request, HttpServletResponse response,
			String targetUrl, boolean http10Compatible) throws IOException {

		// 这个isRemoteHost很有意思。若getHosts()为空,就直接返回false了
		// 然后看它是否有host,若没有host(相对路径)那就直接返回false
		// 若有host再看看这个host是否在我们自己的getHosts()里面,若在里面也返回fasle(表示还是内部的嘛)
		// 只有上面都没有return  就返回true
		// 比如此处值为:/demo_war_war/index.jsp
		String encodedURL = (isRemoteHost(targetUrl) ? targetUrl : response.encodeRedirectURL(targetUrl));

		// 这里是兼容Http1.0的做法   看一下即可~~~
		if (http10Compatible) {
			HttpStatus attributeStatusCode = (HttpStatus) request.getAttribute(View.RESPONSE_STATUS_ATTRIBUTE);
			if (this.statusCode != null) {
				response.setStatus(this.statusCode.value());
				response.setHeader("Location", encodedURL);
			}
			else if (attributeStatusCode != null) {
				response.setStatus(attributeStatusCode.value());
				response.setHeader("Location", encodedURL);
			}
			else {
				// Send status code 302 by default.
				// 大部分情况下我们都会走这里,所以我们看到的Http状态码都是302~~~~
				response.sendRedirect(encodedURL);
			}
		}
		// Http1.1
		else {
			// getHttp11StatusCode:若我们自己指定了status就以指定的为准
			// 否则看这里有没有:request.getAttribute(View.RESPONSE_STATUS_ATTRIBUTE)
			// 最后都没有,就是默认值HttpStatus.SEE_OTHER  303
			HttpStatus statusCode = getHttp11StatusCode(request, response, targetUrl);
			response.setStatus(statusCode.value());
			response.setHeader("Location", encodedURL);
		}
	}

}
备注:若你方法只是:redirect:xxx这种形式,最终都会转换成一个RedirectView,所以不再去单独说明。参见:ViewNameMethodReturnValueHandler有这个转化过程
这里的测试我感觉用jsp视图有点麻烦,所以用返回json的接口才测试,没有返回jsp视图,太麻烦了,当然上面的返回jsp视图的测试也是可以的。
    @GetMapping("/index")
    public Object index(Model model) {
        RedirectView redirectView = new RedirectView("/user");
        redirectView.setContextRelative(true); //因为我们希望加上ServletContext  所以这个设置为true  并且以/打头
        redirectView.setHttp10Compatible(false); //不需要兼容http1.0  所以http状态码一般返回303
        redirectView.setExposeModelAttributes(false);
        // 给些参数 最终会拼接到URL后面去~
        model.addAttribute("name", 123);
        model.addAttribute("age", 18);
        return redirectView;
    }
通过一个接口重定向到定一个接口
    @GetMapping("/user")
    @ResponseBody
    public Data getUser() {
        User user = new User();
        user.setId((long) 99);
        MultipartData data2 = new MultipartData();
        data2.include("us222222er",user);
        data2.include("123123","123123");
        return new MultipartData().plugin().code(10000).message("操作成功").data(data2).attach();
    }

    @PostMapping("/user")
    @ResponseBody
    public Data addUser(@RequestBody MultipartData multipartData) {
        System.out.println("user = " + multipartData);
        return new MultipartData().plugin().code(10000).message("操作成功").data(multipartData).attach();
    }

看,这里的结果就是一个index接口返回值里包含了user接口的返回值,这里有两个user接口,一个是GET,一个是POST,但是只会重定向到GET接口。
这样整个RedirectView就算是看完了。如何重定向到POST请求?不可能
有人说RedirectView的exposeModelAttributes 属性可以改变请求方式,将GET改为POST,其实是不可以的,上面的测试也体现出来了,我加上了exposeModelAttributes 属性,结果就是exposeModelAttributes属性表示是否吧model里的值拼接到URL后面,默认是true会拼接的。若你改成fasle,最多也就是不拼接而已,浏览器还是会给你发送一个GET请求的。
关于Spring MVC中的Flash Attribute
前面讲了重定向视图,这里可以了解一下Spring MVC 3.1版本加了一个很有用的特性,Flash属性,它能解决一个长久以来缺少解决的问题,一个POST/Redirect/GET模式问题。
正常的MVC Web应用程序在每次提交都会POST数据到服务器。一个正常的Controller (被注解 @Controller标记)从请求获取数据和处理它 (保存或更新数据库)。一旦操作成功,用户就会被带到(forward)一个操作成功的页面。传统上来说,这样的POST/Forward/GET模式,有时候会导致多次提交问题. 例如用户按F5刷新页面,这时同样的数据会再提交一次。
为了解决这问题, POST/Redirect/GET 模式被用在MVC应用程序上. 一旦用户表单被提交成功, 我们重定向(Redirect)请求到另一个成功页面。这样能够令浏览器创建新的GET请求和加载新页面。这样用户按下F5,是直接GET请求而不是再提交一次表单。
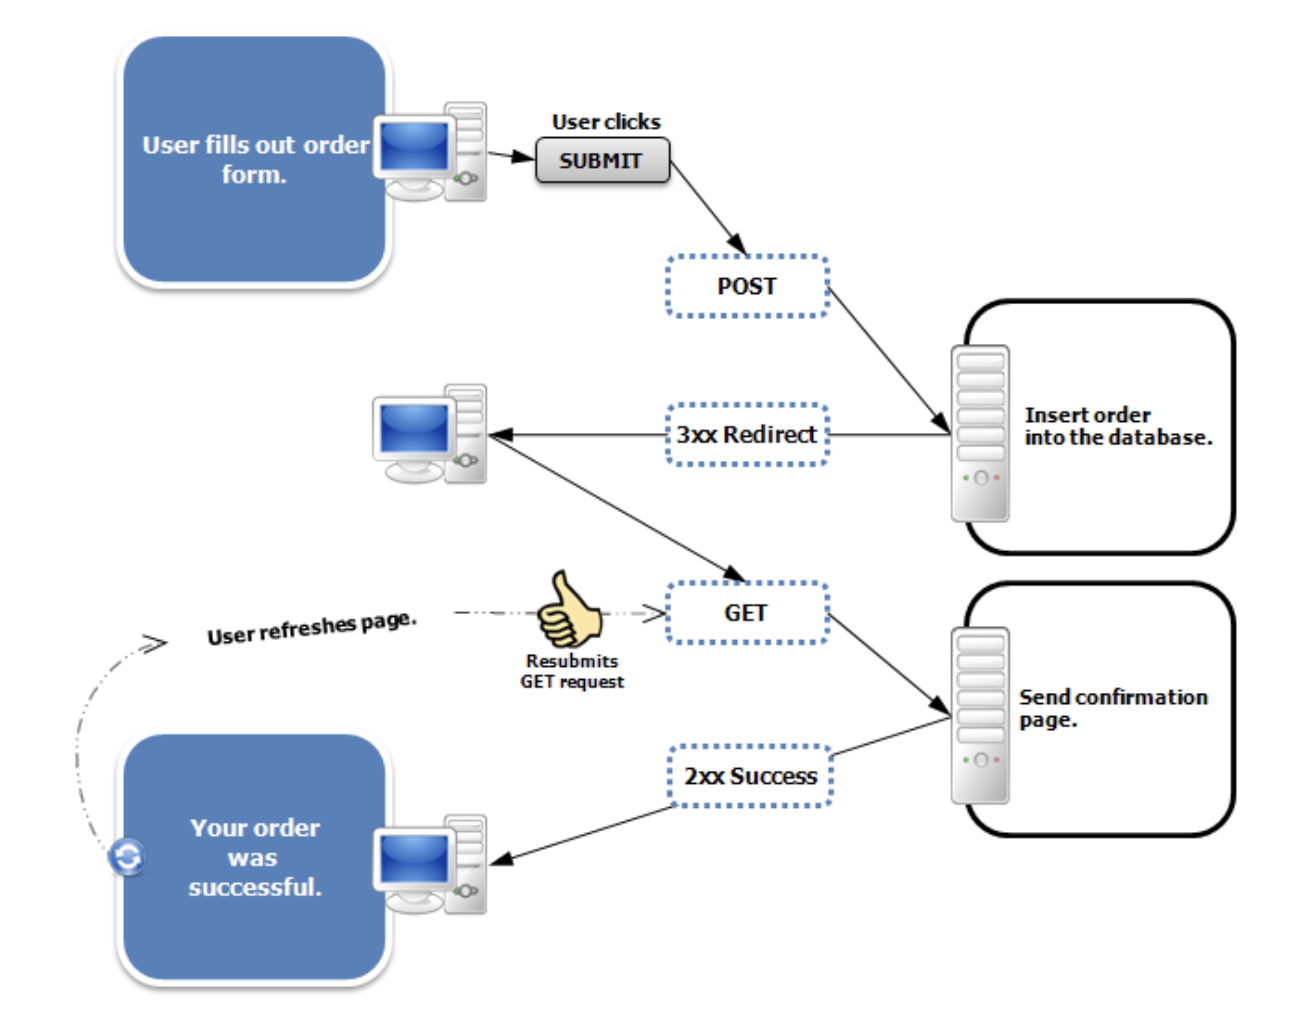
虽然这一方法看起来很完美,并且解决了表单多次提交的问题,但是它又引入了一个获取请求参数和属性的难题. 通常当我们生成一次http重定向请求的时候,被存储到请求数据会丢失,使得下一次GET请求不可能访问到这次请求中的一些有用的信息.
Flash attributes 的到来就是为了处理这一情况. Flash attributes 为一个请求存储意图为另外一个请求所使用的属性提供了一条途径. Flash attributes 在对请求的重定向生效之前被临时存储(通常是在session)中,并且在重定向之后被立即移除.
为了这样做, Flash 特性使用了两个集合. FlashMap 被用来管理 flash attributes 而 FlashMapManager 则被用来存储,获取和管理 FlashMap 实体.
对于每一次请求一个 “input” flash map 会被创建,来存储来自任何之前请求的 flash attribute 还有一个 “output” flash map 会被创建,来存储任何我们存储在这个请求中的,之后的请求参数.
但是现在都是前后端分离,以及ajax承担了很大一部分原来的工作,几乎没有post/redirect/get这种问题了
这里有一个问题:
重定向传值普通值我们好解决,但如果是一个对象呢?比如User对象里面有很多属性?
- 方案一:序列化成json串传递
- 方案二:使用
RedirectAttributes#addFlashAttribute+@ModelAttribute的方式(其原理是基于FlashMapManager和FlashMap的)
但是方案二默认是基于sesson的,所以分布式环境需谨慎使用。
其实像这种重定向还需要传大量数据的方案,一般本身就存在问题,遇上此问题多思考,是否合理?
注意addFlashAttribute传递参数的时候是不暴露参数的,意思是以post方式传递参数,但是RequestPrama类似于request.getParameter,而这个方法不是只能获取get方式,类似于URL后带参数这种方式的参数,用RequestParam接参数,只能通过addAttribute传数据,addFlashAttribute这种方式的话,只能通过@ModelAttribute获取
这里关于RedirectView与RedirectAttributes都是重定向,我的理解是,RedirectView是重定义视图地址,RedirectAttributes是定义数据重定向时的存储模型。
AbstractTemplateView
关于模版引擎渲染的抽象。它主要做两件事:
public abstract class AbstractTemplateView extends AbstractUrlBasedView {
	@Override
	protected final void renderMergedOutputModel(
			Map<String, Object> model, HttpServletRequest request, HttpServletResponse response) throws Exception {
			//1、exposeRequestAttributes,通过request.getAttributeNames()把请求域里面的attr都暴露出去
			//2、exposeSessionAttributes,session.getAttributeNames()把session域里面所有的attr都暴露出去
			//3、exposeSpringMacroHelpers,把RequestContext暴露出去(上两个默认值都是false,这个默认值是true)
			...
			renderMergedTemplateModel(model, request, response);
	}

	// 模版方法  各个模版自己去实现~~~
	protected abstract void renderMergedTemplateModel(
			Map<String, Object> model, HttpServletRequest request, HttpServletResponse response) throws Exception;
}
FreeMarkerView
下面就以老牌模版引擎FreeMarker为例,窥探一下实现的思路:
public class FreeMarkerView extends AbstractTemplateView {

	// FreeMarker Configuration: "ISO-8859-1" if not specified otherwise
	@Nullable
	private String encoding;
	// FreeMarker的配置文件  里面极其多的配置信息~~比如文件后缀名、编码等
	@Nullable
	private Configuration configuration;
	@Nullable
	private TaglibFactory taglibFactory;
	@Nullable
	private ServletContextHashModel servletContextHashModel;


	// 就是检查这个模版存不存在~~~
	@Override
	public boolean checkResource(Locale locale) throws Exception {
		String url = getUrl();
		Assert.state(url != null, "'url' not set");

		try {
			// Check that we can get the template, even if we might subsequently get it again.
			getTemplate(url, locale);
			return true;
		}
		catch (FileNotFoundException ex) {
			// Allow for ViewResolver chaining...
			return false;
		}
		catch (ParseException ex) {
			throw new ApplicationContextException("Failed to parse [" + url + "]", ex);
		}
		catch (IOException ex) {
			throw new ApplicationContextException("Failed to load [" + url + "]", ex);
		}
	}

	...
	// 最终会根据此模版去渲染~~~这是FreeMarker真正去做的事~~~~
	protected void processTemplate(Template template, SimpleHash model, HttpServletResponse response)
			throws IOException, TemplateException {

		template.process(model, response.getWriter());
	}

}
直接使用FreeMarker的使用案例
	@Test
	public void testFreeMarker() throws Exception{
		// 第0步,创建模板文件(自己找个目录创建,文件一般都以.ftl结尾)
		// 第一步:创建一个Configuration对象,直接new一个对象。构造方法的参数就是freemarker对于的版本号。
		Configuration configuration = new Configuration(Configuration.getVersion());
		// 第二步:设置模板文件所在的路径。
		configuration.setDirectoryForTemplateLoading(new File("D:\\workspace\\e3-item-web\\src\\main\\webapp\\WEB-INF\\ftl"));
		// 第三步:设置模板文件使用的字符集。一般就是utf-8.
		configuration.setDefaultEncoding("utf-8");
		// 第四步:加载一个模板,创建一个模板对象。
		Template template = configuration.getTemplate("hello.ftl");
		// 第五步:创建一个模板使用的数据集,可以是pojo也可以是map。一般是Map。
		Map data = new HashMap<>();
		//向数据集中添加数据
		data.put("hello", "this is my first freemarker test!");
		// 第六步:创建一个Writer对象,一般创建一FileWriter对象,指定生成的文件名。
		Writer out = new FileWriter(new File("D:\\Freemarker\\hello.txt"));
		// 第七步:调用模板对象的process方法输出文件,生成静态页面。
		template.process(data, out);
		// 第八步:关闭流。
		out.close();
	}
TilesView,XsltView
略
InternalResourceView
最重要的一个视图,该视图表示:内部资源视图。
// @since 17.02.2003  第一版就有了
public class InternalResourceView extends AbstractUrlBasedView {

	// 指定是否始终包含视图而不是转发到视图
	//默认值为“false”。打开此标志以强制使用servlet include,即使可以进行转发
	private boolean alwaysInclude = false;
	// 设置是否显式阻止分派回当前处理程序路径 表示是否组织循环转发,比如自己转发自己
	// 我个人认为这里默认值用true反而更好~~~因为需要递归的情况毕竟是极少数~
	// 其实可以看到InternalResourceViewResolver的buildView方法里是把这个属性显示的设置为true了的~~~
	private boolean preventDispatchLoop = false;

	public InternalResourceView(String url, boolean alwaysInclude) {
		super(url);
		this.alwaysInclude = alwaysInclude;
	}

	@Override
	protected boolean isContextRequired() {
		return false;
	}


	// 请求包含、请求转发是它特有的~~~~~
	@Override
	protected void renderMergedOutputModel(Map<String, Object> model, HttpServletRequest request, HttpServletResponse response) throws Exception {

		// Expose the model object as request attributes.
		// 把model里的数据都request.setAttribute里
		// 因为最终JSP里面取值其实都是从request等域对象里面取~
		exposeModelAsRequestAttributes(model, request);

		// Expose helpers as request attributes, if any.
		// JstlView有实现此protected方法~
		exposeHelpers(request);

		// Determine the path for the request dispatcher.
		String dispatcherPath = prepareForRendering(request, response);

		// Obtain a RequestDispatcher for the target resource (typically a JSP).  注意:此处特指JSP
		// 就是一句话:request.getRequestDispatcher(path)
		RequestDispatcher rd = getRequestDispatcher(request, dispatcherPath);
		if (rd == null) {
			throw new ServletException("Could not get RequestDispatcher for [" + getUrl() +
					"]: Check that the corresponding file exists within your web application archive!");
		}

		// If already included or response already committed, perform include, else forward.
		//useInclude:若alwaysInclude==true或者该request是incluse请求或者response.isCommitted()==true
		// 那就走incluse,否则走forward~~~~~
		if (useInclude(request, response)) {
			response.setContentType(getContentType());
			if (logger.isDebugEnabled()) {
				logger.debug("Including [" + getUrl() + "]");
			}
			rd.include(request, response);
		}

		else {
			// Note: The forwarded resource is supposed to determine the content type itself.
			if (logger.isDebugEnabled()) {
				logger.debug("Forwarding to [" + getUrl() + "]");
			}
			rd.forward(request, response);
		}
	}

	// 拿到URL,做一个循环检查~~~  若是循环转发就报错~~
	protected String prepareForRendering(HttpServletRequest request, HttpServletResponse response)
			throws Exception {

		String path = getUrl();
		Assert.state(path != null, "'url' not set");

		if (this.preventDispatchLoop) {
			String uri = request.getRequestURI();
			if (path.startsWith("/") ? uri.equals(path) : uri.equals(StringUtils.applyRelativePath(uri, path))) {
				throw new ServletException("Circular view path [" + path + "]: would dispatch back " +
						"to the current handler URL [" + uri + "] again. Check your ViewResolver setup! " +
						"(Hint: This may be the result of an unspecified view, due to default view name generation.)");
			}
		}
		return path;
	}
}
这样我们的InternalResourceView这个视图就渲染完成了,为何这么简单呢?因为它最终要么是include,要么forward掉了。交给别的Servlet去处理了。
而我们知道JSP的本质其实就是一个servlet,所以转发给它处理其实就是定位到了我们的JSP页面,它完成的对response写入动作。
比如
    @GetMapping("/index")
    public Object index() {
        InternalResourceView view = new InternalResourceView();
        view.setUrl("/index.jsp");
        view.setPreventDispatchLoop(true);
        return view;
    }
注意:直接返回一个View是不会经过ViewResolver处理的
这样是能够正常展示出我们的jsp页面的。但是,但是,但是如果我们是一个html页面呢?比如如下:
    @GetMapping("/index")
    public Object index() {
        InternalResourceView view = new InternalResourceView();
        view.setUrl("/index.html");
        view.setPreventDispatchLoop(true);
        return view;
    }
访问会直接报错
原因很简单,因为你是HTML页面,所以它并没有对应的Servlet,所以你转发的时候肯定就报错了。所以接下里的问题变成了
如何让我们的Controller跳转到HTML页面呢?其实这个涉及到Spring MVC中对静态资源的访问问题
因为html属于静态数据,所以一般我们需要访问的话都是通过mvc:resources等这种配置去达到目的让可议直接访问。但是不乏业务中可能也存在通过controller方法跳转到html页面的需求(虽然你可以JSP里面全是html页面)
JstlView
它继承自InternalResourceView,所以还是和JSP相关的。jstl相关的jar为:jstl.jar和standard.jar。这两个已经老久都没有更新过了,不过可以理解。毕竟JSP都快寿终正寝了。
它还可以和国际化有关,若使用Jstl的fmt标签,需要在SpringMVC的配置文件中配置国际化资源文件。
public class JstlView extends InternalResourceView {
	...
	public JstlView(String url, MessageSource messageSource) {
		this(url);
		this.messageSource = messageSource;
	}

	// 导出一些JSTL需要的东西
	@Override
	protected void exposeHelpers(HttpServletRequest request) throws Exception {
		if (this.messageSource != null) {
			JstlUtils.exposeLocalizationContext(request, this.messageSource);
		}
		else {
			JstlUtils.exposeLocalizationContext(new RequestContext(request, getServletContext()));
		}
	}
}
因为JSTL技术比较古老了,现在很少人使用(当然JSP的使用人群还是有不少的,需要较重点的了解一下,毕竟是java嫡系技术,在历史进程中还是很重要的存在的)
ScriptTemplateView
这个是脚本渲染引擎,从Spring4.2开始提供了一个ScriptTemplateView作为脚本模版视图。
总之视图就是展示给用户看的结果。可以是很多形式,例如:html、JSP、excel表单、Word文档、PDF文档、JSON数据、freemarker模板视图等等
