
阅读完需:约 56 分钟
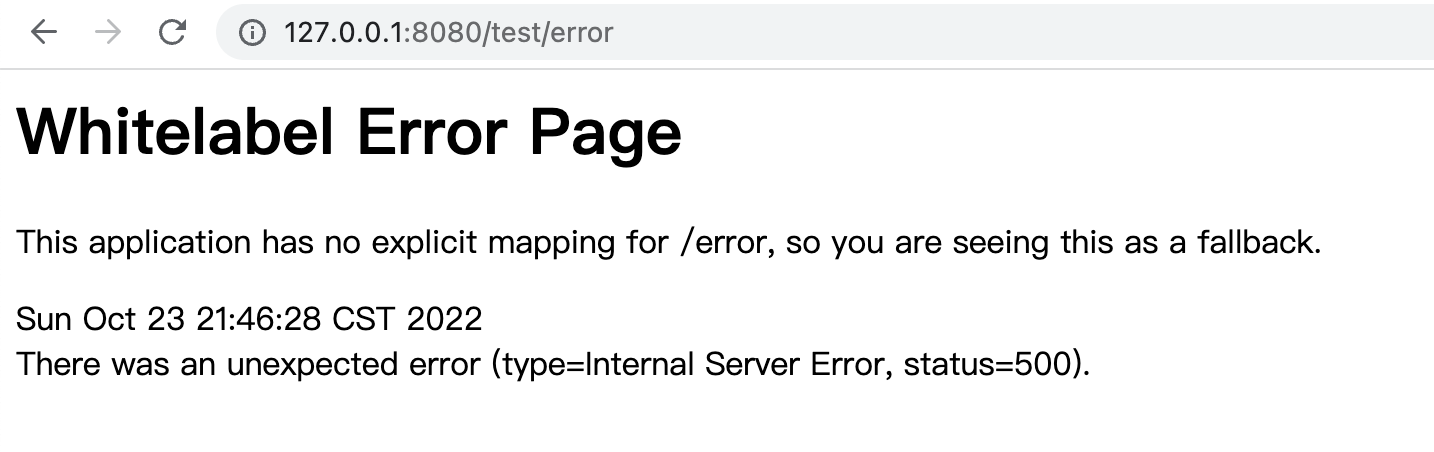
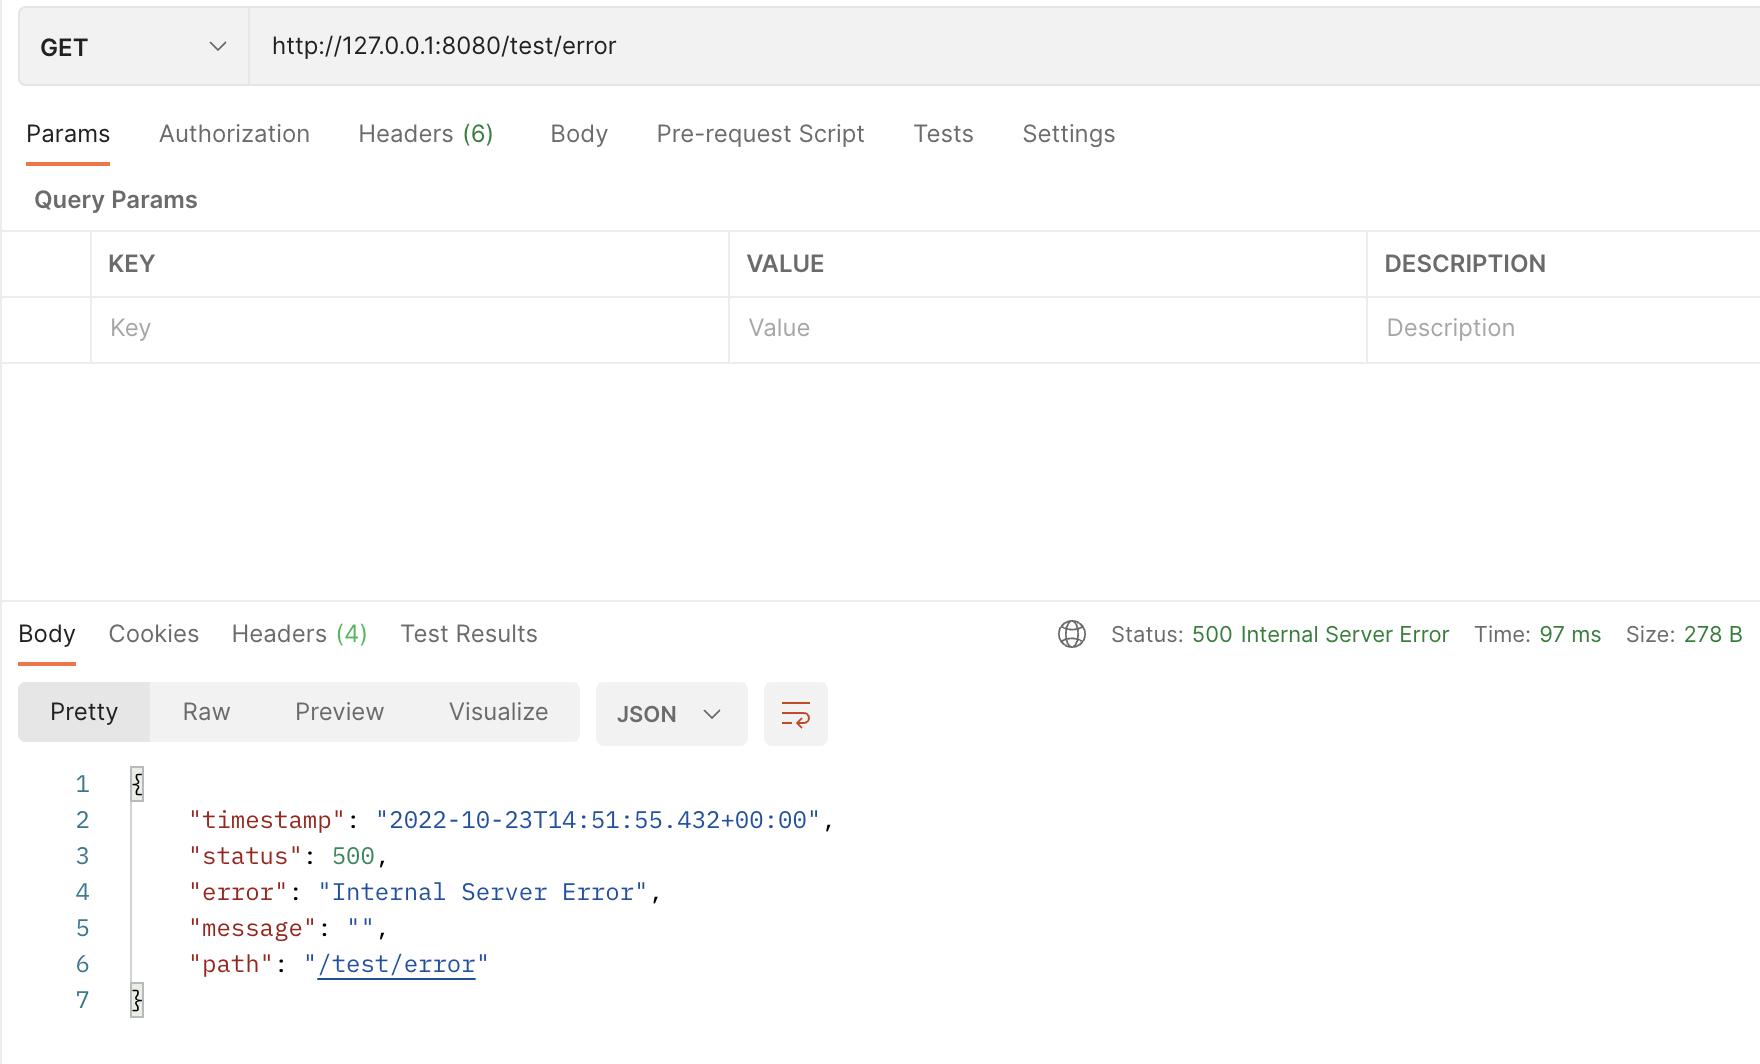
在使用Spring Boot时是否对这样一个现象”诧异”过:同一个接口(同一个URL)在接口报错情况下,若你用rest访问,它返回给你的是一个json串;但若你用浏览器访问,它返回给你的是一段html。恰如下面例子(Spring Boot环境~):
@RestController
@RequestMapping
public class HelloController {
    @GetMapping("/test/error")
    public Object testError() {
        System.out.println(1 / 0); // 强制抛出异常
        return "hello world";
    }
}
使用浏览器访问:http://localhost:8080/test/error
使用Postman访问:
同根不同命有木有。RESTful服务中很重要的一个特性是:同一资源可以有多种表述,这就是内容协商(ContentNegotiation)。
HTTP内容协商
这里主要是想说Spring MVC中的内容协商机制,但是在此之前是很有必要先了解HTTP的内容协商是怎么回事(Spring MVC实现了它并且扩展了它更为强大~)。
定义
一个URL资源服务端可以以多种形式进行响应:即MIME(MediaType)媒体类型。但对于某一个客户端(浏览器、APP、Excel导出…)来说它只需要一种。so这样客户端和服务端就得有一种机制来保证这个事情,这种机制就是内容协商机制。
方式
http的内容协商方式大致有两种:
- 服务端将可用列表(自己能提供的MIME类型们)发给客户端,客户端选择后再告诉服务端。这样服务端再按照客户端告诉的MIME返给它。(缺点:多一次网络交互,而且使用对使用者要求高,所以此方式一般不用)
- (常用)客户端发请求时就指明需要的MIME们(比如Http头部的:Accept),服务端根据客户端指定的要求返回合适的形式,并且在响应头中做出说明(如:Content-Type)若客户端要求的MIME类型服务端提供不了,那就406错误
常用请求头、响应头
请求头
-
Accept:告诉服务端需要的MIME(一般是多个,比如text/plain,application/json等。/表示可以是任何MIME资源) -
Accept-Language:告诉服务端需要的语言(在中国默认是中文嘛,但浏览器一般都可以选择N多种语言,但是是否支持要看服务器是否可以协商) -
Accept-Charset:告诉服务端需要的字符集 -
Accept-Encoding:告诉服务端需要的压缩方式(gzip,deflate,br)
响应头
-
Content-Type:告诉客户端响应的媒体类型(如application/json、text/html等) -
Content-Language:告诉客户端响应的语言 -
Content-Charset:告诉客户端响应的字符集 -
Content-Encoding:告诉客户端响应的压缩方式(gzip)
报头Accept与Content-Type的区别
有很多地方粗暴的解释:Accept属于请求头,Content-Type属于响应头,其实这是不准确的。
在前后端分离开发成为主流的今天,你应该不乏见到前端的request请求上大都有Content-Type:application/json;charset=utf-8这个请求头,因此可见Content-Type并不仅仅是响应头。
HTTP协议规范的格式如下四部分:
- <request-line>(请求消息行)
- <headers>(请求消息头)
- <blank line>(请求空白行)
- <request-body>(请求消息体)
Content-Type指请求消息体的数据格式,因为请求和响应中都可以有消息体,所以它即可用在请求头,亦可用在响应头。
content-type
要学习content-type,必须事先知道它到底是什么,是干什么用的。
HTTP协议(RFC2616)采用了请求/响应模型。客户端向服务器发送一个请求,请求头包含请求的方法、URI、协议版本、以及包含请求修饰符、客户信息和内容的类似于MIME的消息结构。服务器以一个状态行作为响应,相应的内容包括消息协议的版本,成功或者错误编码加上包含服务器信息、实体元信息以及可能的实体内容。
通常HTTP消息由一个起始行,一个或者多个头域,一个只是头域结束的空行和可选的消息体组成。
HTTP的头域包括通用头,请求头,响应头和实体头四个部分。每个头域由一个域名,冒号(:)和域值三部分组成。域名是大小写无关的,域值前可以添加任何数量的空格符,头域可以被扩展为多行,在每行开始处,使用至少一个空格或制表符。
请求消息和响应消息都可以包含实体信息,实体信息一般由实体头域和实体组成。实体头域包含关于实体的原信息,实体头包括Allow、Content- Base、Content-Encoding、Content-Language、 Content-Length、Content-Location、Content-MD5、Content-Range、Content-Type、 Etag、Expires、Last-Modified、extension-header。
Content-Type是返回消息中非常重要的内容,表示后面的文档属于什么MIME类型。Content-Type: [type]/[subtype]; parameter。例如最常见的就是text/html,它的意思是说返回的内容是文本类型,这个文本又是HTML格式的。原则上浏览器会根据Content-Type来决定如何显示返回的消息体内容。
Content-type与Accept
Accept属于请求头, Content-Type属于实体头。
- Http报头分为通用报头,请求报头,响应报头和实体报头。
- 请求方的http报头结构:通用报头|请求报头|实体报头
- 响应方的http报头结构:通用报头|响应报头|实体报头
Accept代表发送端(客户端)希望接受的数据类型。
比如:Accept:text/xml;
代表客户端希望接受的数据类型是xml类型
Content-Type代表发送端(客户端|服务器)发送的实体数据的数据类型。
比如:Content-Type:text/html;
代表发送端发送的数据格式是html。
二者合起来,
Accept:text/xml;
Content-Type:text/html
即代表希望接受的数据类型是xml格式,本次请求发送的数据的数据格式是html。
content-type速查
https://www.runoob.com/http/http-content-type.html
常见的媒体格式类型如下:
text/html : HTML格式
text/plain :纯文本格式
text/xml :  XML格式
image/gif :gif图片格式
image/jpeg :jpg图片格式
image/png:png图片格式
以application开头的媒体格式类型:
 application/xhtml+xml :XHTML格式
 application/xml     : XML数据格式
 application/atom+xml  :Atom XML聚合格式
 application/json    : JSON数据格式
 application/pdf       :pdf格式
 application/msword  : Word文档格式
 application/octet-stream : 二进制流数据(如常见的文件下载)
 application/x-www-form-urlencoded : <form encType=””>中默认的encType,form表单数据被编码为key/value格式发送到服务器(表单默认的提交数据的格式)
以audio开头的常见媒体格式文件:
'audio/x-wav' : wav文件
'audio/x-ms-wma' : wma 文件
'audio/mp3' : mp3文件
以video开头的常见媒体格式文件:
 'video/x-ms-wmv' : wmv文件
 'video/mpeg4' : mp4文件
 'video/avi' : avi文件
另外一种常见的媒体格式是上传文件之时使用的:
multipart/form-data : 需要在表单中进行文件上传时,就需要使用该格式content-type讲解
application/x-www-form-urlencoded
这应该是最常见的 POST 提交数据的方式了。浏览器的原生 form 表单,如果不设置 enctype 属性,那么最终就会以 application/x-www-form-urlencoded 方式提交数据。请求类似于下面这样(无关的请求头在本文中都省略掉了):
POST http://www.example.com HTTP/1.1
Content-Type: application/x-www-form-urlencoded;charset=utf-8
title=test&sub%5B%5D=1&sub%5B%5D=2&sub%5B%5D=3首先,Content-Type 被指定为 application/x-www-form-urlencoded;
其次,提交的数据按照 key1=val1&key2=val2 的方式进行编码,key 和 val 都进行了 URL 转码。大部分服务端语言都对这种方式有很好的支持。例如 PHP 中,$_POST[‘title’] 可以获取到 title 的值,$_POST[‘sub’] 可以得到 sub 数组。
很多时候,我们用 Ajax 提交数据时,也是使用这种方式。例如 JQuery 和 QWrap 的 Ajax,Content-Type 默认值都是「application/x-www-form-urlencoded;charset=utf-8」。
multipart/form-data
这又是一个常见的 POST 数据提交的方式。我们使用表单上传文件时,必须让 form 的 enctyped 等于这个值。
客户端form标签:
<form action="url" enctype="multipart/form-data" method="post"></form>直接来看一个生成的请求示例:
POST http://www.example.com HTTP/1.1
Content-Type:multipart/form-data; boundary=----WebKitFormBoundaryrGKCBY7qhFd3TrwA
------WebKitFormBoundaryrGKCBY7qhFd3TrwA
Content-Disposition: form-data; name="text"
title
------WebKitFormBoundaryrGKCBY7qhFd3TrwA
Content-Disposition: form-data; name="file"; filename="chrome.png"
Content-Type: image/png
PNG ... content of chrome.png ...
------WebKitFormBoundaryrGKCBY7qhFd3TrwA--
首先生成了一个 boundary 用于分割不同的字段,为了避免与正文内容重复,boundary 很长很复杂。
然后 Content-Type 里指明了数据是以 mutipart/form-data 来编码,本次请求的 boundary 是什么内容。消息主体里按照字段个数又分为多个结构类似的部分,每部分都是以 –boundary 开始,紧接着内容描述信息,然后是回车,最后是字段具体内容(文本或二进制)。如果传输的是文件,还要包含文件名和文件类型信息。消息主体最后以 –boundary– 标示结束。关于 mutipart/form-data 的详细定义,请前往 rfc1867 查看。
这种方式一般用来上传文件,各大服务端语言对它也有着良好的支持。
上面提到的这两种 POST 数据的方式,都是浏览器原生支持的,而且现阶段原生 form 表单也只支持这两种方式。但是随着越来越多的 Web 站点,尤其是 WebApp,全部使用 Ajax 进行数据交互之后,我们完全可以定义新的数据提交方式,给开发带来更多便利。
application/json
application/json 这个 Content-Type 作为响应头大家肯定不陌生。实际上,现在越来越多的人把它作为请求头,用来告诉服务端消息主体是序列化后的 JSON 字符串。由于 JSON 规范的流行,除了低版本 IE 之外的各大浏览器都原生支持 JSON.stringify,服务端语言也都有处理 JSON 的函数,使用 JSON 不会遇上什么麻烦。
JSON 格式支持比键值对复杂得多的结构化数据,这一点也很有用。记得我几年前做一个项目时,需要提交的数据层次非常深,我就是把数据 JSON 序列化之后来提交的。不过当时我是把 JSON 字符串作为 val,仍然放在键值对里,以 x-www-form-urlencoded 方式提交。
Google 的 AngularJS 中的 Ajax 功能,默认就是提交 JSON 字符串。例如下面这段代码:
var data = {'title':'test', 'sub' : [1,2,3]};
$http.post(url, data).success(function(result) {
    ...
});
最终发送的请求是:
POST http://www.example.com HTTP/1.1
Content-Type: application/json;charset=utf-8
{"title":"test","sub":[1,2,3]}
这种方案,可以方便的提交复杂的结构化数据,特别适合 RESTful 的接口。各大抓包工具如 Chrome 自带的开发者工具、Firebug、Fiddler,都会以树形结构展示 JSON 数据,非常友好。但也有些服务端语言还没有支持这种方式,例如 php 就无法通过 $_POST 对象从上面的请求中获得内容。这时候,需要自己动手处理下:在请求头中 Content-Type 为 application/json 时,从 php://input 里获得原始输入流,再 json_decode 成对象。一些 php 框架已经开始这么做了。
text/xml
它是一种使用 HTTP 作为传输协议,XML 作为编码方式的远程调用规范。典型的 XML-RPC 请求是这样的:
POST http://www.example.com HTTP/1.1
Content-Type: text/xml
<?xml version="1.0"?>
<methodCall>
    <methodName>examples.getStateName</methodName>
    <params>
        <param>
           <value><i4>41</i4></value>
        </param>
    </params>
</methodCall>
XML-RPC 协议简单、功能够用,各种语言的实现都有。它的使用也很广泛,如 WordPress 的 XML-RPC Api,搜索引擎的 ping 服务等等。JavaScript 中,也有现成的库支持以这种方式进行数据交互,能很好的支持已有的 XML-RPC 服务。不过,我个人觉得 XML 结构还是过于臃肿,一般场景用 JSON 会更灵活方便。
Spring MVC内容协商
Spring-webmvc : 5.3.3
Spring MVC实现了HTTP内容协商的同时,又进行了扩展。它支持4种协商方式:
-
HTTP头Accept - 扩展名
- 请求参数
- 固定类型(producers)
示例基于Spring进行演示,而非Spring Boot
方式一:HTTP头Accept
@RestController
@RequestMapping
public class HelloController {
    @ResponseBody
    @GetMapping("/test/{id}")
    public Person test(@PathVariable(required = false) String id) {
        System.out.println("id的值为:" + id);
        Person person = new Person();
        person.setName("fsx");
        person.setAge(18);
        return person;
    }
}
如果默认就这样,不管浏览器访问还是Postman访问,得到的都是json串。
但若你仅仅只需在pom加入如下两个包:
<!-- 此处需要导入databind包即可, jackson-annotations、jackson-core都不需要显示自己的导入了-->
<dependency>
    <groupId>com.fasterxml.jackson.core</groupId>
    <artifactId>jackson-databind</artifactId>
    <version>2.9.8</version>
</dependency>
<!-- jackson默认只会支持的json。若要xml的支持,需要额外导入如下包 -->
<dependency>
    <groupId>com.fasterxml.jackson.dataformat</groupId>
    <artifactId>jackson-dataformat-xml</artifactId>
    <version>2.9.8</version>
</dependency>
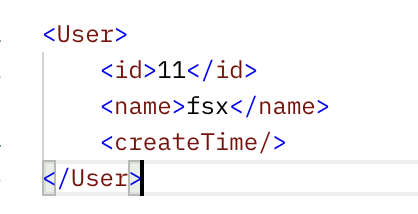
再用浏览器/Postman访问,得到结果就是xml了,形如这样:
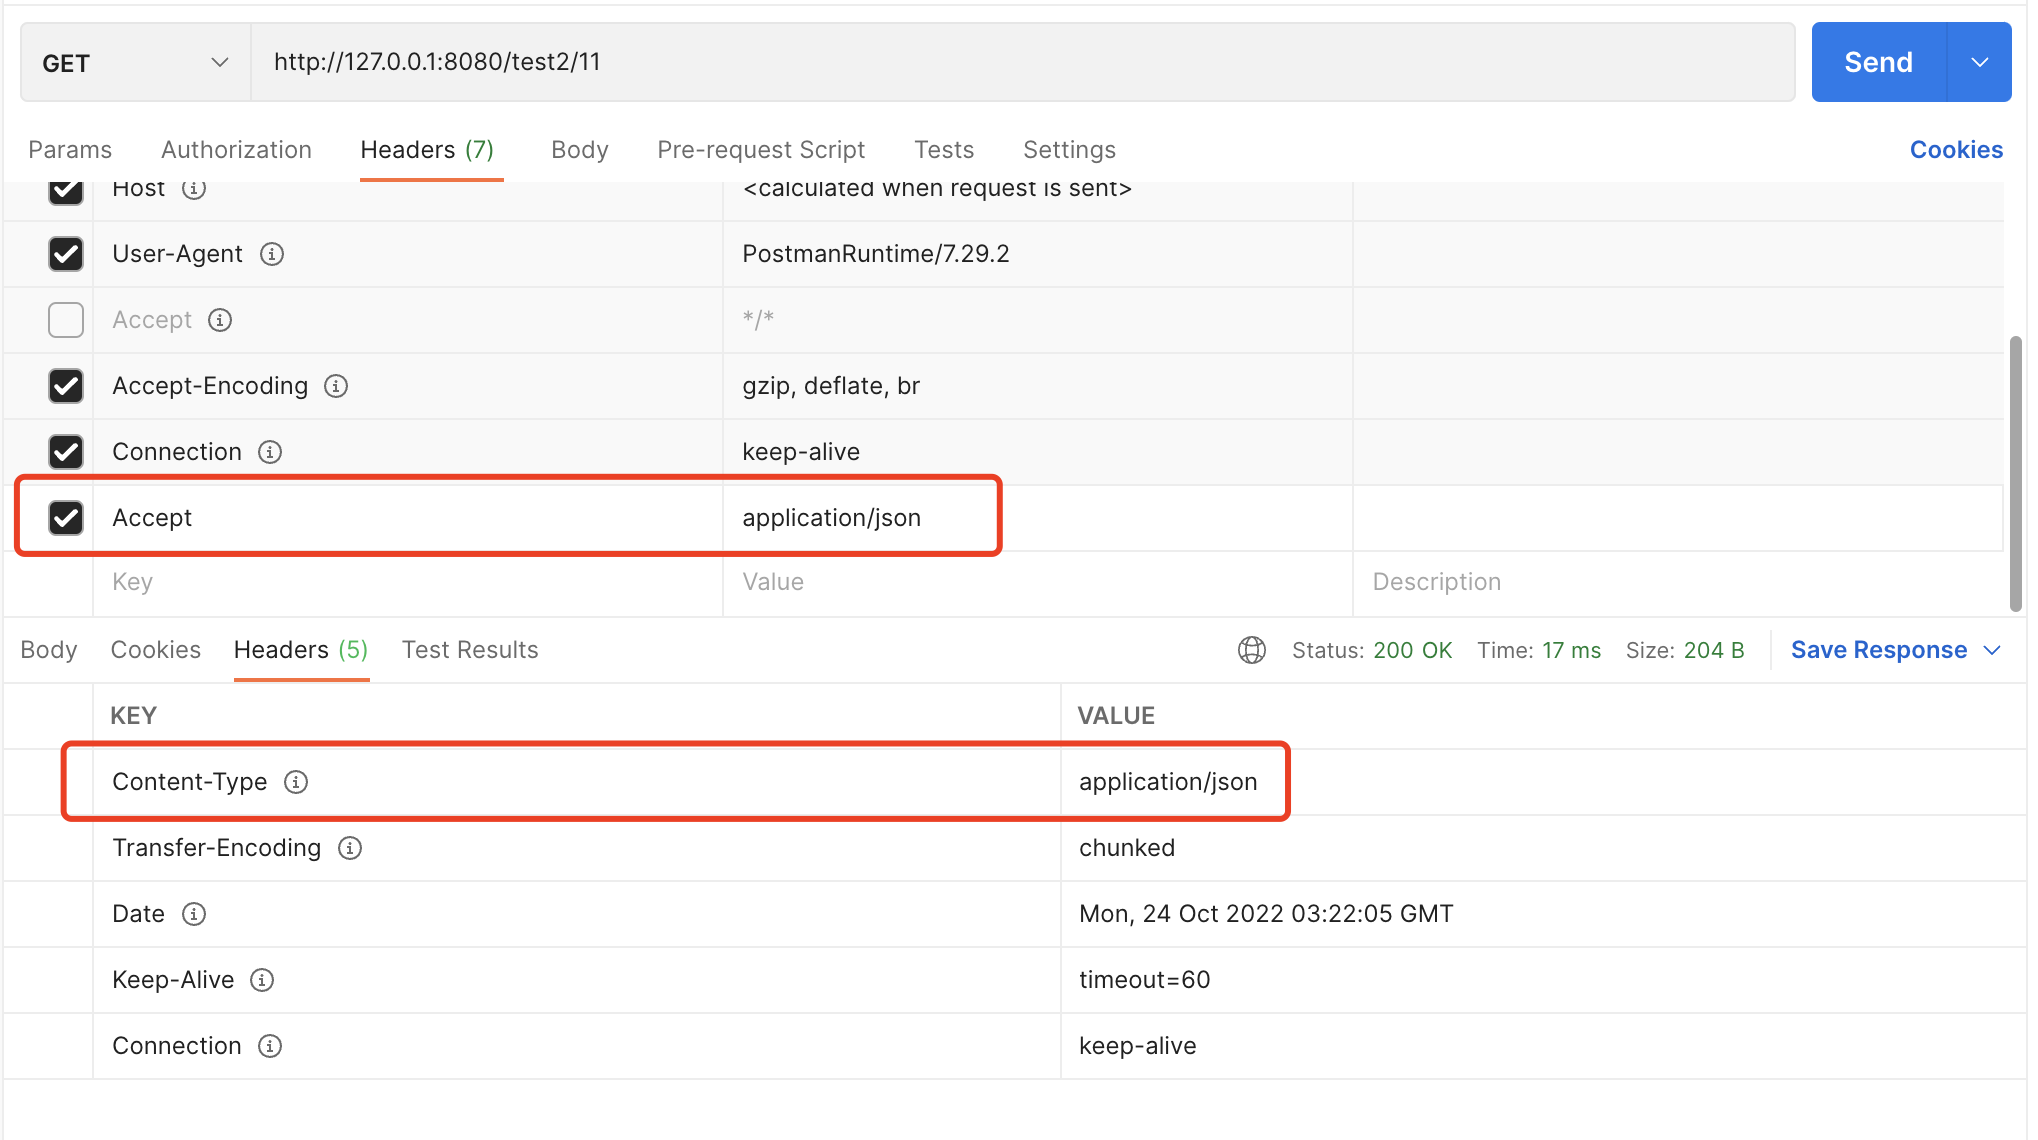
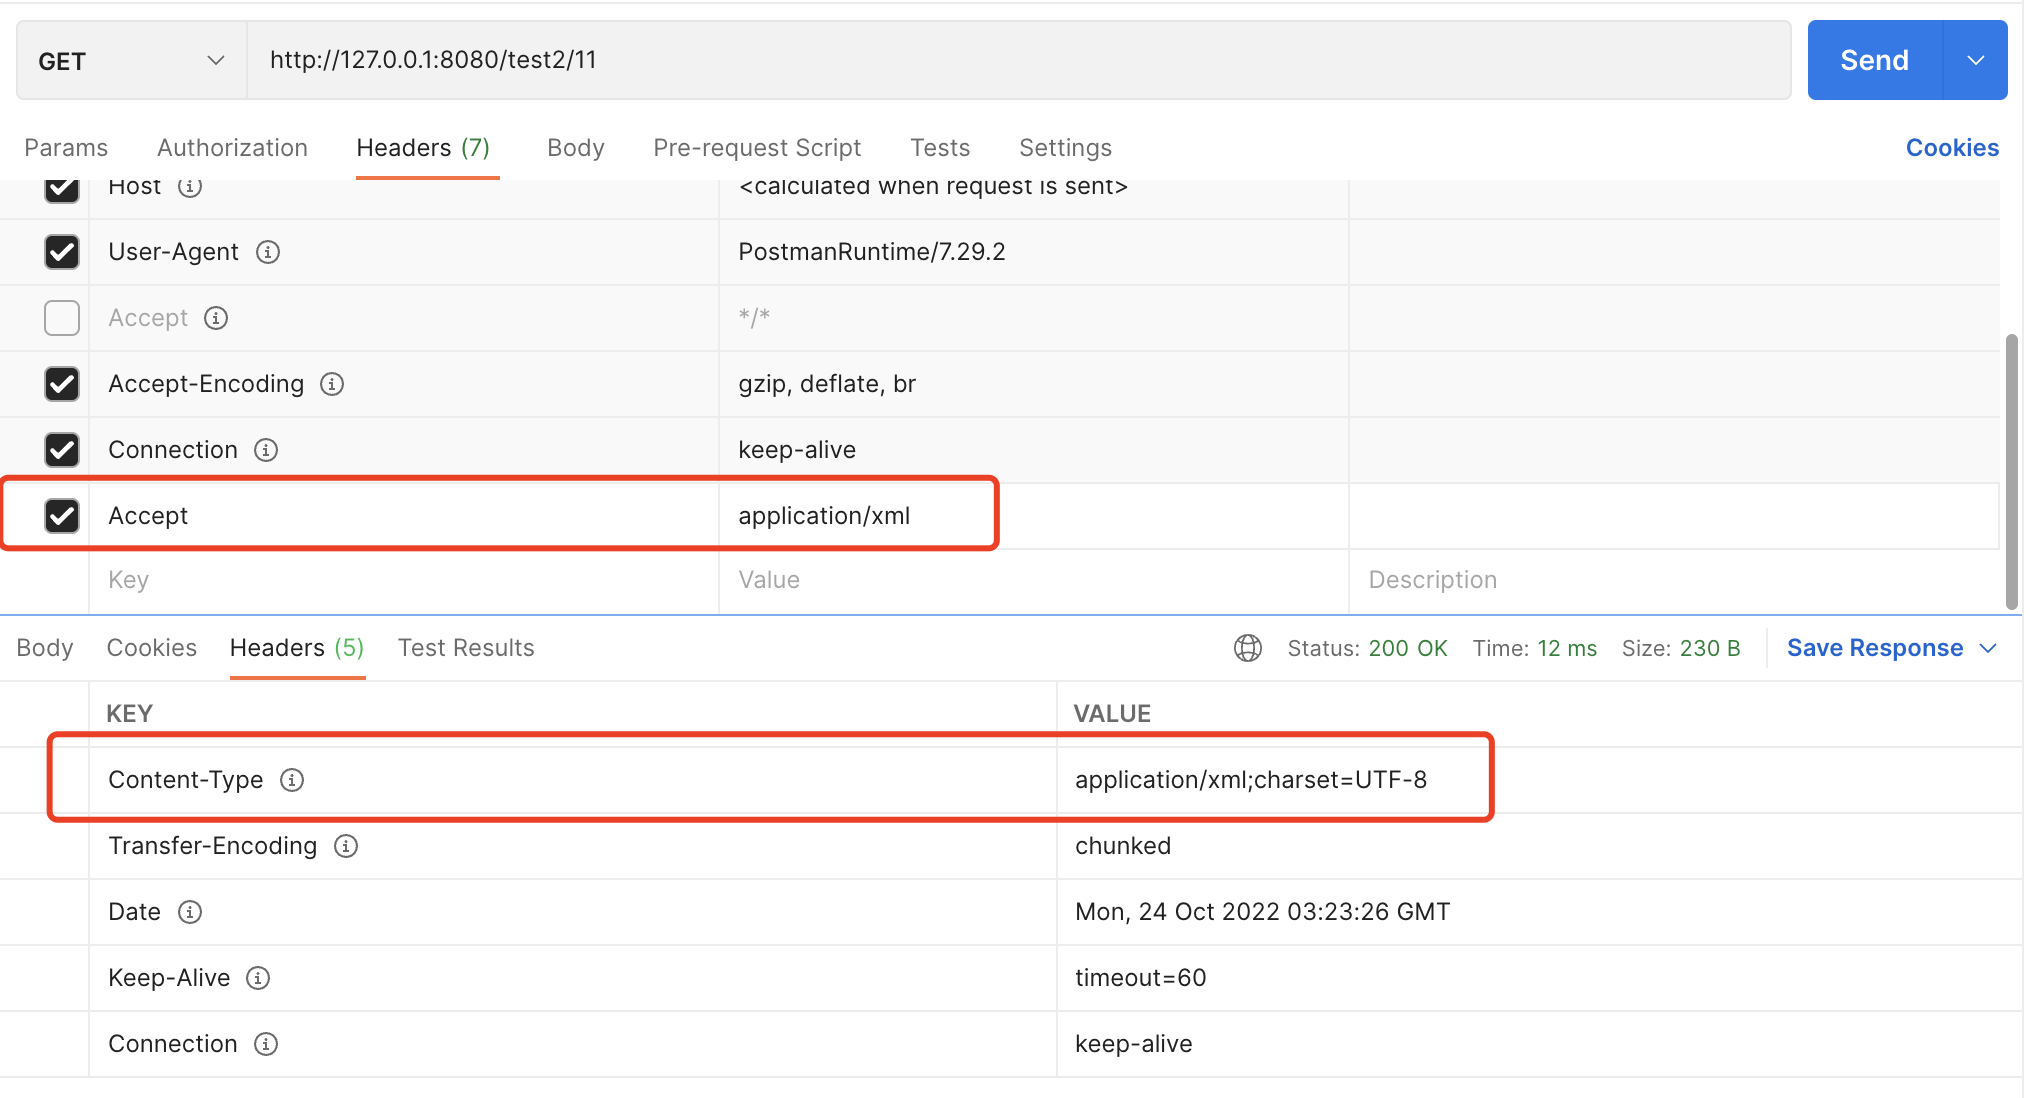
但若我们postman手动指定这个头:Accept:application/json,返回就和浏览器有差异了(若不手动指定,Accept默认值是*/*):
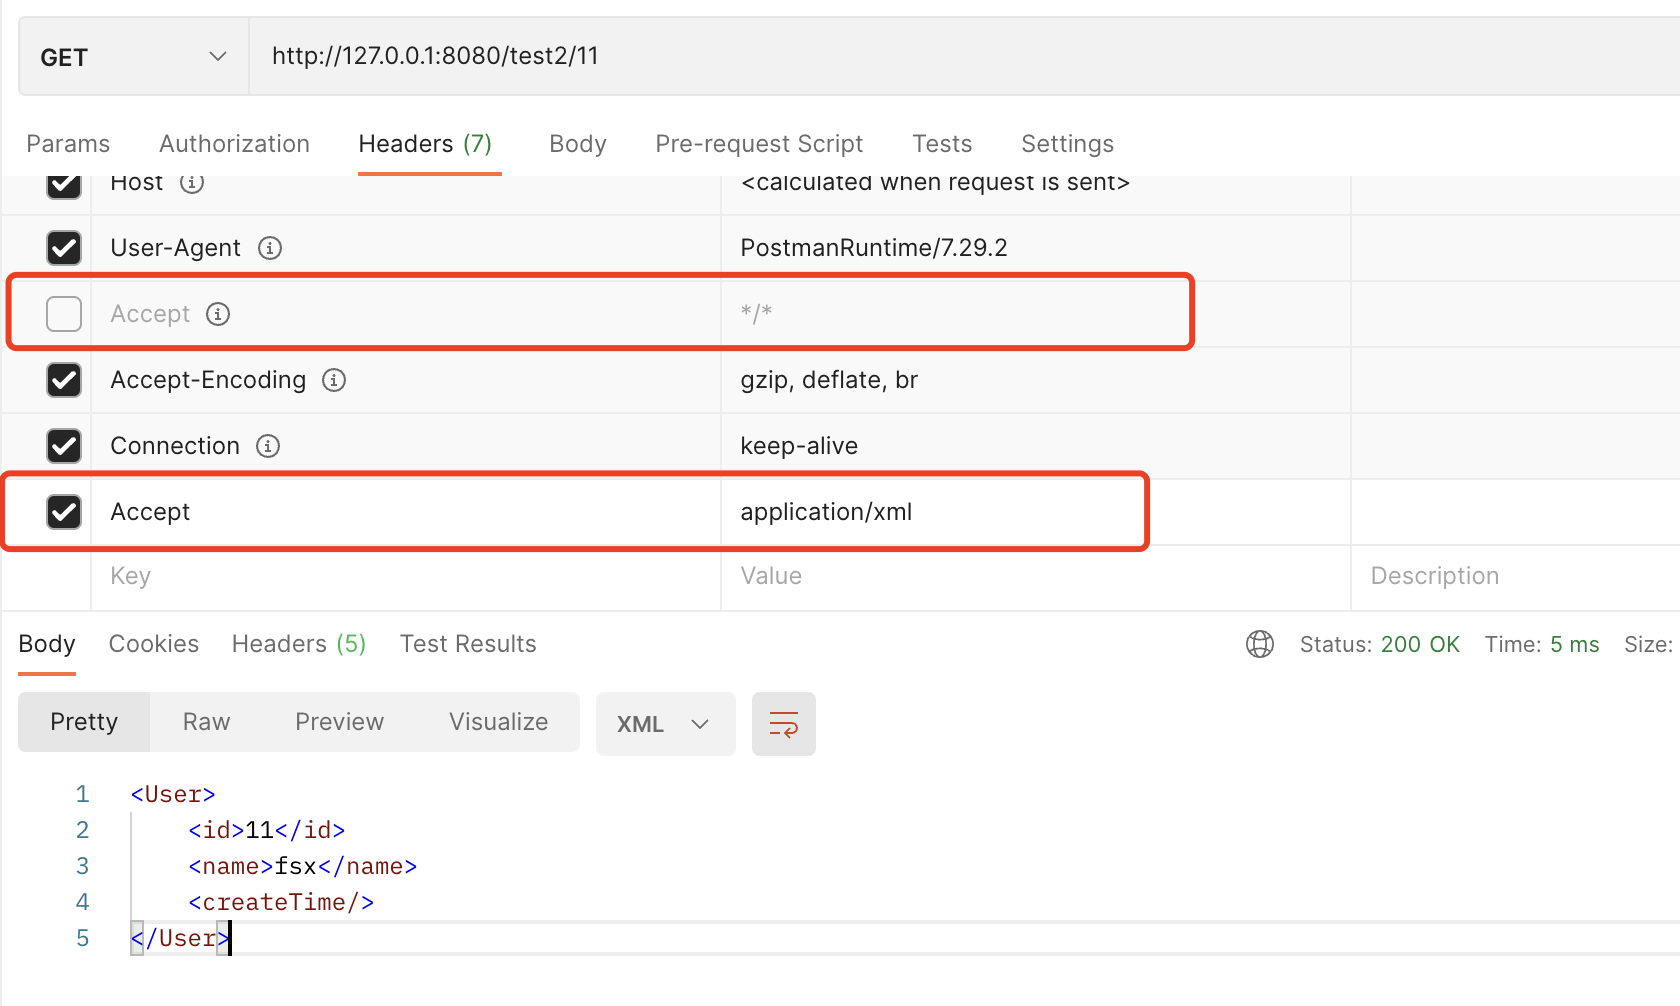
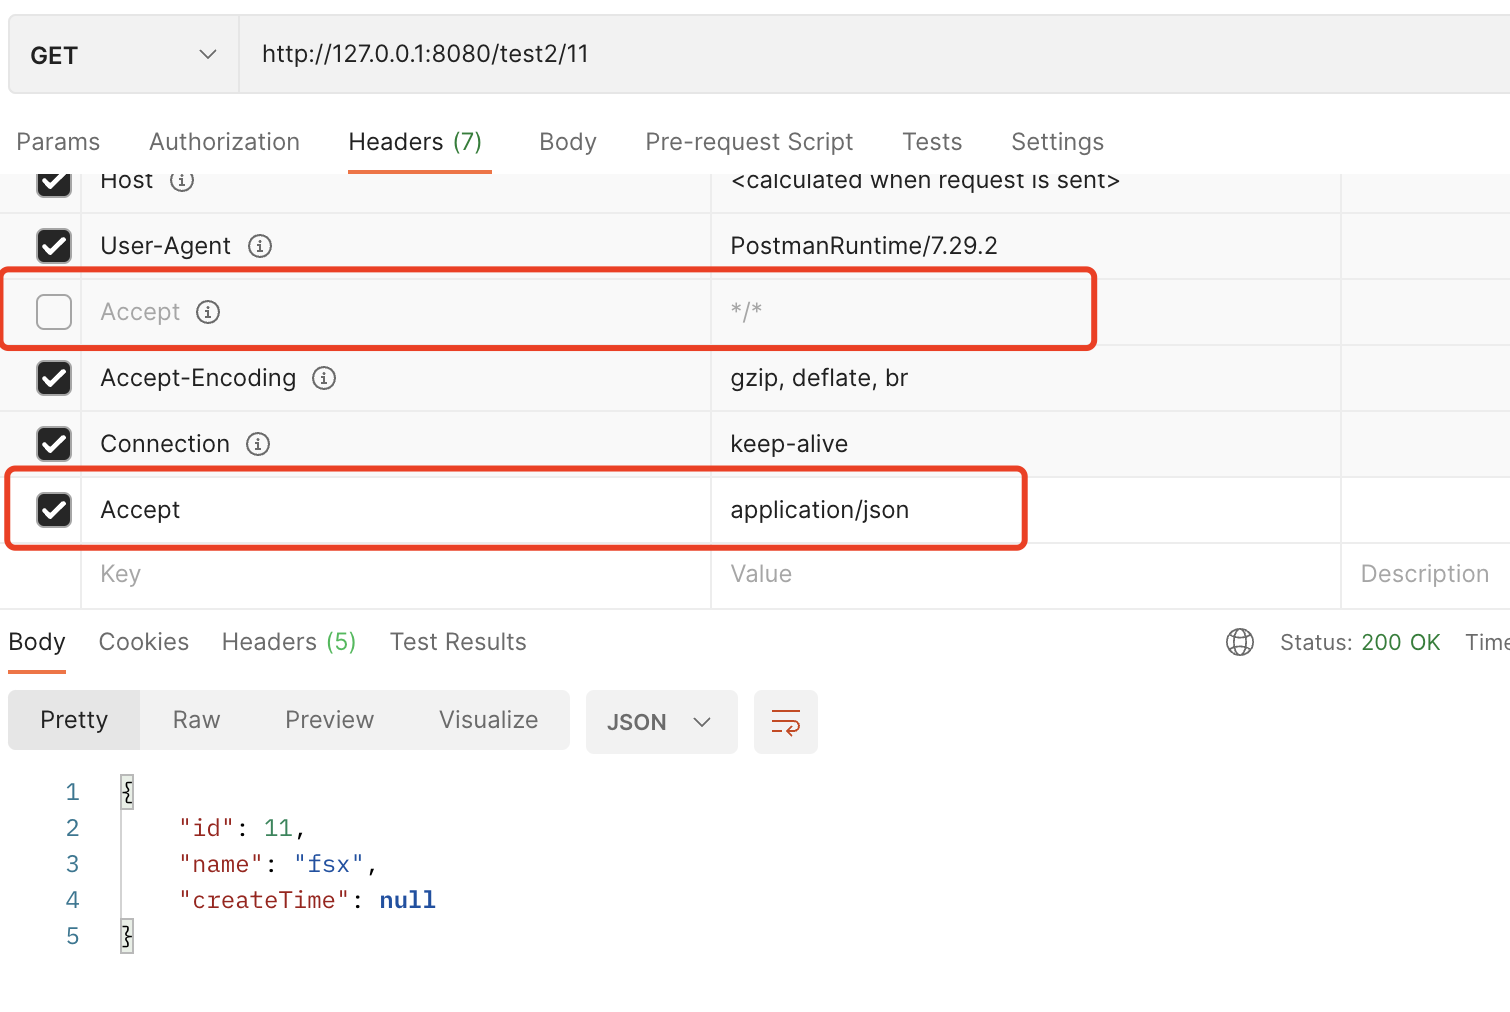
并且我们可以看到response的头信息对比如下:
原因简析
Chrome浏览器请求默认发出的Accept是:Accept: text/html,application/xhtml+xml,application/xml;q=0.9,image/webp,image/apng,/;q=0.8,application/signed-exchange;v=b3。
由于例子使用的是@ResponseBody,因此它不会返回一个view:交给消息转换器处理,因此这就和MediaType以及权重有关了。
消息最终都会交给AbstractMessageConverterMethodProcessor.writeWithMessageConverters()方法:
// @since 3.1
AbstractMessageConverterMethodProcessor:
	protected <T> void writeWithMessageConverters( ... ) {
		Object body;
		Class<?> valueType;
		Type targetType;
		...
		HttpServletRequest request = inputMessage.getServletRequest();
		// 这里交给contentNegotiationManager.resolveMediaTypes()  找出客户端可以接受的MediaType们~~~
		// 此处是已经排序好的(根据Q值等等)
		List<MediaType> acceptableTypes = getAcceptableMediaTypes(request);
		// 这是服务端它所能提供出的MediaType们
		List<MediaType> producibleTypes = getProducibleMediaTypes(request, valueType, targetType);

		// 协商。 经过一定的排序、匹配  最终匹配出一个合适的MediaType
		...
		// 把待使用的们再次排序,
		MediaType.sortBySpecificityAndQuality(mediaTypesToUse);

		// 最终找出一个最合适的、最终使用的:selectedMediaType
			for (MediaType mediaType : mediaTypesToUse) {
				if (mediaType.isConcrete()) {
					selectedMediaType = mediaType;
					break;
				} else if (mediaType.isPresentIn(ALL_APPLICATION_MEDIA_TYPES)) {
					selectedMediaType = MediaType.APPLICATION_OCTET_STREAM;
					break;
				}
			}
	}
acceptableTypes是客户端通过Accept告知的。
producibleTypes代表着服务端所能提供的类型们。参考这个getProducibleMediaTypes()方法:
AbstractMessageConverterMethodProcessor:

	protected List<MediaType> getProducibleMediaTypes( ... ) {
		// 它设值的地方唯一在于:@RequestMapping.producers属性
		// 大多数情况下:我们一般都不会给此属性赋值吧~~~
		Set<MediaType> mediaTypes = (Set<MediaType>) request.getAttribute(HandlerMapping.PRODUCIBLE_MEDIA_TYPES_ATTRIBUTE);
		if (!CollectionUtils.isEmpty(mediaTypes)) {
			return new ArrayList<>(mediaTypes);
		}
		// 大多数情况下:都会走进这个逻辑 --> 从消息转换器中匹配一个合适的出来
		else if (!this.allSupportedMediaTypes.isEmpty()) {
			List<MediaType> result = new ArrayList<>();
			// 从所有的消息转换器中  匹配出一个/多个List<MediaType> result出来
			// 这就代表着:我服务端所能支持的所有的List<MediaType>们了
			for (HttpMessageConverter<?> converter : this.messageConverters) {
				if (converter instanceof GenericHttpMessageConverter && targetType != null) {
					if (((GenericHttpMessageConverter<?>) converter).canWrite(targetType, valueClass, null)) {
						result.addAll(converter.getSupportedMediaTypes());
					}
				}
				else if (converter.canWrite(valueClass, null)) {
					result.addAll(converter.getSupportedMediaTypes());
				}
			}
			return result;
		} else {
			return Collections.singletonList(MediaType.ALL);
		}
	}
可以看到服务端最终能够提供哪些MediaType,来源于消息转换器HttpMessageConverter对类型的支持。
本例的现象:起初返回的是json串,仅仅只需要导入jackson-dataformat-xml后就返回xml了。
原因是因为加入MappingJackson2XmlHttpMessageConverter都有这个判断:
	private static final boolean jackson2XmlPresent = ClassUtils.isPresent("com.fasterxml.jackson.dataformat.xml.XmlMapper", classLoader);

		if (jackson2XmlPresent) {
			addPartConverter(new MappingJackson2XmlHttpMessageConverter());
		}
所以默认情况下Spring MVC并不支持application/xml这种媒体格式,所以若不导包协商出来的结果是:application/json。
默认情况下优先级是xml高于json。当然一般都没有xml包,所以才轮到json的。
这里最常见的就是我们用的注册中心Eureka,里面就有jackson-dataformat-xml依赖包,所以会出现XML格式的内容。
另外还需要注意一点:有人说通过在请求头里指定Content-Type:application/json来达到效果。现在你应该知道,这样做显然是没用的,只能使用Accept这个头来指定
第一种协商方式是Spring MVC完全基于HTTP Accept首部的方式了。该种方式Spring MVC默认支持且默认已开启。
优缺点:
- 优点:理想的标准方式
- 缺点:由于浏览器的差异,导致发送的
Accept Header头可能会不一样,从而得到的结果不具备浏览器兼容性
方式二:(变量)扩展名
访问/test/1.xml返回的是xml,若访问/test/1.json返回的是json
这种方式使用起来非常的便捷,并且还不依赖于浏览器。但有如下几点使时的注意事项:
- 扩展名必须是变量的扩展名。比如上例若访问test.json / test.xml就404
-
@PathVariable的参数类型只能使用通用类型(String/Object),因为接收过来的value值就是1.json/1.xml,所以若用Integer接收将报错类型转换错误,建议是这部分不接收(这部分不使用@PathVariable接收),拿出来只为内容协商使用 - 扩展名优先级比
Accept要高
优缺点:
- 优点:灵活,不受浏览器约束
- 缺点:丧失了同一URL的多种展现方式。在实际环境中使用还是较多的,因为这种方式更符合程序员的习惯
在SpringBoot2.x中,默认情况下是不支持扩展名功能的,所以要想支持扩展名功能,必须开启对该功能的支持。
可以有两种方式开启:
- 配置类中开启(较麻烦)
- 配置文件中开启(较简单)
配置类中开启扩展名功能
@Configuration
@EnableWebMvc
public class WebMvcConfig implements WebMvcConfigurer {

    @Override
    public void configureContentNegotiation(ContentNegotiationConfigurer configurer) {
        //开启支持扩展名功能
        configurer.favorPathExtension(true)
                .useJaf(false)
                .favorParameter(true)
                .ignoreAcceptHeader(true);
//                        .defaultContentType(MediaType.APPLICATION_JSON)
//                        .mediaType("json", MediaType.APPLICATION_JSON)
//                        .mediaType("xml", MediaType.APPLICATION_XML);
    }

}
配置文件中开启扩展名功能
#开启支持扩展名功能
#例如访问/test/1.xml则返回xml格式的文件;如访问/test/1.json返回的是json格式数据.
#该方式丧失了同一url多种展现的方式,但现在这种在实际环境中是使用最多的.因为更加符合程序员的审美观.
spring.mvc.contentnegotiation.favor-path-extension=true
方式三:请求参数
这种协商方式Spring MVC支持,但默认是关闭的,需要显示的打开:
@Configuration
@EnableWebMvc
public class WebMvcConfig extends WebMvcConfigurerAdapter {
    @Override
    public void configureContentNegotiation(ContentNegotiationConfigurer configurer) {
    	// 支持请求参数协商
        configurer.favorParameter(true);
    }
}
请求URL:/test/1?format=xml返回xml;/test/1?format=json返回json。同样的总结如下几点注意事项:
- 前两种方式默认是开启的,但此种方式需要手动显示开启
- 此方式优先级
低于扩展名(因此你测试时若想它生效,请去掉url的后缀)
配置文件中打开请求参数功能
#开启支持扩展名功能
#例如访问/test/1.xml则返回xml格式的文件;如访问/test/1.json返回的是json格式数据.
#该方式丧失了同一url多种展现的方式,但现在这种在实际环境中是使用最多的.因为更加符合程序员的审美观.
spring.mvc.contentnegotiation.favor-path-extension=true

#开启内容协商的请求参数功能,默认没有开启
spring.mvc.contentnegotiation.favor-parameter=true
优缺点:
- 优点:不受浏览器约束
- 缺点:需要额外的传递format参数,URL变得冗余繁琐,缺少了REST的简洁风范。还有个缺点便是:还需手动显示开启。
方式四:固定类型(produces)
它就是利用@RequestMapping注解属性produces(可能你平时也在用,但并不知道原因):
@ResponseBody
@GetMapping(value = {"/test/{id}", "/test"}, produces = MediaType.APPLICATION_JSON_UTF8_VALUE)
public Person test() { ... }
访问:/test/1返回的就是json;即使你已经导入了jackson的xml包,返回的依旧还是json。
它也有它很很很重要的一个注意事项:produces指定的MediaType类型不能和后缀、请求参数、Accept冲突。例如本利这里指定了json格式,如果你这么访问/test/1.xml,或者format=xml,或者Accept不是application/json或者/ 将无法完成内容协商:http状态码为406,报错如下:

produces使用固然也比较简单,针对上面报错406的原因
原因:
- 先解析请求的媒体类型:1.xml解析出来的
MediaType是application/xml - 拿着这个
MediaType(当然还有URL、请求Method等所有)去匹配HandlerMethod的时候会发现producers匹配不上 - 匹配不上就交给
RequestMappingInfoHandlerMapping.handleNoMatch()处理 - 抛出异常后最终交给
DispatcherServlet.processHandlerException()去处理这个异常,转换到Http状态码
RequestMappingInfoHandlerMapping:

	@Override
	protected HandlerMethod handleNoMatch(...) {
		if (helper.hasConsumesMismatch()) {
			...
			throw new HttpMediaTypeNotSupportedException(contentType, new ArrayList<>(mediaTypes));
		}
		// 抛出异常:HttpMediaTypeNotAcceptableException
		if (helper.hasProducesMismatch()) {
			Set<MediaType> mediaTypes = helper.getProducibleMediaTypes();
			throw new HttpMediaTypeNotAcceptableException(new ArrayList<>(mediaTypes));
		}
	}
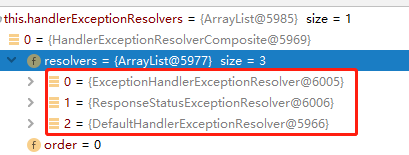
会调用所有的
handlerExceptionResolvers来处理这个异常,本处会被DefaultHandlerExceptionResolver最终处理。最终处理代码如下(406状态码):
	protected ModelAndView handleHttpMediaTypeNotAcceptable(HttpMediaTypeNotAcceptableException ex,
			HttpServletRequest request, HttpServletResponse response, @Nullable Object handler) throws IOException {

		response.sendError(HttpServletResponse.SC_NOT_ACCEPTABLE);
		return new ModelAndView();
	}
Spring MVC默认注册的异常处理器是如下3个:
原理
有了关于Accept的原理描述,理解它就非常简单了。因为指定了produces属性,所以getProducibleMediaTypes()方法在拿服务端支持的媒体类型时:
protected List<MediaType> getProducibleMediaTypes( ... ){
	Set<MediaType> mediaTypes = (Set<MediaType>) request.getAttribute(HandlerMapping.PRODUCIBLE_MEDIA_TYPES_ATTRIBUTE);
	if (!CollectionUtils.isEmpty(mediaTypes)) {
		return new ArrayList<>(mediaTypes);
	}
	...
}
因为设置了producers,所以代码第一句就能拿到值了(后面的协商机制完全同上)。
优缺点:
- 优点:使用简单,天然支持
- 缺点:让
HandlerMethod处理器缺失灵活性
Spring Boot默认异常消息处理
再回到开头的Spring Boot为何对异常消息,浏览器和postman的展示不一样。这就是Spring Boot默认的对异常处理方式:它使用的就是基于 固定类型(produces)实现的内容协商。
Spirng Boot出现异常信息时候,会默认访问/error,它的处理类是:BasicErrorController
@Controller
@RequestMapping("${server.error.path:${error.path:/error}}")
public class BasicErrorController extends AbstractErrorController {
	...
	// 处理类浏览器
	@RequestMapping(produces = "text/html")
	public ModelAndView errorHtml(HttpServletRequest request, HttpServletResponse response) {
		...
		return (modelAndView != null ? modelAndView : new ModelAndView("error", model));
	}

	// 处理restful/json方式
	@RequestMapping
	@ResponseBody
	public ResponseEntity<Map<String, Object>> error(HttpServletRequest request) {
		Map<String, Object> body = getErrorAttributes(request, isIncludeStackTrace(request, MediaType.ALL));
		HttpStatus status = getStatus(request);
		return new ResponseEntity<Map<String, Object>>(body, status);
	}
	...
}
小总结
内容协商在RESTful流行的今天还是非常重要的一块内容,它对于提升用户体验,提升效率和降低维护成本都有不可忽视的作用,注意它三的优先级为:后缀 > 请求参数 > HTTP首部Accept
一般情况下,我们为了通用都会使用基于Http的内容协商(Accept),但在实际应用中其实很少用它,因为不同的浏览器可能导致不同的行为(比如Chrome和Firefox就很不一样),所以为了保证“稳定性”一般都选择使用方案二或方案三(比如Spring的官方doc)。
MVC内容协商实现原理及自定义配置
前面说了Http内容协商的一些概念,以及Spring MVC内置的4种协商方式使用介绍。这里主要针对Spring MVC内容协商方式:从步骤、原理层面理解,最后达到通过自己来扩展协商方式效果。
首先肯定需要介绍的,那必然就是Spring MVC的默认支持的四大协商策略的原理分析喽:
ContentNegotiationStrategy
该接口就是Spring MVC实现内容协商的策略接口:
// A strategy for resolving the requested media types for a request.
// @since 3.2
@FunctionalInterface
public interface ContentNegotiationStrategy {
	// @since 5.0.5
	List<MediaType> MEDIA_TYPE_ALL_LIST = Collections.singletonList(MediaType.ALL);

	// 将给定的请求解析为媒体类型列表
	// 返回的 List 首先按照 specificity 参数排序,其次按照 quality 参数排序
	// 如果请求的媒体类型不能被解析则抛出 HttpMediaTypeNotAcceptableException 异常
	List<MediaType> resolveMediaTypes(NativeWebRequest webRequest) throws HttpMediaTypeNotAcceptableException;
}
说白了,这个策略接口就是想知道客户端的请求需要什么类型(MediaType)的数据List。从 上文 我们知道Spring MVC它支持了4种不同的协商机制,它都和此策略接口相关的。
继承树:
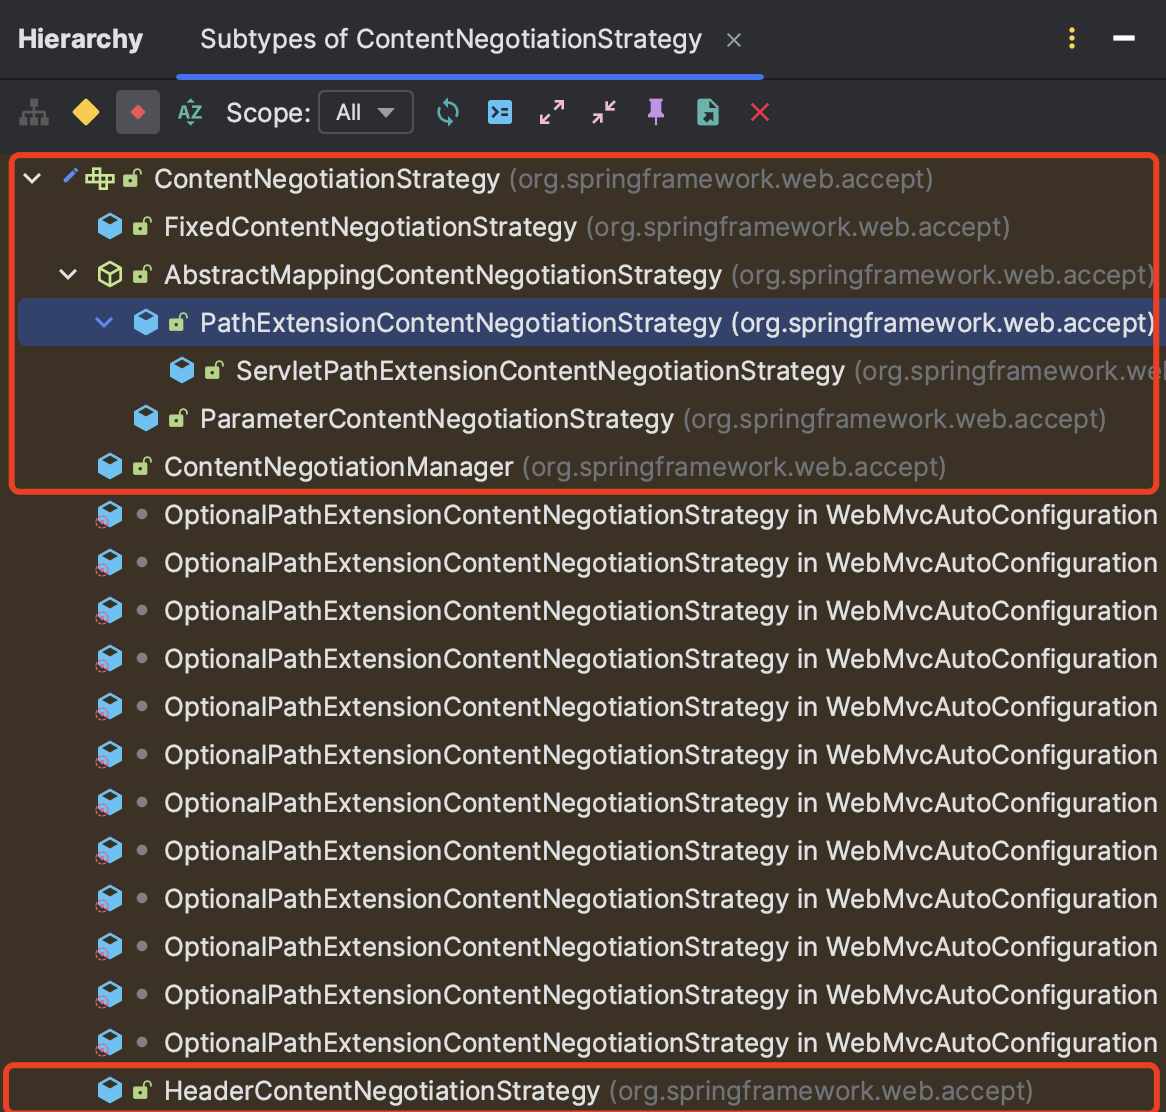
从实现类的名字上就能看出它和上文提到的4种方式恰好是一一对应着的(ContentNegotiationManager除外)。
Spring MVC默认加载两个该策略接口的实现类:
-
ServletPathExtensionContentNegotiationStrategy–>根据文件扩展名(支持RESTful)。 -
HeaderContentNegotiationStrategy–>根据HTTP Header里的Accept字段(支持Http)。
HeaderContentNegotiationStrategy
Accept Header解析:它根据请求头Accept来协商。
public class HeaderContentNegotiationStrategy implements ContentNegotiationStrategy {
	@Override
	public List<MediaType> resolveMediaTypes(NativeWebRequest request) throws HttpMediaTypeNotAcceptableException {

		// 我的Chrome浏览器值是:[text/html,application/xhtml+xml,application/xml;q=0.9,image/webp,image/apng,*/*;q=0.8,application/signed-exchange;v=b3]
		// postman的值是:[*/*]
		String[] headerValueArray = request.getHeaderValues(HttpHeaders.ACCEPT);
		if (headerValueArray == null) {
			return MEDIA_TYPE_ALL_LIST;
		}

		List<String> headerValues = Arrays.asList(headerValueArray);
		try {
			List<MediaType> mediaTypes = MediaType.parseMediaTypes(headerValues);
			// 排序
			MediaType.sortBySpecificityAndQuality(mediaTypes);
			// 最后Chrome浏览器的List如下:
			// 0 = {MediaType@6205} "text/html"
			// 1 = {MediaType@6206} "application/xhtml+xml"
			// 2 = {MediaType@6207} "image/webp"
			// 3 = {MediaType@6208} "image/apng"
			// 4 = {MediaType@6209} "application/signed-exchange;v=b3"
			// 5 = {MediaType@6210} "application/xml;q=0.9"
			// 6 = {MediaType@6211} "*/*;q=0.8"
			return !CollectionUtils.isEmpty(mediaTypes) ? mediaTypes : MEDIA_TYPE_ALL_LIST;
		} catch (InvalidMediaTypeException ex) {
			throw new HttpMediaTypeNotAcceptableException("Could not parse 'Accept' header " + headerValues + ": " + ex.getMessage());
		}
	}
}
可以看到,如果没有传递Accept,则默认使用MediaType.ALL 也就是*/*
AbstractMappingContentNegotiationStrategy
通过file extension/query param来协商的抽象实现类。在了解它之前,有必要先插队先了解MediaTypeFileExtensionResolver它的作用:
MediaTypeFileExtensionResolver:MediaType和路径扩展名解析策略的接口,例如将 .json 解析成 application/json 或者反向解析
// @since 3.2
public interface MediaTypeFileExtensionResolver {

	// 根据指定的mediaType返回一组文件扩展名
	List<String> resolveFileExtensions(MediaType mediaType);
	// 返回该接口注册进来的所有的扩展名
	List<String> getAllFileExtensions();
}
继承树如下:
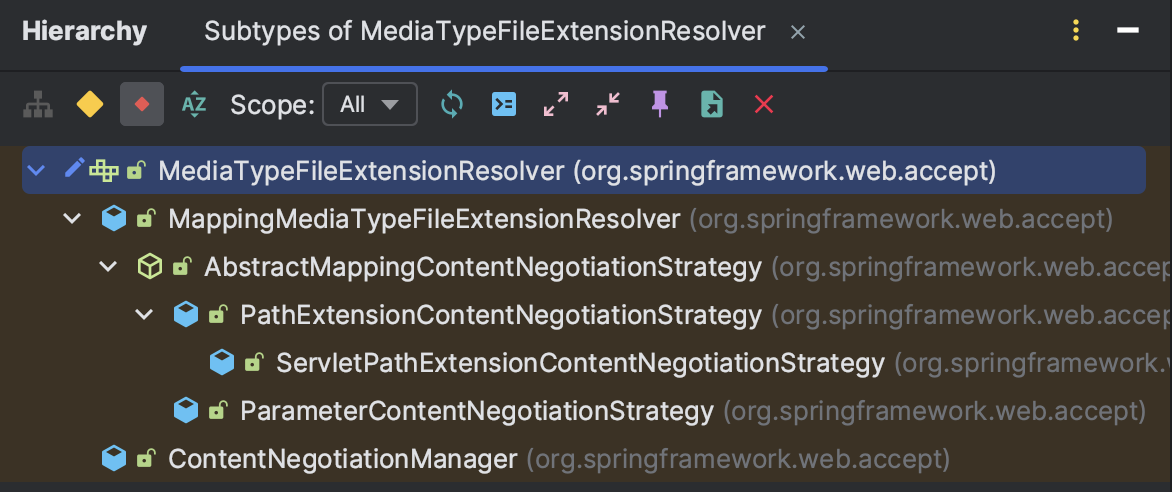
显然,本处只需要讲解它的直接实现子类MappingMediaTypeFileExtensionResolver即可:
MappingMediaTypeFileExtensionResolver
public class MappingMediaTypeFileExtensionResolver implements MediaTypeFileExtensionResolver {

	// key是lowerCaseExtension,value是对应的mediaType
	private final ConcurrentMap<String, MediaType> mediaTypes = new ConcurrentHashMap<>(64);
	// 和上面相反,key是mediaType,value是lowerCaseExtension(显然用的是多值map)
	private final MultiValueMap<MediaType, String> fileExtensions = new LinkedMultiValueMap<>();
	// 所有的扩展名(List非set哦~)
	private final List<String> allFileExtensions = new ArrayList<>();

	...
	public Map<String, MediaType> getMediaTypes() {
		return this.mediaTypes;
	}
	// protected 方法
	protected List<MediaType> getAllMediaTypes() {
		return new ArrayList<>(this.mediaTypes.values());
	}
	// 给extension添加一个对应的mediaType
	// 采用ConcurrentMap是为了避免出现并发情况下导致的一致性问题
	protected void addMapping(String extension, MediaType mediaType) {
		MediaType previous = this.mediaTypes.putIfAbsent(extension, mediaType);
		if (previous == null) {
			this.fileExtensions.add(mediaType, extension);
			this.allFileExtensions.add(extension);
		}
	}

	// 接口方法:拿到指定的mediaType对应的扩展名们~
	@Override
	public List<String> resolveFileExtensions(MediaType mediaType) {
		List<String> fileExtensions = this.fileExtensions.get(mediaType);
		return (fileExtensions != null ? fileExtensions : Collections.emptyList());
	}
	@Override
	public List<String> getAllFileExtensions() {
		return Collections.unmodifiableList(this.allFileExtensions);
	}

	// protected 方法:根据扩展名找到一个MediaType~(当然可能是找不到的)
	@Nullable
	protected MediaType lookupMediaType(String extension) {
		return this.mediaTypes.get(extension.toLowerCase(Locale.ENGLISH));
	}
}
此抽象类维护一些Map以及提供操作的方法,它维护了一个文件扩展名和MediaType的双向查找表。扩展名和MediaType的对应关系:
- 一个
MediaType对应N个扩展名 - 一个扩展名最多只会属于一个MediaType
继续回到AbstractMappingContentNegotiationStrategy。
// @since 3.2 它是个协商策略抽象实现,同时也有了扩展名+MediaType对应关系的能力
public abstract class AbstractMappingContentNegotiationStrategy extends MappingMediaTypeFileExtensionResolver implements ContentNegotiationStrategy {

	// Whether to only use the registered mappings to look up file extensions,
	// or also to use dynamic resolution (e.g. via {@link MediaTypeFactory}.
	// org.springframework.http.MediaTypeFactory是Spring5.0提供的一个工厂类
	// 它会读取/org/springframework/http/mime.types这个文件,里面有记录着对应关系
	private boolean useRegisteredExtensionsOnly = false;
	// Whether to ignore requests with unknown file extension. Setting this to
	// 默认false:若认识不认识的扩展名,抛出异常:HttpMediaTypeNotAcceptableException
	private boolean ignoreUnknownExtensions = false;

	// 唯一构造函数
	public AbstractMappingContentNegotiationStrategy(@Nullable Map<String, MediaType> mediaTypes) {
		super(mediaTypes);
	}

	// 实现策略接口方法
	@Override
	public List<MediaType> resolveMediaTypes(NativeWebRequest webRequest) throws HttpMediaTypeNotAcceptableException {
		// getMediaTypeKey:抽象方法(让子类把扩展名这个key提供出来)
		return resolveMediaTypeKey(webRequest, getMediaTypeKey(webRequest));
	}

	public List<MediaType> resolveMediaTypeKey(NativeWebRequest webRequest, @Nullable String key) throws HttpMediaTypeNotAcceptableException {
		if (StringUtils.hasText(key)) {
			// 调用父类方法:根据key去查找出一个MediaType出来
			MediaType mediaType = lookupMediaType(key);
			// 找到了就return就成(handleMatch是protected的空方法~~~  子类目前没有实现的)
			if (mediaType != null) {
				handleMatch(key, mediaType); // 回调
				return Collections.singletonList(mediaType);
			}

			// 若没有对应的MediaType,交给handleNoMatch处理(默认是抛出异常,见下面)
			// 注意:handleNoMatch如果通过工厂找到了,那就addMapping()保存起来(相当于注册上去)
			mediaType = handleNoMatch(webRequest, key);
			if (mediaType != null) {
				addMapping(key, mediaType);
				return Collections.singletonList(mediaType);
			}
		}
		return MEDIA_TYPE_ALL_LIST; // 默认值:所有
	}

	// 此方法子类ServletPathExtensionContentNegotiationStrategy有复写
	@Nullable
	protected MediaType handleNoMatch(NativeWebRequest request, String key) throws HttpMediaTypeNotAcceptableException {

		// 若不是仅仅从注册里的拿,那就再去MediaTypeFactory里看看~~~  找到了就返回
		if (!isUseRegisteredExtensionsOnly()) {
			Optional<MediaType> mediaType = MediaTypeFactory.getMediaType("file." + key);
			if (mediaType.isPresent()) {
				return mediaType.get();
			}
		}

		// 忽略找不到,返回null吧  否则抛出异常:HttpMediaTypeNotAcceptableException
		if (isIgnoreUnknownExtensions()) {
			return null;
		}
		throw new HttpMediaTypeNotAcceptableException(getAllMediaTypes());
	}
}
该抽象类实现了模版处理流程。
由子类去决定:你的扩展名是来自于URL的参数还是来自于path
ParameterContentNegotiationStrategy
上面抽象类的子类具体实现,从名字中能看出扩展名来自于param参数。
public class ParameterContentNegotiationStrategy extends AbstractMappingContentNegotiationStrategy {
	// 请求参数默认的key是format,你是可以设置和更改的。(set方法)
	private String parameterName = "format";

	// 唯一构造
	public ParameterContentNegotiationStrategy(Map<String, MediaType> mediaTypes) {
		super(mediaTypes);
	}
	... // 生路get/set

	// 小Tips:这里调用的是getParameterName()而不是直接用属性名,以后建议大家设计框架也都这么使用 虽然很多时候效果是一样的,但更符合使用规范
	@Override
	@Nullable
	protected String getMediaTypeKey(NativeWebRequest request) {
		return request.getParameter(getParameterName());
	}
}
根据一个查询参数(query parameter)判断请求的MediaType,该查询参数缺省使用format。
基于param的此策略Spring MVC虽然支持,但默认是没有开启的,若想使用需要手动显示开启
PathExtensionContentNegotiationStrategy
它的扩展名需要从Path里面分析出来。
public class PathExtensionContentNegotiationStrategy extends AbstractMappingContentNegotiationStrategy {

	private UrlPathHelper urlPathHelper = new UrlPathHelper();

	// 它额外提供了一个空构造
	public PathExtensionContentNegotiationStrategy() {
		this(null);
	}
	// 有参构造
	public PathExtensionContentNegotiationStrategy(@Nullable Map<String, MediaType> mediaTypes) {
		super(mediaTypes);
		setUseRegisteredExtensionsOnly(false);
		setIgnoreUnknownExtensions(true); // 注意:这个值设置为了true
		this.urlPathHelper.setUrlDecode(false); // 不需要解码(url请勿有中文)
	}

	// @since 4.2.8  可见Spring MVC允许你自己定义解析的逻辑
	public void setUrlPathHelper(UrlPathHelper urlPathHelper) {
		this.urlPathHelper = urlPathHelper;
	}


	@Override
	@Nullable
	protected String getMediaTypeKey(NativeWebRequest webRequest) {
		HttpServletRequest request = webRequest.getNativeRequest(HttpServletRequest.class);
		if (request == null) {
			return null;
		}

		// 借助urlPathHelper、UriUtils从URL中把扩展名解析出来
		String path = this.urlPathHelper.getLookupPathForRequest(request);
		String extension = UriUtils.extractFileExtension(path);
		return (StringUtils.hasText(extension) ? extension.toLowerCase(Locale.ENGLISH) : null);
	}

	// 子类ServletPathExtensionContentNegotiationStrategy有使用和复写
	// 它的作用是面向Resource找到这个资源对应的MediaType ~
	@Nullable
	public MediaType getMediaTypeForResource(Resource resource) { ... }
}
根据请求URL路径中所请求的文件资源的扩展名部分判断请求的MediaType(借助UrlPathHelper和UriUtils解析URL)。
ServletPathExtensionContentNegotiationStrategy
它是对PathExtensionContentNegotiationStrategy的扩展,和Servlet容器有关了。
因为Servlet额外提供了这个方法:ServletContext#getMimeType(String)来处理文件的扩展名问题。
public class ServletPathExtensionContentNegotiationStrategy extends PathExtensionContentNegotiationStrategy {
	private final ServletContext servletContext;
	... // 省略构造函数

	// 一句话:在去工厂找之前,先去this.servletContext.getMimeType("file." + extension)这里找一下,找到就直接返回。否则再进工厂
	@Override
	@Nullable
	protected MediaType handleNoMatch(NativeWebRequest webRequest, String extension) throws HttpMediaTypeNotAcceptableException { ... }

	//  一样的:先this.servletContext.getMimeType(resource.getFilename()) 再交给父类处理
	@Override
	public MediaType getMediaTypeForResource(Resource resource) { ... }

	// 两者调用父类的条件都是:mediaType == null || MediaType.APPLICATION_OCTET_STREAM.equals(mediaType)
}
说明:ServletPathExtensionContentNegotiationStrategy是Spring MVC默认就开启支持的策略,无需手动开启。
FixedContentNegotiationStrategy
固定类型解析:返回固定的MediaType。
public class FixedContentNegotiationStrategy implements ContentNegotiationStrategy {
	private final List<MediaType> contentTypes;

	// 构造函数:必须指定MediaType
	// 一般通过@RequestMapping.produces这个注解属性指定(可指定多个)
	public FixedContentNegotiationStrategy(MediaType contentType) {
		this(Collections.singletonList(contentType));
	}
	// @since 5.0
	public FixedContentNegotiationStrategy(List<MediaType> contentTypes) {
		this.contentTypes = Collections.unmodifiableList(contentTypes);
	}
}
固定参数类型非常简单,构造函数传进来啥返回啥(不能为null)。
ContentNegotiationManager
介绍完了上面4中协商策略,开始介绍这个协商”容器”。
这个管理器它的作用特别像之前讲述的xxxComposite这种“容器”管理类,总体思想是管理、委托,有了之前的基础了解起他还是非常简单的了。
//  它不仅管理一堆strategies(List),还管理一堆resolvers(Set)
public class ContentNegotiationManager implements ContentNegotiationStrategy, MediaTypeFileExtensionResolver {
	private final List<ContentNegotiationStrategy> strategies = new ArrayList<>();
	private final Set<MediaTypeFileExtensionResolver> resolvers = new LinkedHashSet<>();

	...
	// 若没特殊指定,至少是包含了这一种的策略的:HeaderContentNegotiationStrategy
	public ContentNegotiationManager() {
		this(new HeaderContentNegotiationStrategy());
	}
	... // 因为比较简单,所以省略其它代码
}
它是一个ContentNegotiationStrategy容器,同时也是一个MediaTypeFileExtensionResolver容器。自身同时实现了这两个接口。
ContentNegotiationManagerFactoryBean
顾名思义,它是专门用于来创建一个ContentNegotiationManager的FactoryBean。
// @since 3.2  还实现了ServletContextAware,可以得到当前servlet容器上下文
public class ContentNegotiationManagerFactoryBean implements FactoryBean<ContentNegotiationManager>, ServletContextAware, InitializingBean {

	// 默认就是开启了对后缀的支持的
	private boolean favorPathExtension = true;
	// 默认没有开启对param的支持
	private boolean favorParameter = false;
	// 默认也是开启了对Accept的支持的
	private boolean ignoreAcceptHeader = false;

	private Map<String, MediaType> mediaTypes = new HashMap<String, MediaType>();
	private boolean ignoreUnknownPathExtensions = true;
	// Jaf是一个数据处理框架,可忽略
	private Boolean useJaf;
	private String parameterName = "format";
	private ContentNegotiationStrategy defaultNegotiationStrategy;
	private ContentNegotiationManager contentNegotiationManager;
	private ServletContext servletContext;
	... // 省略普通的get/set

	// 注意这里传入的是:Properties  表示后缀和MediaType的对应关系
	public void setMediaTypes(Properties mediaTypes) {
		if (!CollectionUtils.isEmpty(mediaTypes)) {
			for (Entry<Object, Object> entry : mediaTypes.entrySet()) {
				String extension = ((String)entry.getKey()).toLowerCase(Locale.ENGLISH);
				MediaType mediaType = MediaType.valueOf((String) entry.getValue());
				this.mediaTypes.put(extension, mediaType);
			}
		}
	}
	public void addMediaType(String fileExtension, MediaType mediaType) {
		this.mediaTypes.put(fileExtension, mediaType);
	}
	...

	// 这里面处理了很多默认逻辑
	@Override
	public void afterPropertiesSet() {
		List<ContentNegotiationStrategy> strategies = new ArrayList<ContentNegotiationStrategy>();

		// 默认favorPathExtension=true,所以是支持path后缀模式的
		// servlet环境使用的是ServletPathExtensionContentNegotiationStrategy,否则使用的是PathExtensionContentNegotiationStrategy
		//
		if (this.favorPathExtension) {
			PathExtensionContentNegotiationStrategy strategy;
			if (this.servletContext != null && !isUseJafTurnedOff()) {
				strategy = new ServletPathExtensionContentNegotiationStrategy(this.servletContext, this.mediaTypes);
			} else {
				strategy = new PathExtensionContentNegotiationStrategy(this.mediaTypes);
			}
			strategy.setIgnoreUnknownExtensions(this.ignoreUnknownPathExtensions);
			if (this.useJaf != null) {
				strategy.setUseJaf(this.useJaf);
			}
			strategies.add(strategy);
		}

		// 默认favorParameter=false 木有开启滴
		if (this.favorParameter) {
			ParameterContentNegotiationStrategy strategy = new ParameterContentNegotiationStrategy(this.mediaTypes);
			strategy.setParameterName(this.parameterName);
			strategies.add(strategy);
		}

		// 注意这前面有个!,所以默认Accept也是支持的
		if (!this.ignoreAcceptHeader) {
			strategies.add(new HeaderContentNegotiationStrategy());
		}

		// 若你喜欢,你可以设置一个defaultNegotiationStrategy  最终也会被add进去
		if (this.defaultNegotiationStrategy != null) {
			strategies.add(this.defaultNegotiationStrategy);
		}

		// 这部分我需要提醒注意的是:这里使用的是ArrayList,所以你add的顺序就是u最后的执行顺序
		// 所以若你指定了defaultNegotiationStrategy,它也是放到最后的
		this.contentNegotiationManager = new ContentNegotiationManager(strategies);
	}

	// 三个接口方法
	@Override
	public ContentNegotiationManager getObject() {
		return this.contentNegotiationManager;
	}
	@Override
	public Class<?> getObjectType() {
		return ContentNegotiationManager.class;
	}
	@Override
	public boolean isSingleton() {
		return true;
	}
}
这里解释了前面的顺序(后缀 > 请求参数 > HTTP首部Accept)现象。
Spring MVC是通过它来创建ContentNegotiationManager进而管理协商策略的。
内容协商的配置:ContentNegotiationConfigurer
虽然说默认情况下Spring开启的协商支持能覆盖我们绝大部分应用场景了,但不乏有的时候我们也还是需要对它进行个性化的,那么这部分就讲解下对它的个性化配置
ContentNegotiationConfigurer
它用于”收集”配置项,根据你提供的配置项来创建出一个ContentNegotiationManager。
public class ContentNegotiationConfigurer {

	private final ContentNegotiationManagerFactoryBean factory = new ContentNegotiationManagerFactoryBean();
	private final Map<String, MediaType> mediaTypes = new HashMap<String, MediaType>();

	public ContentNegotiationConfigurer(@Nullable ServletContext servletContext) {
		if (servletContext != null) {
			this.factory.setServletContext(servletContext);
		}
	}
	// @since 5.0
	public void strategies(@Nullable List<ContentNegotiationStrategy> strategies) {
		this.factory.setStrategies(strategies);
	}
	...
	public ContentNegotiationConfigurer defaultContentTypeStrategy(ContentNegotiationStrategy defaultStrategy) {
		this.factory.setDefaultContentTypeStrategy(defaultStrategy);
		return this;
	}

	// 手动创建出一个ContentNegotiationManager 此方法是protected
	// 唯一调用处是:WebMvcConfigurationSupport
	protected ContentNegotiationManager buildContentNegotiationManager() {
		this.factory.addMediaTypes(this.mediaTypes);
		return this.factory.build();
	}
}
ContentNegotiationConfigurer可以认为是提供一个设置ContentNegotiationManagerFactoryBean的入口(自己内容new了一个它的实例)
最终交给WebMvcConfigurationSupport向容器内注册这个Bean:
public class WebMvcConfigurationSupport implements ApplicationContextAware, ServletContextAware {
	...
	// 请注意是BeanName为:mvcContentNegotiationManager
	// 若实在有需要,你是可以覆盖的~~~~
	@Bean
	public ContentNegotiationManager mvcContentNegotiationManager() {
		if (this.contentNegotiationManager == null) {
			ContentNegotiationConfigurer configurer = new ContentNegotiationConfigurer(this.servletContext);
			configurer.mediaTypes(getDefaultMediaTypes()); // 服务端默认支持的后缀名-->MediaType们~~~

			// 这个方法就是回调我们自定义配置的protected方法~~~~
			configureContentNegotiation(configurer);

			// 调用方法生成一个管理器
			this.contentNegotiationManager = configurer.buildContentNegotiationManager();
		}
		return this.contentNegotiationManager;
	}


	// 默认支持的协商MediaType们~~~~
	protected Map<String, MediaType> getDefaultMediaTypes() {
		Map<String, MediaType> map = new HashMap<>(4);
		// 几乎不用
		if (romePresent) {
			map.put("atom", MediaType.APPLICATION_ATOM_XML);
			map.put("rss", MediaType.APPLICATION_RSS_XML);
		}
		// 若导了jackson对xml支持的包,它就会被支持
		if (jaxb2Present || jackson2XmlPresent) {
			map.put("xml", MediaType.APPLICATION_XML);
		}
		// jackson.databind就支持json了,所以此处一般都是满足的
		// 额外还支持到了gson和jsonb。希望不久将来内置支持fastjson
		if (jackson2Present || gsonPresent || jsonbPresent) {
			map.put("json", MediaType.APPLICATION_JSON);
		}
		if (jackson2SmilePresent) {
			map.put("smile", MediaType.valueOf("application/x-jackson-smile"));
		}
		if (jackson2CborPresent) {
			map.put("cbor", MediaType.valueOf("application/cbor"));
		}
		return map;
	}
	...
}
WebMvcConfigurationSupport是@EnableWebMvc导进去的。
配置实践
有了上面理论的支撑,那么使用Spring MVC协商的最佳实践配置可参考如下(大多数情况下都无需配置):
@Configuration
@EnableWebMvc
public class WebMvcConfig extends WebMvcConfigurerAdapter {

    @Override
    public void configureContentNegotiation(ContentNegotiationConfigurer configurer) {
        configurer.favorParameter(true)
        //.parameterName("mediaType")
        //.defaultContentTypeStrategy(new ...) // 自定义一个默认的内容协商策略
        //.ignoreAcceptHeader(true) // 禁用Accept协商方式
        //.defaultContentType(MediaType.APPLICATION_JSON) // 它的效果是new FixedContentNegotiationStrategy(contentTypes)  增加了对固定策略的支
        //.strategies(list);
        //.useRegisteredExtensionsOnly() //PathExtensionContentNegotiationStrategy.setUseRegisteredExtensionsOnly(this.useRegisteredExtensionsOnly);
        ;
    }
}
从原理上分析了Spring MVC对内容协商策略的管理、使用以及开放的配置,旨在做到心中有数,从而更好、更安全、更方便的进行扩展,对下文内容协商视图的理解有非常大的帮助作用
在视图View上的应用-ContentNegotiatingViewResolver
在了解了Spring MVC的内容协商机制之后,就可以配合RESTful发挥它的功效了。这其实也就达到了我们目的的80%,因为我认为在前后端完全分离的今天,绝大部分使用场景都是这种情况,完成了覆盖,还有20%呢?因为内容协商不仅仅可以使用在HttpMessage上,还可以使用在View视图上。
在HttpMessage上的应用
在讲解原理的时候提到:处理的入口在AbstractMessageConverterMethodProcessor.writeWithMessageConverters()方法上,看此抽象类的子类也能看出端倪:
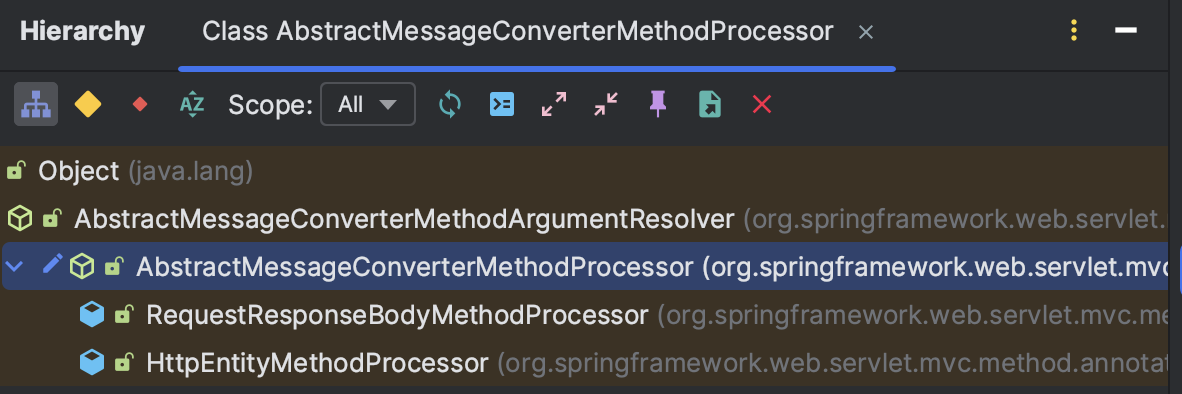
从子类实现中你也能够明白:它和HttpMessage是强相关的,都是经过了HttpMessageConverter处理的消息来做内容协商。
这两个实现类处理的也就是我们当下最为常用的注解:@ResponseBody。或者返回值直接是HttpEntity/ResponseEntity类型(不是RequestEntity就成)
ResponseEntity可以作为controller的返回值,比如对于一个处理下载二进制文件的接口
ResponseEntity不仅仅可以用于处理下载,非ModelAndView的其他场景均可以使用。在WEB API项目中,如果没有特定的Java Bean封装的返回类型,可以使用该类型。
-
ResponseEntity:表示整个HTTP响应:状态代码,标题和正文。因此,我们可以使用它来完全配置HTTP响应,它是一个对象。 -
@ResponseBody:返回json格式的结果 -
@ResponseStatus:返回状态
ResponseEntity类,扩展了HttpEntity类,新增了status成员变量,这样,一个ResponseEntity基本可以代表完整的http的请求或响应了。这其实就是ResponseEntity类的作用。
使用ResponseEntity作为controller的返回值,我们可以方便地处理响应的header,状态码以及body。而通常使用的@ResponseBody注解,只能处理body部分。这也是为什么通常在下载场景中会使用ResponseEntity,因为下载需要设置header里的content-type以及特殊的status。
@GetMapping("/customHeader")
ResponseEntity<String> customHeader() {
   HttpHeaders headers = new HttpHeaders();
   headers.add("Custom-Header", "foo");

   return new ResponseEntity<>(
         "Custom header set", headers, HttpStatus.OK);
}

//---------------------------------------------------

@Controller
public class XXXController{

  @ResponseBody
  public User postResponseController(@RequestBody LoginForm loginForm) {
      return new User("Thanks For Posting!!!");
  }

//---------------------------------------------------

@RestController
public class XXXController{

 @ResponseStatus(HttpStatus.FOUND)
 public User postResponseController() {
    return new User("Thanks For Posting!!!");
 }

//---------------------------------------------------

// Spring还允许我们直接访问javax.servlet.http.HttpServletResponse对象; 我们只需要将它声明为方法参数:
// 由于Spring在底层实现之上提供了抽象和附加功能,因此如果以这种方式直接操纵响应,会失去很多Spring提供方便功能。
@GetMapping("/manual")
public void manual(HttpServletResponse response) throws IOException {
      response.setHeader("Custom-Header", "foo");
      response.setStatus(200);
      response.getWriter().println("Hello World!");
      }
但毫无疑问,基于@ResponseBody的Rest接口方式在前后端完全分离的今天已然是主流方式
搜索到ContentNegotiationManager.resolveMediaTypes()方法在ContentNegotiatingViewResolver里也使用到了,因此自然而然的联想到了内容协商也能结合视图解析器一起使用
内容协商在视图View上的应用
由于前面给的示例都是基于Http消息的,没有视图可言。此处需要讲解的是内容协商在视图解析方面的应用:同一个URL,以不同的视图作为展示方式。
我们已经知道了:RequestMappingInfoHandlerMapping(@RequestMapping)它在对带有后缀的http请求进行匹配的时候,如果找不到精确的pattern, 那么就会pattern+.*后再匹配 url,它会处理多个不同形式是 url,但是返回的是同一个View。这里就看看用一个@RequestMapping也能返回多个View
视图解析器ViewResolver
使用处:DispatcherServlet.resolveViewName()
得到逻辑视图后,通过已经注册好的视图解析器ViewResolver把逻辑视图解析为真正的视图View
DispatcherServlet:
	@Nullable
	protected View resolveViewName(String viewName, @Nullable Map<String, Object> model, Locale locale, HttpServletRequest request) throws Exception {
		if (this.viewResolvers != null) {
			// 按照顺序:一个一个执行。第一个最先解析到不返回null的  就是最终返回的view视图
			for (ViewResolver viewResolver : this.viewResolvers) {
				View view = viewResolver.resolveViewName(viewName, locale);
				if (view != null) {
					return view;
				}
			}
		}
		return null;
	}
加载处:DispatcherServlet.initViewResolvers()
DispatcherServlet:
	private void initViewResolvers(ApplicationContext context) {
		// 1、若detectAllViewResolvers=true,去容器中找到所有的ViewResolver Bean们。排序后返回
		// 2、若不是探测全部。就只找BeanName=viewResolver它的这一个Bean
		// 2、若一个都没有找到,就走默认策略:从DispatcherServlet.properties里配置的读取默认的配置
	}
这个查找策略,对我们合理注册、管理视图解析器都是很有用的,可以稍加留意
声明处:WebMvcConfigurationSupport.mvcViewResolver()
WebMvcConfigurationSupport:

	// @since 4.1 向容器注册一个ViewResolver Bean
	// 使用的是容器管理方式:ViewResolverComposite
	@Bean
	public ViewResolver mvcViewResolver() {

		// mvcContentNegotiationManager:内容协商管理器(本文重点之一)
		ViewResolverRegistry registry = new ViewResolverRegistry(mvcContentNegotiationManager(), this.applicationContext);
		// protected方法,回调给我们调用者,允许自定义ViewResolverRegistry
		configureViewResolvers(registry);

		// 它的意思是:如果你没有自定义(或者自定义了但一个解析器都木有)
		// 那就主动去容器里找。如果仅仅仅仅只知道一个:那它就是InternalResourceViewResolver(注意此处是new的)
		// 注意此处的处理方式哦~~~~
		if (registry.getViewResolvers().isEmpty() && this.applicationContext != null) {
			String[] names = BeanFactoryUtils.beanNamesForTypeIncludingAncestors(this.applicationContext, ViewResolver.class, true, false);
			if (names.length == 1) {
				registry.getViewResolvers().add(new InternalResourceViewResolver());
			}
		}

		// 最终使用ViewResolverComposite把这些(多个)装起来,便于管理~
		ViewResolverComposite composite = new ViewResolverComposite();
		composite.setOrder(registry.getOrder());
		composite.setViewResolvers(registry.getViewResolvers());
		if (this.applicationContext != null) {
			composite.setApplicationContext(this.applicationContext);
		}
		if (this.servletContext != null) {
			composite.setServletContext(this.servletContext);
		}
		return composite;
	}
这里我们能发现,它默认情况下使用的是我们上文说的默认的ContentNegotiationManager来处理内容协商的。因此下面重点要来到今天的主角ContentNegotiatingViewResolver身上
ContentNegotiatingViewResolver:内容协商视图解析器
ContentNagotiatingViewResolver自己并不解析视图,而是委派给其他的视图处理器。
为了使这个解析器正常工作,order序号需要设置成比其他的视图处理器高的优先级(默认就是最高的)
// @since 3.0
public class ContentNegotiatingViewResolver extends WebApplicationObjectSupport implements ViewResolver, Ordered, InitializingBean {
	// 用于内容协商的管理器
	@Nullable
	private ContentNegotiationManager contentNegotiationManager;
	private final ContentNegotiationManagerFactoryBean cnmFactoryBean = new ContentNegotiationManagerFactoryBean();

	// 如果没有合适的view的时候,是否使用406这个状态码(HttpServletResponse#SC_NOT_ACCEPTABLE)
	// 默认值是false:表示没有找到就返回null,而不是406
	private boolean useNotAcceptableStatusCode = false;
	// 当无法获取到具体的视图时,会走defaultViews
	@Nullable
	private List<View> defaultViews;

	@Nullable
	private List<ViewResolver> viewResolvers;
	private int order = Ordered.HIGHEST_PRECEDENCE; // 默认,优先级就是最高的

	// 复写:WebApplicationObjectSupport的方法
	// 它在setServletContext和initApplicationContext会调用(也就是容器启动时候会调用)
	@Override
	protected void initServletContext(ServletContext servletContext) {
		Collection<ViewResolver> matchingBeans = BeanFactoryUtils.beansOfTypeIncludingAncestors(obtainApplicationContext(), ViewResolver.class).values();
		//容器内找到了  就以容器内所有已经配置好的视图解析器都拿出来(包含父容器)
		if (this.viewResolvers == null) {
			this.viewResolvers = new ArrayList<>(matchingBeans.size());
			for (ViewResolver viewResolver : matchingBeans) {
				if (this != viewResolver) { // 排除自己
					this.viewResolvers.add(viewResolver);
				}
			}
		} else { // 进入这里证明是调用者自己set进来的
			for (int i = 0; i < this.viewResolvers.size(); i++) {
				ViewResolver vr = this.viewResolvers.get(i);
				if (matchingBeans.contains(vr)) {
					continue;
				}
				String name = vr.getClass().getName() + i;
				// 对视图解析器完成初始化工作~~~~~
				// 关于AutowireCapableBeanFactory的使用,参见:https://blog.csdn.net/f641385712/article/details/88651128
				obtainApplicationContext().getAutowireCapableBeanFactory().initializeBean(vr, name);
			}

		}

		// 找到所有的ViewResolvers排序后,放进ContentNegotiationManagerFactoryBean里
		AnnotationAwareOrderComparator.sort(this.viewResolvers);
		this.cnmFactoryBean.setServletContext(servletContext);
	}

	// 从这一步骤可以知道:contentNegotiationManager 可以自己set
	// 也可以通过工厂来生成  两种方式均可
	@Override
	public void afterPropertiesSet() {
		if (this.contentNegotiationManager == null) {
			this.contentNegotiationManager = this.cnmFactoryBean.build();
		}
		if (this.viewResolvers == null || this.viewResolvers.isEmpty()) {
			logger.warn("No ViewResolvers configured");
		}
	}

	// 处理逻辑视图到View 在此处会进行内容协商
	@Override
	@Nullable
	public View resolveViewName(String viewName, Locale locale) throws Exception {
		RequestAttributes attrs = RequestContextHolder.getRequestAttributes();
		Assert.state(attrs instanceof ServletRequestAttributes, "No current ServletRequestAttributes");

		// getMediaTypes()这个方法完成了
		// 1、通过contentNegotiationManager.resolveMediaTypes(webRequest)得到请求的MediaTypes
		// 2、拿到服务端能够提供的MediaTypes  producibleMediaTypes
		// (请注意因为没有消息转换器,所以它的值的唯一来源是:request.getAttribute(HandlerMapping.PRODUCIBLE_MEDIA_TYPES_ATTRIBUTE))
		// (若没有指定producers的值,那就是ALL)
		// 3、按照优先级,协商出`selectedMediaTypes`(是个List)
		List<MediaType> requestedMediaTypes = getMediaTypes(((ServletRequestAttributes) attrs).getRequest());

		// 进入此处:说明协商出了有可用的MediaTypes(至少有一个嘛)
		if (requestedMediaTypes != null) {

			// getCandidateViews()这个很重要的方法,见下文
			List<View> candidateViews = getCandidateViews(viewName, locale, requestedMediaTypes);

			// 上面一步骤解析出了多个符合条件的views,这里就是通过MediaType、attrs等等一起决定出一个,一个,一个最佳的
			// getBestView()方法描述如下:
			// 第一大步:遍历所有的candidateViews,只要是smartView.isRedirectView(),就直接return
			// 第二大步:遍历所有的requestedMediaTypes,针对每一种MediaType下再遍历所有的candidateViews
			// 1、针对每一种MediaType,拿出View.getContentType(),只会看这个值不为null的
			// 2、view的contentType!=null,继续看看mediaType.isCompatibleWith(candidateContentType) 若不匹配这个视图就略过
			// 3、若匹配:attrs.setAttribute(View.SELECTED_CONTENT_TYPE, mediaType, RequestAttributes.SCOPE_REQUEST)  然后return掉此视图作为best最佳的
			View bestView = getBestView(candidateViews, requestedMediaTypes, attrs);
			if (bestView != null) { // 很显然,找到了最佳的就返回渲染吧
				return bestView;
			}
		}

		...
		// useNotAcceptableStatusCode=true没找到视图就返回406
		// NOT_ACCEPTABLE_VIEW是个private内部静态类View,它的render方法只有一句话:
		// response.setStatus(HttpServletResponse.SC_NOT_ACCEPTABLE);
		if (this.useNotAcceptableStatusCode) {
			return NOT_ACCEPTABLE_VIEW;
		} else {
			return null;
		}
	}

	// 根据viewName、requestedMediaTypes等等去得到所有的备选的Views~~
	// 这这里会调用所有的viewResolvers.resolveViewName()来分别处理~~~所以可能生成多多个viewo ~
	private List<View> getCandidateViews(String viewName, Locale locale, List<MediaType> requestedMediaTypes) throws Exception {
		List<View> candidateViews = new ArrayList<>();
		if (this.viewResolvers != null) {
			Assert.state(this.contentNegotiationManager != null, "No ContentNegotiationManager set");

			// 遍历所有的viewResolvers,多逻辑视图一个一个的处理
			for (ViewResolver viewResolver : this.viewResolvers) {
				View view = viewResolver.resolveViewName(viewName, locale);
				if (view != null) {
					candidateViews.add(view); // 处理好的就装进来
				}


				// 另外还没有完:遍历所有支持的MediaType,拿到它对应的扩展名们(一个MediaType可以对应多个扩展名)
				// 如果viewName + '.' + extension能被处理成一个视图,也是ok的
				// 也就是说index和index.jsp都能被解析成view视图~~~
				for (MediaType requestedMediaType : requestedMediaTypes) {
					// resolveFileExtensions()方法可以说这里是唯一调用的地方
					List<String> extensions = this.contentNegotiationManager.resolveFileExtensions(requestedMediaType);
					for (String extension : extensions) {
						String viewNameWithExtension = viewName + '.' + extension;
						view = viewResolver.resolveViewName(viewNameWithExtension, locale);
						if (view != null) {
							candidateViews.add(view); // 带上后缀名也能够处理的  这种视图也ok
						}
					}
				}
			}
		}
		// 若指定了默认视图,把视图也得加上(在最后面哦~)
		if (!CollectionUtils.isEmpty(this.defaultViews)) {
			candidateViews.addAll(this.defaultViews);
		}
		return candidateViews;
	}
}
关于ContentNegotiatingViewResolver我总结出如下细节要点:
-
ContentNegotiationManager用于内容协商的策略可以手动set指定,也可以通过FactoryBean自动生成 -
viewResolvers默认是去容器内找到所有的,当然你也可以手动set进来的~ - 使用request的媒体类型,根据扩展名选择不同的view输出不同的格式
- 不是自己处理view,而是代理给不同的
ViewResolver来处理不同的view; - 默认是支持Accept和后缀的协商方式的。并且还支持 逻辑视图名.后缀的视图解析方式~
- 依据
View.getContentType匹配MediaType来完成的最佳匹配
如何使用
我们已经知道,默认情况下Spring MVC可没有使用此内容协商视图解析器,因此若有同一资源,多视图展示的需求,我们是需要手动配置(开启)支持的。
通过检索可以看到ViewResolverRegistry它为我们提供了便捷使用的方式:
也可以通过单独配置一个ContentNegotiatingViewResolver @Bean的方式来做。
public class ViewResolverRegistry {
	...
	public void enableContentNegotiation(View... defaultViews) {
		initContentNegotiatingViewResolver(defaultViews);
	}
	public void enableContentNegotiation(boolean useNotAcceptableStatus, View... defaultViews) {
		ContentNegotiatingViewResolver vr = initContentNegotiatingViewResolver(defaultViews);
		vr.setUseNotAcceptableStatusCode(useNotAcceptableStatus);
	}
	// 初始化一个内容协商视图解析器
	private ContentNegotiatingViewResolver initContentNegotiatingViewResolver(View[] defaultViews) {
		// ContentNegotiatingResolver in the registry: elevate its precedence!
		// 请保证它是最高优先级的:在所有视图解析器之前执行
		// 这样即使你配置了其它的视图解析器  也会先执行这个(后面的被短路掉)
		this.order = (this.order != null ? this.order : Ordered.HIGHEST_PRECEDENCE);

		// 调用者自己已经配置好了一个contentNegotiatingResolver,那就用他的
		if (this.contentNegotiatingResolver != null) {
			// 若存在defaultViews,那就处理一下把它放进contentNegotiatingResolver里面
			if (!ObjectUtils.isEmpty(defaultViews) && !CollectionUtils.isEmpty(this.contentNegotiatingResolver.getDefaultViews())) {
				List<View> views = new ArrayList<>(this.contentNegotiatingResolver.getDefaultViews());
				views.addAll(Arrays.asList(defaultViews));
				this.contentNegotiatingResolver.setDefaultViews(views);
			}
		} else { // 若没配置就自己new一个 并且设置好viewResolvers
			this.contentNegotiatingResolver = new ContentNegotiatingViewResolver();
			this.contentNegotiatingResolver.setDefaultViews(Arrays.asList(defaultViews));
			// 注意:这个viewResolvers是通过此ViewResolverRegistry配置进来的
			// 若仅仅是容器内的Bean,这里可捕获不到。所以如果你有特殊需求建议你自己set
			// 若仅仅是jsp()/tiles()/freeMarker()/groovy()/beanName()这些,内置的支持即可满足要求儿聊
			// ViewResolverRegistry.viewResolver()可调用多次,因此可以多次指定  若有需要个性化,可以调用此方法
			this.contentNegotiatingResolver.setViewResolvers(this.viewResolvers);
			if (this.contentNegotiationManager != null) {
				this.contentNegotiatingResolver.setContentNegotiationManager(this.contentNegotiationManager);
			}
		}
		return this.contentNegotiatingResolver;
	}
}
说明一点:虽然这里有些视图解析器是new出来的,但不用担心最后都会执行InitializingBean、ApplicationContextAware…等等的一些接口方法的。因为这些都是交给ViewResolverComposite统一代劳的(因此并不需要放进Spring容器里亦可,减少容器的负担也是一种优化)
Spring MVC准备好ViewResolverRegistry后会回调我们,因此实际使用中可以通过此入口进行配置(最佳实践):
@Configuration
@EnableWebMvc
public class WebMvcConfig extends WebMvcConfigurerAdapter {

    @Override
    public void configureViewResolvers(ViewResolverRegistry registry) {
        registry.enableContentNegotiation(); // 开启内容协商视图解析器
    }
}
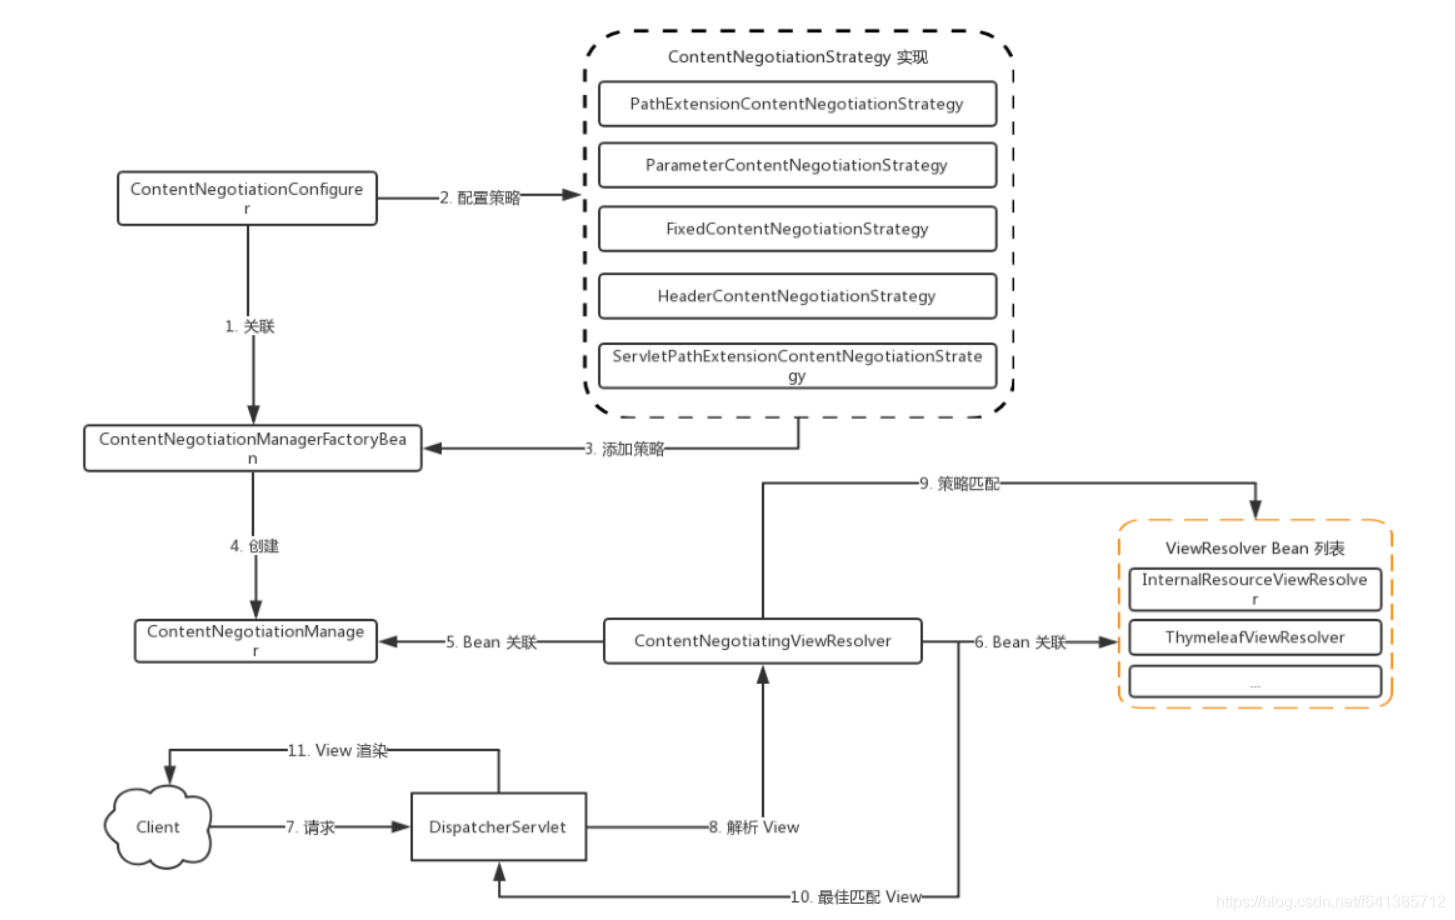
执行原理流程图作为辅助理解
使用示例
需求:同一个RESTful的URL,我希望得到一个PDF视图、JSON视图、Html视图
因为是同一个URL,并且还要求是有不同视图的,因此这里用ContentNegotiatingViewResolver来做内容协商就非常得心应手了。
准备针对于处理这三种视图的ViewResolver实现类:
// 自定义三个视图分别用于处理对应的视图需求
private final ViewResolver pdf_viewresolver= (viewName, locale) -> new View() {
@Override
public String getContentType() {
return MediaType.APPLICATION_PDF_VALUE;
}
@Override
public void render(Map<String, ?> model, HttpServletRequest request, HttpServletResponse response) throws Exception {
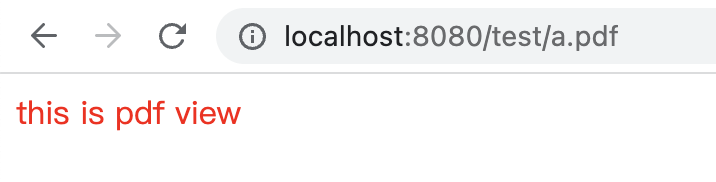
response.getWriter().write("<html><body style='color:red'>this is pdf view</body></html>");
}
};
private final ViewResolver excel_viewresolver= (viewName, locale) -> new View() {
@Override
public String getContentType() {
return MediaType.APPLICATION_JSON_UTF8_VALUE;
}
@Override
public void render(Map<String, ?> model, HttpServletRequest request, HttpServletResponse response) throws Exception {
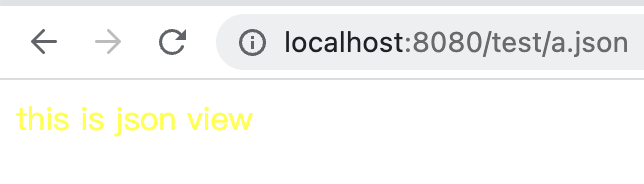
response.getWriter().write("<html><body style='color:yellow'>this is json view</body></html>");
}
};
private final ViewResolver html_viewresolver= (viewName, locale) -> new View() {
@Override
public String getContentType() {
return MediaType.TEXT_HTML_VALUE;
}
@Override
public void render(Map<String, ?> model, HttpServletRequest request, HttpServletResponse response) throws Exception {
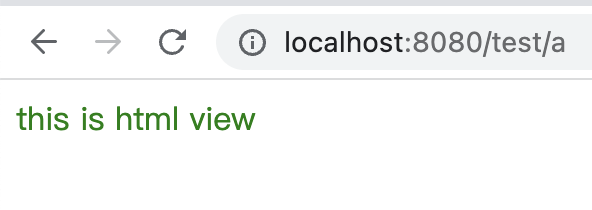
response.getWriter().write("<html><body style='color:green'>this is html view</body></html>");
}
};
三者的getContentType()、渲染内容、颜色都是不一样的,此处只是模拟,所以我全部以匿名类来实现
开启Spring MVC在视图上对ContentNegotiation内容协商的支持:
@Configuration
@EnableWebMvc
public class WebMvcConfig implements WebMvcConfigurer {

    @Override
    public void configureContentNegotiation(ContentNegotiationConfigurer configurer) {
        //开启支持扩展名功能
        configurer.favorPathExtension(true)
                // 使用请求参数
                .favorParameter(true);
//                        .defaultContentType(MediaType.APPLICATION_JSON)
//                        .mediaType("json", MediaType.APPLICATION_JSON)
//                        .mediaType("xml", MediaType.APPLICATION_XML);
    }


    @Override
    public void configureViewResolvers(ViewResolverRegistry registry) {
        registry.viewResolver(pdf_viewresolver);
        registry.viewResolver(excel_viewresolver);
        registry.viewResolver(html_viewresolver);

        // 上面三个注册方法必须在此方法之上执行
        registry.enableContentNegotiation(false);
    }

}
测试代码
@Controller
@RequestMapping
public class HelloController {

    @GetMapping("/test/{type}")
    public String testContentNegotiation() {
        return "test ContentNegotiation";
    }
}
顺序请求:/test/a.pdf、/test/a.json、/test/a.html、/test/a(无后缀)分别得到的页面截图如下

使用Accept方式演示如下:
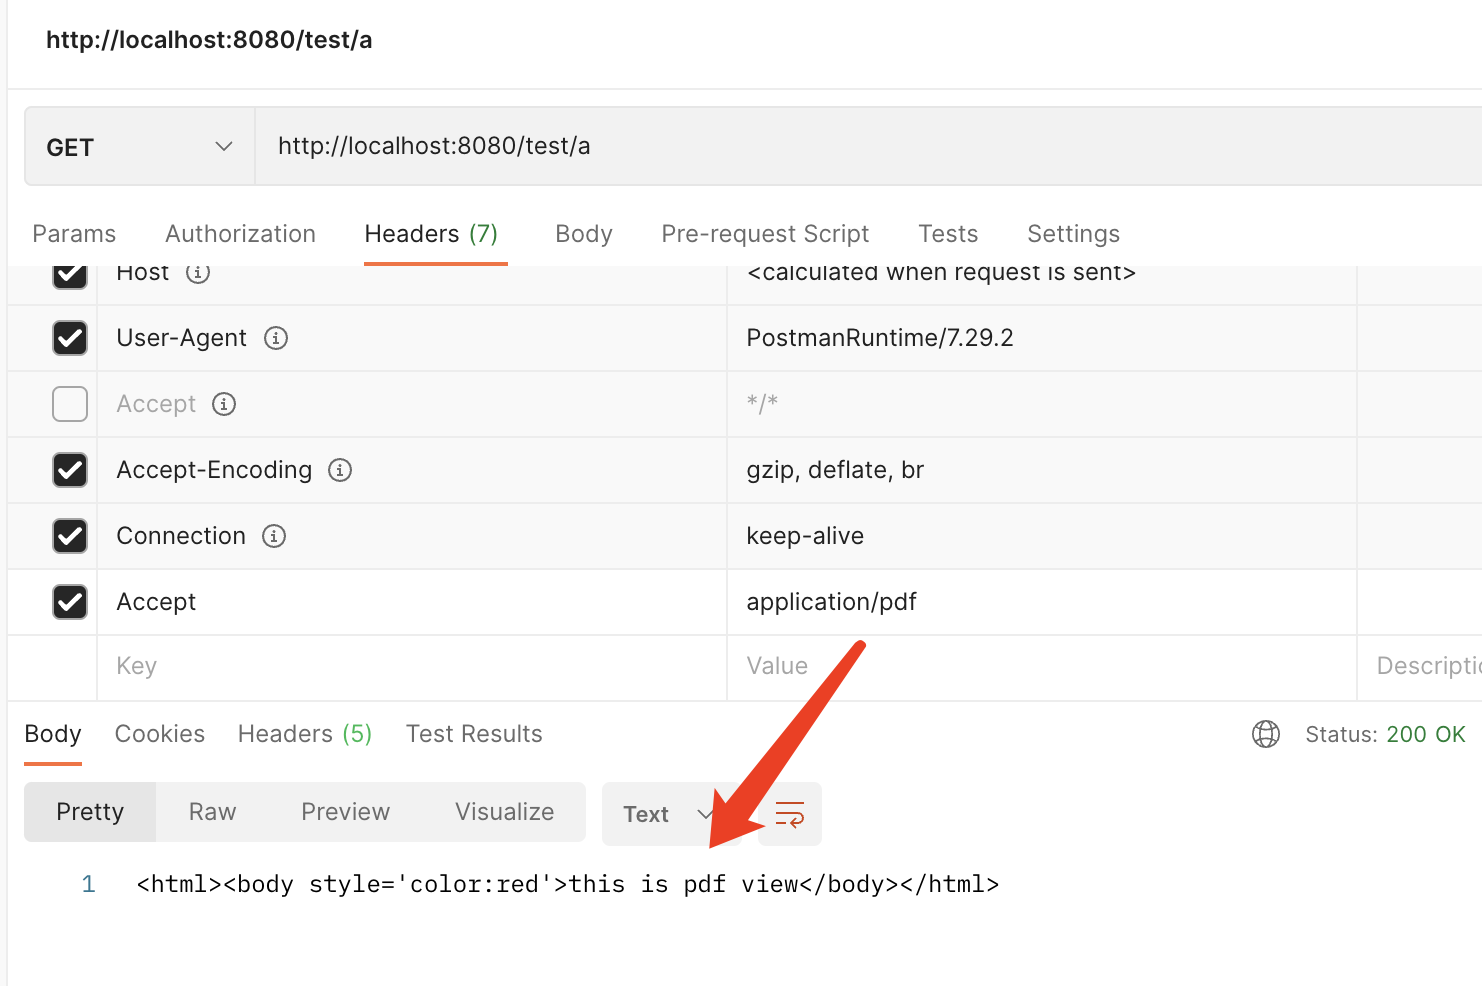
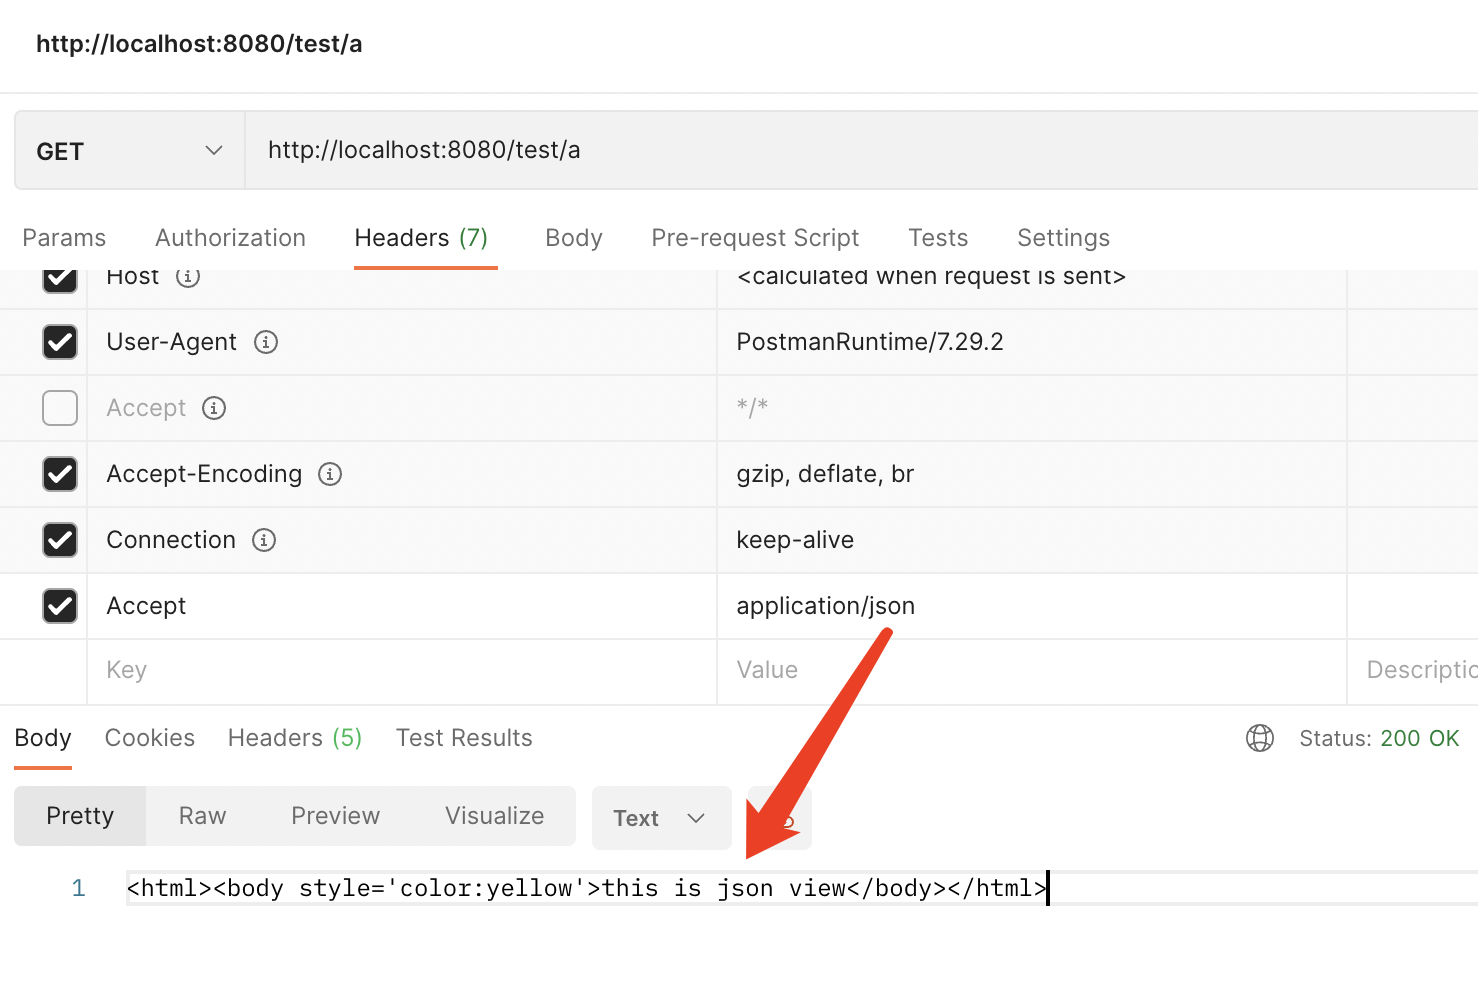
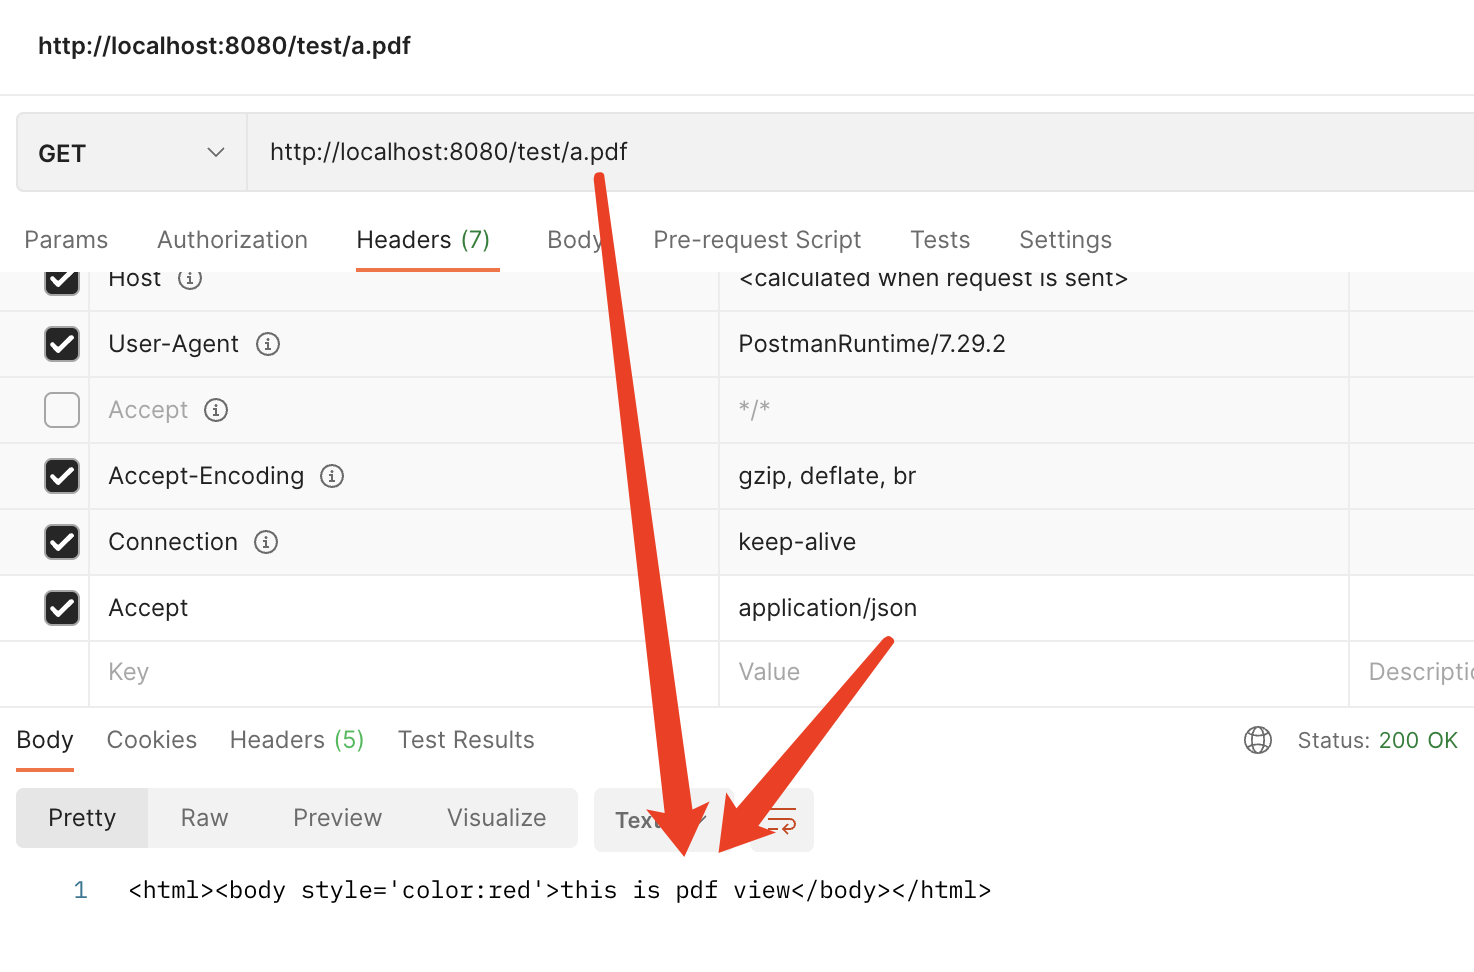
后缀的优先级高于Accept,符合我们前面的理论知识。若没有指定后缀,Accept就会生效。
因为我这里resolveViewName()是很定的返回了一个view,相当于可以解析任何扩展名。即使你的扩展名不存在也会被解析,最终以html形式展示出来。
这里讲解了ContentNegotiatingViewResolver内容协商在视图解析方面的应用,填补所谓的剩余的20%的内容。
虽然说现在视图技术对于后端来说使用相对较少了,但毕竟thymeleaf还是很优秀的。
