
阅读完需:约 16 分钟
LinkedBlockingQueue介绍
LinkedBlockingQueue是一个单向链表实现的阻塞队列。该队列按 FIFO(先进先出)排序元素,新元素插入到队列的尾部,并且队列获取操作会获得位于队列头部的元素。链接队列的吞吐量通常要高于基于数组的队列,但是在大多数并发应用程序中,其可预知的性能要低。
此外,LinkedBlockingQueue还是可选容量的(防止过度膨胀),即可以指定队列的容量。如果不指定,默认容量大小等于Integer.MAX_VALUE。
LinkedBlockingQueue原理和数据结构
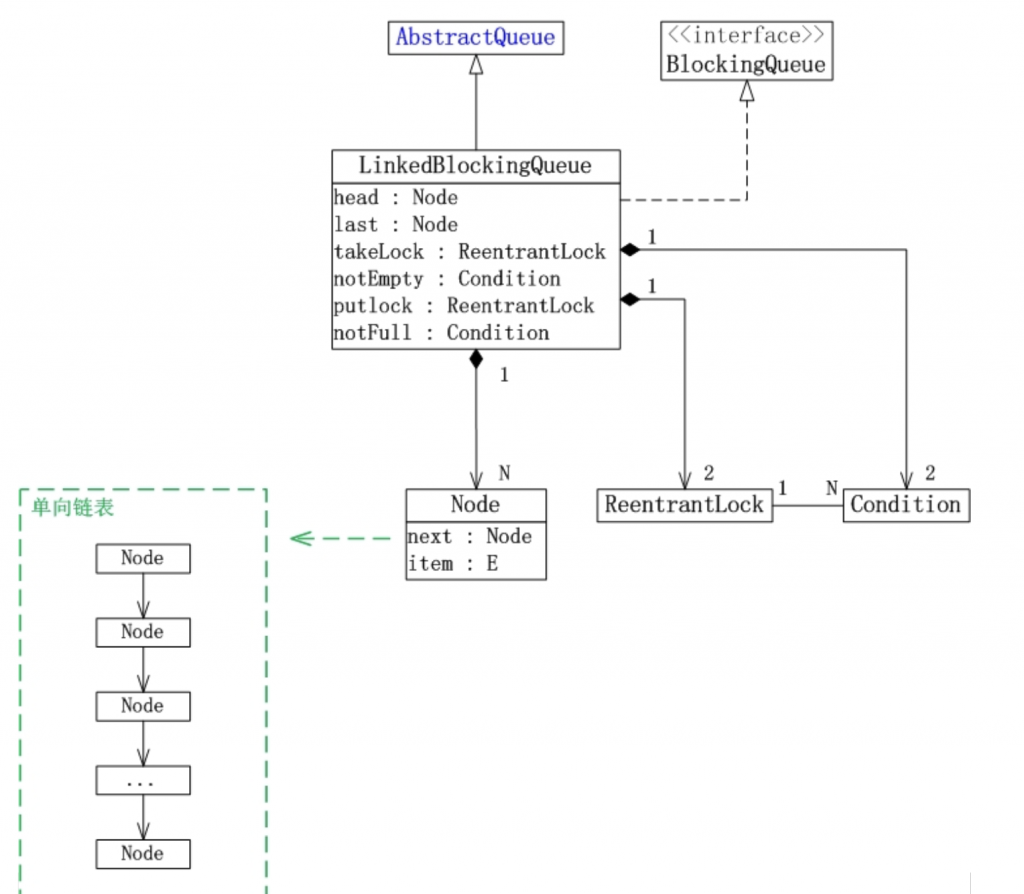
LinkedBlockingQueue的数据结构,如下图所示:
说明:
- LinkedBlockingQueue继承于AbstractQueue,它本质上是一个FIFO(先进先出)的队列。
- LinkedBlockingQueue实现了BlockingQueue接口,它支持多线程并发。当多线程竞争同一个资源时,某线程获取到该资源之后,其它线程需要阻塞等待。
-
LinkedBlockingQueue是通过单链表实现的。
- head是链表的表头。取出数据时,都是从表头head处插入。
- last是链表的表尾。新增数据时,都是从表尾last处插入。
- count是链表的实际大小,即当前链表中包含的节点个数。
- capacity是列表的容量,它是在创建链表时指定的。
- putLock是插入锁,takeLock是取出锁;notEmpty是“非空条件”,notFull是“未满条件”。通过它们对链表进行并发控制。
- LinkedBlockingQueue在实现“多线程对竞争资源的互斥访问”时,对于“插入”和“取出(删除)”操作分别使用了不同的锁。对于插入操作,通过“插入锁putLock”进行同步;对于取出操作,通过“取出锁takeLock”进行同步。
- 此外,插入锁putLock和“非满条件notFull”相关联,取出锁takeLock和“非空条件notEmpty”相关联。通过notFull和notEmpty更细腻的控制锁。
若某线程(线程A)要取出数据时,队列正好为空,则该线程会执行notEmpty.await()进行等待;当其它某个线程(线程B)向队列中插入了数据之后,会调用notEmpty.signal()唤醒“notEmpty上的等待线程”。此时,线程A会被唤醒从而得以继续运行。 此外,线程A在执行取操作前,会获取takeLock,在取操作执行完毕再释放takeLock。
若某线程(线程H)要插入数据时,队列已满,则该线程会它执行notFull.await()进行等待;当其它某个线程(线程I)取出数据之后,会调用notFull.signal()唤醒“notFull上的等待线程”。此时,线程H就会被唤醒从而得以继续运行。 此外,线程H在执行插入操作前,会获取putLock,在插入操作执行完毕才释放putLock。
LinkedBlockingQueue函数列表
// 创建一个容量为 Integer.MAX_VALUE 的 LinkedBlockingQueue。
LinkedBlockingQueue()
// 创建一个容量是 Integer.MAX_VALUE 的 LinkedBlockingQueue,最初包含给定 collection 的元素,元素按该 collection 迭代器的遍历顺序添加。
LinkedBlockingQueue(Collection<? extends E> c)
// 创建一个具有给定(固定)容量的 LinkedBlockingQueue。
LinkedBlockingQueue(int capacity)

// 从队列彻底移除所有元素。
void clear()
// 移除此队列中所有可用的元素,并将它们添加到给定 collection 中。
int drainTo(Collection<? super E> c)
// 最多从此队列中移除给定数量的可用元素,并将这些元素添加到给定 collection 中。
int drainTo(Collection<? super E> c, int maxElements)
// 返回在队列中的元素上按适当顺序进行迭代的迭代器。
Iterator<E> iterator()
// 将指定元素插入到此队列的尾部(如果立即可行且不会超出此队列的容量),在成功时返回 true,如果此队列已满,则返回 false。
boolean offer(E e)
// 将指定元素插入到此队列的尾部,如有必要,则等待指定的时间以使空间变得可用。
boolean offer(E e, long timeout, TimeUnit unit)
// 获取但不移除此队列的头;如果此队列为空,则返回 null。
E peek()
// 获取并移除此队列的头,如果此队列为空,则返回 null。
E poll()
// 获取并移除此队列的头部,在指定的等待时间前等待可用的元素(如果有必要)。
E poll(long timeout, TimeUnit unit)
// 将指定元素插入到此队列的尾部,如有必要,则等待空间变得可用。
void put(E e)
// 返回理想情况下(没有内存和资源约束)此队列可接受并且不会被阻塞的附加元素数量。
int remainingCapacity()
// 从此队列移除指定元素的单个实例(如果存在)。
boolean remove(Object o)
// 返回队列中的元素个数。
int size()
// 获取并移除此队列的头部,在元素变得可用之前一直等待(如果有必要)。
E take()
// 返回按适当顺序包含此队列中所有元素的数组。
Object[] toArray()
// 返回按适当顺序包含此队列中所有元素的数组;返回数组的运行时类型是指定数组的运行时类型。
<T> T[] toArray(T[] a)
// 返回此 collection 的字符串表示形式。
String toString()
LinkedBlockingQueue源码分析
下面从LinkedBlockingQueue的创建,添加,删除,遍历这几个方面对它进行分析。
1. 创建
下面以LinkedBlockingQueue(int capacity)来进行说明。
// 传说中的有界队列
public LinkedBlockingQueue(int capacity) {
    if (capacity <= 0) throw new IllegalArgumentException();
    this.capacity = capacity;
    last = head = new Node<E>(null);
}
// 这里会初始化一个空的头结点,那么第一个元素入队的时候,队列中就会有两个元素。
// 读取元素时,也总是获取头节点后面的一个节点。count 的计数值不包括这个头节点。
------------------------------------------------------------------
// 传说中的无界队列 (暂时不用)
public LinkedBlockingQueue() {
    this(Integer.MAX_VALUE);
}说明:
(01) capacity是“链式阻塞队列”的容量。
(02) head和last是“链式阻塞队列”的首节点和尾节点。它们在LinkedBlockingQueue中的声明如下:
// 容量
private final int capacity;
// 当前数量
private final AtomicInteger count = new AtomicInteger(0);
private transient Node<E> head; // 链表的表头
private transient Node<E> last; // 链表的表尾
// 用于控制“删除元素”的互斥锁takeLock 和 锁对应的“非空条件”notEmpty
private final ReentrantLock takeLock = new ReentrantLock();
private final Condition notEmpty = takeLock.newCondition();
// 用于控制“添加元素”的互斥锁putLock 和 锁对应的“非满条件”notFull
private final ReentrantLock putLock = new ReentrantLock();
private final Condition notFull = putLock.newCondition();
链表的节点定义如下:
static class Node<E> {
    E item;         // 数据
    Node<E> next;   // 下一个节点的指针

    Node(E x) { item = x; }
}上面的说明中用了两个锁,两个 Condition,简单介绍如下:
takeLock 和 notEmpty 怎么搭配:如果要获取(take)一个元素,需要获取 takeLock 锁,但是获取了锁还不够,如果队列此时为空,还需要队列不为空(notEmpty)这个条件(Condition)。
putLock 需要和 notFull 搭配:如果要插入(put)一个元素,需要获取 putLock 锁,但是获取了锁还不够,如果队列此时已满,还需要队列不是满的(notFull)这个条件(Condition)。
首先,这里用一个示意图来看看 LinkedBlockingQueue 的并发读写控制,然后再开始分析源码:
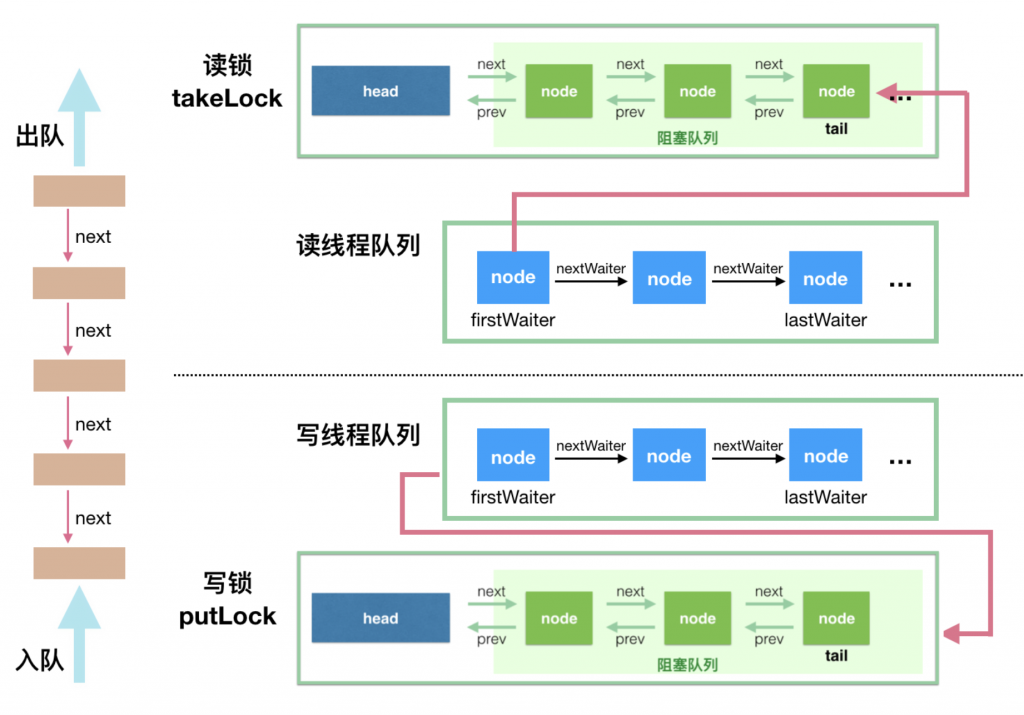
看懂这个示意图,源码也就简单了,读操作是排好队的,写操作也是排好队的,唯一的并发问题在于一个写操作和一个读操作同时进行,只要控制好这个就可以了。
2. 添加
下面以offer(E e)为例,对LinkedBlockingQueue的添加方法进行说明。
public boolean offer(E e) {
    if (e == null) throw new NullPointerException();
    // 如果“队列已满”,则返回false,表示插入失败。
    final AtomicInteger count = this.count;
    if (count.get() == capacity)
        return false;
    int c = -1;
    // 新建“节点e”
    Node<E> node = new Node(e);
    final ReentrantLock putLock = this.putLock;
    // 获取“插入锁putLock”
    putLock.lock();
    try {
        // 再次对“队列是不是满”的进行判断。
        // 若“队列未满”,则插入节点。
        if (count.get() < capacity) {
            // 插入节点
            enqueue(node);
            // 将“当前节点数量”+1,并返回“原始的数量”
            c = count.getAndIncrement();
            // 如果在插入元素之后,队列仍然未满,则唤醒notFull上的等待线程。
            if (c + 1 < capacity)
                notFull.signal();
        }
    } finally {
        // 释放“插入锁putLock”
        putLock.unlock();
    }
    // 如果在插入节点前,队列为空;则插入节点后,唤醒notEmpty上的等待线程
    if (c == 0)
        signalNotEmpty();
    return c >= 0;
}说明:offer()的作用很简单,就是将元素E添加到队列的末尾。
enqueue()的源码如下:
private void enqueue(Node<E> node) {
    // assert putLock.isHeldByCurrentThread();
    // assert last.next == null;
    last = last.next = node;
}
enqueue()的作用是将node添加到队列末尾,并设置node为新的尾节点!
signalNotEmpty()的源码如下:
private void signalNotEmpty() {
    final ReentrantLock takeLock = this.takeLock;
    takeLock.lock();
    try {
        notEmpty.signal();
    } finally {
        takeLock.unlock();
    }
}
signalNotEmpty()的作用是唤醒notEmpty上的等待线程。
我们来看下 put 方法是怎么将元素插入到队尾的:
public void put(E e) throws InterruptedException {
    if (e == null) throw new NullPointerException();
    // 如果你纠结这里为什么是 -1,可以看看 offer 方法。这就是个标识成功、失败的标志而已。
    int c = -1;
    Node<E> node = new Node(e);
    final ReentrantLock putLock = this.putLock;
    final AtomicInteger count = this.count;
    // 必须要获取到 putLock 才可以进行插入操作
    putLock.lockInterruptibly();
    try {
        // 如果队列满,等待 notFull 的条件满足。
        while (count.get() == capacity) {
            notFull.await();
        }
        // 入队
        enqueue(node);
        // count 原子加 1,c 还是加 1 前的值
        c = count.getAndIncrement();
        // 如果这个元素入队后,还有至少一个槽可以使用,调用 notFull.signal() 唤醒等待线程。
        // 哪些线程会等待在 notFull 这个 Condition 上呢?
        if (c + 1 < capacity)
            notFull.signal();
    } finally {
        // 入队后,释放掉 putLock
        putLock.unlock();
    }
    // 如果 c == 0,那么代表队列在这个元素入队前是空的(不包括head空节点),
    // 那么所有的读线程都在等待 notEmpty 这个条件,等待唤醒,这里做一次唤醒操作
    if (c == 0)
        signalNotEmpty();
}

// 入队的代码非常简单,就是将 last 属性指向这个新元素,并且让原队尾的 next 指向这个元素
// 这里入队没有并发问题,因为只有获取到 putLock 独占锁以后,才可以进行此操作
private void enqueue(Node<E> node) {
    // assert putLock.isHeldByCurrentThread();
    // assert last.next == null;
    last = last.next = node;
}

// 元素入队后,如果需要,调用这个方法唤醒读线程来读
private void signalNotEmpty() {
    final ReentrantLock takeLock = this.takeLock;
    takeLock.lock();
    try {
        notEmpty.signal();
    } finally {
        takeLock.unlock();
    }
}
3. 取出
下面以take()为例,对LinkedBlockingQueue的取出方法进行说明。
public E take() throws InterruptedException {
    E x;
    int c = -1;
    final AtomicInteger count = this.count;
    final ReentrantLock takeLock = this.takeLock;
    // 获取“取出锁”,若当前线程是中断状态,则抛出InterruptedException异常
    // 需要获取到 takeLock 才能进行出队操作
    takeLock.lockInterruptibly();
    try {
        // 如果队列为空,等待 notEmpty 这个条件满足再继续执行
        while (count.get() == 0) {
            notEmpty.await();
        }
        // 取出元素
        x = dequeue();
        // 取出元素之后,将“节点数量”-1;并返回“原始的节点数量”。
        c = count.getAndDecrement();
        // 如果这次出队后,队列中至少还有一个元素,那么调用 notEmpty.signal() 唤醒其他的读线程
        if (c > 1)
            notEmpty.signal();
    } finally {
        // 释放“取出锁”
        takeLock.unlock();
    }
    // 如果 c == capacity,那么说明在这个 take 方法发生的时候,队列是满的
    // 既然出队了一个,那么意味着队列不满了,唤醒写线程去写
    if (c == capacity)
        signalNotFull();
    return x;
}说明:take()的作用是取出并返回队列的头。若队列为空,则一直等待。
dequeue()的源码如下:
// 取队头,出队
private E dequeue() {
    // assert takeLock.isHeldByCurrentThread();
    // assert head.item == null;
    // 之前说了,头结点是空的
    Node<E> h = head;
    Node<E> first = h.next;
    h.next = h; // help GC
    // 设置这个为新的头结点
    head = first;
    E x = first.item;
    first.item = null;
    return x;
}
dequeue()的作用就是删除队列的头节点,并将表头指向“原头节点的下一个节点”。
signalNotFull()的源码如下:
// 元素出队后,如果需要,调用这个方法唤醒写线程来写
private void signalNotFull() {
    final ReentrantLock putLock = this.putLock;
    putLock.lock();
    try {
        notFull.signal();
    } finally {
        putLock.unlock();
    }
}
signalNotFull()的作用就是唤醒notFull上的等待线程。
4. 遍历
下面对LinkedBlockingQueue的遍历方法进行说明。
public Iterator<E> iterator() {
  return new Itr();
}
iterator()实际上是返回一个Iter对象。
Itr类的定义如下:
private class Itr implements Iterator<E> {
    // 当前节点
    private Node<E> current;
    // 上一次返回的节点
    private Node<E> lastRet;
    // 当前节点对应的值
    private E currentElement;

    Itr() {
        // 同时获取“插入锁putLock” 和 “取出锁takeLock”
        fullyLock();
        try {
            // 设置“当前元素”为“队列表头的下一节点”,即为队列的第一个有效节点
            current = head.next;
            if (current != null)
                currentElement = current.item;
        } finally {
            // 释放“插入锁putLock” 和 “取出锁takeLock”
            fullyUnlock();
        }
    }

    // 返回“下一个节点是否为null”
    public boolean hasNext() {
        return current != null;
    }

    private Node<E> nextNode(Node<E> p) {
        for (;;) {
            Node<E> s = p.next;
            if (s == p)
                return head.next;
            if (s == null || s.item != null)
                return s;
            p = s;
        }
    }

    // 返回下一个节点
    public E next() {
        fullyLock();
        try {
            if (current == null)
                throw new NoSuchElementException();
            E x = currentElement;
            lastRet = current;
            current = nextNode(current);
            currentElement = (current == null) ? null : current.item;
            return x;
        } finally {
            fullyUnlock();
        }
    }

    // 删除下一个节点
    public void remove() {
        if (lastRet == null)
            throw new IllegalStateException();
        fullyLock();
        try {
            Node<E> node = lastRet;
            lastRet = null;
            for (Node<E> trail = head, p = trail.next;
                 p != null;
                 trail = p, p = p.next) {
                if (p == node) {
                    unlink(p, trail);
                    break;
                }
            }
        } finally {
            fullyUnlock();
        }
    }
}
LinkedBlockingQueue示例
import java.util.*;
import java.util.concurrent.*;

/*
 *   LinkedBlockingQueue是“线程安全”的队列,而LinkedList是非线程安全的。
 *
 *   下面是“多个线程同时操作并且遍历queue”的示例
 *   (01) 当queue是LinkedBlockingQueue对象时,程序能正常运行。
 *   (02) 当queue是LinkedList对象时,程序会产生ConcurrentModificationException异常。
 *
 * @author skywang
 */
public class LinkedBlockingQueueDemo1 {

    // TODO: queue是LinkedList对象时,程序会出错。
    //private static Queue<String> queue = new LinkedList<String>();
    private static Queue<String> queue = new LinkedBlockingQueue<String>();
    public static void main(String[] args) {

        // 同时启动两个线程对queue进行操作!
        new MyThread("ta").start();
        new MyThread("tb").start();
    }

    private static void printAll() {
        String value;
        Iterator iter = queue.iterator();
        while(iter.hasNext()) {
            value = (String)iter.next();
            System.out.print(value+", ");
        }
        System.out.println();
    }

    private static class MyThread extends Thread {
        MyThread(String name) {
            super(name);
        }
        @Override
        public void run() {
                int i = 0;
            while (i++ < 6) {
                // “线程名” + "-" + "序号"
                String val = Thread.currentThread().getName()+i;
                queue.add(val);
                // 通过“Iterator”遍历queue。
                printAll();
            }
        }
    }
}(某一次)运行结果:
tb1, ta1,
tb1, ta1, ta2,
tb1, ta1, ta2, ta3,
tb1, ta1, ta2, ta3, ta4,
tb1, ta1, tb1, ta2, ta1, ta3, ta2, ta4, ta3, ta5,
ta4, tb1, ta5, ta1, ta6,
ta2, tb1, ta3, ta1, ta4, ta2, ta5, ta3, ta6, ta4, tb2,
ta5, ta6, tb2,
tb1, ta1, ta2, ta3, ta4, ta5, ta6, tb2, tb3,
tb1, ta1, ta2, ta3, ta4, ta5, ta6, tb2, tb3, tb4,
tb1, ta1, ta2, ta3, ta4, ta5, ta6, tb2, tb3, tb4, tb5,
tb1, ta1, ta2, ta3, ta4, ta5, ta6, tb2, tb3, tb4, tb5, tb6,结果说明:
示例程序中,启动两个线程(线程ta和线程tb)分别对LinkedBlockingQueue进行操作。以线程ta而言,它会先获取“线程名”+“序号”,然后将该字符串添加到LinkedBlockingQueue中;接着,遍历并输出LinkedBlockingQueue中的全部元素。 线程tb的操作和线程ta一样,只不过线程tb的名字和线程ta的名字不同。
当queue是LinkedBlockingQueue对象时,程序能正常运行。如果将queue改为LinkedList时,程序会产生ConcurrentModificationException异常。
