
阅读完需:约 38 分钟
线程等待与唤醒
1. wait(), notify(), notifyAll()等方法介绍
在Object.java中,定义了wait(), notify()和notifyAll()等接口。
wait()的作用是让当前线程进入等待状态,同时,wait()也会让当前线程释放它所持有的锁。而notify()和notifyAll()的作用,则是唤醒当前对象上的等待线程;notify()是唤醒单个线程,而notifyAll()是唤醒所有的线程。
Object类中关于等待/唤醒的API详细信息如下:
notify() — 唤醒在此对象监视器上等待的单个线程。
notifyAll() — 唤醒在此对象监视器上等待的所有线程。
wait() — 让当前线程处于“等待(阻塞)状态”,“直到其他线程调用此对象的 notify() 方法或 notifyAll() 方法”,当前线程被唤醒(进入“就绪状态”)。
wait(long timeout) — 让当前线程处于“等待(阻塞)状态”,“直到其他线程调用此对象的 notify() 方法或 notifyAll() 方法,或者超过指定的时间量”,当前线程被唤醒(进入“就绪状态”)。
wait(long timeout, int nanos) — 让当前线程处于“等待(阻塞)状态”,“直到其他线程调用此对象的 notify() 方法或 notifyAll() 方法,或者其他某个线程中断当前线程,或者已超过某个实际时间量”,当前线程被唤醒(进入“就绪状态”)。
2. wait()和notify()示例
// WaitTest.java的源码
class ThreadA extends Thread{

    public ThreadA(String name) {
        super(name);
    }

    public void run() {
        synchronized (this) {
            System.out.println(Thread.currentThread().getName()+" call notify()");
            // 唤醒当前的wait线程
            notify();
        }
    }
}

public class WaitTest {

    public static void main(String[] args) {

        ThreadA t1 = new ThreadA("t1");

        synchronized(t1) {
            try {
                // 启动“线程t1”
                System.out.println(Thread.currentThread().getName()+" start t1");
                t1.start();

                // 主线程等待t1通过notify()唤醒。
                System.out.println(Thread.currentThread().getName()+" wait()");
                t1.wait();

                System.out.println(Thread.currentThread().getName()+" continue");
            } catch (InterruptedException e) {
                e.printStackTrace();
            }
        }
    }
}
运行结果:
main start t1
main wait()
t1 call notify()
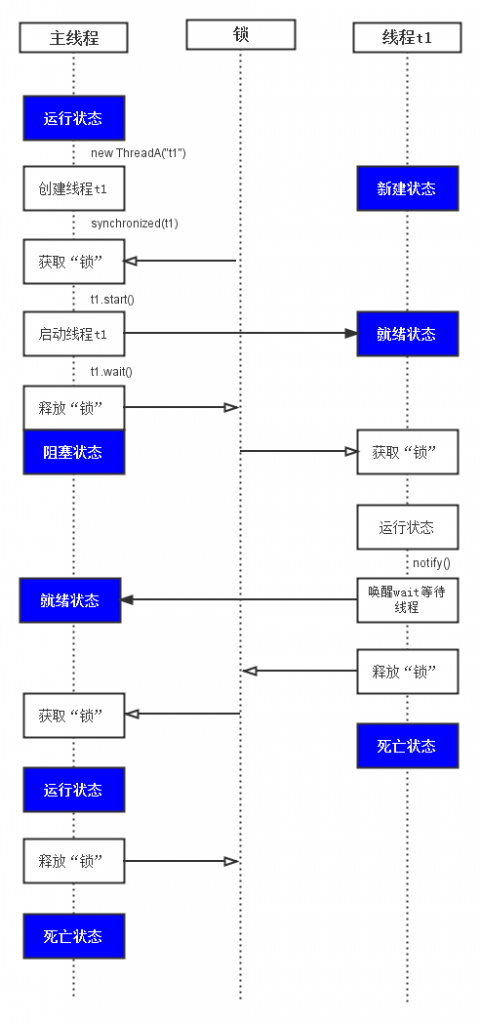
main continue(01) 注意,图中”主线程” 代表“主线程main”。”线程t1″ 代表WaitTest中启动的“线程t1”。 而“锁” 代表“t1这个对象的同步锁”。
(02) “主线程”通过 new ThreadA(“t1”) 新建“线程t1”。随后通过synchronized(t1)获取“t1对象的同步锁”。然后调用t1.start()启动“线程t1”。
(03) “主线程”执行t1.wait() 释放“t1对象的锁”并且进入“等待(阻塞)状态”。等待t1对象上的线程通过notify() 或 notifyAll()将其唤醒。
(04) “线程t1”运行之后,通过synchronized(this)获取“当前对象的锁”;接着调用notify()唤醒“当前对象上的等待线程”,也就是唤醒“主线程”。
(05) “线程t1”运行完毕之后,释放“当前对象的锁”。紧接着,“主线程”获取“t1对象的锁”,然后接着运行。
t1.wait()应该是让“线程t1”等待;但是,为什么却是让“主线程main”等待了呢?
wait() 引起“当前线程”等待,直到另外一个线程调用notify()或notifyAll()唤醒该线程。换句话说,这个方法和wait(0)的效果一样!(补充,对于wait(long millis)方法,当millis为0时,表示无限等待,直到被notify()或notifyAll()唤醒)。 “当前线程”在调用wait()时,必须拥有该对象的同步锁。该线程调用wait()之后,会释放该锁;然后一直等待直到“其它线程”调用对象的同步锁的notify()或notifyAll()方法。然后,该线程继续等待直到它重新获取“该对象的同步锁”,然后就可以接着运行。
jdk的解释中,说wait()的作用是让“当前线程”等待,而“当前线程”是指正在cpu上运行的线程!
这也意味着,虽然t1.wait()是通过“线程t1”调用的wait()方法,但是调用t1.wait()的地方是在“主线程main”中。而主线程必须是“当前线程”,也就是运行状态,才可以执行t1.wait()。所以,此时的“当前线程”是“主线程main”!因此,t1.wait()是让“主线程”等待,而不是“线程t1”!
3. wait(long timeout)和notify()
wait(long timeout)会让当前线程处于“等待(阻塞)状态”,“直到其他线程调用此对象的 notify() 方法或 notifyAll() 方法,或者超过指定的时间量”,当前线程被唤醒(进入“就绪状态”)。
下面的示例就是演示wait(long timeout)在超时情况下,线程被唤醒的情况。
// WaitTimeoutTest.java的源码
class ThreadA extends Thread{

    public ThreadA(String name) {
        super(name);
    }

    public void run() {
        System.out.println(Thread.currentThread().getName() + " run ");
        // 死循环,不断运行。
        while(true)
            ;
    }
}

public class WaitTimeoutTest {

    public static void main(String[] args) {

        ThreadA t1 = new ThreadA("t1");

        synchronized(t1) {
            try {
                // 启动“线程t1”
                System.out.println(Thread.currentThread().getName() + " start t1");
                t1.start();

                // 主线程等待t1通过notify()唤醒 或 notifyAll()唤醒,或超过3000ms延时;然后才被唤醒。
                System.out.println(Thread.currentThread().getName() + " call wait ");
                t1.wait(3000);

                System.out.println(Thread.currentThread().getName() + " continue");
            } catch (InterruptedException e) {
                e.printStackTrace();
            }
        }
    }
}运行结果:
main start t1
main call wait
t1 run                  // 大约3秒之后...输出“main continue”
main continue结果说明:
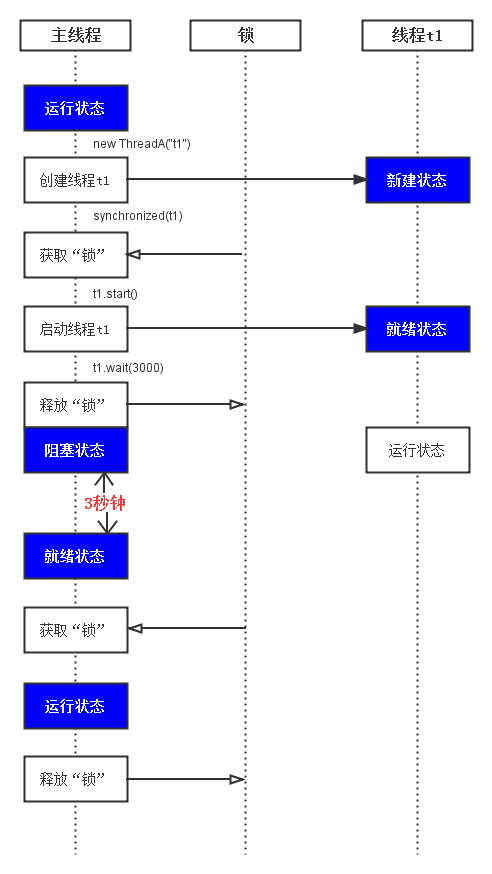
如下图,说明了“主线程”和“线程t1”的流程。
(01) 注意,图中”主线程” 代表WaitTimeoutTest主线程(即,线程main)。”线程t1″ 代表WaitTest中启动的线程t1。 而“锁” 代表“t1这个对象的同步锁”。
(02) 主线程main执行t1.start()启动“线程t1”。
(03) 主线程main执行t1.wait(3000),此时,主线程进入“阻塞状态”。需要“用于t1对象锁的线程通过notify() 或者 notifyAll()将其唤醒” 或者 “超时3000ms之后”,主线程main才进入到“就绪状态”,然后才可以运行。
(04) “线程t1”运行之后,进入了死循环,一直不断的运行。
(05) 超时3000ms之后,主线程main会进入到“就绪状态”,然后接着进入“运行状态”。
4. wait() 和 notifyAll()
通过前面的示例,我们知道 notify() 可以唤醒在此对象监视器上等待的单个线程。
下面,我们通过示例演示notifyAll()的用法;
它的作用是唤醒在此对象监视器上等待的所有线程。
public class NotifyAllTest {

    private static Object obj = new Object();
    public static void main(String[] args) {

        ThreadA t1 = new ThreadA("t1");
        ThreadA t2 = new ThreadA("t2");
        ThreadA t3 = new ThreadA("t3");
        t1.start();
        t2.start();
        t3.start();

        try {
            System.out.println(Thread.currentThread().getName()+" sleep(3000)");
            Thread.sleep(3000);
        } catch (InterruptedException e) {
            e.printStackTrace();
        }

        synchronized(obj) {
            // 主线程等待唤醒。
            System.out.println(Thread.currentThread().getName()+" notifyAll()");
            obj.notifyAll();
        }
    }

    static class ThreadA extends Thread{

        public ThreadA(String name){
            super(name);
        }

        public void run() {
            synchronized (obj) {
                try {
                    // 打印输出结果
                    System.out.println(Thread.currentThread().getName() + " wait");

                    // 唤醒当前的wait线程
                    obj.wait();

                    // 打印输出结果
                    System.out.println(Thread.currentThread().getName() + " continue");
                } catch (InterruptedException e) {
                    e.printStackTrace();
                }
            }
        }
    }
}运行结果:
t1 wait
main sleep(3000)
t3 wait
t2 wait
main notifyAll()
t2 continue
t3 continue
t1 continue结果说明:
参考下面的流程图。
(01) 主线程中新建并且启动了3个线程”t1″, “t2″和”t3″。
(02) 主线程通过sleep(3000)休眠3秒。在主线程休眠3秒的过程中,我们假设”t1″, “t2″和”t3″这3个线程都运行了。以”t1″为例,当它运行的时候,它会执行obj.wait()等待其它线程通过notify()或额nofityAll()来唤醒它;相同的道理,”t2″和”t3″也会等待其它线程通过nofity()或nofityAll()来唤醒它们。
(03) 主线程休眠3秒之后,接着运行。执行 obj.notifyAll() 唤醒obj上的等待线程,即唤醒”t1″, “t2″和”t3″这3个线程。 紧接着,主线程的synchronized(obj)运行完毕之后,主线程释放“obj锁”。这样,”t1”, “t2″和”t3″就可以获取“obj锁”而继续运行了!

5. 为什么notify(), wait()等函数定义在Object中,而不是Thread中
Object中的wait(), notify()等函数,和synchronized一样,会对“对象的同步锁”进行操作。
wait()会使“当前线程”等待,因为线程进入等待状态,所以线程应该释放它锁持有的“同步锁”,否则其它线程获取不到该“同步锁”而无法运行!
OK,线程调用wait()之后,会释放它锁持有的“同步锁”;而且,根据前面的介绍,我们知道:等待线程可以被notify()或notifyAll()唤醒。
思考一个问题:notify()是依据什么唤醒等待线程的?或者说,wait()等待线程和notify()之间是通过什么关联起来的?答案是:依据“对象的同步锁”。
负责唤醒等待线程的那个线程(我们称为“唤醒线程”),它只有在获取“该对象的同步锁”(这里的同步锁必须和等待线程的同步锁是同一个),并且调用notify()或notifyAll()方法之后,才能唤醒等待线程。虽然,等待线程被唤醒;但是,它不能立刻执行,因为唤醒线程还持有“该对象的同步锁”。必须等到唤醒线程释放了“对象的同步锁”之后,等待线程才能获取到“对象的同步锁”进而继续运行。
总之,notify(), wait()依赖于“同步锁”,而“同步锁”是对象锁持有,并且每个对象有且仅有一个!这就是为什么notify(), wait()等函数定义在Object类,而不是Thread类中的原因。
线程让步
1. yield()介绍
yield()的作用是让步。它能让当前线程由“运行状态”进入到“就绪状态”,从而让其它具有相同优先级的等待线程获取执行权;但是,并不能保证在当前线程调用yield()之后,其它具有相同优先级的线程就一定能获得执行权;也有可能是当前线程又进入到“运行状态”继续运行!
2. yield()示例
// YieldTest.java的源码
class ThreadA extends Thread{
    public ThreadA(String name){
        super(name);
    }
    public synchronized void run(){
        for(int i=0; i <10; i++){
            System.out.printf("%s [%d]:%d\n", this.getName(), this.getPriority(), i);
            // i整除4时,调用yield
            if (i%4 == 0)
                Thread.yield();
        }
    }
}

public class YieldTest{
    public static void main(String[] args){
        ThreadA t1 = new ThreadA("t1");
        ThreadA t2 = new ThreadA("t2");
        t1.start();
        t2.start();
    }
}(某一次的)运行结果:
t1 [5]:0
t2 [5]:0
t1 [5]:1
t1 [5]:2
t1 [5]:3
t1 [5]:4
t1 [5]:5
t1 [5]:6
t1 [5]:7
t1 [5]:8
t1 [5]:9
t2 [5]:1
t2 [5]:2
t2 [5]:3
t2 [5]:4
t2 [5]:5
t2 [5]:6
t2 [5]:7
t2 [5]:8
t2 [5]:9结果说明:
“线程t1”在能被4整数的时候,并没有切换到“线程t2”。这表明,yield()虽然可以让线程由“运行状态”进入到“就绪状态”;但是,它不一定会让其它线程获取CPU执行权(即,其它线程进入到“运行状态”),即使这个“其它线程”与当前调用yield()的线程具有相同的优先级。
3. yield() 与 wait()的比较
我们知道,wait()的作用是让当前线程由“运行状态”进入“等待(阻塞)状态”的同时,也会释放同步锁。而yield()的作用是让步,它也会让当前线程离开“运行状态”。它们的区别是:
(01) wait()是让线程由“运行状态”进入到“等待(阻塞)状态”,而不yield()是让线程由“运行状态”进入到“就绪状态”。
(02) wait()是会线程释放它所持有对象的同步锁,而yield()方法不会释放锁。
下面通过示例演示yield()是不会释放锁的。
// YieldLockTest.java 的源码
public class YieldLockTest{

    private static Object obj = new Object();

    public static void main(String[] args){
        ThreadA t1 = new ThreadA("t1");
        ThreadA t2 = new ThreadA("t2");
        t1.start();
        t2.start();
    }

    static class ThreadA extends Thread{
        public ThreadA(String name){
            super(name);
        }
        public void run(){
            // 获取obj对象的同步锁
            synchronized (obj) {
                for(int i=0; i <10; i++){
                    System.out.printf("%s [%d]:%d\n", this.getName(), this.getPriority(), i);
                    // i整除4时,调用yield
                    if (i%4 == 0)
                        Thread.yield();
                }
            }
        }
    }
}
某一次运行结果:
t1 [5]:0
t1 [5]:1
t1 [5]:2
t1 [5]:3
t1 [5]:4
t1 [5]:5
t1 [5]:6
t1 [5]:7
t1 [5]:8
t1 [5]:9
t2 [5]:0
t2 [5]:1
t2 [5]:2
t2 [5]:3
t2 [5]:4
t2 [5]:5
t2 [5]:6
t2 [5]:7
t2 [5]:8
t2 [5]:9结果说明:
主线程main中启动了两个线程t1和t2。t1和t2在run()会引用同一个对象的同步锁,即synchronized(obj)。在t1运行过程中,虽然它会调用Thread.yield();但是,t2是不会获取cpu执行权的。因为,t1并没有释放“obj所持有的同步锁”!
线程休眠
1. sleep()介绍
sleep() 定义在Thread.java中。
sleep() 的作用是让当前线程休眠,即当前线程会从“运行状态”进入到“休眠(阻塞)状态”。sleep()会指定休眠时间,线程休眠的时间会大于/等于该休眠时间;在线程重新被唤醒时,它会由“阻塞状态”变成“就绪状态”,从而等待cpu的调度执行。
2. sleep()示例
// SleepTest.java的源码
class ThreadA extends Thread{
    public ThreadA(String name){
        super(name);
    }
    public synchronized void run() {
        try {
            for(int i=0; i <10; i++){
                System.out.printf("%s: %d\n", this.getName(), i);
                // i能被4整除时,休眠100毫秒
                if (i%4 == 0)
                    Thread.sleep(100);
            }
        } catch (InterruptedException e) {
            e.printStackTrace();
        }
    }
}

public class SleepTest{
    public static void main(String[] args){
        ThreadA t1 = new ThreadA("t1");
        t1.start();
    }
}运行结果:
t1: 0
t1: 1
t1: 2
t1: 3
t1: 4
t1: 5
t1: 6
t1: 7
t1: 8
t1: 9结果说明:
程序比较简单,在主线程main中启动线程t1。t1启动之后,当t1中的计算i能被4整除时,t1会通过Thread.sleep(100)休眠100毫秒。
3. sleep() 与 wait()的比较
我们知道,wait()的作用是让当前线程由“运行状态”进入“等待(阻塞)状态”的同时,也会释放同步锁。而sleep()的作用是也是让当前线程由“运行状态”进入到“休眠(阻塞)状态”。
但是,wait()会释放对象的同步锁,而sleep()则不会释放锁。
下面通过示例演示sleep()是不会释放锁的。
// SleepLockTest.java的源码
public class SleepLockTest{

    private static Object obj = new Object();

    public static void main(String[] args){
        ThreadA t1 = new ThreadA("t1");
        ThreadA t2 = new ThreadA("t2");
        t1.start();
        t2.start();
    }

    static class ThreadA extends Thread{
        public ThreadA(String name){
            super(name);
        }
        public void run(){
            // 获取obj对象的同步锁
            synchronized (obj) {
                try {
                    for(int i=0; i <10; i++){
                        System.out.printf("%s: %d\n", this.getName(), i);
                        // i能被4整除时,休眠100毫秒
                        if (i%4 == 0)
                            Thread.sleep(100);
                    }
                } catch (InterruptedException e) {
                    e.printStackTrace();
                }
            }
        }
    }
}运行结果:
t1: 0
t1: 1
t1: 2
t1: 3
t1: 4
t1: 5
t1: 6
t1: 7
t1: 8
t1: 9
t2: 0
t2: 1
t2: 2
t2: 3
t2: 4
t2: 5
t2: 6
t2: 7
t2: 8
t2: 9结果说明:
主线程main中启动了两个线程t1和t2。t1和t2在run()会引用同一个对象的同步锁,即synchronized(obj)。在t1运行过程中,虽然它会调用Thread.sleep(100);但是,t2是不会获取cpu执行权的。因为,t1并没有释放“obj所持有的同步锁”!
注意,若我们注释掉synchronized (obj)后再次执行该程序,t1和t2是可以相互切换的。下面是注释调synchronized(obj) 之后的源码:
// SleepLockTest.java的源码(注释掉synchronized(obj))
public class SleepLockTest{

    private static Object obj = new Object();

    public static void main(String[] args){
        ThreadA t1 = new ThreadA("t1");
        ThreadA t2 = new ThreadA("t2");
        t1.start();
        t2.start();
    }

    static class ThreadA extends Thread{
        public ThreadA(String name){
            super(name);
        }
        public void run(){
            // 获取obj对象的同步锁
//            synchronized (obj) {
                try {
                    for(int i=0; i <10; i++){
                        System.out.printf("%s: %d\n", this.getName(), i);
                        // i能被4整除时,休眠100毫秒
                        if (i%4 == 0)
                            Thread.sleep(100);
                    }
                } catch (InterruptedException e) {
                    e.printStackTrace();
                }
//            }
        }
    }
}
join()
1. join()介绍
join() 定义在Thread.java中。
join() 的作用:让“主线程”等待“子线程”结束之后才能继续运行。这句话可能有点晦涩,我们还是通过例子去理解:
// 主线程
public class Father extends Thread {
    public void run() {
        Son s = new Son();
        s.start();
        s.join();
        ...
    }
}
// 子线程
public class Son extends Thread {
    public void run() {
        ...
    }
}说明:
上面的有两个类Father(主线程类)和Son(子线程类)。因为Son是在Father中创建并启动的,所以,Father是主线程类,Son是子线程类。
在Father主线程中,通过new Son()新建“子线程s”。接着通过s.start()启动“子线程s”,并且调用s.join()。在调用s.join()之后,Father主线程会一直等待,直到“子线程s”运行完毕;在“子线程s”运行完毕之后,Father主线程才能接着运行。 这也就是我们所说的“join()的作用,是让主线程会等待子线程结束之后才能继续运行”!
2. join()源码分析
public final void join() throws InterruptedException {
    join(0);
}

public final synchronized void join(long millis)
throws InterruptedException {
    long base = System.currentTimeMillis();
    long now = 0;

    if (millis < 0) {
        throw new IllegalArgumentException("timeout value is negative");
    }

    if (millis == 0) {
        while (isAlive()) {
            wait(0);
        }
    } else {
        while (isAlive()) {
            long delay = millis - now;
            if (delay <= 0) {
                break;
            }
            wait(delay);
            now = System.currentTimeMillis() - base;
        }
    }
}说明:
从代码中,我们可以发现。当millis==0时,会进入while(isAlive())循环;即只要子线程是活的,主线程就不停的等待。
我们根据上面解释join()作用时的代码来理解join()的用法!
问题:
虽然s.join()被调用的地方是发生在“Father主线程”中,但是s.join()是通过“子线程s”去调用的join()。那么,join()方法中的isAlive()应该是判断“子线程s”是不是Alive状态;对应的wait(0)也应该是“让子线程s”等待才对。但如果是这样的话,s.join()的作用怎么可能是“让主线程等待,直到子线程s完成为止”呢,应该是让”子线程等待才对(因为调用子线程对象s的wait方法嘛)”?
答案:wait()的作用是让“当前线程”等待,而这里的“当前线程”是指当前在CPU上运行的线程。所以,虽然是调用子线程的wait()方法,但是它是通过“主线程”去调用的;所以,休眠的是主线程,而不是“子线程”!
3. join()示例
// JoinTest.java的源码
public class JoinTest{

    public static void main(String[] args){
        try {
            ThreadA t1 = new ThreadA("t1"); // 新建“线程t1”

            t1.start();                     // 启动“线程t1”
            t1.join();                        // 将“线程t1”加入到“主线程main”中,并且“主线程main()会等待它的完成”
            System.out.printf("%s finish\n", Thread.currentThread().getName());
        } catch (InterruptedException e) {
            e.printStackTrace();
        }
    }

    static class ThreadA extends Thread{

        public ThreadA(String name){
            super(name);
        }
        public void run(){
            System.out.printf("%s start\n", this.getName());

            // 延时操作
            for(int i=0; i <1000000; i++)
               ;

            System.out.printf("%s finish\n", this.getName());
        }
    }
}运行结果:
t1 start
t1 finish
main finish结果说明:
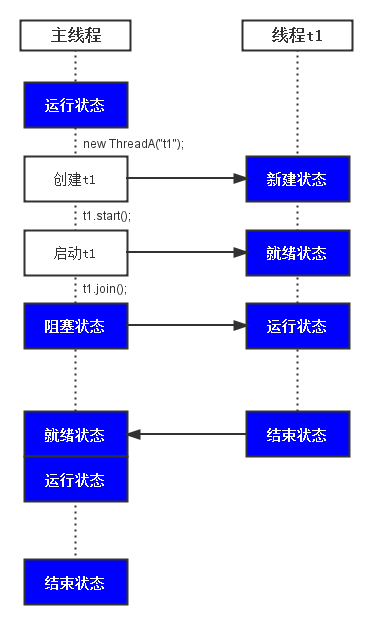
运行流程如图
(01) 在“主线程main”中通过 new ThreadA(“t1”) 新建“线程t1”。 接着,通过 t1.start() 启动“线程t1”,并执行t1.join()。
(02) 执行t1.join()之后,“主线程main”会进入“阻塞状态”等待t1运行结束。“子线程t1”结束之后,会唤醒“主线程main”,“主线程”重新获取cpu执行权,继续运行。
interrupt()和线程终止方式
1. interrupt()说明
interrupt()的作用是中断本线程。 本线程中断自己是被允许的;其它线程调用本线程的interrupt()方法时,会通过checkAccess()检查权限。这有可能抛出SecurityException异常。 如果本线程是处于阻塞状态:调用线程的wait(), wait(long)或wait(long, int)会让它进入等待(阻塞)状态,或者调用线程的join(), join(long), join(long, int), sleep(long), sleep(long, int)也会让它进入阻塞状态。若线程在阻塞状态时,调用了它的interrupt()方法,那么它的“中断状态”会被清除并且会收到一个InterruptedException异常。例如,线程通过wait()进入阻塞状态,此时通过interrupt()中断该线程;调用interrupt()会立即将线程的中断标记设为“true”,但是由于线程处于阻塞状态,所以该“中断标记”会立即被清除为“false”,同时,会产生一个InterruptedException的异常。 如果线程被阻塞在一个Selector选择器中,那么通过interrupt()中断它时;线程的中断标记会被设置为true,并且它会立即从选择操作中返回。 如果不属于前面所说的情况,那么通过interrupt()中断线程时,它的中断标记会被设置为“true”。 中断一个“已终止的线程”不会产生任何操作。
2. 终止线程的方式
Thread中的stop()和suspend()方法,由于固有的不安全性,已经建议不再使用!
下面,我先分别讨论线程在“阻塞状态”和“运行状态”的终止方式,然后再总结出一个通用的方式。
终止处于“阻塞状态”的线程
通常,我们通过“中断”方式终止处于“阻塞状态”的线程。
当线程由于被调用了sleep(), wait(), join()等方法而进入阻塞状态;若此时调用线程的interrupt()将线程的中断标记设为true。由于处于阻塞状态,中断标记会被清除,同时产生一个InterruptedException异常。将InterruptedException放在适当的为止就能终止线程,形式如下:
@Override
public void run() {
    try {
        while (true) {
            // 执行任务...
        }
    } catch (InterruptedException ie) {
        // 由于产生InterruptedException异常,退出while(true)循环,线程终止!
    }
}说明:在while(true)中不断的执行任务,当线程处于阻塞状态时,调用线程的interrupt()产生InterruptedException中断。中断的捕获在while(true)之外,这样就退出了while(true)循环!
注意:对InterruptedException的捕获务一般放在while(true)循环体的外面,这样,在产生异常时就退出了while(true)循环。否则,InterruptedException在while(true)循环体之内,就需要额外的添加退出处理。形式如下:
@Override
public void run() {
    while (true) {
        try {
            // 执行任务...
        } catch (InterruptedException ie) {
            // InterruptedException在while(true)循环体内。
            // 当线程产生了InterruptedException异常时,while(true)仍能继续运行!需要手动退出
            break;
        }
    }
}
说明:上面的InterruptedException异常的捕获在whle(true)之内。当产生InterruptedException异常时,被catch处理之外,仍然在while(true)循环体内;要退出while(true)循环体,需要额外的执行退出while(true)的操作。
终止处于“运行状态”的线程
通常,我们通过“标记”方式终止处于“运行状态”的线程。其中,包括“中断标记”和“额外添加标记”。
(01) 通过“中断标记”终止线程。
形式如下:
private volatile boolean flag= true;
protected void stopTask() {
    flag = false;
}

@Override
public void run() {
    while (flag) {
        // 执行任务...
    }
}说明:线程中有一个flag标记,它的默认值是true;并且我们提供stopTask()来设置flag标记。当我们需要终止该线程时,调用该线程的stopTask()方法就可以让线程退出while循环。
注意:将flag定义为volatile类型,是为了保证flag的可见性。即其它线程通过stopTask()修改了flag之后,本线程能看到修改后的flag的值。
综合线程处于“阻塞状态”和“运行状态”的终止方式,比较通用的终止线程的形式如下:
@Override
public void run() {
    try {
        // 1. isInterrupted()保证,只要中断标记为true就终止线程。
        while (!isInterrupted()) {
            // 执行任务...
        }
    } catch (InterruptedException ie) {
        // 2. InterruptedException异常保证,当InterruptedException异常产生时,线程被终止。
    }
}
3. 终止线程的示例
interrupt()常常被用来终止“阻塞状态”线程。参考下面示例:
// Demo1.java的源码
class MyThread extends Thread {

    public MyThread(String name) {
        super(name);
    }

    @Override
    public void run() {
        try {
            int i=0;
            while (!isInterrupted()) {
                Thread.sleep(100); // 休眠100ms
                i++;
                System.out.println(Thread.currentThread().getName()+" ("+this.getState()+") loop " + i);
            }
        } catch (InterruptedException e) {
            System.out.println(Thread.currentThread().getName() +" ("+this.getState()+") catch InterruptedException.");
        }
    }
}

public class Demo1 {

    public static void main(String[] args) {
        try {
            Thread t1 = new MyThread("t1");  // 新建“线程t1”
            System.out.println(t1.getName() +" ("+t1.getState()+") is new.");

            t1.start();                      // 启动“线程t1”
            System.out.println(t1.getName() +" ("+t1.getState()+") is started.");

            // 主线程休眠300ms,然后主线程给t1发“中断”指令。
            Thread.sleep(300);
            t1.interrupt();
            System.out.println(t1.getName() +" ("+t1.getState()+") is interrupted.");

            // 主线程休眠300ms,然后查看t1的状态。
            Thread.sleep(300);
            System.out.println(t1.getName() +" ("+t1.getState()+") is interrupted now.");
        } catch (InterruptedException e) {
            e.printStackTrace();
        }
    }
}运行结果:
t1 (NEW) is new.
t1 (RUNNABLE) is started.
t1 (RUNNABLE) loop 1
t1 (RUNNABLE) loop 2
t1 (TIMED_WAITING) is interrupted.
t1 (RUNNABLE) catch InterruptedException.
t1 (TERMINATED) is interrupted now.结果说明:
(01) 主线程main中通过new MyThread(“t1”)创建线程t1,之后通过t1.start()启动线程t1。
(02) t1启动之后,会不断的检查它的中断标记,如果中断标记为“false”;则休眠100ms。
(03) t1休眠之后,会切换到主线程main;主线程再次运行时,会执行t1.interrupt()中断线程t1。t1收到中断指令之后,会将t1的中断标记设置“false”,而且会抛出InterruptedException异常。在t1的run()方法中,是在循环体while之外捕获的异常;因此循环被终止。
我们对上面的结果进行小小的修改,将run()方法中捕获InterruptedException异常的代码块移到while循环体内。
// Demo2.java的源码
class MyThread extends Thread {

    public MyThread(String name) {
        super(name);
    }

    @Override
    public void run() {
        int i=0;
        while (!isInterrupted()) {
            try {
                Thread.sleep(100); // 休眠100ms
            } catch (InterruptedException ie) {
                System.out.println(Thread.currentThread().getName() +" ("+this.getState()+") catch InterruptedException.");
            }
            i++;
            System.out.println(Thread.currentThread().getName()+" ("+this.getState()+") loop " + i);
        }
    }
}

public class Demo2 {

    public static void main(String[] args) {
        try {
            Thread t1 = new MyThread("t1");  // 新建“线程t1”
            System.out.println(t1.getName() +" ("+t1.getState()+") is new.");

            t1.start();                      // 启动“线程t1”
            System.out.println(t1.getName() +" ("+t1.getState()+") is started.");

            // 主线程休眠300ms,然后主线程给t1发“中断”指令。
            Thread.sleep(300);
            t1.interrupt();
            System.out.println(t1.getName() +" ("+t1.getState()+") is interrupted.");

            // 主线程休眠300ms,然后查看t1的状态。
            Thread.sleep(300);
            System.out.println(t1.getName() +" ("+t1.getState()+") is interrupted now.");
        } catch (InterruptedException e) {
            e.printStackTrace();
        }
    }
}运行结果:
t1 (NEW) is new.
t1 (RUNNABLE) is started.
t1 (RUNNABLE) loop 1
t1 (RUNNABLE) loop 2
t1 (TIMED_WAITING) is interrupted.
t1 (RUNNABLE) catch InterruptedException.
t1 (RUNNABLE) loop 3
t1 (RUNNABLE) loop 4
t1 (RUNNABLE) loop 5
t1 (TIMED_WAITING) is interrupted now.
t1 (RUNNABLE) loop 6
t1 (RUNNABLE) loop 7
t1 (RUNNABLE) loop 8
t1 (RUNNABLE) loop 9
...结果说明:
程序进入了死循环!
为什么会这样呢?这是因为,t1在“等待(阻塞)状态”时,被interrupt()中断;此时,会清除中断标记[即isInterrupted()会返回false],而且会抛出InterruptedException异常[该异常在while循环体内被捕获]。因此,t1理所当然的会进入死循环了。
解决该问题,需要我们在捕获异常时,额外的进行退出while循环的处理。例如,在MyThread的catch(InterruptedException)中添加break 或 return就能解决该问题。
下面是通过“额外添加标记”的方式终止“状态状态”的线程的示例:
// Demo3.java的源码
class MyThread extends Thread {

    private volatile boolean flag= true;
    public void stopTask() {
        flag = false;
    }

    public MyThread(String name) {
        super(name);
    }

    @Override
    public void run() {
        synchronized(this) {
            try {
                int i=0;
                while (flag) {
                    Thread.sleep(100); // 休眠100ms
                    i++;
                    System.out.println(Thread.currentThread().getName()+" ("+this.getState()+") loop " + i);
                }
            } catch (InterruptedException ie) {
                System.out.println(Thread.currentThread().getName() +" ("+this.getState()+") catch InterruptedException.");
            }
        }
    }
}

public class Demo3 {

    public static void main(String[] args) {
        try {
            MyThread t1 = new MyThread("t1");  // 新建“线程t1”
            System.out.println(t1.getName() +" ("+t1.getState()+") is new.");

            t1.start();                      // 启动“线程t1”
            System.out.println(t1.getName() +" ("+t1.getState()+") is started.");

            // 主线程休眠300ms,然后主线程给t1发“中断”指令。
            Thread.sleep(300);
            t1.stopTask();
            System.out.println(t1.getName() +" ("+t1.getState()+") is interrupted.");

            // 主线程休眠300ms,然后查看t1的状态。
            Thread.sleep(300);
            System.out.println(t1.getName() +" ("+t1.getState()+") is interrupted now.");
        } catch (InterruptedException e) {
            e.printStackTrace();
        }
    }
}运行结果:
t1 (NEW) is new.
t1 (RUNNABLE) is started.
t1 (RUNNABLE) loop 1
t1 (RUNNABLE) loop 2
t1 (TIMED_WAITING) is interrupted.
t1 (RUNNABLE) loop 3
t1 (TERMINATED) is interrupted now.
4. interrupted() 和 isInterrupted()的区别
最后谈谈 interrupted() 和 isInterrupted()。
interrupted() 和 isInterrupted()都能够用于检测对象的“中断标记”。
区别是,interrupted()除了返回中断标记之外,它还会清除中断标记(即将中断标记设为false);而isInterrupted()仅仅返回中断标记。
线程优先级和守护线程
1. 线程优先级的介绍
java 中的线程优先级的范围是1~10,默认的优先级是5。“高优先级线程”会优先于“低优先级线程”执行。
java 中有两种线程:用户线程和守护线程。可以通过isDaemon()方法来区别它们:如果返回false,则说明该线程是“用户线程”;否则就是“守护线程”。
用户线程一般用户执行用户级任务,而守护线程也就是“后台线程”,一般用来执行后台任务。需要注意的是:Java虚拟机在“用户线程”都结束后会后退出。
JDK 中关于线程优先级和守护线程的介绍如下:
每个线程都有一个优先级。“高优先级线程”会优先于“低优先级线程”执行。每个线程都可以被标记为一个守护进程或非守护进程。在一些运行的主线程中创建新的子线程时,子线程的优先级被设置为等于“创建它的主线程的优先级”,当且仅当“创建它的主线程是守护线程”时“子线程才会是守护线程”。
当Java虚拟机启动时,通常有一个单一的非守护线程(该线程通过是通过main()方法启动)。JVM会一直运行直到下面的任意一个条件发生,JVM就会终止运行:
(01) 调用了exit()方法,并且exit()有权限被正常执行。
(02) 所有的“非守护线程”都死了(即JVM中仅仅只有“守护线程”)。
每一个线程都被标记为“守护线程”或“用户线程”。当只有守护线程运行时,JVM会自动退出。
2. 线程优先级的示例
我们先看看优先级的示例
class MyThread extends Thread{
    public MyThread(String name) {
        super(name);
    }

    public void run(){
        for (int i=0; i<5; i++) {
            System.out.println(Thread.currentThread().getName()
                    +"("+Thread.currentThread().getPriority()+ ")"
                    +", loop "+i);
        }
    }
};

public class Demo {
    public static void main(String[] args) {

        System.out.println(Thread.currentThread().getName()
                +"("+Thread.currentThread().getPriority()+ ")");

        Thread t1=new MyThread("t1");    // 新建t1
        Thread t2=new MyThread("t2");    // 新建t2
        t1.setPriority(1);                // 设置t1的优先级为1
        t2.setPriority(10);                // 设置t2的优先级为10
        t1.start();                        // 启动t1
        t2.start();                        // 启动t2
    }
}运行结果:
main(5)
t1(1), loop 0
t2(10), loop 0
t1(1), loop 1
t2(10), loop 1
t1(1), loop 2
t2(10), loop 2
t1(1), loop 3
t2(10), loop 3
t1(1), loop 4
t2(10), loop 4结果说明:
(01) 主线程main的优先级是5。
(02) t1的优先级被设为1,而t2的优先级被设为10。cpu在执行t1和t2的时候,根据时间片轮循调度,所以能够并发执行。
3. 守护线程的示例
下面是守护线程的示例。
// Demo.java
class MyThread extends Thread{
    public MyThread(String name) {
        super(name);
    }

    public void run(){
        try {
            for (int i=0; i<5; i++) {
                Thread.sleep(3);
                System.out.println(this.getName() +"(isDaemon="+this.isDaemon()+ ")" +", loop "+i);
            }
        } catch (InterruptedException e) {
        }
    }
};

class MyDaemon extends Thread{
    public MyDaemon(String name) {
        super(name);
    }

    public void run(){
        try {
            for (int i=0; i<10000; i++) {
                Thread.sleep(1);
                System.out.println(this.getName() +"(isDaemon="+this.isDaemon()+ ")" +", loop "+i);
            }
        } catch (InterruptedException e) {
        }
    }
}
public class Demo {
    public static void main(String[] args) {

        System.out.println(Thread.currentThread().getName()
                +"(isDaemon="+Thread.currentThread().isDaemon()+ ")");

        Thread t1=new MyThread("t1");    // 新建t1
        Thread t2=new MyDaemon("t2");    // 新建t2
        t2.setDaemon(true);                // 设置t2为守护线程
        t1.start();                        // 启动t1
        t2.start();                        // 启动t2
    }
}运行结果:
main(isDaemon=false)
t2(isDaemon=true), loop 0
t2(isDaemon=true), loop 1
t1(isDaemon=false), loop 0
t2(isDaemon=true), loop 2
t2(isDaemon=true), loop 3
t1(isDaemon=false), loop 1
t2(isDaemon=true), loop 4
t2(isDaemon=true), loop 5
t2(isDaemon=true), loop 6
t1(isDaemon=false), loop 2
t2(isDaemon=true), loop 7
t2(isDaemon=true), loop 8
t2(isDaemon=true), loop 9
t1(isDaemon=false), loop 3
t2(isDaemon=true), loop 10
t2(isDaemon=true), loop 11
t1(isDaemon=false), loop 4
t2(isDaemon=true), loop 12结果说明:
(01) 主线程main是用户线程,它创建的子线程t1也是用户线程。
(02) t2是守护线程。在“主线程main”和“子线程t1”(它们都是用户线程)执行完毕,只剩t2这个守护线程的时候,JVM自动退出。
生产消费者问题
1. 生产/消费者模型
生产/消费者问题是个非常典型的多线程问题,涉及到的对象包括“生产者”、“消费者”、“仓库”和“产品”。他们之间的关系如下:
(01) 生产者仅仅在仓储未满时候生产,仓满则停止生产。
(02) 消费者仅仅在仓储有产品时候才能消费,仓空则等待。
(03) 当消费者发现仓储没产品可消费时候会通知生产者生产。
(04) 生产者在生产出可消费产品时候,应该通知等待的消费者去消费。
2. 生产/消费者实现
下面通过wait()/notify()方式实现该模型(后面在学习了线程池相关内容之后,再通过其它方式实现生产/消费者模型)。源码如下:
// Demo1.java
// 仓库
class Depot {
    private int capacity;    // 仓库的容量
    private int size;        // 仓库的实际数量

    public Depot(int capacity) {
        this.capacity = capacity;
        this.size = 0;
    }

    public synchronized void produce(int val) {
        try {
             // left 表示“想要生产的数量”(有可能生产量太多,需多此生产)
            int left = val;
            while (left > 0) {
                // 库存已满时,等待“消费者”消费产品。
                while (size >= capacity)
                    wait();
                // 获取“实际生产的数量”(即库存中新增的数量)
                // 如果“库存”+“想要生产的数量”>“总的容量”,则“实际增量”=“总的容量”-“当前容量”。(此时填满仓库)
                // 否则“实际增量”=“想要生产的数量”
                int inc = (size+left)>capacity ? (capacity-size) : left;
                size += inc;
                left -= inc;
                System.out.printf("%s produce(%3d) --> left=%3d, inc=%3d, size=%3d\n",
                        Thread.currentThread().getName(), val, left, inc, size);
                // 通知“消费者”可以消费了。
                notifyAll();
            }
        } catch (InterruptedException e) {
        }
    }

    public synchronized void consume(int val) {
        try {
            // left 表示“客户要消费数量”(有可能消费量太大,库存不够,需多此消费)
            int left = val;
            while (left > 0) {
                // 库存为0时,等待“生产者”生产产品。
                while (size <= 0)
                    wait();
                // 获取“实际消费的数量”(即库存中实际减少的数量)
                // 如果“库存”<“客户要消费的数量”,则“实际消费量”=“库存”;
                // 否则,“实际消费量”=“客户要消费的数量”。
                int dec = (size<left) ? size : left;
                size -= dec;
                left -= dec;
                System.out.printf("%s consume(%3d) <-- left=%3d, dec=%3d, size=%3d\n",
                        Thread.currentThread().getName(), val, left, dec, size);
                notifyAll();
            }
        } catch (InterruptedException e) {
        }
    }

    public String toString() {
        return "capacity:"+capacity+", actual size:"+size;
    }
}

// 生产者
class Producer {
    private Depot depot;

    public Producer(Depot depot) {
        this.depot = depot;
    }

    // 消费产品:新建一个线程向仓库中生产产品。
    public void produce(final int val) {
        new Thread() {
            public void run() {
                depot.produce(val);
            }
        }.start();
    }
}

// 消费者
class Customer {
    private Depot depot;

    public Customer(Depot depot) {
        this.depot = depot;
    }

    // 消费产品:新建一个线程从仓库中消费产品。
    public void consume(final int val) {
        new Thread() {
            public void run() {
                depot.consume(val);
            }
        }.start();
    }
}

public class Demo1 {
    public static void main(String[] args) {
        Depot mDepot = new Depot(100);
        Producer mPro = new Producer(mDepot);
        Customer mCus = new Customer(mDepot);

        mPro.produce(60);
        mPro.produce(120);
        mCus.consume(90);
        mCus.consume(150);
        mPro.produce(110);
    }
}说明:
(01) Producer是“生产者”类,它与“仓库(depot)”关联。当调用“生产者”的produce()方法时,它会新建一个线程并向“仓库”中生产产品。
(02) Customer是“消费者”类,它与“仓库(depot)”关联。当调用“消费者”的consume()方法时,它会新建一个线程并消费“仓库”中的产品。
(03) Depot是“仓库”类,仓库中记录“仓库的容量(capacity)”以及“仓库中当前产品数目(size)”。
“仓库”类的生产方法produce()和消费方法consume()方法都是synchronized方法,进入synchronized方法体,意味着这个线程获取到了该“仓库”对象的同步锁。这也就是说,同一时间,生产者和消费者线程只能有一个能运行。通过同步锁,实现了对“残酷”的互斥访问。
对于生产方法produce()而言:当仓库满时,生产者线程等待,需要等待消费者消费产品之后,生产线程才能生产;生产者线程生产完产品之后,会通过notifyAll()唤醒同步锁上的所有线程,包括“消费者线程”,即我们所说的“通知消费者进行消费”。
对于消费方法consume()而言:当仓库为空时,消费者线程等待,需要等待生产者生产产品之后,消费者线程才能消费;消费者线程消费完产品之后,会通过notifyAll()唤醒同步锁上的所有线程,包括“生产者线程”,即我们所说的“通知生产者进行生产”。
(某一次)运行结果:
Thread-0 produce( 60) --> left=  0, inc= 60, size= 60
Thread-4 produce(110) --> left= 70, inc= 40, size=100
Thread-2 consume( 90) <-- left=  0, dec= 90, size= 10
Thread-3 consume(150) <-- left=140, dec= 10, size=  0
Thread-1 produce(120) --> left= 20, inc=100, size=100
Thread-3 consume(150) <-- left= 40, dec=100, size=  0
Thread-4 produce(110) --> left=  0, inc= 70, size= 70
Thread-3 consume(150) <-- left=  0, dec= 40, size= 30
Thread-1 produce(120) --> left=  0, inc= 20, size= 50