
阅读完需:约 12 分钟
1.项目规划
搭建一个 OAuth2+JWT 的环境来做演示。一共搭建两个服务:

我稍微解释一下:
- auth-server 就是我的资源服务器,用来颁发 JWT 令牌。
- user-server 则是资源服务器,访问 user-server 上的资源,都需要携带令牌才能访问。
- swagger 则用来给 user-server 上的接口生成文档。
OK,这是我们项目的一个大致规划。
2.环境搭建
接下来我们来搭建 OAuth2 测试环境。
2.1 授权服务器搭建
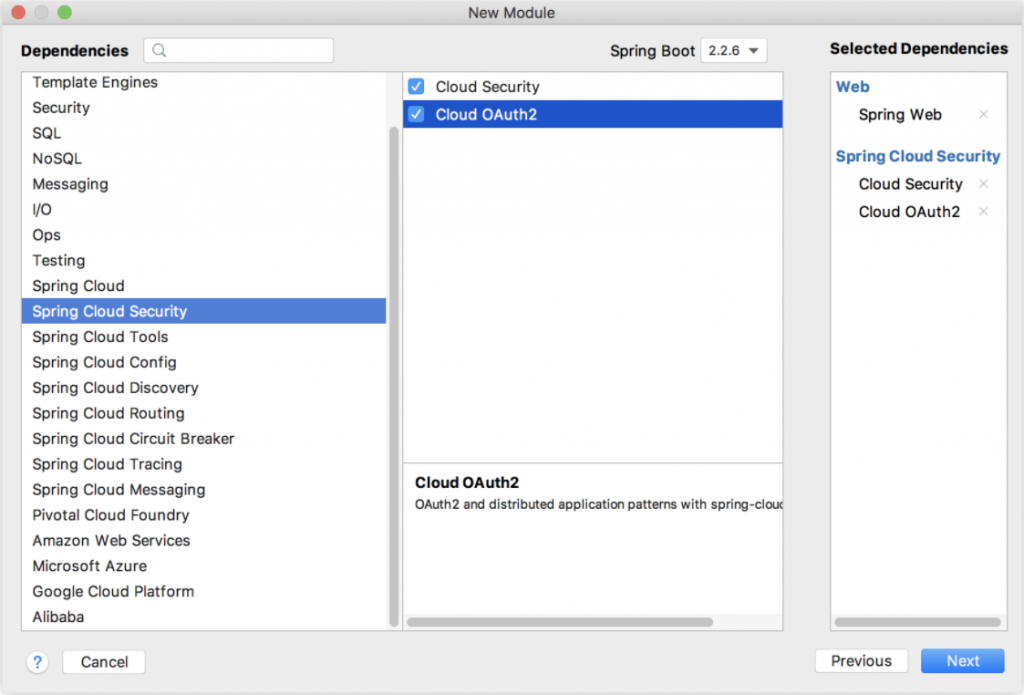
首先我们搭建一个名为 auth-server 的授权服务,搭建的时候,选择如下三个依赖:
- Web
- Spring Cloud Security
- Spirng Cloud OAuth2
项目创建完成后,首先提供一个 Spring Security 的基本配置:
@Configuration
public class SecurityConfig extends WebSecurityConfigurerAdapter {
    @Bean
    PasswordEncoder passwordEncoder() {
        return new BCryptPasswordEncoder();
    }

    @Override
    @Bean
    public AuthenticationManager authenticationManagerBean() throws Exception {
        return super.authenticationManagerBean();
    }

    @Override
    protected void configure(AuthenticationManagerBuilder auth) throws Exception {
        auth.inMemoryAuthentication()
                .withUser("sang")
                .password(passwordEncoder().encode("123"))
                .roles("admin")
                .and()
                .withUser("javaboy")
                .password(passwordEncoder().encode("123"))
                .roles("user");
    }

    @Override
    protected void configure(HttpSecurity http) throws Exception {
        http.csrf().disable().formLogin();
    }
}
在这段代码中,为了代码简洁,我就不把 Spring Security 用户存到数据库中去了,直接存在内存中。
这里我创建了一个名为 sang 的用户,密码是 123,角色是 admin。同时我还配置了一个表单登录。
这段配置的目的,实际上就是配置用户。例如你想用微信登录第三方网站,在这个过程中,你得先登录微信,登录微信就要你的用户名/密码信息,那么我们在这里配置的,其实就是用户的用户名/密码/角色信息。
需要注意的是,在当前案例中,我将采用 OAuth2 中的 password 模式进行登录,因此这里还需要明确的提供一个 AuthenticationManager 的 Bean。
基本的用户信息配置完成后,接下来我们来配置授权服务器。
首先来配置 TokenStore:
@Configuration
public class AccessTokenConfig {
    @Bean
    TokenStore tokenStore() {
        return new JwtTokenStore(jwtAccessTokenConverter());
    }

    @Bean
    JwtAccessTokenConverter jwtAccessTokenConverter() {
        JwtAccessTokenConverter converter = new JwtAccessTokenConverter();
        converter.setSigningKey("javaboy");
        return converter;
    }
}- TokenStore 我们使用 JwtTokenStore 这个实例。使用了 JWT,access_token 实际上就不用存储了(无状态登录,服务端不需要保存信息),因为用户的所有信息都在 jwt 里边,所以这里配置的 JwtTokenStore 本质上并不是做存储。
- 另外我们还提供了一个 JwtAccessTokenConverter,这个 JwtAccessTokenConverter 可以实现将用户信息和 JWT 进行转换(将用户信息转为 jwt 字符串,或者从 jwt 字符串提取出用户信息)。
- 另外,在 JWT 字符串生成的时候,我们需要一个签名,这个签名需要自己保存好。
接下来对授权服务器进行详细配置:
@EnableAuthorizationServer
@Configuration
public class AuthorizationServer extends AuthorizationServerConfigurerAdapter {
    @Autowired
    TokenStore tokenStore;
    @Autowired
    ClientDetailsService clientDetailsService;
    @Autowired
    AuthenticationManager authenticationManager;
    @Autowired
    PasswordEncoder passwordEncoder;
    @Autowired
    JwtAccessTokenConverter jwtAccessTokenConverter;

    @Bean
    AuthorizationServerTokenServices tokenServices() {
        DefaultTokenServices services = new DefaultTokenServices();
        services.setClientDetailsService(clientDetailsService);
        services.setSupportRefreshToken(true);
        services.setTokenStore(tokenStore);
        services.setAccessTokenValiditySeconds(60 * 60 * 24 * 2);
        services.setRefreshTokenValiditySeconds(60 * 60 * 24 * 7);
        TokenEnhancerChain tokenEnhancerChain = new TokenEnhancerChain();
        tokenEnhancerChain.setTokenEnhancers(Arrays.asList(jwtAccessTokenConverter));
        services.setTokenEnhancer(tokenEnhancerChain);
        return services;
    }

    @Override
    public void configure(AuthorizationServerSecurityConfigurer security) throws Exception {
        security.allowFormAuthenticationForClients();
    }

    @Override
    public void configure(ClientDetailsServiceConfigurer clients) throws Exception {
        clients.inMemory()
                .withClient("javaboy")
                .secret(passwordEncoder.encode("123"))
                .resourceIds("res1")
                .authorizedGrantTypes("password", "refresh_token")
                .scopes("all")
                .redirectUris("http://localhost:8082/index.html");
    }

    @Override
    public void configure(AuthorizationServerEndpointsConfigurer endpoints) throws Exception {
        endpoints
                .authenticationManager(authenticationManager)
                .tokenServices(tokenServices());
    }
}
这段代码有点长,我来给大家挨个解释:
- 创建 AuthorizationServer 类继承自 AuthorizationServerConfigurerAdapter,来对授权服务器做进一步的详细配置,AuthorizationServer 类记得加上 @EnableAuthorizationServer 注解,表示开启授权服务器的自动化配置。
- 在 AuthorizationServer 类中,我们其实主要重写三个 configure 方法。
- AuthorizationServerSecurityConfigurer 用来配置令牌端点的安全约束,也就是这个端点谁能访问,谁不能访问。
- ClientDetailsServiceConfigurer 用来配置客户端的详细信息,在之前文章中,授权服务器要做两方面的检验,一方面是校验客户端,另一方面则是校验用户,校验用户,我们前面已经配置了,这里就是配置校验客户端。客户端的信息我们可以存在数据库中,这其实也是比较容易的,和用户信息存到数据库中类似,但是这里为了简化代码,我还是将客户端信息存在内存中,这里我们分别配置了客户端的 id,secret、资源 id、授权类型、授权范围以及重定向 uri。授权类型在之前文章讲了四种,四种之中不包含 refresh_token 这种类型,但是在实际操作中,refresh_token 也被算作一种。
- AuthorizationServerEndpointsConfigurer 这里用来配置令牌的访问端点和令牌服务。
- tokenServices 这个 Bean 主要用来配置 Token 的一些基本信息,例如 Token 是否支持刷新、Token 的存储位置、Token 的有效期以及刷新 Token 的有效期等等。Token 有效期这个好理解,刷新 Token 的有效期我说一下,当 Token 快要过期的时候,我们需要获取一个新的 Token,在获取新的 Token 时候,需要有一个凭证信息,这个凭证信息不是旧的 Token,而是另外一个 refresh_token,这个 refresh_token 也是有有效期的。
好了,如此之后,我们的授权服务器就算是配置完成了,接下来我们启动授权服务器。
2.2 资源服务器搭建
接下来我们搭建一个资源服务器。大家网上看到的例子,资源服务器大多都是和授权服务器放在一起的,如果项目比较小的话,这样做是没问题的,但是如果是一个大项目,这种做法就不合适了。
资源服务器就是用来存放用户的资源,例如你在微信上的图像、openid 等信息,用户从授权服务器上拿到 access_token 之后,接下来就可以通过 access_token 来资源服务器请求数据。
我们创建一个新的 Spring Boot 项目,叫做 user-server ,作为我们的资源服务器,创建时,添加如下依赖:
项目创建成功之后,先把前面的 AccessTokenConfig 拷贝到资源服务器上,然后添加如下配置:
@Configuration
@EnableResourceServer
public class ResourceServerConfig extends ResourceServerConfigurerAdapter {
    @Autowired
    TokenStore tokenStore;

    @Override
    public void configure(ResourceServerSecurityConfigurer resources) throws Exception {
        resources.resourceId("res1").tokenStore(tokenStore);
    }

    @Override
    public void configure(HttpSecurity http) throws Exception {
        http.authorizeRequests()
                .antMatchers("/admin/**").hasRole("admin")
                .anyRequest().authenticated();
    }
}
这段配置代码很简单,我简单的说一下:
- 首先在 configure 方法中配置资源 ID 和 TokenStore,这里配置好之后,会自动调用 JwtAccessTokenConverter 将 jwt 解析出来,jwt 里边就包含了用户的基本信息,所以就不用远程校验 access_token 了。
- 最后配置一下资源的拦截规则,这就是 Spring Security 中的基本写法,我就不再赘述。
接下来我们再来配置两个测试接口:
@RestController
public class HelloController {
    @GetMapping("/hello")
    public String hello() {
        return "hello";
    }
    @GetMapping("/admin/hello")
    public String admin() {
        return "admin";
    }
}
如此之后,我们的资源服务器就算配置成功了。
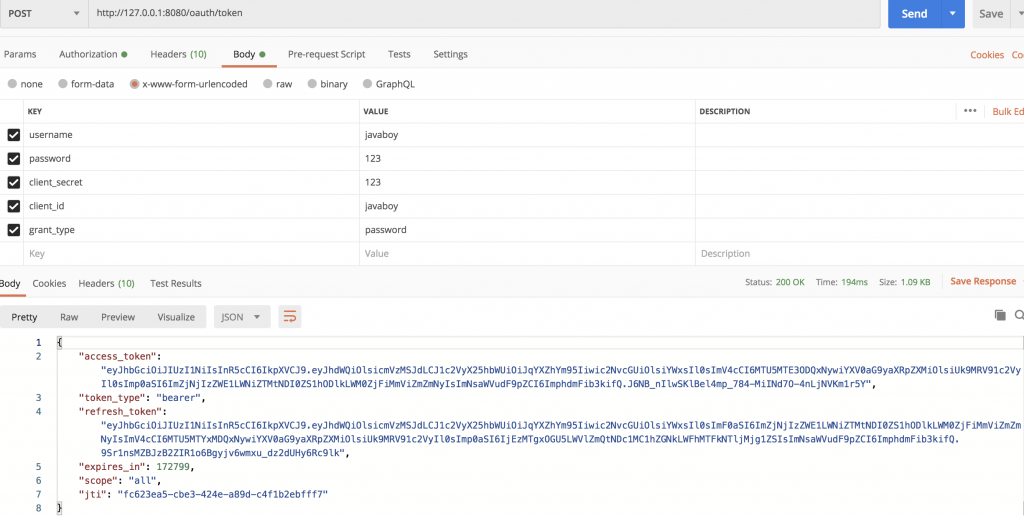
2.3 测试
分别启动授权服务器和资源服务器,先访问授权服务器获取 access_token:
再利用拿到的 access_token 去访问资源服务器:
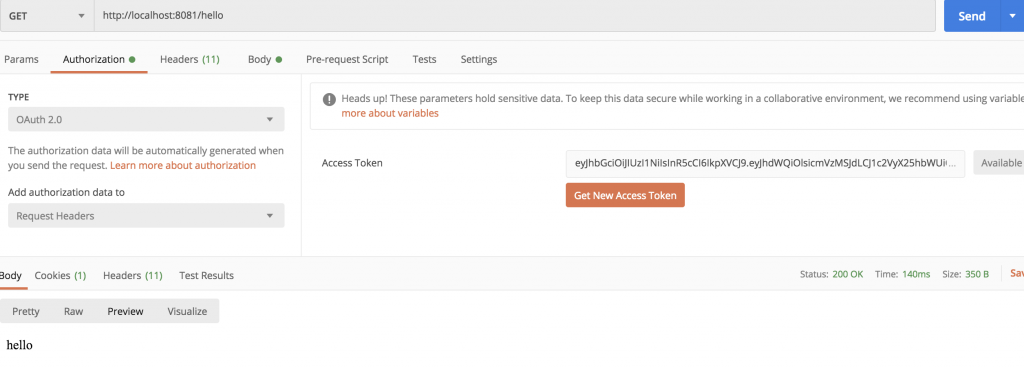
OK,测试没问题。
3.整合 Swagger
接下来,我们在 user-server 中加入 swagger 功能,首先我们加入 swagger 依赖:
<dependency>
    <groupId>io.springfox</groupId>
    <artifactId>springfox-swagger2</artifactId>
    <version>2.9.2</version>
</dependency>
<dependency>
    <groupId>io.springfox</groupId>
    <artifactId>springfox-swagger-ui</artifactId>
    <version>2.9.2</version>
</dependency>
这里加入的依赖有两个,一个用来生成接口数据,另一个 swagger-ui 用来做数据展示。
3.1 认证方式一
请求头加参数,这里给大家介绍两种,先来看第一种。
先配置一个 Docket 实例,如下:
@Configuration
@EnableSwagger2
public class Swagger2Config {
    @Bean
    Docket docket() {
        return new Docket(DocumentationType.SWAGGER_2)
                .select()
                .apis(RequestHandlerSelectors.basePackage("org.javaboy.oauth2.res.controller"))
                .paths(PathSelectors.any())
                .build()
                .securityContexts(Arrays.asList(securityContexts()))
                .securitySchemes(Arrays.asList(securitySchemes()))
                .apiInfo(new ApiInfoBuilder()
                        .description("接口文档的描述信息")
                        .title("微人事项目接口文档")
                        .contact(new Contact("javaboy","http://www.javaboy.org","wangsong0210@gmail.com"))
                        .version("v1.0")
                        .license("Apache2.0")
                        .build());
    }
    private SecurityScheme securitySchemes() {
        return new ApiKey("Authorization", "Authorization", "header");
    }

    private SecurityContext securityContexts() {
        return SecurityContext.builder()
                        .securityReferences(defaultAuth())
                        .forPaths(PathSelectors.any())
                        .build();
    }

    private List<SecurityReference> defaultAuth() {
        AuthorizationScope authorizationScope = new AuthorizationScope("xxx", "描述信息");
        AuthorizationScope[] authorizationScopes = new AuthorizationScope[1];
        authorizationScopes[0] = authorizationScope;
        return Arrays.asList(new SecurityReference("Authorization", authorizationScopes));
    }
}
这里的配置稍微有点长,我来给大家解释下:
- 首先通过 @EnableSwagger2 注解启用 Swagger2。
- 配置一个 Docket Bean,这个 Bean 中,配置映射路径和要扫描的接口的位置。
- 在 apiInfo 中,主要配置一下 Swagger2 文档网站的信息,例如网站的 title,网站的描述,联系人的信息,使用的协议等等。
- 通过 securitySchemes 来配置全局参数,这里的配置是一个名为 Authorization 的请求头(OAuth2 中需要携带的请求头)。
- securityContexts 则用来配置有哪些请求需要携带 Token,这里我们配置了所有请求。
配置完成后,我们还需要给 swagger-ui 放行,否则 swagger-ui 相关的静态资源会被 Spring Security 拦截下来:
@Configuration
public class SecurityConfig extends WebSecurityConfigurerAdapter {

    @Override
    public void configure(WebSecurity web) throws Exception {
        web.ignoring().antMatchers("/swagger-ui.html")
                .antMatchers("/webjars/**")
                .antMatchers("/v2/**")
                .antMatchers("/swagger-resources/**");
    }
}
配置完成后,重启 user-server,浏览器输入 http://localhost:8081/swagger-ui.html,结果如下:
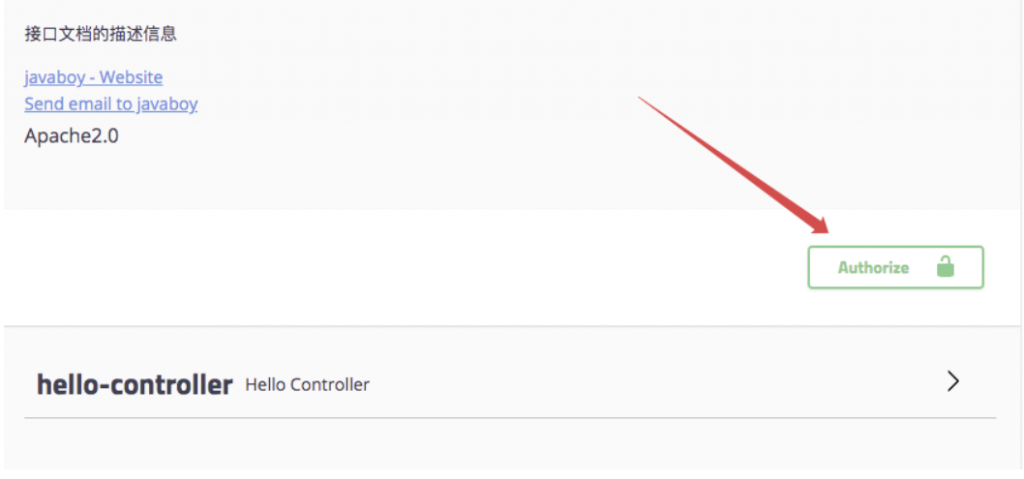
大家可以看到,页面中多了一个 Authorize 按钮,点击该按钮,输入 Bearer ${token},如下:

输入完成后,点击 Authorize 按钮,完成认证,接下来,user-server 中的各种接口就可以直接调用测试了。
上面这种方式比较通用,不仅仅适用于 OAuth2,也适用于其他一些自定义的 token 登录方式。
但是这种方式需要开发者先通过其他途径获取到 access_token,有的人会觉得这样有点麻烦,那么有没有更好的办法呢?请看方式二。
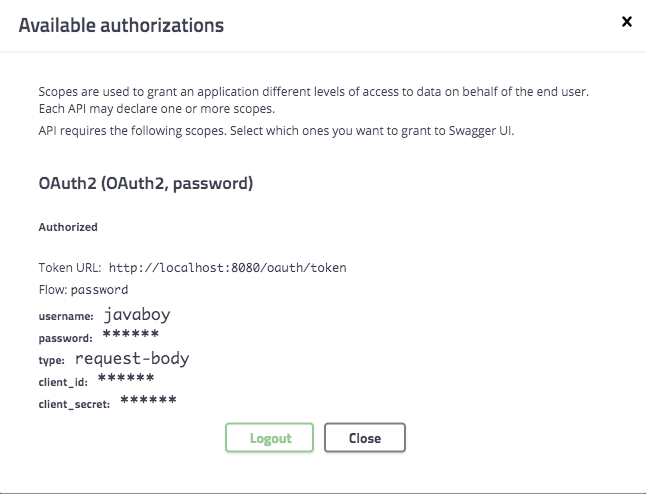
3.2 认证方式二
认证方式二就是直接在 Swagger 中填入认证信息,这样就不用从外部去获取 access_token 了,效果如下:
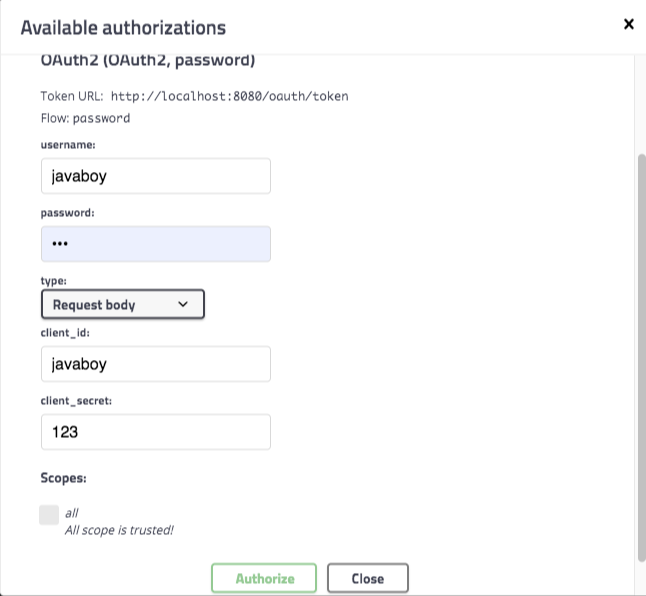
我们来看下这个怎么配置。
由于 swagger 去请求 /oauth/token 接口会跨域,所以我们首先要修改 auth-server ,使之支持跨域:
主要是两方面的修改,首先是配置 CorsFilter,允许跨域,如下:
@Configuration
public class GlobalCorsConfiguration {
    @Bean
    public CorsFilter corsFilter() {
        CorsConfiguration corsConfiguration = new CorsConfiguration();
        corsConfiguration.setAllowCredentials(true);
        corsConfiguration.addAllowedOrigin("*");
        corsConfiguration.addAllowedHeader("*");
        corsConfiguration.addAllowedMethod("*");
        UrlBasedCorsConfigurationSource urlBasedCorsConfigurationSource = new UrlBasedCorsConfigurationSource();
        urlBasedCorsConfigurationSource.registerCorsConfiguration("/**", corsConfiguration);
        return new CorsFilter(urlBasedCorsConfigurationSource);
    }
}
然后在 SecurityConfig 中开启跨域支持:
@Configuration
@Order(Ordered.HIGHEST_PRECEDENCE)
public class SecurityConfig extends WebSecurityConfigurerAdapter {
    ...
    ...
    @Override
    protected void configure(HttpSecurity http) throws Exception {
        http
                .requestMatchers().antMatchers(HttpMethod.OPTIONS, "/oauth/**")
                .and()
                .csrf().disable().formLogin()
                .and()
                .cors();
    }
}
经过这两步的配置,服务端的跨域支持就开启了。
接下来我们在 user-server 中修改关于 Docket bean 的定义:
@Configuration
@EnableSwagger2
public class Swagger2Config {
    @Bean
    Docket docket() {
        return new Docket(DocumentationType.SWAGGER_2)
                .select()
                .apis(RequestHandlerSelectors.basePackage("org.javaboy.oauth2.res.controller"))
                .paths(PathSelectors.any())
                .build()
                .securityContexts(Arrays.asList(securityContext()))
                .securitySchemes(Arrays.asList(securityScheme()))
                .apiInfo(new ApiInfoBuilder()
                        .description("接口文档的描述信息")
                        .title("微人事项目接口文档")
                        .contact(new Contact("javaboy","http://www.javaboy.org","wangsong0210@gmail.com"))
                        .version("v1.0")
                        .license("Apache2.0")
                        .build());
    }

    private AuthorizationScope[] scopes() {
        return new AuthorizationScope[]{
                new AuthorizationScope("all", "all scope")
        };
    }

    private SecurityScheme securityScheme() {
        GrantType grant = new ResourceOwnerPasswordCredentialsGrant("http://localhost:8080/oauth/token");
        return new OAuthBuilder().name("OAuth2")
                .grantTypes(Arrays.asList(grant))
                .scopes(Arrays.asList(scopes()))
                .build();
    }

    private SecurityContext securityContext() {
        return SecurityContext.builder()
                .securityReferences(Arrays.asList(new SecurityReference("OAuth2", scopes())))
                .forPaths(PathSelectors.any())
                .build();
    }
}
这段配置跟前面的类似,主要是 SecurityScheme 不同。这里采用了 OAuthBuilder 来构建,构建时即得配置 token 的获取地址。
好了,配置完成,重启 auth-server 和 user-server 进行测试。
这种方式最大的好处就是不用通过其他途径获取 access_token,直接在 swagger-ui 页面输入 password 模式的认证参数即可。非常方便,仅限于 OAuth2 模式。
