
阅读完需:约 19 分钟
协程框架
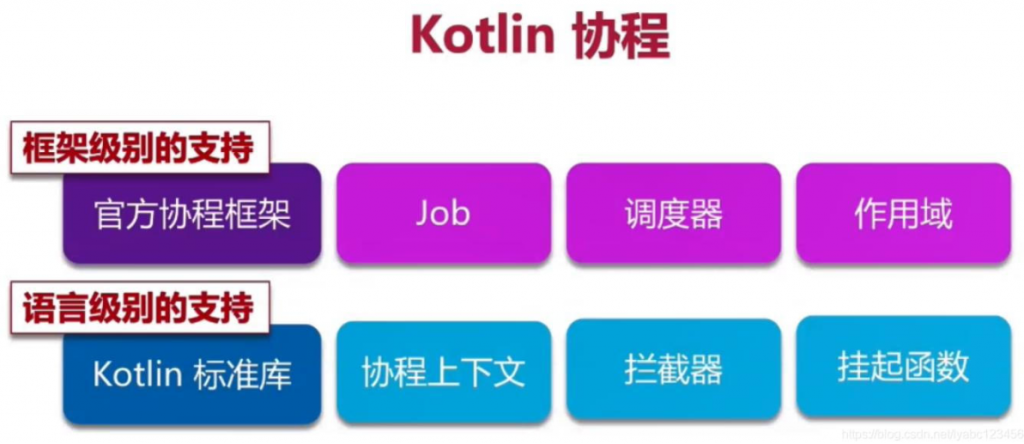
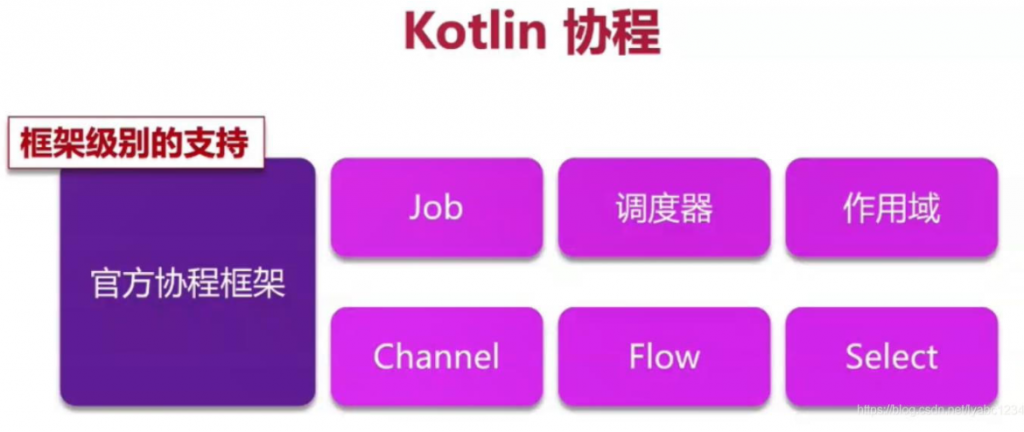
如果是应用的话,主要掌握框架级别的使用即可,语言级别的支持api来源于标准库,写起来比较麻烦也非常难理解。

作用域
Scope是什么?
当launch, async或runBlocking开启新协程的时候, 它们自动创建相应的scope. 所有的这些方法都有一个带receiver的lambda参数, 默认的receiver类型是CoroutineScope
IDE会提示this: CoroutineScope:
launch { /* this: CoroutineScope */
}我们在runBlocking, launch, 或async的大括号里面再创建一个新的协程的时候, 自动就在这个scope里创建:
fun main() = runBlocking {
    /* this: CoroutineScope */
    launch { /* ... */ }
    // the same as:
    this.launch { /* ... */ }
}因为launch是一个扩展方法, 所以上面例子中默认的receiver是this(runBlocking).
这个例子中launch所启动的协程被称作外部协程(runBlocking启动的协程)的child. 这种”parent-child”的关系通过scope传递: child在parent的scope中启动.
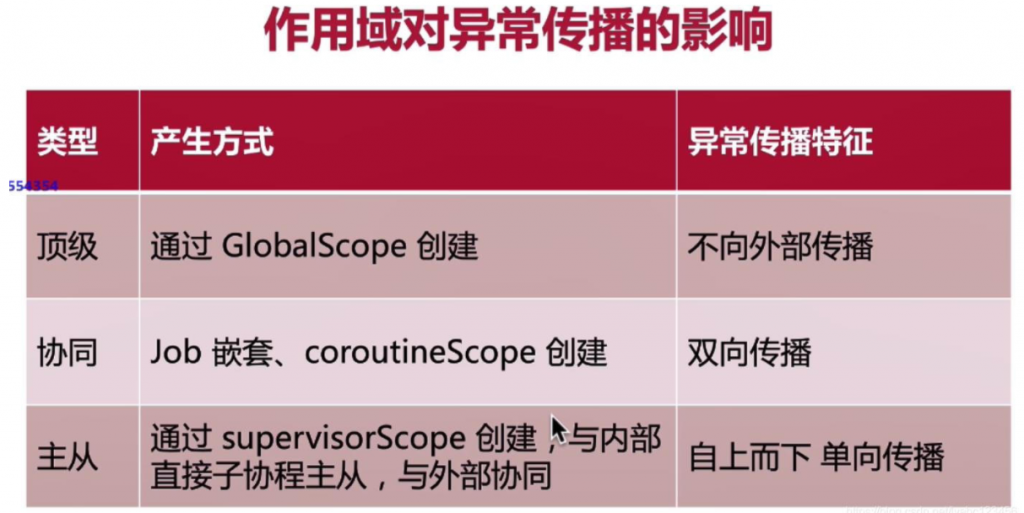
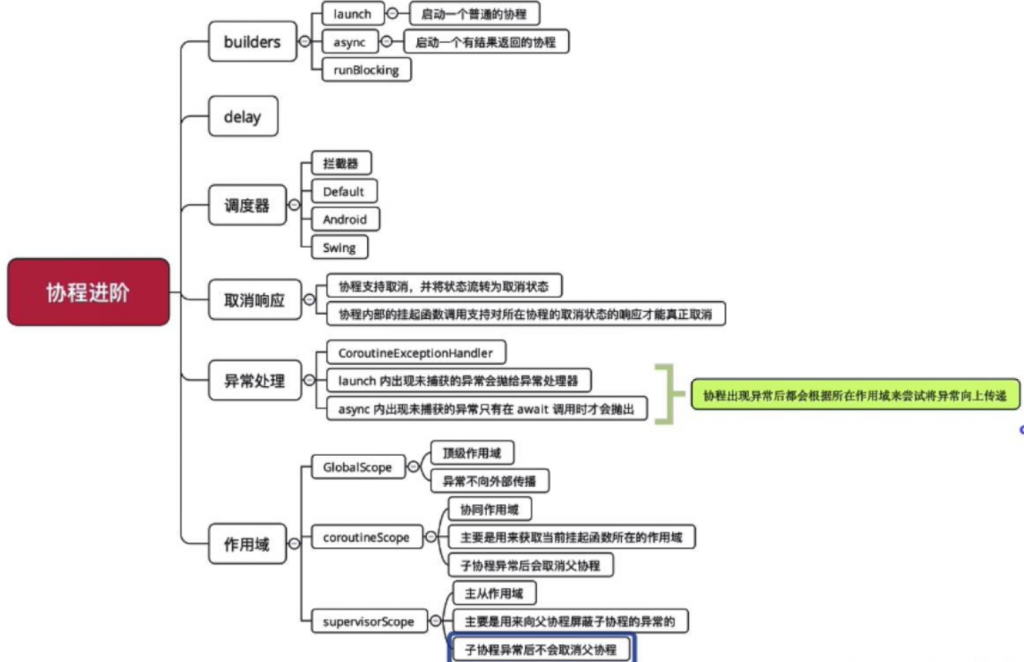
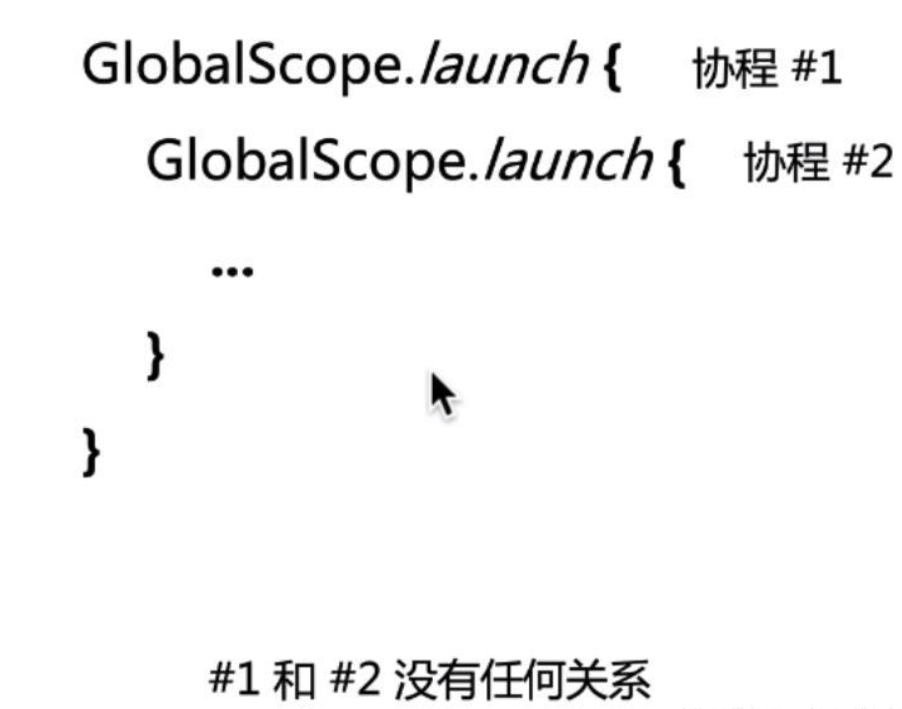
- 顶级作用域
这是一个全局的CoroutineScope不会受任何Job约束,通过它创建的是全局协程,它会在整个应用的生命周期中运行,不能被取消
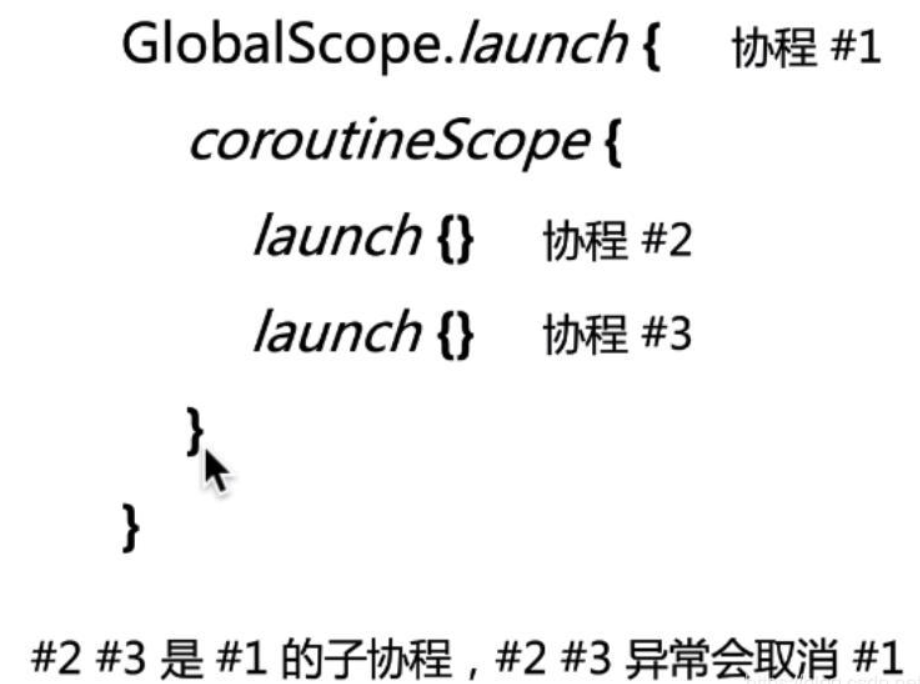
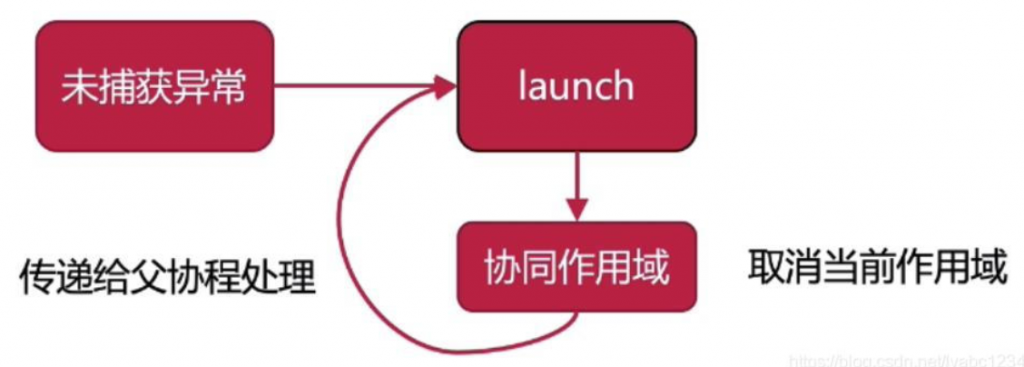
- 协同作用域
coroutineScope表示协同作用域,coroutineScope内部的协程出现异常可以挂掉外部协程,会向外部传播,外部协程挂掉也会挂掉子协程,即双向传播。
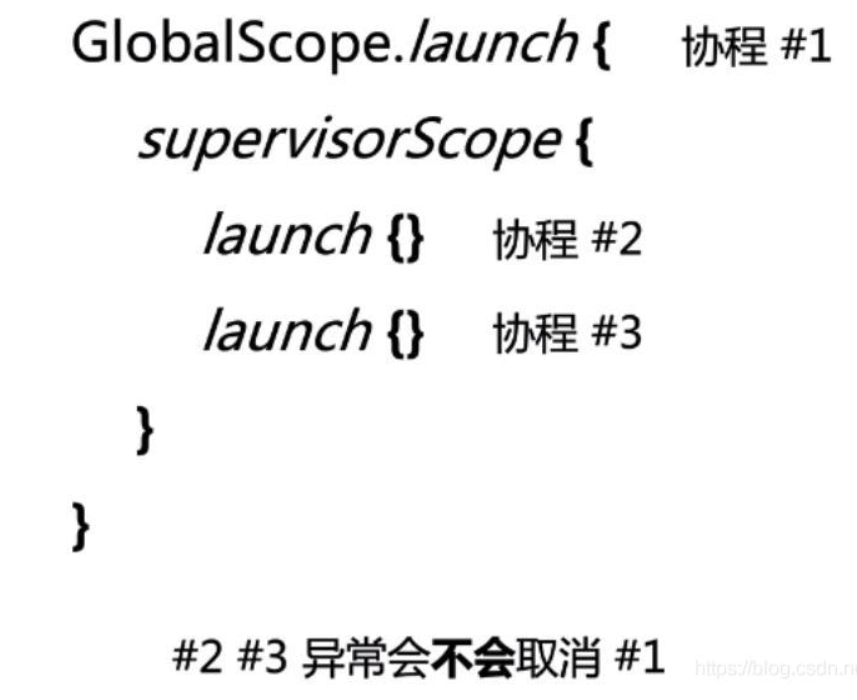
- 主从作用域
supervisorScope表示主从作用域,supervisorScope内部的协程挂掉不会影响外部的协程继续运行,它就像一道防火墙,隔离了异常,保证程序健壮,但是如果外部协程挂掉还是可以取消子协程的,即单向传播。
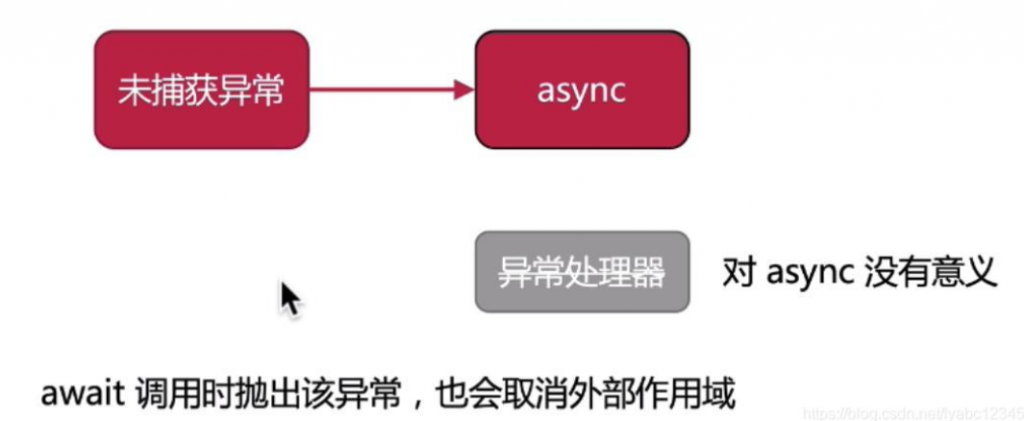
异常处理
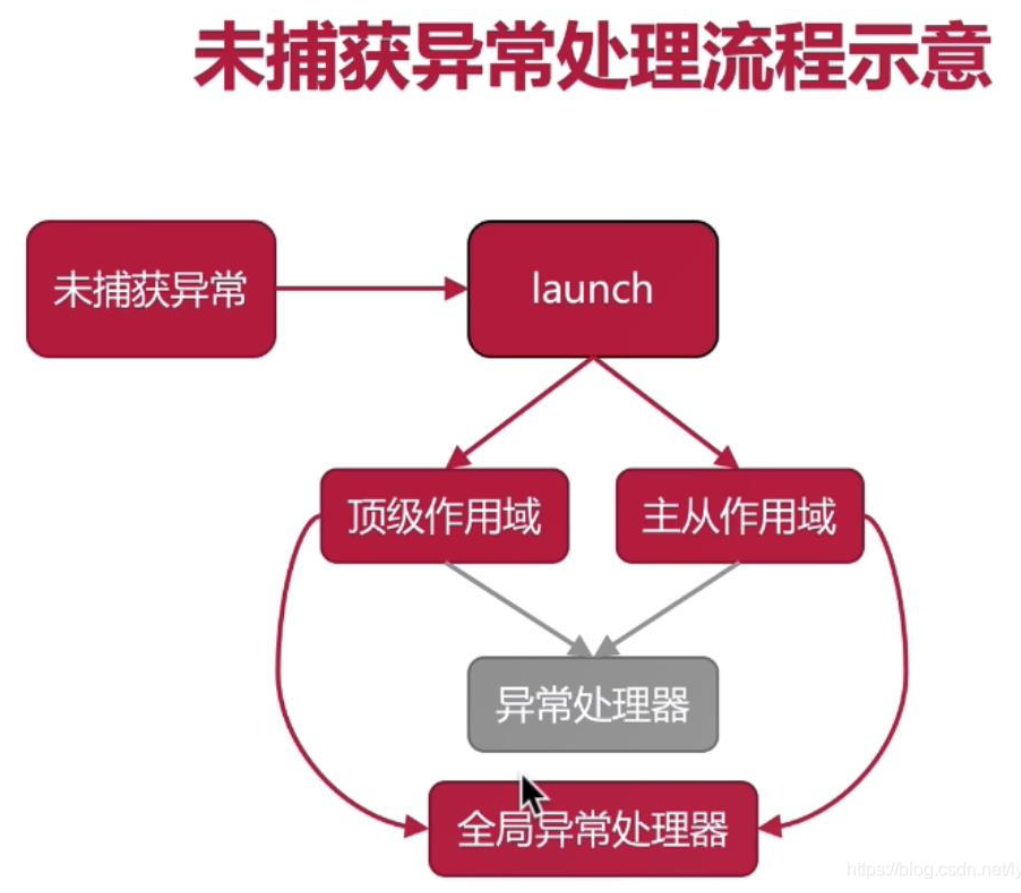
简单总结就是,主从关系:无法坑爹,爹可以坑儿子。协同关系:可以坑爹,可以坑儿子,互相坑。
协程出现异常后都会根据所在作用域来尝试将异常向上传递
协程启动
启动协程需要三样东西,分别是 上下文、启动模式、协程体
详细介绍 启动模式,在 Kotlin 协程当中,启动模式是一个枚举:
public enum class CoroutineStart {
    DEFAULT,
    LAZY,
    @ExperimentalCoroutinesApi
    ATOMIC,
    @ExperimentalCoroutinesApi
    UNDISPATCHED;
}
四个启动模式当中我们最常用的其实是 DEFAULT 和 LAZY。

这里launch会进行一次调度 ,delay会进行一次调度,每次调度完成会执行一次resume, 最终协程体执行完毕会执行一次resume, 所以内部有n个挂起点的协程体会执行n+2次resume.
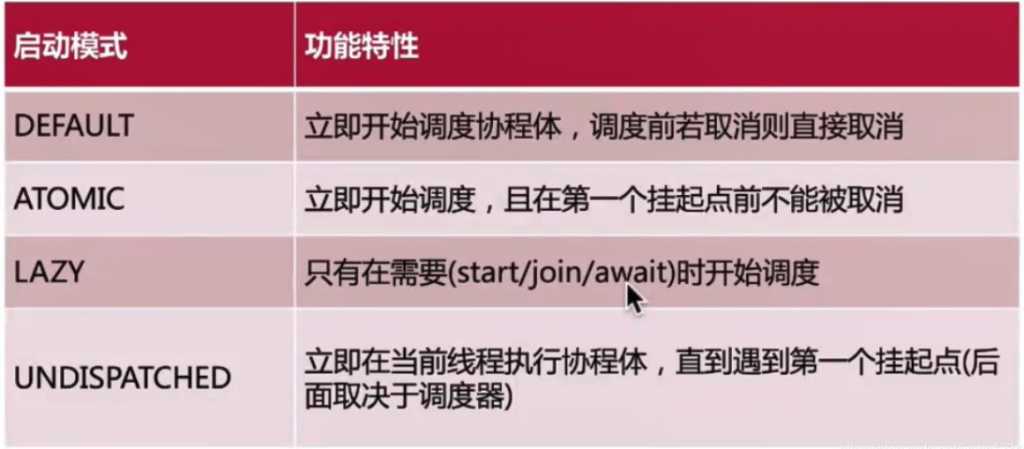
DEFAULT 立即开始调度 和 UNDISPATCHED 立即开始执行协程体,这两个含义的区别是 DEFAULT 只是立即启动协程执行可能是异步的,而后者是直接执行协程体中的代码了。LAZY 是先创建协程体,然后在未来的某个时刻才去启动执行。

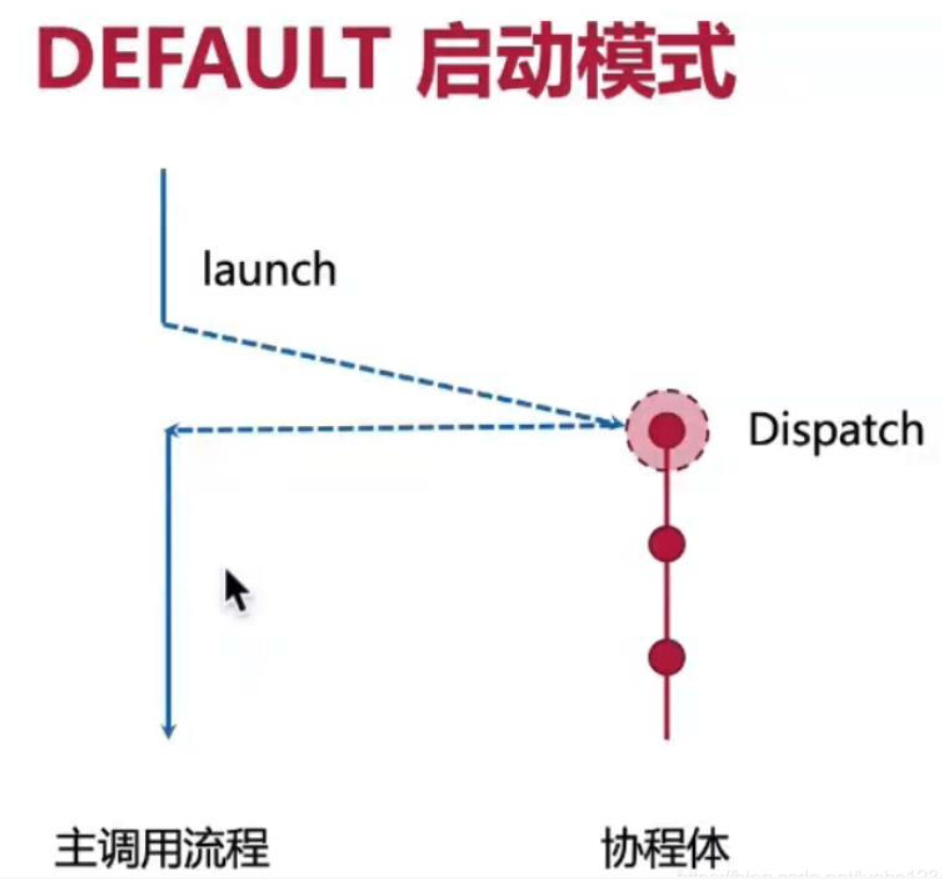
DEFAULT
DEFAULT 是饿汉式启动,launch 调用后,会立即进入待调度状态,一旦调度器 OK 就可以开始执行。我们来看个简单的例子:
suspend fun main() {
    log(1)
    val job = GlobalScope.launch {
        log(2)
    }
    log(3)
    job.join()
    log(4)
}
这段程序采用默认的启动模式,由于我们也没有指定调度器,因此调度器也是默认的
19:51:08:160 [main] 1
19:51:08:603 [main] 3
19:51:08:606 [DefaultDispatcher-worker-1] 2
19:51:08:624 [main] 4
或
20:19:06:367 [main] 1
20:19:06:541 [DefaultDispatcher-worker-1] 2
20:19:06:550 [main] 3
20:19:06:551 [main] 4
这取决于 CPU 对于当前线程与后台线程的调度顺序
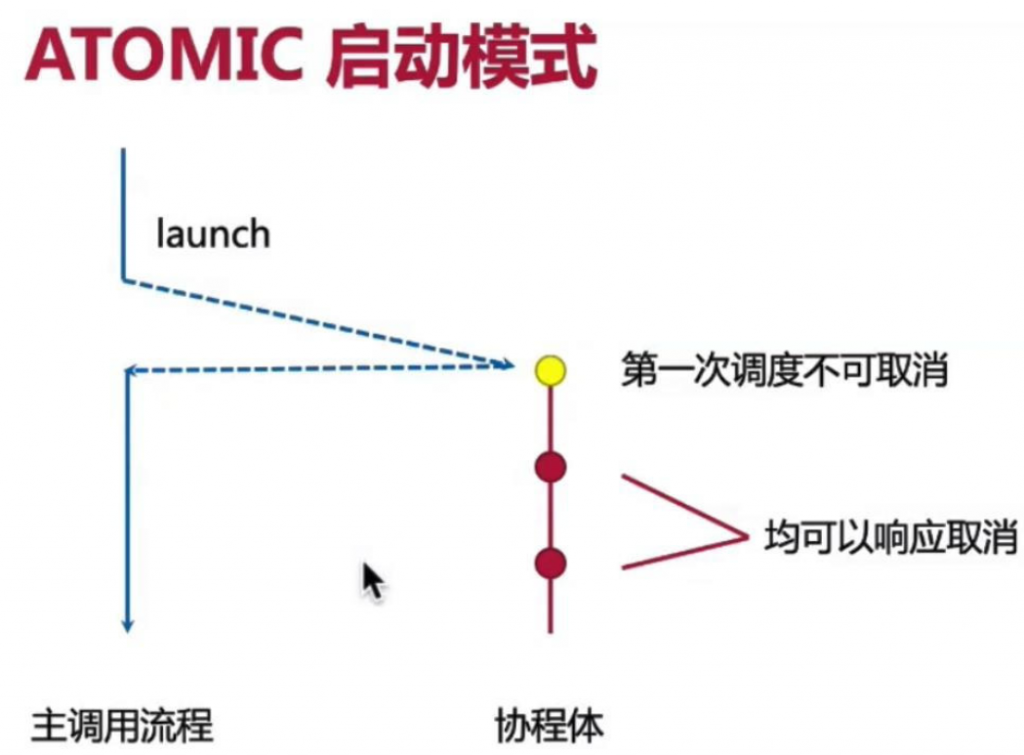
ATOMIC
ATOMIC 只有涉及 cancel 的时候才有意义,cancel 本身也是一个值得详细讨论的话题,在这里我们就简单认为 cancel 后协程会被取消掉,也就是不再执行了。那么调用 cancel 的时机不同,结果也是有差异的,例如协程调度之前、开始调度但尚未执行、已经开始执行、执行完毕等等。
为了搞清楚它与 DEFAULT 的区别,我们来看一段例子:
log(1)
val job = GlobalScope.launch(start = CoroutineStart.ATOMIC) {
    log(2)
}
job.cancel()
log(3)
我们创建了协程后立即 cancel,但由于是 ATOMIC 模式,因此协程一定会被调度,因此 1、2、3 一定都会输出,只是 2 和 3 的顺序就难说了。
20:42:42:783 [main] 1
20:42:42:879 [main] 3
20:42:42:879 [DefaultDispatcher-worker-1] 2
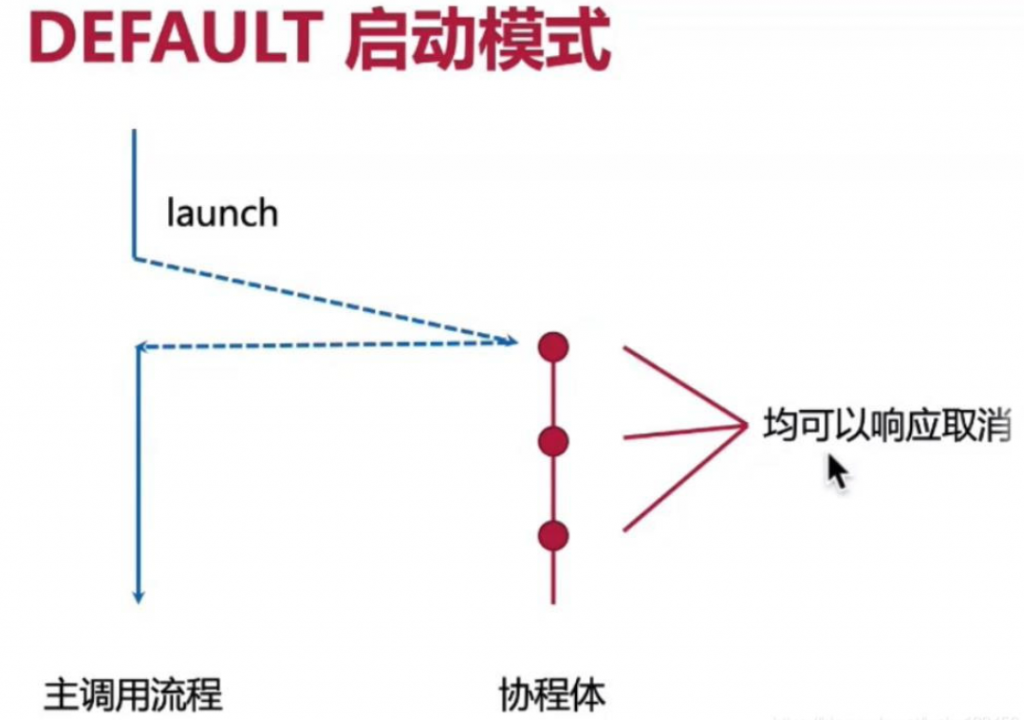
对应的,如果是 DEFAULT 模式,在第一次调度该协程时如果 cancel 就已经调用,那么协程就会直接被 cancel 而不会有任何调用,当然也有可能协程开始时尚未被 cancel,那么它就可以正常启动了。所以前面的例子如果改用 DEFAULT 模式,那么 2 有可能会输出,也可能不会。
需要注意的是,cancel 调用一定会将该 job 的状态置为 cancelling,只不过ATOMIC 模式的协程在启动时无视了这一状态。为了证明这一点,我们可以让例子稍微复杂一些:
log(1)
val job = GlobalScope.launch(start = CoroutineStart.ATOMIC) {
    log(2)
    delay(1000)
    log(3)
}
job.cancel()
log(4)
job.join()
我们在 2 和 3 之间加了一个 delay,delay 会使得协程体的执行被挂起,1000ms 之后再次调度后面的部分,因此 3 会在 2 执行之后 1000ms 时输出。对于 ATOMIC 模式,我们已经讨论过它一定会被启动,实际上在遇到第一个挂起点之前,它的执行是不会停止的,而 delay 是一个 suspend 函数,这时我们的协程迎来了自己的第一个挂起点,恰好 delay 是支持 cancel 的,因此后面的 3 将不会被打印。
LAZY
LAZY 是懒汉式启动,launch 后并不会有任何调度行为,协程体也自然不会进入执行状态,直到我们需要它执行的时候。这其实就有点儿费解了,什么叫我们需要它执行的时候呢?就是需要它的运行结果的时候, launch 调用后会返回一个 Job 实例,对于这种情况,我们可以:
- 调用
Job.start,主动触发协程的调度执行 - 调用
Job.join,隐式的触发协程的调度执行
所以这个所谓的”需要“,其实是一个很有趣的措辞,后面你还会看到我们也可以通过 await 来表达对 Deferred 的需要。这个行为与 Thread.join 不一样,后者如果没有启动的话,调用 join 不会有任何作用。
log(1)
val job = GlobalScope.launch(start = CoroutineStart.LAZY) {
    log(2)
}
log(3)
job.start()
log(4)
基于此,对于上面的示例,输出的结果可能是:
14:56:28:374 [main] 1
14:56:28:493 [main] 3
14:56:28:511 [main] 4
14:56:28:516 [DefaultDispatcher-worker-1] 2
当然如果你运气够好,也可能出现 2 比 4 在前面的情况。而对于 join,
...
log(3)
job.join()
log(4)
因为要等待协程执行完毕,因此输出的结果一定是:
14:47:45:963 [main] 1
14:47:46:054 [main] 3
14:47:46:069 [DefaultDispatcher-worker-1] 2
14:47:46:090 [main] 4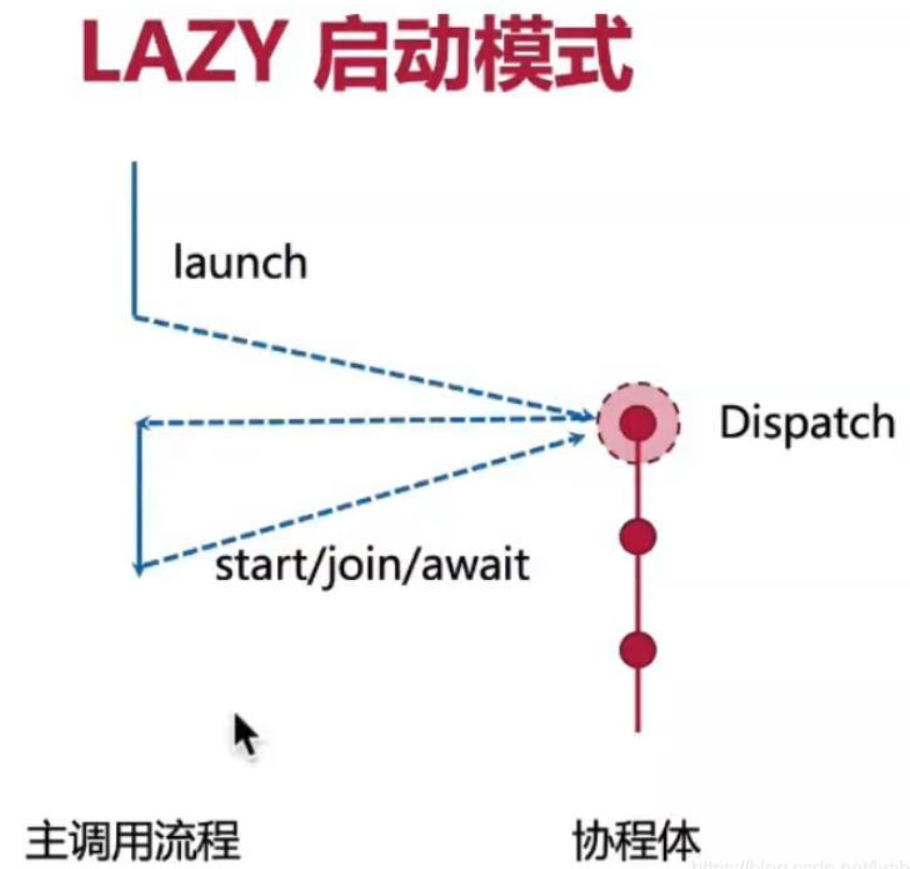
UNDISPATCHED
有了前面的基础,UNDISPATCHED 就很容易理解了。协程在这种模式下会直接开始在当前线程下执行,直到第一个挂起点,这听起来有点儿像前面的 ATOMIC,不同之处在于 UNDISPATCHED 不经过任何调度器即开始执行协程体。当然遇到挂起点之后的执行就取决于挂起点本身的逻辑以及上下文当中的调度器了。
log(1)
val job = GlobalScope.launch(start = CoroutineStart.UNDISPATCHED) {
    log(2)
    delay(100)
    log(3)
}
log(4)
job.join()
log(5)
我们还是以这样一个例子来认识下 UNDISPATCHED 模式,按照我们前面的讨论,协程启动后会立即在当前线程执行,因此 1、2 会连续在同一线程中执行,delay 是挂起点,因此 3 会等 100ms 后再次调度,这时候 4 执行,join 要求等待协程执行完,因此等 3 输出后再执行 5。以下是运行结果:
22:00:31:693 [main] 1
22:00:31:782 [main @coroutine#1] 2
22:00:31:800 [main] 4
22:00:31:914 [DefaultDispatcher-worker-1 @coroutine#1] 3
22:00:31:916 [DefaultDispatcher-worker-1 @coroutine#1] 5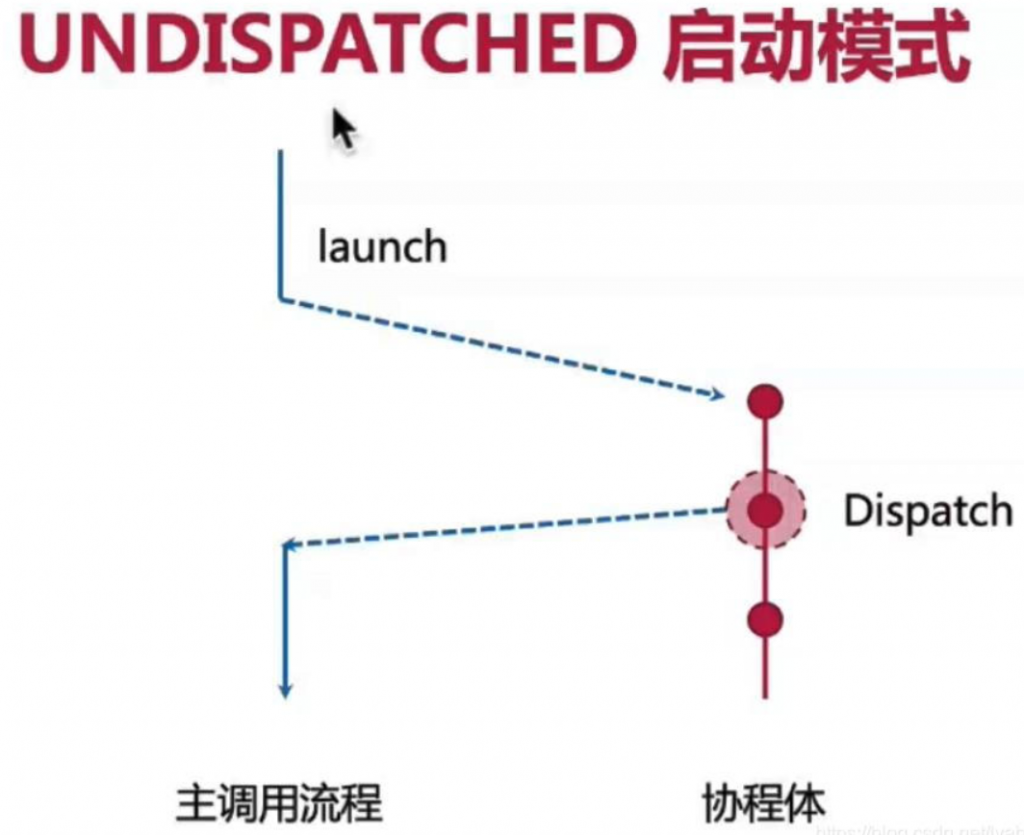
UNDISPATCHED 立即开始执行协程体,如果遇到挂起点,就切回主流程了,后面的协程体继续执行在单独的调度器。
import kotlinx.coroutines.*


@ExperimentalCoroutinesApi
suspend fun main() {
    println("start")
    testDefaultMode()
//    testAtomicMode()
//    testLazyMode()
//    testUNDISPATCHEDMode()
    println("finish")
}

suspend fun testDefaultMode() {
    val defaultMode = GlobalScope.launch(start = CoroutineStart.DEFAULT) {
        println("aaa")
        delay(3000)
        println("bbb")
    }
    println("222")
    defaultMode.join()
}

@ExperimentalCoroutinesApi
suspend fun testAtomicMode() {
    val defaultMode = GlobalScope.launch(start = CoroutineStart.ATOMIC) {
        println("aaa")
        delay(3000)
        println("bbb")
    }
    println("222")
    defaultMode.join()
}

suspend fun testLazyMode() {
    val defaultMode = GlobalScope.async(start = CoroutineStart.LAZY) {
        println("aaa")
        delay(3000)
        println("bbb")
    }
    println("222")
    defaultMode.await()
}

@ExperimentalCoroutinesApi
suspend fun testUNDISPATCHEDMode() {
    val defaultMode = GlobalScope.launch(start = CoroutineStart.UNDISPATCHED) {
        println("aaa")
        delay(3000)
        println("bbb")
    }
    println("222")
    defaultMode.join()
}
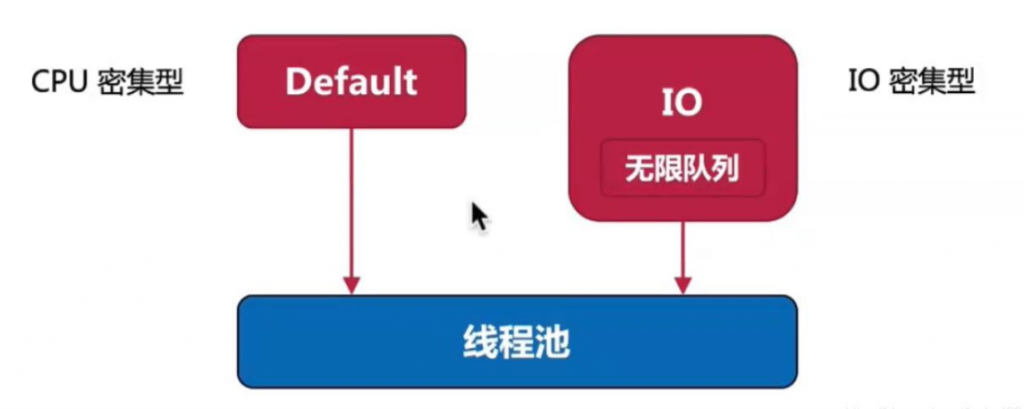
调度器
调度:协程的代码会挂起,后面又会恢复,恢复的时候怎么执行,在哪个线程执行就是调度~
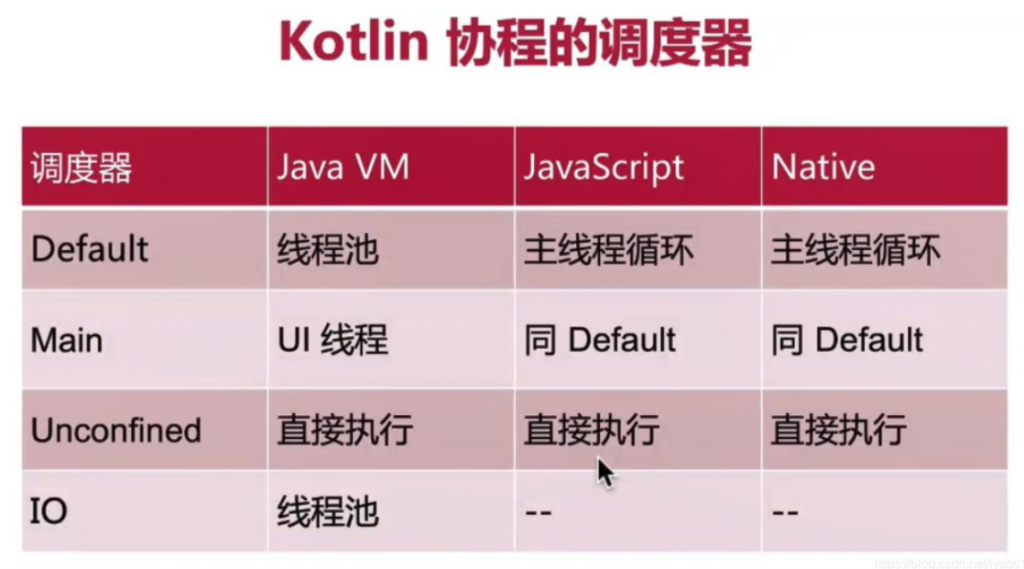
Default和IO线程的区别,IO内部多了一个队列的维护
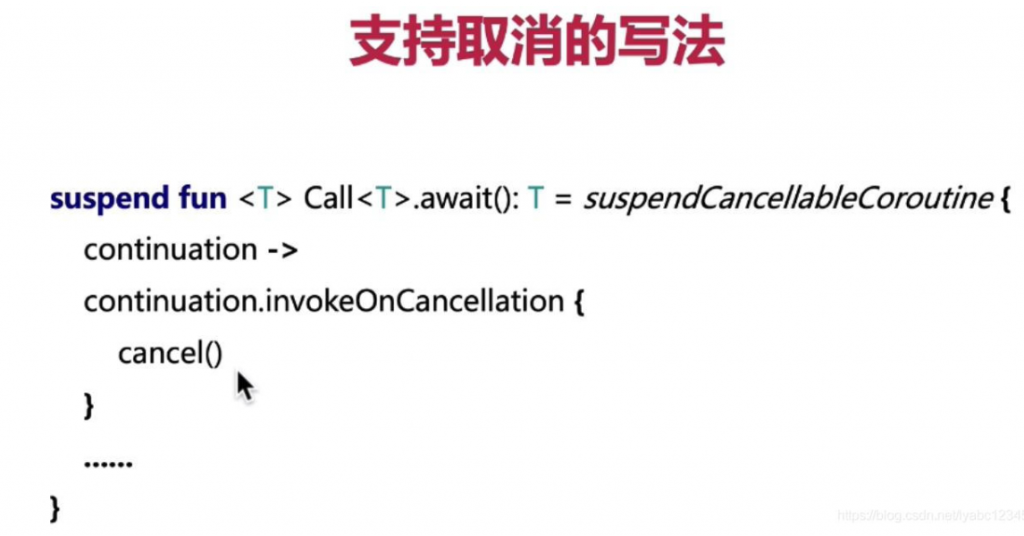
回调转协程的完整写法:
import com.bennyhuo.kotlin.coroutines.advanced.common.gitHubServiceApi
import kotlinx.coroutines.suspendCancellableCoroutine
import retrofit2.Call
import retrofit2.Callback
import retrofit2.HttpException
import retrofit2.Response
import kotlin.coroutines.resume
import kotlin.coroutines.resumeWithException

suspend fun <T> Call<T>.await(): T = suspendCancellableCoroutine { //可取消
    continuation ->
    continuation.invokeOnCancellation {
        cancel() //调用retrofit的取消方法
    }

    enqueue(object: Callback<T> {
        override fun onFailure(call: Call<T>, t: Throwable) {
            continuation.resumeWithException(t)
        }

        override fun onResponse(call: Call<T>, response: Response<T>) {
            response.takeIf { it.isSuccessful }?.body()?.also {continuation.resume(it) }
                ?: continuation.resumeWithException(HttpException(response))
        }

    })
}


suspend fun main() {
    val user = gitHubServiceApi.getUserCallback("flycumt").await()
    println(user)
}
也可以不自己写,retrofit的api中本身有实现await()方法,awaitResponse()方法等。
CompletableFuture 添加回调的写法:
import com.bennyhuo.kotlin.coroutines.advanced.utils.log
import kotlinx.coroutines.suspendCancellableCoroutine
import java.util.concurrent.CompletableFuture
import java.util.concurrent.ExecutionException
import kotlin.coroutines.resume
import kotlin.coroutines.resumeWithException

suspend fun main() {
    val result = CompletableFuture.supplyAsync {
        3
    }.await()

    log(result)
}

suspend fun <T> CompletableFuture<T>.await(): T {
    if(isDone){
        try {
            return get()
        } catch (e: ExecutionException) {
            throw e.cause ?: e
        }
    }
    return suspendCancellableCoroutine { //可取消
        cancellableContinuation ->
        cancellableContinuation.invokeOnCancellation {
            cancel(true) //取消
        }

        whenComplete { value, throwable ->
            if(throwable == null){
                cancellableContinuation.resume(value)
            } else {
                cancellableContinuation.resumeWithException(throwable.cause ?: throwable)
            }
        }
    }
}
CompletableFuture本身也有实现await()方法。
模仿给Handler扩展添加可取消的支持:
suspend fun <T> Handler.run(block: () -> T) = suspendCoroutine<T> { continuation ->
    post {
        try {
            continuation.resume(block())
        } catch (e: Exception) {
            continuation.resumeWithException(e)
        }
    }
}

suspend fun <T> Handler.runDelay(delay: Long, block: () -> T) = suspendCancellableCoroutine<T> { continuation ->

    val message = Message.obtain(this) { //Message obtain(Handler h, Runnable callback)
        try {
            continuation.resume(block())
        } catch (e: Exception){
            continuation.resumeWithException(e)
        }
    }.also {
        it.obj = continuation //message.obj
    }

    continuation.invokeOnCancellation {
        removeCallbacksAndMessages(continuation) //通过Handler的removeCallbacksAndMessages方法来取消回调, 参数就是前面设置的message.obj的值
    }

    sendMessageDelayed(message, delay)
}


suspend fun main() {
    Looper.prepareMainLooper()

    GlobalScope.launch {
        val handler = Handler(Looper.getMainLooper())
        val result = handler.run { "Hello" }
        val delayedResult = handler.runDelay(5000){ "World" }
        log(result, delayedResult)
        Looper.getMainLooper().quit()
    }

    Looper.loop()
}
这个例子的主要意图是,Hanlder可以通过定义扩展函数的方式来延时获取一些东西,比如Activity刚创建的时候,拿不到view的宽和高,就可以使用这种方法。
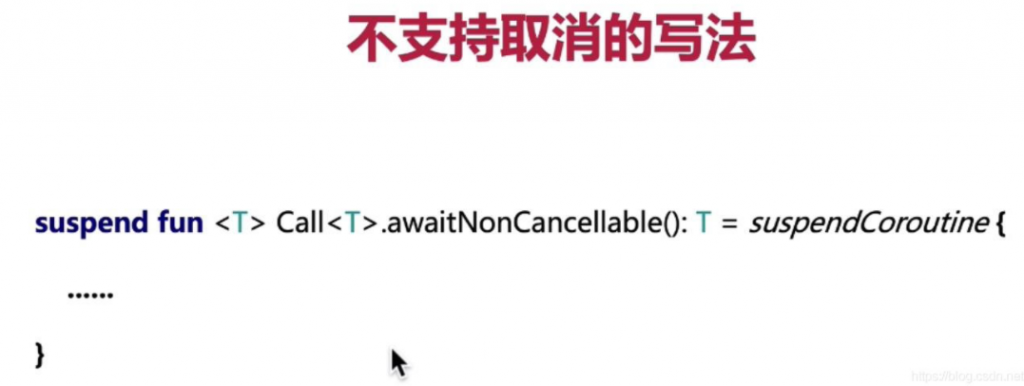
上面三个例子主要是针对可取消的写法,如果实际用,不用自己写,直接导库就行。
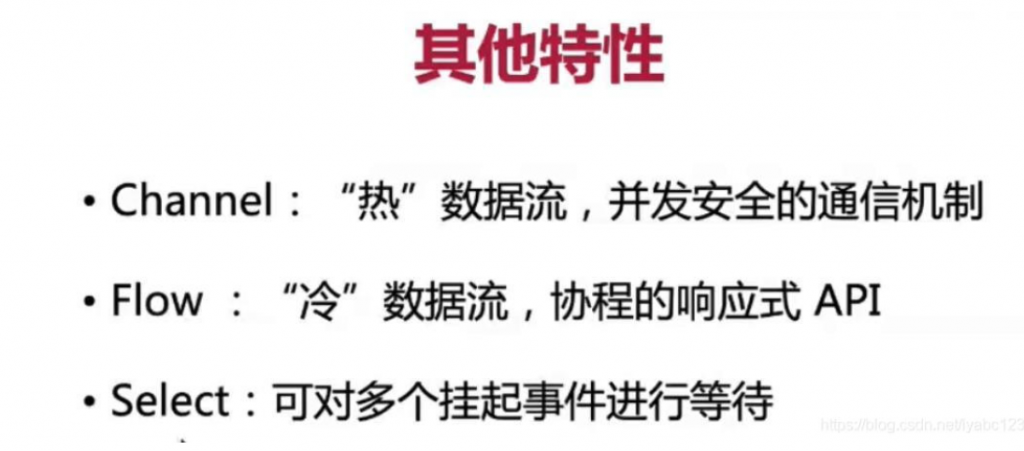
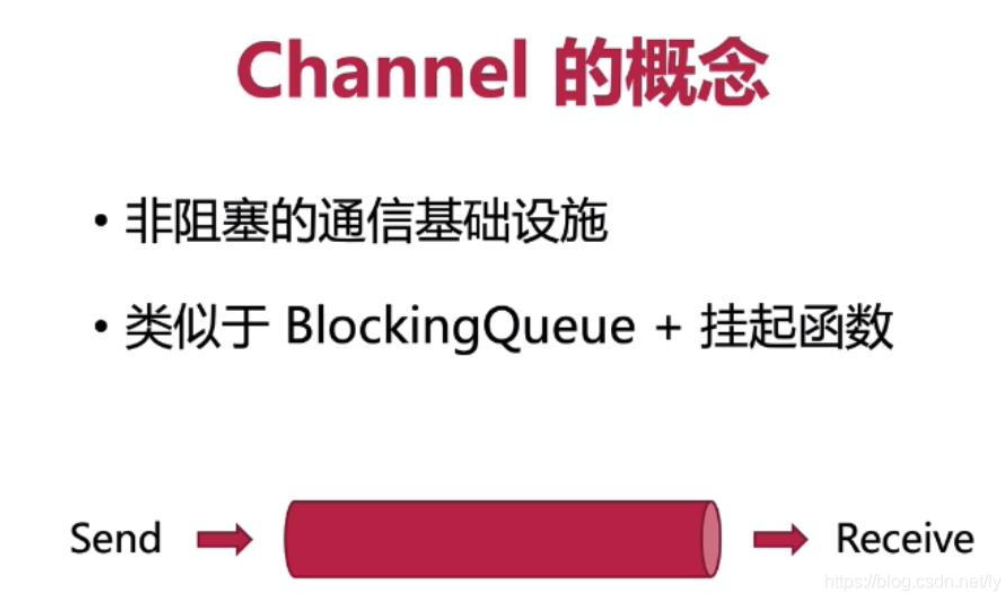
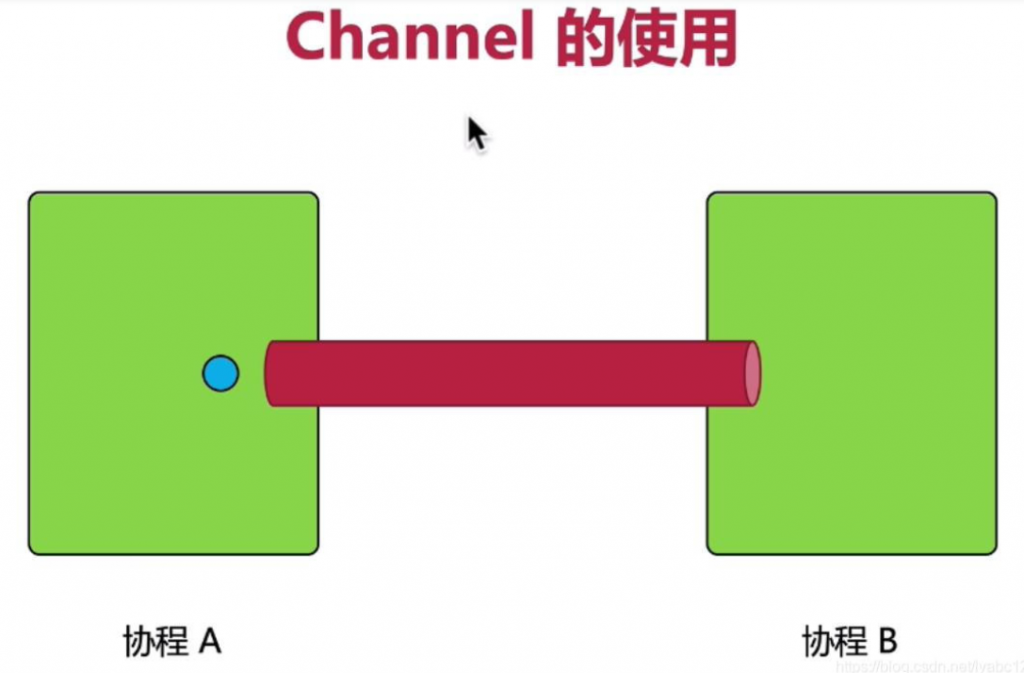
Channel
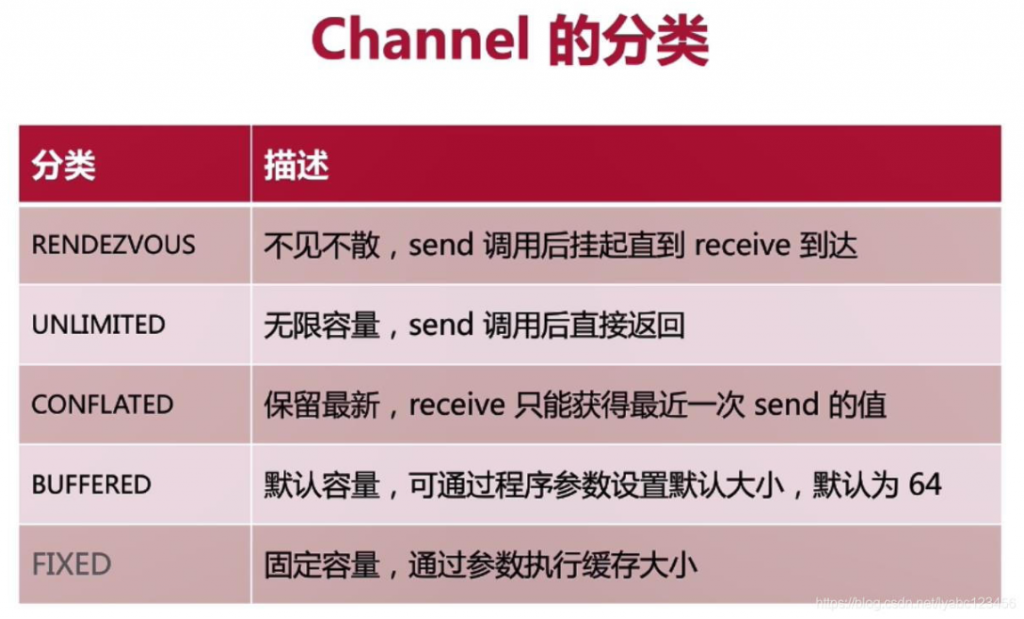
其中CONFLATED比较适合用于状态更新,比如进度条的进度,因为它总是只取最新的。
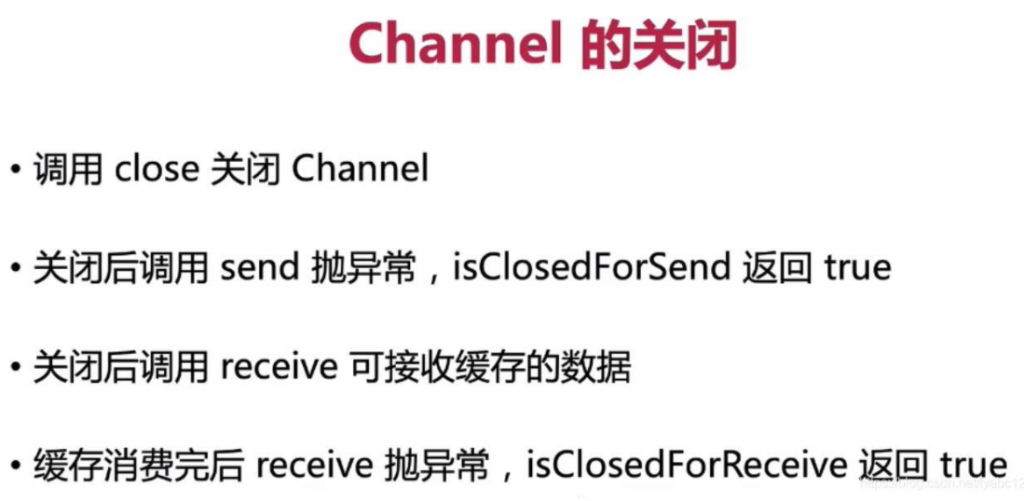

关闭后再发送会抛异常:

channel关闭后,channel中的数据仍然可以被接受,只有当channel中的数据消费完了,isClosedForReceive才为true.

suspend fun main() {
    basics()
}

suspend fun basics() {
    val channel = Channel<Int>(Channel.RENDEZVOUS)
//    val channel = Channel<Int>(Channel.UNLIMITED)
//    val channel = Channel<Int>(Channel.CONFLATED)
//    val channel = Channel<Int>(Channel.BUFFERED)
//    val channel = Channel<Int>(1)

    //生产者 发
    val producer = GlobalScope.launch {
        for (i in 0..3) {
            log("sending", i)
            channel.send(i)
            log("sent", i)
        }
        channel.close()
    }

    //消费者 收
    val consumer = GlobalScope.launch {
        while (!channel.isClosedForReceive) {
            log("receiving")
            val value = channel.receiveOrNull()
            log("received", value)
        }
    }

    producer.join()
    consumer.join()
}
Channel(Channel.RENDEZVOUS ) 的方式是发一个收一个,边发边收,如果没有接受的,发送者会挂起等待,输出如下:
Channel(Channel.UNLIMITED ) 的方式是全部发送完毕,才会接收到,先发后收,发送者发送完就返回了,不管有没有接受者
Channel(Channel.CONFLATED ) 的方式是不管发了多少个,只能收到最后一个,也是发送完就返回了,不管有没有接受者
Channel(Channel.BUFFERED ) 的方式也是发送者发送完就返回了,不管有没有接受者,可以指定buffer大小
Channel(1) 的方式指定管道的容量大小,如果数据超过容量,发送者就会挂起等待,直到有接受者取走数据,发送者才发送下一批数据
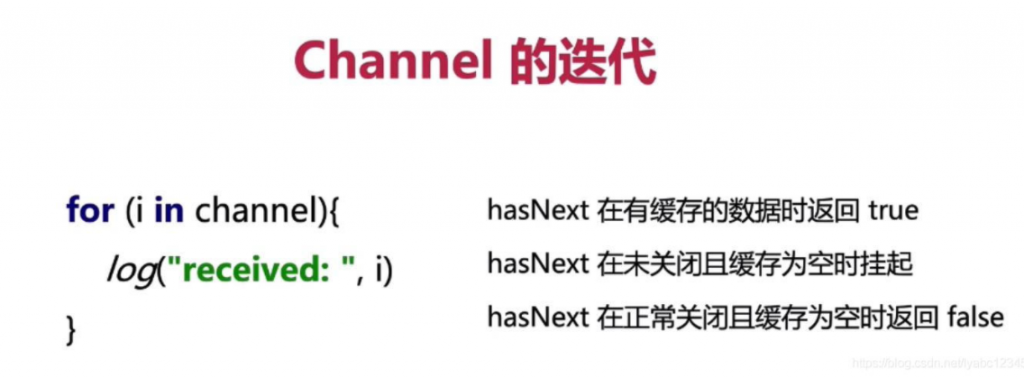
channel接受数据的时候可以直接当成迭代器使用:
suspend fun iterateChannel() {
    val channel = Channel<Int>(Channel.UNLIMITED)

    val producer = GlobalScope.launch {
        for (i in 0..3) {
            log("sending", i)
            channel.send(i)
            log("sent", i)
        }
        channel.close()
    }

    val consumer = GlobalScope.launch {
        for (i in channel) {
            log("received: ", i)
        }
    }

    producer.join()
    consumer.join()
}
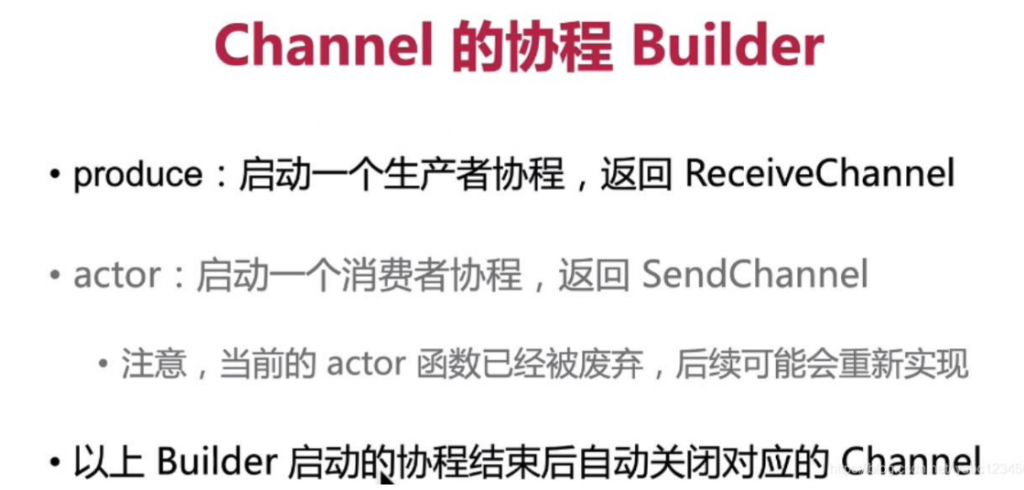
suspend fun producer() {
    val receiveChannel = GlobalScope.produce(capacity = Channel.UNLIMITED) {
        for (i in 0..3) {
            log("sending", i)
            send(i)
            log("sent", i)
        }
    }

    val consumer = GlobalScope.launch {
        for (i in receiveChannel) {
            log("received: ", i)
        }
    }

    consumer.join()
}

suspend fun consumer() {
    val sendChannel = GlobalScope.actor<Int>(capacity = Channel.UNLIMITED) {
        for (i in this) {
            log("received: ", i)
        }
    }

    val producer = GlobalScope.launch {
        for (i in 0..3) {
            log("sending", i)
            sendChannel.send(i)
            log("sent", i)
        }
    }

    producer.join()
}

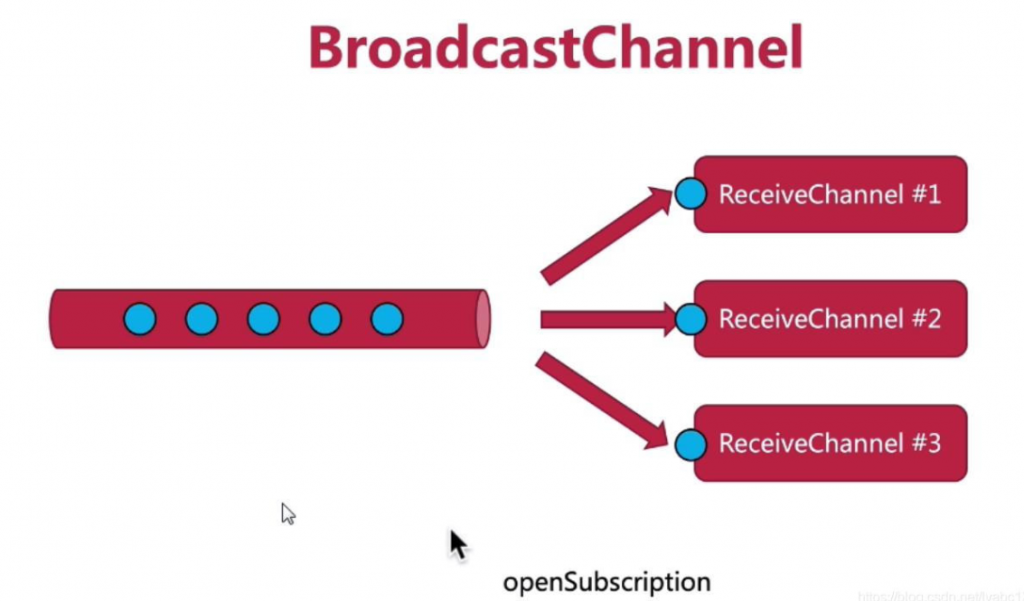
suspend fun broadcast() {
    //下面几种都可以创建一个BroadcastChannel
    //val broadcastChannel = BroadcastChannel<Int>(Channel.BUFFERED)
    //val broadcastChannel = Channel<Int>(Channel.BUFFERED).broadcast()
    val broadcastChannel = GlobalScope.broadcast {
        for (i in 0..5) {
            send(i)
        }
    }

    //启动5个接受者,每个都能收到
    List(5) { index ->
        GlobalScope.launch {
            val receiveChannel = broadcastChannel.openSubscription()
            for (i in receiveChannel) {
                log("[#$index] received: $i")
            }
        }
    }.joinAll()
}
输出:
> Task :ChannelsKt.main()
21:07:12:924 [DefaultDispatcher-worker-3 @coroutine#2] [#0] received: 0
21:07:12:924 [DefaultDispatcher-worker-5 @coroutine#6] [#4] received: 0
21:07:12:924 [DefaultDispatcher-worker-1 @coroutine#3] [#1] received: 0
21:07:12:925 [DefaultDispatcher-worker-4 @coroutine#5] [#3] received: 0
21:07:12:925 [DefaultDispatcher-worker-2 @coroutine#4] [#2] received: 0
21:07:12:944 [DefaultDispatcher-worker-1 @coroutine#3] [#1] received: 1
21:07:12:943 [DefaultDispatcher-worker-3 @coroutine#2] [#0] received: 1
21:07:12:943 [DefaultDispatcher-worker-5 @coroutine#6] [#4] received: 1
21:07:12:944 [DefaultDispatcher-worker-4 @coroutine#5] [#3] received: 1
21:07:12:945 [DefaultDispatcher-worker-2 @coroutine#4] [#2] received: 1
21:07:12:945 [DefaultDispatcher-worker-2 @coroutine#4] [#2] received: 2
21:07:12:945 [DefaultDispatcher-worker-8 @coroutine#3] [#1] received: 2
21:07:12:945 [DefaultDispatcher-worker-8 @coroutine#3] [#1] received: 3
21:07:12:945 [DefaultDispatcher-worker-7 @coroutine#4] [#2] received: 3
21:07:12:945 [DefaultDispatcher-worker-2 @coroutine#6] [#4] received: 2
21:07:12:946 [DefaultDispatcher-worker-2 @coroutine#6] [#4] received: 3
21:07:12:946 [DefaultDispatcher-worker-8 @coroutine#5] [#3] received: 2
21:07:12:946 [DefaultDispatcher-worker-8 @coroutine#5] [#3] received: 3
21:07:12:946 [DefaultDispatcher-worker-3 @coroutine#2] [#0] received: 2
21:07:12:946 [DefaultDispatcher-worker-3 @coroutine#2] [#0] received: 3
21:07:12:946 [DefaultDispatcher-worker-1 @coroutine#3] [#1] received: 4
21:07:12:946 [DefaultDispatcher-worker-3 @coroutine#2] [#0] received: 4
21:07:12:946 [DefaultDispatcher-worker-1 @coroutine#6] [#4] received: 4
21:07:12:947 [DefaultDispatcher-worker-6 @coroutine#5] [#3] received: 4
21:07:12:947 [DefaultDispatcher-worker-6 @coroutine#5] [#3] received: 5
21:07:12:947 [DefaultDispatcher-worker-2 @coroutine#3] [#1] received: 5
21:07:12:947 [DefaultDispatcher-worker-6 @coroutine#2] [#0] received: 5
21:07:12:947 [DefaultDispatcher-worker-2 @coroutine#6] [#4] received: 5
21:07:12:947 [DefaultDispatcher-worker-3 @coroutine#4] [#2] received: 4
21:07:12:947 [DefaultDispatcher-worker-3 @coroutine#4] [#2] received: 5
Select
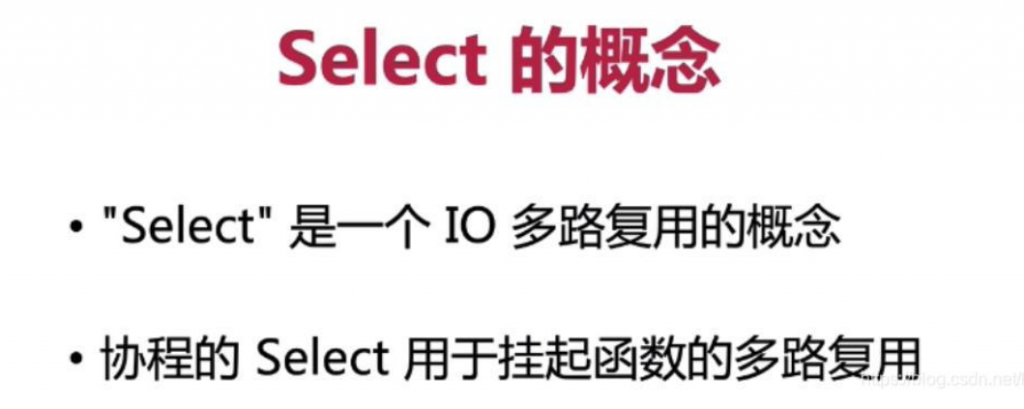
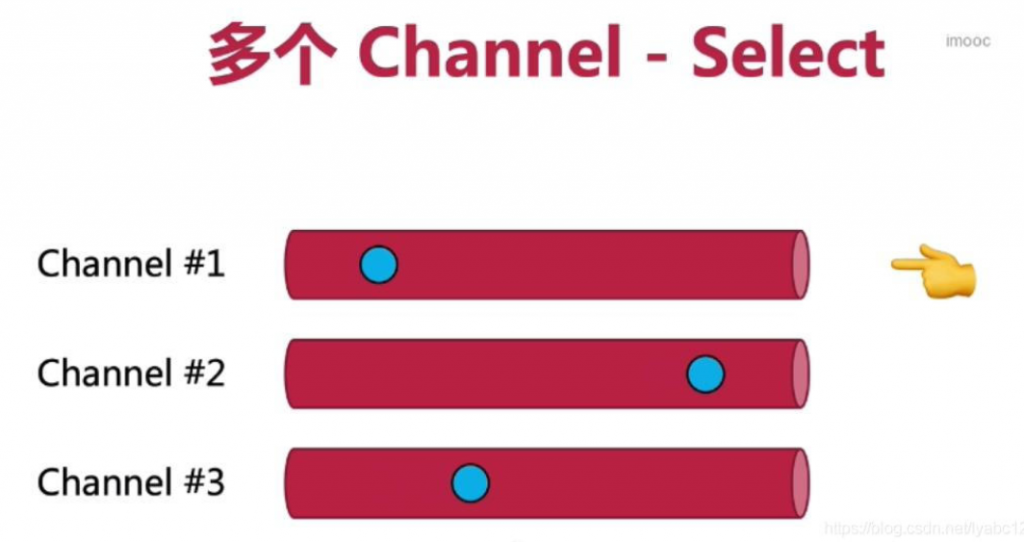
Select的使用场景是多个协程异步执行时,获取最先结束的那个协程结果返回,比如加载图片时,可能从网络获取,也可能从本地获取,这两种可能同时异步执行,使用Select就会优先获取返回比较快的本地结果展示,然后我们再去获取网络最新的更新即可。

val localDir = File("localCache").also { it.mkdirs() }

val gson = Gson()

fun CoroutineScope.getUserFromApi(login: String) = async(Dispatchers.IO){
    gitHubServiceApi.getUserSuspend(login)
}

fun CoroutineScope.getUserFromLocal(login:String) = async(Dispatchers.IO){
    File(localDir, login).takeIf { it.exists() }?.readText()?.let { gson.fromJson(it, User::class.java) }
}

fun cacheUser(login: String, user: User){
    File(localDir, login).writeText(gson.toJson(user))
}

data class Response<T>(val value: T, val isLocal: Boolean)

suspend fun main() {
    val login = "test"
    GlobalScope.launch {
        val localDeferred = getUserFromLocal(login)
        val remoteDeferred = getUserFromApi(login)

        //val userResponse  = Response(localDeferred.await(), true)

		//select选择优先返回的结果
        val userResponse = select<Response<User?>> {
            localDeferred.onAwait { Response(it, true) }
            remoteDeferred.onAwait { Response(it, false) }
        }

        userResponse.value?.let { log(it) } //获取结果显示 输出
        //如果是本地的结果,重新请求,并缓存本地
        userResponse.isLocal.takeIf { it }?.let {
            val userFromApi = remoteDeferred.await()
            cacheUser(login, userFromApi)
            log(userFromApi)
        }
    }.join()
}
如果有多个异步请求同时返回,select会按顺序取第一个,想要随机的取可以使用selectUnbiased

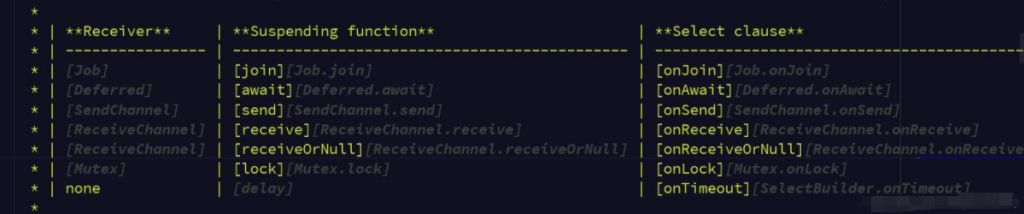
select大括号中onAwait的写法等价于 await() 的写法,localDeferred.await(),还有很多操作join send等都是一样的前面加on
例:使用channel和select实现统计代码行数
val KotlinFileFilter = { file: File -> file.isDirectory || file.name.endsWith(".kt") }

data class FileLines(val file: File, val lines: Int) {
    override fun toString(): String {
        return "${file.name}: $lines"
    }
}

suspend fun main() {
    val result = lineCounter(File("."))
    log(result)
}

suspend fun lineCounter(root: File): HashMap<File, Int> {
    return Executors.newFixedThreadPool(Runtime.getRuntime().availableProcessors() + 1).asCoroutineDispatcher()
        //使用use自动关闭资源
        .use {
            //withContext是一个挂起函数 返回值是最后一行表达式的值
            withContext(it){
                val fileChannel  = walkFile(root)

                //定义5个同时读取
                val fileLinesChannels = List(5){
                    fileLineCounter(fileChannel)
                }

                resultAggregator(fileLinesChannels)
            }
        }
}

//创建生产者返回ReceiveChannel
fun CoroutineScope.walkFile(root: File): ReceiveChannel<File> {
    return produce(capacity = Channel.BUFFERED) {
        fileWalker(root)
    }
}

//递归过滤kotlin文件并发送文件
suspend fun SendChannel<File>.fileWalker(file: File) {
    if(file.isDirectory){
        file.listFiles()?.filter(KotlinFileFilter)?.forEach { fileWalker(it) }
    } else {
        send(file)
    }
}

//输入File 返回FileLines对象
fun CoroutineScope.fileLineCounter(input: ReceiveChannel<File>): ReceiveChannel<FileLines> {
    return produce(capacity = Channel.BUFFERED) {
        for (file in input){
            //统计行数
            file.useLines {
                send(FileLines(file, it.count())) //发送结果
            }
        }
    }
}

suspend fun CoroutineScope.resultAggregator(channels: List<ReceiveChannel<FileLines>>): HashMap<File, Int> {
    val map = HashMap<File, Int>()
    channels.aggregate {
            filteredChannels ->
                //使用select返回最快统计的那一个
                select<FileLines?> {
                    filteredChannels.forEach {
                        it.onReceiveOrNull {
                            log("received: $it")
                            it
                        }
                    }
                } ?.let {
                    map[it.file] = it.lines
                }
    }
    return map
}

//tailrec-递归优化 定义List<ReceiveChannel<FileLines>>的扩展函数,过滤掉已完成的
tailrec suspend fun List<ReceiveChannel<FileLines>>.aggregate(block: suspend (List<ReceiveChannel<FileLines>>) -> Unit) {
    block(this)//消费一次
    //从当前list中过掉isClosedForReceive=true的ReceiveChannel
    filter { !it.isClosedForReceive }.takeIf { it.isNotEmpty() }?.aggregate(block)//递归
}
Flow
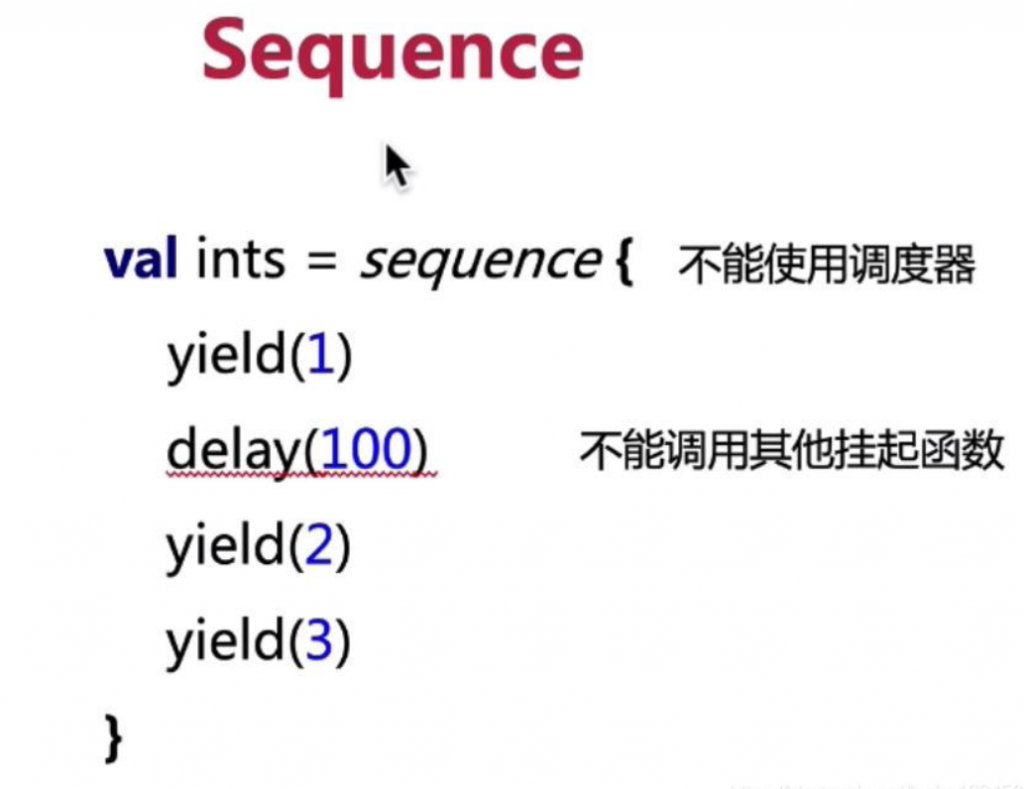
Sequence中不能调用其他挂起函数,不能设置调度器,只能单线程中使用。而Flow可以支持:
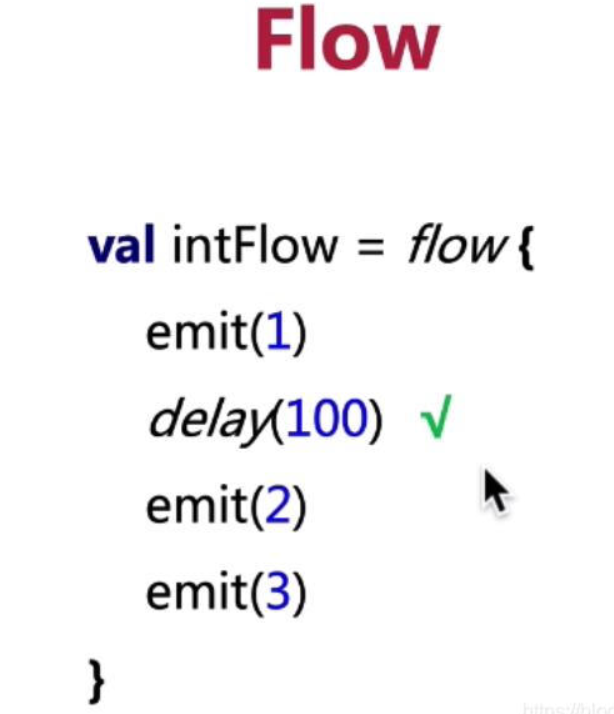
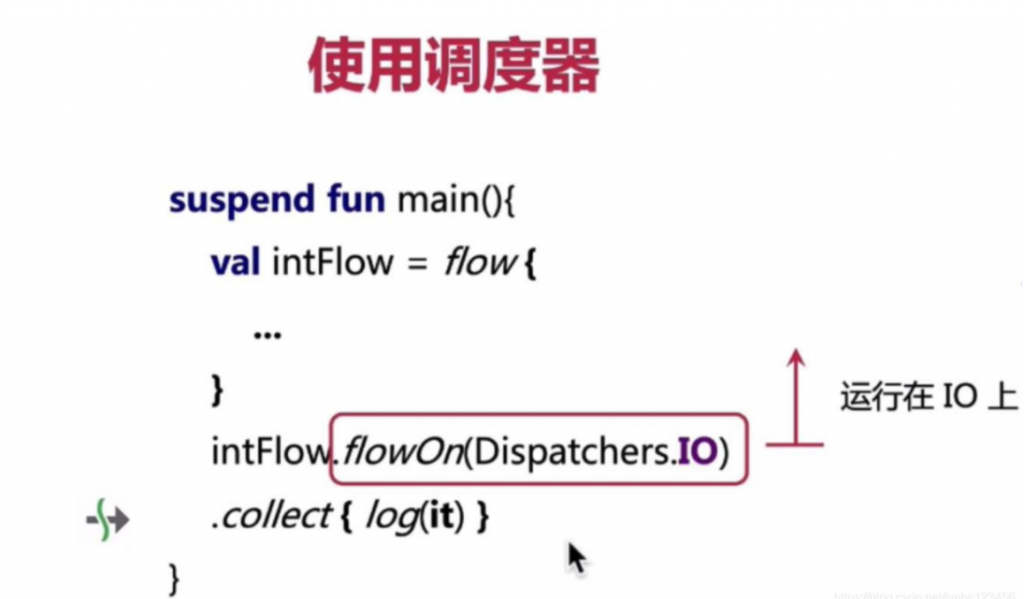
Flow中调用delay会把后面的代码切换到默认调度器上执行,也可以显示的指定调度器:
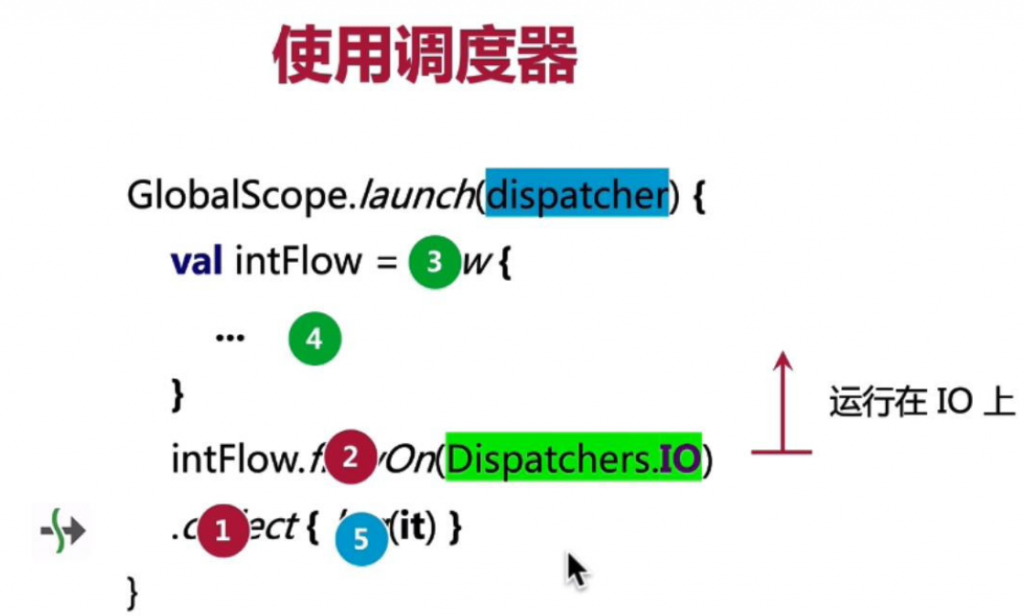
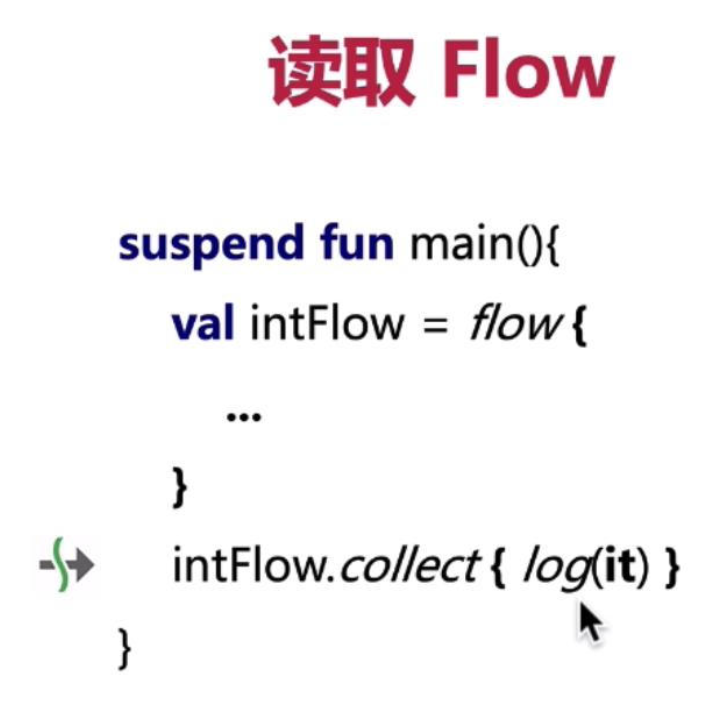
suspend fun flows(){
    val intFlow = flow {
        emit(1)
        delay(100)
        emit(2)
        emit(3)
    }
    val dispatcher = Executors.newSingleThreadExecutor { Thread(it, "MyThread").also { it.isDaemon = true } }.asCoroutineDispatcher()
    GlobalScope.launch(dispatcher) {
        intFlow.flowOn(Dispatchers.IO)
            .collect { log(it) }
    }.join()
}
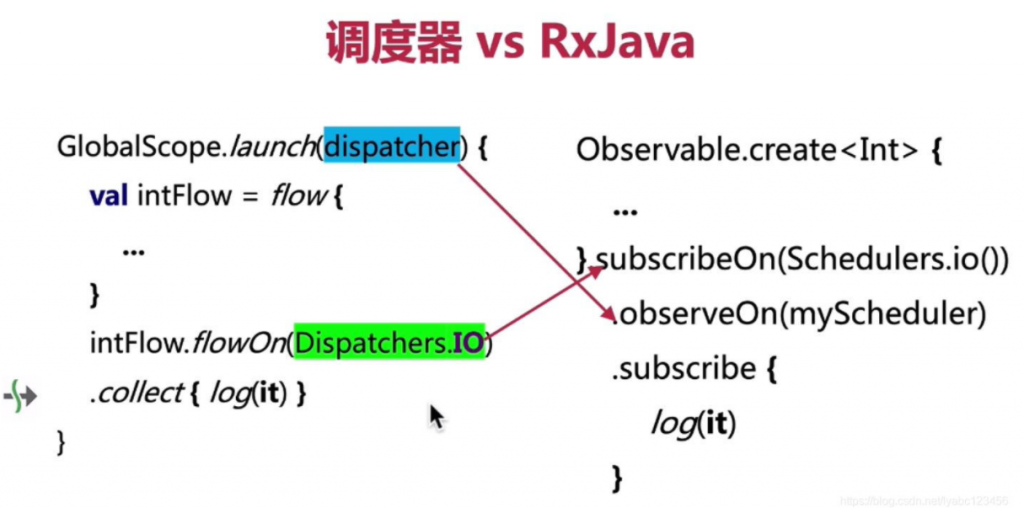
对比RxJava的线程切换方式很像,flowOn传递的调度器指定flow里面的代码执行在哪个线程上,而launch传递的调度器指定flow执行完后resume恢复执行在哪个线程上。
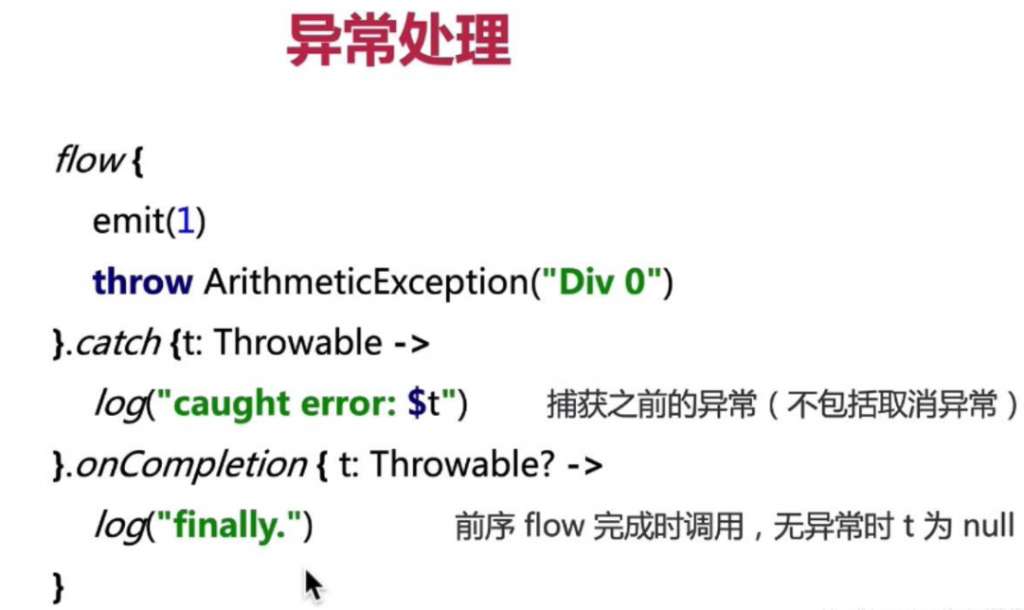
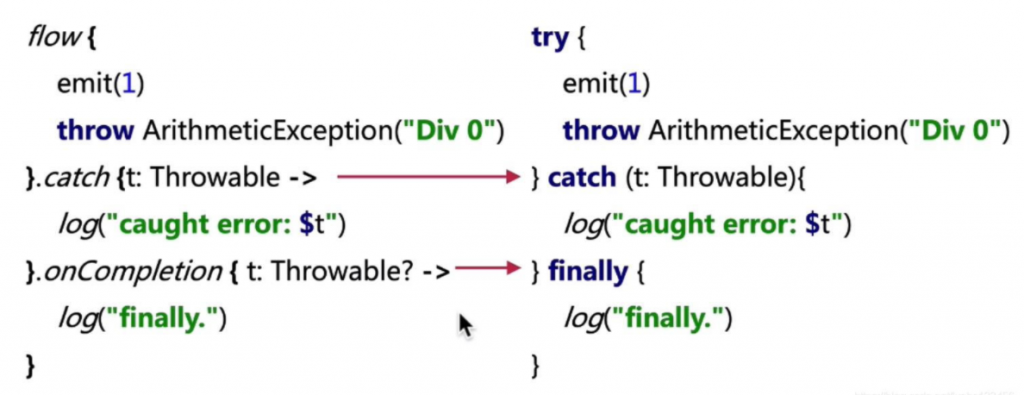
flow-catch-onCompletion 和 java的 try-catch-finally 基本类似,onCompletion中的代码是一定会执行的,不同的是有异常发生的时候,会携带一个异常参数。
suspend fun exception(){
    flow<Int> {
        emit(1)
        throw ArithmeticException("Div 0")
    }.catch {t: Throwable ->
        log("caught error: $t")
    }.onCompletion { t: Throwable? ->
        log("finally.")
    }.flowOn(Dispatchers.IO)
        .collect { log(it) }

//    flow { // bad!!!
//        try {
//            emit(1)
//            throw ArithmeticException("Div 0")
//        } catch (t: Throwable){
//            log("caught error: $t")
//        } finally {
//            log("finally.")
//        }
//    }
}
flow的异常捕获使用flow自己的api处理就行,不需要内部再进行try-catch.
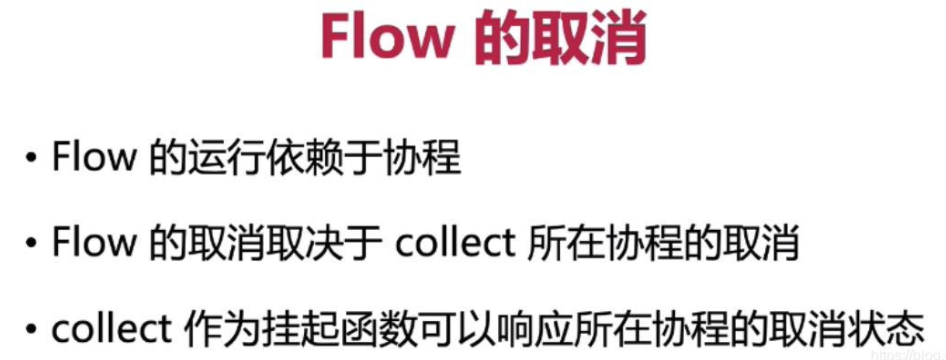
Flow没有提供单独的取消方法,要取消Flow只需要取消flow.collect { } 所在的协程即可。

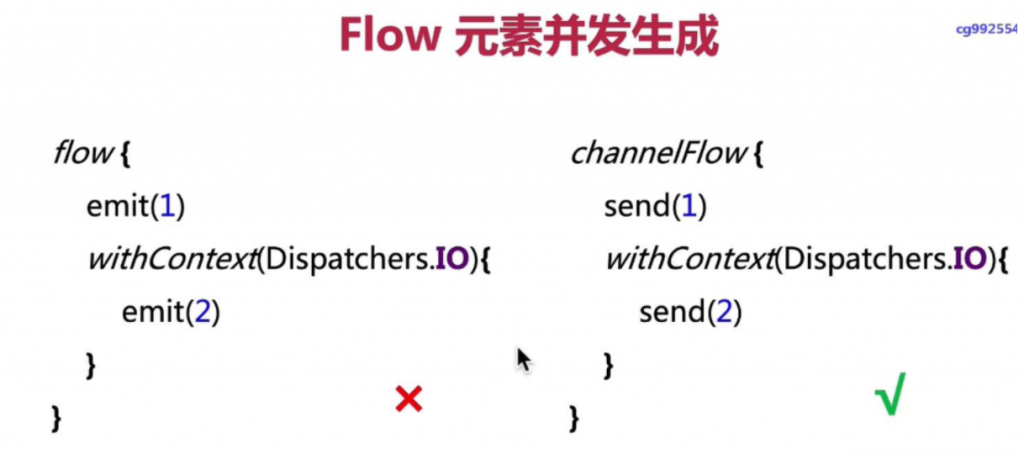
Flow内部不能再去切换线程,如果需要这样做可以使用channelFlow。
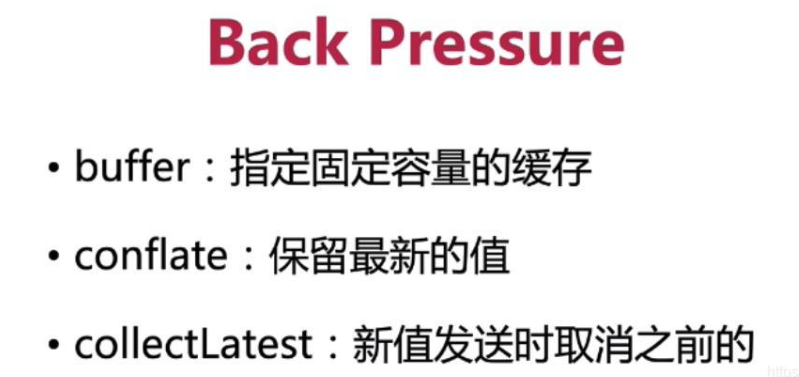
由于是流的概念flow也有背压的问题,也就是接受端来不及消费,发送端会累积大量的数据,感觉kotlin抄RxJava也抄了不少,背压解决办法,要么采用只保留最新conflate,要么取消之前发送的值collectLatest
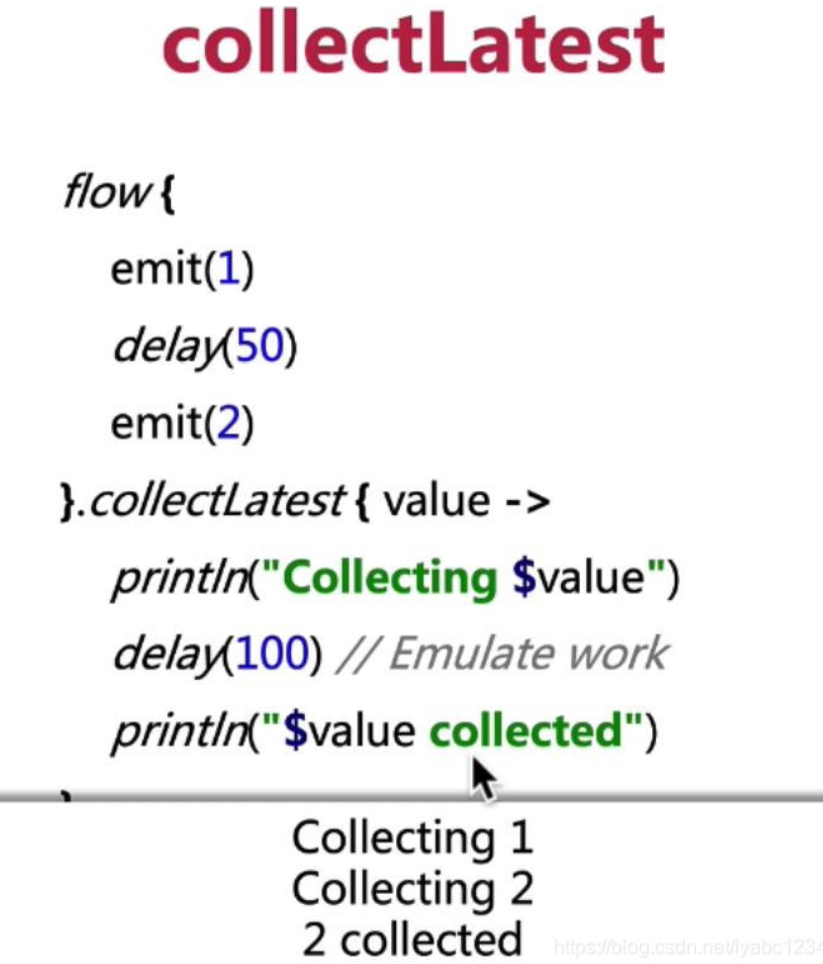
suspend fun backPressure(){
    flow {
        emit(1)
        delay(50)
        emit(2)
    }.collectLatest { value ->
        println("Collecting $value")
        delay(100) // Emulate work
        println("$value collected")
    }
}
上面的例子collectLatest当中100毫秒之后只能接受到2,因为延时100的过程中发送2的时候会把1取消掉。
