阅读完需:约 9 分钟
docker的理念回顾:
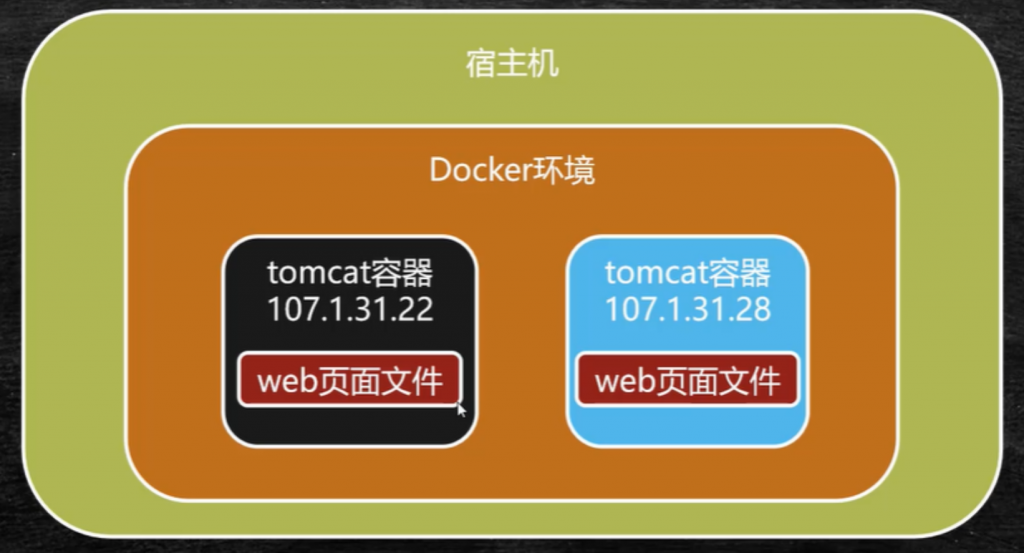
将应用和运行的环境打包形成容器运行,运行可以伴随着容器,但是我们对于数据的要求,是希望能够持久化的!
就好比,你安装一个MySQL,结果你把容器删了,就相当于删库跑路了,这TM也太扯了吧!
所以我们希望容器之间有可能可以共享数据,Docker容器产生的数据,如果不通过docker commit 生成新的镜像,使得数据作为镜像的一部分保存下来,那么当容器删除后,数据自然也就没有了!这样是行不通的!

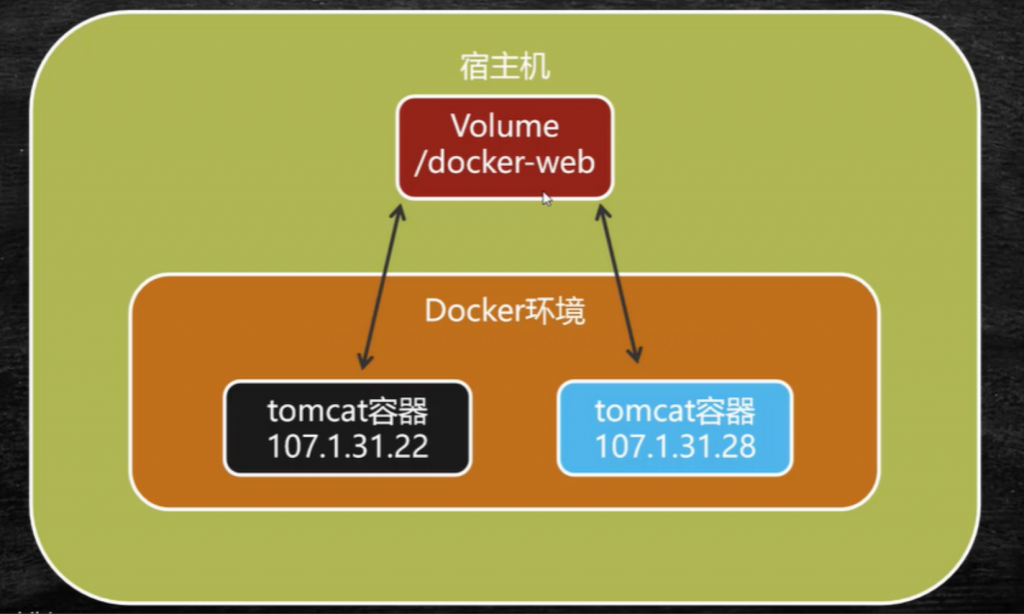
为了能保存数据在Docker中我们就可以使用卷!让数据挂载到我们本地!这样数据就不会因为容器删除而丢失了!

作用:
卷就是目录或者文件,存在一个或者多个容器中,由docker挂载到容器,但不属于联合文件系统,因此能够绕过 Union File System ,提供一些用于持续存储或共享数据的特性:卷的设计目的就是数据的持久化,完全独立于容器的生存周期,因此Docker不会在容器删除时删除其挂载的数据卷。
特点:
- 数据卷可在容器之间共享或重用数据
- 卷中的更改可以直接生效
- 数据卷中的更改不会包含在镜像的更新中
- 数据卷的生命周期一直持续到没有容器使用它为止
所以:总结一句话:就是容器的持久化,以及容器间的继承和数据共享!
使用数据卷
1、容器中直接使用命令来添加
挂载
#命令
docker run -it -v 宿主机绝对路径目录:容器内目录镜像名

#测试
[root@kuangshen~]#docker run -it -v /home/ceshi:/homecentos /bin/bash
查看数据卷是否挂载成功 docker inspect 容器id

测试容器和宿主机之间数据共享:可以发现,在容器中,创建的会在宿主机中看到!

测试容器停止退出后,主机修改数据是否会同步!
- 停止容器
- 在宿主机上修改文件,增加些内容
- 启动刚才停止的容器
- 然后查看对应的文件,发现数据依旧同步!ok

使用 docker 安装 mysql
思考:mysql 数据持久化的问题!
#1、拉取镜像
[root@kuangshen~]#docker pull mysql:5.7
5.7: Pulling from library/mysql
54fec2fa59d0: Already exists
bcc6c6145912: Pull complete
951c3d959c9d: Pull complete
05de4d0e206e: Pull complete
..........

#2、启动容器-e环境变量!
#注意:mysql的数据应该不丢失!先体验下-v挂载卷!参考官方文档
[root@kuangshenhome]#docker run -d -p 3310:3306 -v /home/mysql/conf:/etc/mysql/conf.d -v /home/mysql/data:/var/lib/mysql -e MYSQL_ROOT_PASSWORD=123456 --name mysql01mysql:5.7
4763fa5c68c4323688102f57938fb10996a0fb902d2812349286529f9378f16c

#3、使用本地的sqlyog连接测试一下3310

#4、查看本地的 /home/mysql目录
[root@kuangshendata]#pwd
/home/mysql/data
[root@kuangshendata]#ls
......
test#可以看到我们刚刚建立的mysql数据库在本地存储着

#5、删除mysql容器
[root@kuangshendata]#docker rm -f mysql01 #删除容器,然后发现远程连接失败!
mysql01
[root@kuangshendata]#ls
......
test    #可以看到我们刚刚建立的mysql数据库在本地存储着
通过Docker File 来添加
DockerFile 是用来构建Docker镜像的构建文件,是由一些列命令和参数构成的脚本。
我们在这里,先体验下,后面我们会详细讲解 DockerFile !
#1、我们在宿主机/home目录下新建一个docker-test-volume文件夹
[root@kuangshenhome]# mkdir docker-test-volume

#说明:在编写DockerFile文件中使用VOLUME指令来给镜像添加一个或多个数据卷
VOLUME["/dataVolumeContainer1","/dataVolumeContainer2","/dataVolumeContainer3"]

#出于可移植和分享的考虑,我们之前使用的-v主机目录:容器目录这种方式不能够直接在DockerFile中实现。
#由于宿主机目录是依赖于特定宿主机的,并不能够保证在所有宿主机上都存在这样的特定目录.

#2、编写DockerFile文件
[root@kuangshendocker-test-volume]# pwd
/home/docker-test-volume
[root@kuangshendocker-test-volume]#vim dockerfile1
[root@kuangshendocker-test-volume]#cat dockerfile1
# volume test
FROM centos
VOLUME ["/dataVolumeContainer1","/dataVolumeContainer2"]
CMD echo"-------end------"
CMD /bin/bash

#3、build后生成镜像,获得一个新镜像kuangshen/centos
docker build -f /home/docker-test-volume/dockerfile1 -t kuangshen/centos . #
注意最后有个.
#4、启动容器
[root@kuangshendocker-test-volume]#docker run -it 0e97e1891a3d /bin/bash # 启动容器
[root@f5824970eefc/]# ls -l
total56
lrwxrwxrwx 1rootroot 7 May112019bin->usr/bin
drwxr-xr-x 2rootroot 4096 May1111:55dataVolumeContainer1 #数据卷目录
drwxr-xr-x 2rootroot 4096 May1111:55dataVolumeContainer2 #数据卷目录
drwxr-xr-x 5rootroot 360 May1111:55dev
drwxr-xr-x 1rootroot 4096 May1111:55etc
drwxr-xr-x 2rootroot 4096 May112019home
.....

# 问题:通过上述步骤,容器内的卷目录地址就已经知道了,但是对应的主机目录地址在哪里呢?

#5、我们在数据卷中新建一个文件
[root@f5824970eefcdataVolumeContainer1]#pwd
/dataVolumeContainer1
[root@f5824970eefcdataVolumeContainer1]#touch container.txt
[root@f5824970eefcdataVolumeContainer1]#ls -l
total0
- rw-r--r-- 1 rootroot 0 May 11 11:58 container.txt

#6、查看下这个容器的信息
[root@kuangshen~]#docker inspect 0e97e1891a3d
#查看输出的Volumes
"Volumes":{
   "/dataVolumeContainer1":{},
   "/dataVolumeContainer2":{}
},

# 7、这个卷在主机对应的默认位置
注意:如果访问出现了 cannot open directory: Permission denied
解决办法:在挂载目录后多加一个 –privileged=true参数即可
匿名和具名挂载
#匿名挂载

-v容器内路径
docker run -d -P --name nginx01 -v /etc/nginx nginx

#匿名挂载的缺点,就是不好维护,通常使用命令 docker volume 维护
docker volume ls

#具名挂载
-v 卷名:/容器内路径
docker run -d -P --name nginx02 -v nginxconfig:/etc/nginx nginx

#查看挂载的路径
[root@kuangshen~]#docker volume inspect nginxconfig
.......
"Mountpoint":"/var/lib/docker/volumes/nginxconfig/_data",
"Name":"nginxconfig",
.......

# 怎么判断挂载的是卷名而不是本机目录名?
不是/开始就是卷名,是/开始就是目录名

#改变文件的读写权限
# ro : readonly
# rw : readwrite
#指定容器对我们挂载出来的内容的读写权限
docker run -d -P --name nginx02 -v nginxconfig:/etc/nginx:ro nginx
docker run -d -P --name nginx02 -v nginxconfig:/etc/nginx:rw nginx
数据卷容器
命名的容器挂载数据卷,其他容器通过挂载这个(父容器)实现数据共享,挂载数据卷的容器,称之为数据卷容器。
我们使用上一步的镜像: kuangshen/centos 为模板,运行容器 docker01,docker02,docker03,他们都会具有容器卷
1、先启动一个父容器docker01,然后在dataVolumeContainer2新增文件

退出不停止:ctrl+P+Q
2、创建docker02,docker03 让他们继承 docker01 –volumes-from
[root@kuangshen docker-test-volume]# docker run -it --name docker02 --volumes-from docker01 kuangshen/centos
[root@ea4c82779077 /]# cd /dataVolumeContainer2
[root@ea4c82779077 dataVolumeContainer2]# ls
docker01.txt
[root@95164598b306 dataVolumeContainer2]# touch docker02.txt
[root@95164598b306 dataVolumeContainer2]# ls
docker01.txt docker02.txt

[root@kuangshen docker-test-volume]# docker run -it --name docker03 --volumes-from docker01 kuangshen/centos
[root@ea4c82779077 /]# cd /dataVolumeContainer2
[root@ea4c82779077 dataVolumeContainer2]# ls
docker01.txt docker02.txt
[root@95164598b306 dataVolumeContainer2]# touch docker03.txt
[root@95164598b306 dataVolumeContainer2]# ls
docker01.txt docker02.txt docker03.txt3、回到docker01发现可以看到 02 和 03 添加的共享文件
[root@kuangshen docker-test-volume]# docker attach docker01
[root@799b6ea5db7c dataVolumeContainer2]# ls -l
total 0
-rw-r--r-- 1 root root 0 May 11 13:20 docker01.txt
-rw-r--r-- 1 root root 0 May 11 13:22 docker02.txt
-rw-r--r-- 1 root root 0 May 11 13:24 docker03.txt4、删除docker01,docker02 修改后docker03还能不能访问
[root@kuangshen docker-test-volume]# docker rm -f docker01
docker01
[root@kuangshen docker-test-volume]# docker attach docker02
[root@ea4c82779077 dataVolumeContainer2]# ls -l
total 0
-rw-r--r-- 1 root root 0 May 11 13:20 docker01.txt
-rw-r--r-- 1 root root 0 May 11 13:22 docker02.txt
-rw-r--r-- 1 root root 0 May 11 13:24 docker03.txt
[root@ea4c82779077 dataVolumeContainer2]# touch docker02-update.txt
[root@ea4c82779077 dataVolumeContainer2]# ls -a
. .. docker01.txt docker02.txt docker02-update.txt docker03.txt
[root@ea4c82779077 dataVolumeContainer2]# Ctrl+P+Q 退出容器

[root@kuangshen docker-test-volume]# docker attach docker03
[root@95164598b306 dataVolumeContainer2]# ls -l
total 0
-rw-r--r-- 1 root root 0 May 11 13:20 docker01.txt
-rw-r--r-- 1 root root 0 May 11 13:22 docker02.txt
-rw-r--r-- 1 root root 0 May 11 13:29 docker02-update.txt
-rw-r--r-- 1 root root 0 May 11 13:24 docker03.txt
5、删除docker02 ,docker03还能不能访问
[root@kuangshen docker-test-volume]# docker ps
CONTAINER ID IMAGE
95164598b306 kuangshen/centos
ea4c82779077 kuangshen/centos
[root@kuangshen docker-test-volume]# docker rm -f docker02
docker02
[root@kuangshen docker-test-volume]# docker attach docker03
[root@95164598b306 dataVolumeContainer2]# ls -l
total 0
-rw-r--r-- 1 root root 0 May 11 13:20 docker01.txt
-rw-r--r-- 1 root root 0 May 11 13:22 docker02.txt
-rw-r--r-- 1 root root 0 May 11 13:29 docker02-update.txt
-rw-r--r-- 1 root root 0 May 11 13:24 docker03.txt
[root@95164598b306 dataVolumeContainer2]# touch docker03-update.txt
6、新建docker04继承docker03,然后再删除docker03,看下是否可以访问!

[root@2119f4f23a92 /]# cd dataVolumeContainer2
[root@2119f4f23a92 dataVolumeContainer2]# ls -l
total 0
-rw-r--r-- 1 root root 0 May 11 13:20 docker01.txt
-rw-r--r-- 1 root root 0 May 11 13:22 docker02.txt
-rw-r--r-- 1 root root 0 May 11 13:29 docker02-update.txt
-rw-r--r-- 1 root root 0 May 11 13:32 docker03-update.txt
-rw-r--r-- 1 root root 0 May 11 13:24 docker03.txt
# 查看当前运行的容器
[root@kuangshen docker-test-volume]# docker ps
CONTAINER ID IMAGE NAMES
2119f4f23a92 kuangshen/centos docker04
95164598b306 kuangshen/centos docker03
# 继续删除docker03
[root@kuangshen docker-test-volume]# docker rm -f docker03
docker03
[root@kuangshen docker-test-volume]# docker attach docker04
[root@2119f4f23a92 dataVolumeContainer2]# ls -l
total 0
-rw-r--r-- 1 root root 0 May 11 13:20 docker01.txt
-rw-r--r-- 1 root root 0 May 11 13:22 docker02.txt
-rw-r--r-- 1 root root 0 May 11 13:29 docker02-update.txt
-rw-r--r-- 1 root root 0 May 11 13:32 docker03-update.txt
-rw-r--r-- 1 root root 0 May 11 13:24 docker03.txt
得出结论:
容器之间配置信息的传递,数据卷的生命周期一直持续到没有容器使用它为止。 存储在本机的文件则会一直保留!

