
阅读完需:约 37 分钟
异步
传统单线程环境下,调用函数是同步的,必须等待程序返回结果后,才可进行其他处理。因此为了提高系统整体的并发性能,引入了异步执行~
jdk中已经内置future模式的实现。Future是Java5添加的类,用来描述一个异步计算的结果。可以用isDone方法来检查计算是否完成,或者使用get阻塞住调用线程,直至计算完成返回结果,也可以用cancel方法来停止任务的执行。
Futrue异步模式存在的问题
Future以及相关使用方法提供了异步执行任务的能力,但对于结果的获取却是不方便,只能通过阻塞或轮询的方式得到任务结果。
阻塞的方式与我们理解的异步编程其实是相违背的,而轮询又会耗无谓的CPU资源。而且还不能及时得到计算结果,为什么不能用观察者设计模式当计算结果完成及时通知监听者呢?
很多语言像Node.js,采用回调的方式实现异步编程。Java的一些框架像Netty,自己扩展Java的Future接口,提供了addListener等多个扩展方法。
guava里面也提供了通用的扩展Future: ListenableFuture\SettableFuture以及辅助类Futures等,方便异步编程
Spring4.0也扩展了Futrue,提供了ListenableFuture来addCallback()采用回调函数的形式来提高整体异步性能~
关于ListenableFuture后面有写哦!
作为正统Java类库,是不是应该加点什么特性,可以加强一下自身库的功能?
JDK8引入中重磅类库:CompletableFuture
Java8里面新增加了一个包含50个方法左右的类:CompletableFuture. 提供了非常强大的Future的扩展功能,可以帮助简化异步编程的复杂性,提供了函数式编程能力,可以通过回调的方式计算处理结果,并且提供了转换和组织CompletableFuture的方法。
JDK1.8才新加入的一个实现类CompletableFuture,实现了Future, CompletionStage两个接口。
CompletableFuture实现了CompletionStage接口的如下策略:
- 为了完成当前的CompletableFuture接口或者其他完成方法的回调函数的线程,提供了非异步的完成操作。
- 没有显式入参Executor的所有async方法都使用ForkJoinPool.commonPool()为了简化监视、调试和跟踪,所有生成的异步任务都是标记接口AsynchronousCompletionTask的实例。
- 所有的CompletionStage方法都是独立于其他共有方法实现的,因此一个方法的行为不会受到子类中其他方法的覆盖
CompletableFuture实现了Futurre接口的如下策略:
- CompletableFuture无法直接控制完成,所以cancel操作被视为是另一种异常完成形式。方法isCompletedExceptionally可以用来确定一个CompletableFuture是否以任何异常的方式完成。
- 以一个CompletionException为例,方法get()和get(long,TimeUnit)抛出一个ExecutionException,对应CompletionException。为了在大多数上下文中简化用法,这个类还定义了方法join()和getNow,而不是直接在这些情况中直接抛出CompletionException。
CompletableFuture中4个异步执行任务静态方法:
public static <U> CompletableFuture<U> supplyAsync(Supplier<U> supplier) {
        return asyncSupplyStage(asyncPool, supplier);
    }

public static <U> CompletableFuture<U> supplyAsync(Supplier<U> supplier,Executor executor) {
    return asyncSupplyStage(screenExecutor(executor), supplier);
}

public static CompletableFuture<Void> runAsync(Runnable runnable) {
    return asyncRunStage(asyncPool, runnable);
}

public static CompletableFuture<Void> runAsync(Runnable runnable, Executor executor) {
    return asyncRunStage(screenExecutor(executor), runnable);
}
其中supplyAsync用于有返回值的任务,runAsync则用于没有返回值的任务。Executor参数可以手动指定线程池,否则默认ForkJoinPool.commonPool()系统级公共线程池,
注意:这些线程都是Daemon线程,主线程结束Daemon线程不结束,只有JVM关闭时,生命周期终止
主动完成计算
CompletableFuture 类实现了CompletionStage和Future接口,所以还是可以像以前一样通过阻塞或轮询的方式获得结果。尽管这种方式不推荐使用。
如下四个方法都可以获取结果:
public T 	get()  //Futrue的方法 阻塞
public T 	get(long timeout, TimeUnit unit) //Futrue的方法 阻塞
// 新提供的方法
public T 	getNow(T valueIfAbsent) //getNow有点特殊,如果结果已经计算完则返回结果或抛异常,否则返回给定的valueIfAbsent的值(此方法有点反人类有木有)
public T 	join() // 返回计算的结果或抛出一个uncheckd异常。 推荐使用
上面4个方法,推荐使用join,还有带超时时间的get方法
CompletableFuture并非一定要交给线程池执行才能实现异步,你可以像下面这样实现异步运行:
     public static void main(String[] args) throws ExecutionException, InterruptedException {
        CompletableFuture<String> completableFuture = new CompletableFuture();

        //自己开个线程去执行 执行完把结果告诉completableFuture即可
        new Thread(() -> {
            // 模拟执行耗时任务
            System.out.println("task doing...");
            try {
                Thread.sleep(3000);
            } catch (InterruptedException e) {
                e.printStackTrace();
            }
            // 告诉completableFuture任务已经完成 并且把结果告诉completableFuture
            completableFuture.complete("ok"); //这里把你信任的结果set进去后,所有阻塞的get()方法都能立马苏醒,获得到结果
        }).start();
        // 获取任务结果,如果没有完成会一直阻塞等待
        System.out.println("准备打印结果...");
        String result = completableFuture.get();
        System.out.println("计算结果:" + result);
    }
输出:
准备打印结果...
task doing...
计算结果:ok
如果没有意外,上面发的代码工作得很正常。但是,如果任务执行过程中产生了异常会怎样呢?如下:只加一句1/0的代码
 //自己开个线程去执行 执行完把结果告诉completableFuture即可
        new Thread(() -> {
            // 模拟执行耗时任务
            System.out.println("task doing...");
            try {
                Thread.sleep(3000);
                System.out.println(1 / 0);
            } catch (InterruptedException e) {
                e.printStackTrace();
            }
            // 告诉completableFuture任务已经完成 并且把结果告诉completableFuture
            completableFuture.complete("ok");
        }).start();
这种情况下会得到一个相当糟糕的结果:异常会被限制在执行任务的线程的范围内,最终会杀死该守护线程,而主线程,将永远永远阻塞了。
怎么解决呢?
- 使用get(long timeout, TimeUnit unit)代替get()方法,它使用一个超时参数来避免发生这样的情况。这是一种值得推荐的做法,我们应该尽量在你的代码中添加超时判断的逻辑,避免发生类似的问题。
使用这种方法至少能防止程序永久地等待下去,超时发生时,程序会得到通知发生了TimeoutException 。不过,也因为如此,你不能确定执行任务的线程内到底发生了什么问题(因此自己要做好权衡)。
- 更好的解决方案是:为了能获取任务线程内发生的异常,你需要使用
CompletableFuture的completeExceptionally方法将导致CompletableFuture内发生问题的异常抛出。这样,当执行任务发生异常时,调用get()方法的线程将会收到一个 ExecutionException异常,该异常接收了一个包含失败原因的Exception 参数。
    public static void main(String[] args) throws ExecutionException, InterruptedException {
        CompletableFuture<String> completableFuture = new CompletableFuture();

        //自己开个线程去执行 执行完把结果告诉completableFuture即可
        new Thread(() -> {
            // 模拟执行耗时任务
            System.out.println("task doing...");
            try {
                Thread.sleep(3000);
                System.out.println(1 / 0);
            //} catch (InterruptedException e) {
            } catch (Exception e) {
                // 告诉completableFuture任务发生异常了
                completableFuture.completeExceptionally(e);
                e.printStackTrace();
            }
            // 告诉completableFuture任务已经完成 并且把结果告诉completableFuture
            completableFuture.complete("ok");
        }).start();
        // 获取任务结果,如果没有完成会一直阻塞等待
        System.out.println("准备打印结果...");
        String result = completableFuture.get();
        System.out.println("计算结果:" + result);
    }
这样子,如果内部发生了异常,调用get方法的时候就能得到这个Exception,进而能拿到抛异常的原因了。
说明:若执行了
completableFuture.completeExceptionally(e);,那么completableFuture.get()它最终不是把异常获取出来了,而是给throw出来了,阻断主线程。(get()方法是用于获取正常返回值的)
使用案例
在Java8中,CompletableFuture提供了非常强大的Future的扩展功能,可以帮助我们简化异步编程的复杂性,并且提供了函数式编程的能力,可以通过回调的方式处理计算结果,也提供了转换和组合 CompletableFuture 的方法。
它可能代表一个明确完成的Future,也有可能代表一个完成阶段( CompletionStage ),它支持在计算完成以后触发一些函数或执行某些动作。
创建CompletableFuture
四个静态方法(如上),一个空构造函数
whenComplete计算结果完成时的处理
当CompletableFuture的计算结果完成,或者抛出异常的时候,我们可以执行特定的Action。主要是下面的方法:
public CompletableFuture<T> 	whenComplete(BiConsumer<? super T,? super Throwable> action)
public CompletableFuture<T> 	whenCompleteAsync(BiConsumer<? super T,? super Throwable> action)
public CompletableFuture<T> 	whenCompleteAsync(BiConsumer<? super T,? super Throwable> action, Executor executor)
public CompletableFuture<T>     exceptionally(Function<Throwable,? extends T> fn)
可以看到Action的类型是BiConsumer<? super T,? super Throwable>,它可以处理正常的计算结果,或者异常情况。
方法不以Async结尾,意味着Action使用相同的线程执行,而Async可能会使用其它的线程去执行(如果使用相同的线程池,也可能会被同一个线程选中执行)。
注意这几个方法都会返回CompletableFuture。
CompletableFuture.supplyAsync(() -> 100)
                .thenApplyAsync(i -> i * 10)
                .thenApply(i -> i.toString())
                .whenComplete((r, e) -> System.out.println(r + "_____" + e)); //1000_____null

        //若有异常
        CompletableFuture.supplyAsync(() -> 1 / 0)
                .thenApplyAsync(i -> i * 10)
                .thenApply(i -> i.toString())
                .whenComplete((r, e) -> System.out.println(r + "_____" + e)); //null_____java.util.concurrent.CompletionException: java.lang.ArithmeticException: / by zero
Main方法本地测试小细节:
假若我们直接通过这种方式,sleep个几秒:
    public static void main(String[] args) {
        CompletableFuture.supplyAsync(() -> 100)
                .thenApplyAsync(i -> {
                    try {
                        TimeUnit.SECONDS.sleep(5);
                        System.out.println("this my sleep time");
                    } catch (InterruptedException e) {
                        e.printStackTrace();
                    }
                    return i + 1;
                })
                .thenApply(i -> i.toString())
                .whenComplete((r, e) -> System.out.println(r + "_____" + e));
    }
发现控制台木有任何打印:

很多小伙伴就就开始打断点,发现断点都进不去。
根本原因:因为是异步执行的,所以主线程会线结束,JVM都退出了,自然异步线程也会死掉喽
解决方案:让main线程不这么快退出就行,自己测试的时候我们加上这么一句话就Ok了:
    public static void main(String[] args) throws InterruptedException {
    	...
    	// 让主线程等待 只要这个时间大于你异步线程的时间就成~~~
    	TimeUnit.SECONDS.sleep(20);
    }
Tips:对于web环境是不会存在此问题的,因为它的主线程一般情况下永远不会退出~~~~这里只是小伙伴在本地测试上需要注意的一个小细节~
handle、 thenApply相当于回调函数(callback) 当然也有转换的作用
public <U> CompletableFuture<U> 	handle(BiFunction<? super T,Throwable,? extends U> fn)
public <U> CompletableFuture<U> 	handleAsync(BiFunction<? super T,Throwable,? extends U> fn)
public <U> CompletableFuture<U> 	handleAsync(BiFunction<? super T,Throwable,? extends U> fn, Executor executor)


    public <U> CompletableFuture<U> thenApply(
        Function<? super T,? extends U> fn) {
        return uniApplyStage(null, fn);
    }

    public <U> CompletableFuture<U> thenApplyAsync(
        Function<? super T,? extends U> fn) {
        return uniApplyStage(asyncPool, fn);
    }

    public <U> CompletableFuture<U> thenApplyAsync(
        Function<? super T,? extends U> fn, Executor executor) {
        return uniApplyStage(screenExecutor(executor), fn);
    }
使用方式如下:
    public static void main(String[] args) {

        CompletableFuture.supplyAsync(() -> 100)
                .thenApplyAsync(i -> i * 10)
                .thenApply(i -> i.toString())
                .whenComplete((r, e) -> System.out.println(r + "_____" + e)); //1000_____null

        //若有异常
        CompletableFuture.supplyAsync(() -> 1 / 0)
                .thenApplyAsync(i -> i * 10)
                .thenApply(i -> i.toString())
                .whenComplete((r, e) -> System.out.println(r + "_____" + e)); //null_____java.util.concurrent.CompletionException: java.lang.ArithmeticException: / by zero

        //上面效果 或者下面这么写也行(但上面那么写 连同异常都可以处理) 全部匿名方式 效率高 代码也优雅
        //CompletableFuture<String> f = CompletableFuture.supplyAsync(() -> 100)
        //       .thenApplyAsync(i -> i * 10)
        //        .thenApply(i -> i.toString());
        //System.out.println(f.get()); //"1000"
    }
我们会发现,结合Java8的流式处理,简直绝配。代码看起来特别的优雅,关键还效率高,连异常都一下子给我们抓住了,简直完美。
thenApply与handle方法的区别在于handle方法会处理正常计算值和异常,因此它可以屏蔽异常,避免异常继续抛出。而thenApply方法只是用来处理正常值,因此一旦有异常就会抛出。
thenAccept与thenRun(纯消费(执行Action))
    public CompletableFuture<Void> thenAccept(Consumer<? super T> action) {
        return uniAcceptStage(null, action);
    }

    public CompletableFuture<Void> thenAcceptAsync(Consumer<? super T> action) {
        return uniAcceptStage(asyncPool, action);
    }

    public CompletableFuture<Void> thenAcceptAsync(Consumer<? super T> action,
                                                   Executor executor) {
        return uniAcceptStage(screenExecutor(executor), action);
    }

    public CompletableFuture<Void> thenRun(Runnable action) {
        return uniRunStage(null, action);
    }

    public CompletableFuture<Void> thenRunAsync(Runnable action) {
        return uniRunStage(asyncPool, action);
    }

    public CompletableFuture<Void> thenRunAsync(Runnable action,
                                                Executor executor) {
        return uniRunStage(screenExecutor(executor), action);
    }
- 可以看到,thenAccept和thenRun都是无返回值的。如果说thenApply是不停的输入输出的进行生产,那么thenAccept和thenRun就是在进行消耗。它们是整个计算的最后两个阶段。
- 同样是执行指定的动作,同样是消耗,二者也有区别:
thenAccept接收上一阶段的输出作为本阶段的输入
thenRun根本不关心前一阶段的输出,根本不不关心前一阶段的计算结果,因为它不需要输入参数(thenRun使用的是Runnable,若你只是单纯的消费,不需要启用线程时,就用thenRun更合适)
上面的方法是当计算完成的时候,会生成新的计算结果(thenApply, handle),或者返回同样的计算结果whenComplete。CompletableFuture还提供了一种处理结果的方法,只对结果执行Action,而不返回新的计算值,因此计算值为Void:
public static void main(String[] args) {
        CompletableFuture<Void> f = CompletableFuture.supplyAsync(() -> 100)
                .thenAccept(x -> System.out.println(x)); //100
        //如果此句话get不调用  也是能够输出100的 上面也会有输出的
        System.out.println(f.join()); //null 返回null,所以thenAccept是木有返回值的

        //thenRun的案例演示
        CompletableFuture<Void> f2 = CompletableFuture.supplyAsync(() -> 100)
                .thenRun(() -> System.out.println("不需要入参")); //不需要入参
        System.out.println(f2.join()); //null 返回null,所以thenRun是木有返回值的

    }
thenAcceptBoth以及相关方法提供了类似的功能,当两个CompletionStage都正常完成计算的时候,就会执行提供的action,它用来组合另外一个异步的结果。
runAfterBoth是当两个CompletionStage都正常完成计算的时候,执行一个Runnable,这个Runnable并不使用计算的结果。
public <U> CompletableFuture<Void> 	thenAcceptBoth(CompletionStage<? extends U> other, BiConsumer<? super T,? super U> action)
public <U> CompletableFuture<Void> 	thenAcceptBothAsync(CompletionStage<? extends U> other, BiConsumer<? super T,? super U> action)
public <U> CompletableFuture<Void> 	thenAcceptBothAsync(CompletionStage<? extends U> other, BiConsumer<? super T,? super U> action, Executor executor)
public     CompletableFuture<Void> 	runAfterBoth(CompletionStage<?> other,  Runnable action)
例子:
    public static void main(String[] args) {
        CompletableFuture<Void> f =  CompletableFuture.supplyAsync(() -> 100)
                // 第二个消费者:x,y显然是可以把前面几个的结果都拿到,然后再做处理
                .thenAcceptBoth(CompletableFuture.completedFuture(10), (x, y) -> System.out.println(x * y)); //1000
        System.out.println(f.join()); //null
    }
thenCombine、thenCompose整合两个计算结果
public <U,V> CompletableFuture<V> 	thenCombine(CompletionStage<? extends U> other, BiFunction<? super T,? super U,? extends V> fn)
public <U,V> CompletableFuture<V> 	thenCombineAsync(CompletionStage<? extends U> other, BiFunction<? super T,? super U,? extends V> fn)
public <U,V> CompletableFuture<V> 	thenCombineAsync(CompletionStage<? extends U> other, BiFunction<? super T,? super U,? extends V> fn, Executor executor)

public <U> CompletableFuture<U> 	thenCompose(Function<? super T,? extends CompletionStage<U>> fn)
public <U> CompletableFuture<U> 	thenComposeAsync(Function<? super T,? extends CompletionStage<U>> fn)
public <U> CompletableFuture<U> 	thenComposeAsync(Function<? super T,? extends CompletionStage<U>> fn, Executor executor)
先说:thenCompose
这一组方法接受一个Function作为参数,这个Function的输入是当前的CompletableFuture的计算值,返回结果将是一个新的CompletableFuture,这个新的CompletableFuture会组合原来的CompletableFuture和函数返回的CompletableFuture。
而下面的一组方法thenCombine用来复合另外一个CompletionStage的结果。它的功能类似:
两个CompletionStage是并行执行的,它们之间并没有先后依赖顺序,other并不会等待先前的CompletableFuture执行完毕后再执行。
其实从功能上来讲,它们的功能更类似thenAcceptBoth,只不过thenAcceptBoth是纯消费,它的函数参数没有返回值,而thenCombine的函数参数fn有返回值。
    public static void main(String[] args) {
        CompletableFuture<Integer> future = CompletableFuture.supplyAsync(() -> 100);
        CompletableFuture<String> future2 = CompletableFuture.supplyAsync(() -> "abc");
        CompletableFuture<String> f = future.thenCombine(future2, (x, y) -> y + "-" + x);
        System.out.println(f.join()); //abc-100
    }
因此,你可以根据方法的参数的类型来加速你的记忆。Runnable类型的参数会忽略计算的结果,Consumer是纯消费计算结果,BiConsumer会组合另外一个CompletionStage纯消费,Function会对计算结果做转换,BiFunction会组合另外一个CompletionStage的计算结果做转换。
Either:任意一个计算完了就可以执行
thenAcceptBoth和runAfterBoth是当两个CompletableFuture都计算完成,而我们下面要了解的方法是当任意一个CompletableFuture计算完成的时候就会执行。
public CompletableFuture<Void> 	acceptEither(CompletionStage<? extends T> other, Consumer<? super T> action)
public CompletableFuture<Void> 	acceptEitherAsync(CompletionStage<? extends T> other, Consumer<? super T> action)
public CompletableFuture<Void> 	acceptEitherAsync(CompletionStage<? extends T> other, Consumer<? super T> action, Executor executor)
public <U> CompletableFuture<U> 	applyToEither(CompletionStage<? extends T> other, Function<? super T,U> fn)
public <U> CompletableFuture<U> 	applyToEitherAsync(CompletionStage<? extends T> other, Function<? super T,U> fn)
public <U> CompletableFuture<U> 	applyToEitherAsync(CompletionStage<? extends T> other, Function<? super T,U> fn, Executor executor)
acceptEither方法是当任意一个CompletionStage完成的时候,action这个消费者就会被执行。这个方法返回CompletableFuture
applyToEither方法是当任意一个CompletionStage完成的时候,fn会被执行,它的返回值会当作新的CompletableFuture的计算结果。
下面这个例子有时会输出100,有时候会输出200,哪个Future先完成就会根据它的结果计算。
    public static void main(String[] args) {
        Random rand = new Random();
        CompletableFuture<Integer> future = CompletableFuture.supplyAsync(() -> {
            try {
                Thread.sleep(1000 + rand.nextInt(1000));
            } catch (InterruptedException e) {
                e.printStackTrace();
            }
            return 100;
        });
        CompletableFuture<Integer> future2 = CompletableFuture.supplyAsync(() -> {
            try {
                Thread.sleep(1000 + rand.nextInt(1000));
            } catch (InterruptedException e) {
                e.printStackTrace();
            }
            return 200;
        });
        CompletableFuture<String> f = future.applyToEither(future2, i -> i.toString());
        System.out.println(f.join()); //有时候输出100  有时候输出200
    }
辅助方法 allOf 和 anyOf
前面我们已经介绍了几个静态方法:completedFuture、runAsync、supplyAsync,下面介绍的这两个方法用来组合多个CompletableFuture。
public static CompletableFuture<Void> 	    allOf(CompletableFuture<?>... cfs)
public static CompletableFuture<Object> 	anyOf(CompletableFuture<?>... cfs)
allOf方法是当所有的CompletableFuture都执行完后执行计算。anyOf方法是当任意一个CompletableFuture执行完后就会执行计算,计算的结果返回
但是anyOf和applyToEither不同。anyOf接受任意多的CompletableFuture但是applyToEither只是判断两个CompletableFuture,anyOf返回值的计算结果是参数中其中一个CompletableFuture的计算结果,applyToEither返回值的计算结果却是要经过fn处理的。当然还有静态方法的区别,线程池的选择等
    public static void main(String[] args) {
        Random rand = new Random();
        CompletableFuture<Integer> future1 = CompletableFuture.supplyAsync(() -> {
            try {
                Thread.sleep(10000 + rand.nextInt(1000));
            } catch (InterruptedException e) {
                e.printStackTrace();
            }
            return 100;
        });
        CompletableFuture<String> future2 = CompletableFuture.supplyAsync(() -> {
            try {
                Thread.sleep(10000 + rand.nextInt(1000));
            } catch (InterruptedException e) {
                e.printStackTrace();
            }
            return "abc";
        });
        //CompletableFuture<Void> f =  CompletableFuture.allOf(future1,future2);
        CompletableFuture<Object> f = CompletableFuture.anyOf(future1, future2);
        System.out.println(f.join());
    }
通过上面的介绍,应该把CompletableFuture的方法和功能介绍完了(cancel、isCompletedExceptionally()、isDone()以及继承于Object的方法无需介绍了, toCompletableFuture()返回CompletableFuture本身)
CompletableFuture的同步回调和异步回调
CompletableFuture 根据任务的主从关系为:
- 提交任务的方法,如静态方法 supplyAsync(supplier[, executor]), runAsync(runnable[, executor])
-
回调函数,即对任务执行后所作出回应的方法,多数方法了,如 thenRun(action), thenRunAsync(action[, executor]), whenComplete(action), whenCompleteAsync(action[, executor]) 等
– 注意:每个方法都有带Async后缀和不带此后缀的方法(下面会说区别)
根据执行方法可分为同步与异步方法,任务都是要被异步执行(请注意:任务的执行都是异步的)。所以提交任务的方法都是异步的。而对任务作出回应的方法很多分为两个版本,如
- 同步回应,如 thenRun(action), whenComplete(action)
- 异步回应,如 thenRunAsync(action[, executor]), whenCompleteAsync(action[, executor]), 异步方法可以传入线程池,否则用默认的。可参考:理解 CompletableFuture 的任务与回调函数的线程 和 CompletableFuture的async后缀函数与不带async的函数的区别
更上一层楼(手写sequence方法)
如果用过Guava的Future类,就会知道它的Futures辅助类提供了很多便利方法,用来处理多个Future,而不像Java的CompletableFuture,只提供了allOf、anyOf两个方法。
比如有这样一个需求,将多个CompletableFuture组合成一个CompletableFuture,这个组合后的CompletableFuture的计算结果是个List,它包含前面所有的CompletableFuture的计算结果,guava的Futures.allAsList可以实现这样的功能,但是对于java CompletableFuture,我们需要一些辅助方法:
 /**
     * 可以把多个futures序列化起来  最终返回一个装载有结果的CompletableFuture即可  调用join方法就够了
     * 当然只能是同一类型哦(返回的结果)
     *
     * @param <T>     the type parameter
     * @param futures the futures
     * @return the completable future
     */
    public static <T> CompletableFuture<List<T>> sequence(List<CompletableFuture<T>> futures) {
        //通过allOf方法把所有的futures放到一起  返回Void
        CompletableFuture<Void> allDoneFuture = CompletableFuture.allOf(futures.toArray(new CompletableFuture[futures.size()]));
        //遍历把每一个futures通过join方法把结果拿到  最终给返回出去 并且是用CompletableFuture包装着的
        return allDoneFuture.thenApply(v -> futures.stream().map(CompletableFuture::join).collect(Collectors.<T>toList()));
    }
或者Java Future转CompletableFuture:
public static <T> CompletableFuture<T> toCompletable(Future<T> future, Executor executor) {
    return CompletableFuture.supplyAsync(() -> {
        try {
            return future.get();
        } catch (InterruptedException | ExecutionException e) {
            throw new RuntimeException(e);
        }
    }, executor);
}
使用案例:
    public static void main(String[] args) {
        CompletableFuture<Integer> future1 = CompletableFuture.supplyAsync(() -> {
            try {
                Thread.sleep(3000);
            } catch (InterruptedException e) {
                e.printStackTrace();
            }
            return 100;
        });
        CompletableFuture<Integer> future2 = CompletableFuture.supplyAsync(() -> {
            try {
                Thread.sleep(3000);
            } catch (InterruptedException e) {
                e.printStackTrace();
            }
            return 200;
        });
        CompletableFuture<List<Integer>> resultList = sequence(Arrays.asList(future1, future2));

        System.out.println(resultList.join()); //[100, 200]
    }
事实上,如果每个操作都很简单的话(比如:我们仅仅是getById()这种查询)没有必要用这种多线程异步的方式,因为创建线程还需要时间,还不如直接同步执行来得快。
事实证明,只有当每个操作很复杂需要花费相对很长的时间(比如,调用多个其它的系统的接口;比如,商品详情页面这种需要从多个系统中查数据显示的)的时候用CompletableFuture才合适,不然区别真的不大,还不如顺序同步执行。
CompletableFuture避坑
需要自定义线程池
CompletableFuture默认使用的线程池是 ForkJoinPool.commonPool(),commonPool是当前 JVM(进程) 上的所有 CompletableFuture、并行 Stream 共享的,commonPool 的目标场景是非阻塞的 CPU 密集型任务,其线程数默认为 CPU 数量减1,所以对于我们用java常做的IO密集型任务,默认线程池是远远不够使用的;在双核及以下机器上,默认线程池又会退化为为每个任务创建一个线程,相当于没有线程池。
以runAsync的代码举例,不指定线程池时,使用的是ASYNC_POOL,而这个ASYNC_POOL的大小,是根据 CPU 核数计算出来的(COMMON_PARALLELISM)如果COMMON_PARALLELISM小于1,USE_COMMON_POOL为false(此时ForkJoinPool.commonPool()不支持并发),直接退化为 ThreadPerTaskExecutor,每个任务新开一个线程。
关于ForkJoinPool.commonPool()查看这篇
下面是部分代码及注释,解释一下为何会这样。
这段用来计算ForkJoinPool.commonPool()的线程池大小的
static {
        // initialize field offsets for CAS etc
        try {
            U = sun.misc.Unsafe.getUnsafe();
            Class<?> k = ForkJoinPool.class;
            CTL = U.objectFieldOffset
                (k.getDeclaredField("ctl"));
            RUNSTATE = U.objectFieldOffset
                (k.getDeclaredField("runState"));
            STEALCOUNTER = U.objectFieldOffset
                (k.getDeclaredField("stealCounter"));
            Class<?> tk = Thread.class;
            PARKBLOCKER = U.objectFieldOffset
                (tk.getDeclaredField("parkBlocker"));
            Class<?> wk = WorkQueue.class;
            QTOP = U.objectFieldOffset
                (wk.getDeclaredField("top"));
            QLOCK = U.objectFieldOffset
                (wk.getDeclaredField("qlock"));
            QSCANSTATE = U.objectFieldOffset
                (wk.getDeclaredField("scanState"));
            QPARKER = U.objectFieldOffset
                (wk.getDeclaredField("parker"));
            QCURRENTSTEAL = U.objectFieldOffset
                (wk.getDeclaredField("currentSteal"));
            QCURRENTJOIN = U.objectFieldOffset
                (wk.getDeclaredField("currentJoin"));
            Class<?> ak = ForkJoinTask[].class;
            ABASE = U.arrayBaseOffset(ak);
            int scale = U.arrayIndexScale(ak);
            if ((scale & (scale - 1)) != 0)
                throw new Error("data type scale not a power of two");
            ASHIFT = 31 - Integer.numberOfLeadingZeros(scale);
        } catch (Exception e) {
            throw new Error(e);
        }

        commonMaxSpares = DEFAULT_COMMON_MAX_SPARES;
        defaultForkJoinWorkerThreadFactory =
            new DefaultForkJoinWorkerThreadFactory();
        modifyThreadPermission = new RuntimePermission("modifyThread");

        common = java.security.AccessController.doPrivileged
            (new java.security.PrivilegedAction<ForkJoinPool>() {
                public ForkJoinPool run() { return makeCommonPool(); }});
        int par = common.config & SMASK; // report 1 even if threads disabled
        commonParallelism = par > 0 ? par : 1;
    }
关键的来了
     // ForkJoinPool.commonPool()线程池大小为1或0,就不使用ForkJoinPool.commonPool()了
     private static final boolean useCommonPool =
        (ForkJoinPool.getCommonPoolParallelism() > 1);

    /**
     * Default executor -- ForkJoinPool.commonPool() unless it cannot
     * support parallelism.
     */
    private static final Executor asyncPool = useCommonPool ?
        ForkJoinPool.commonPool() : new ThreadPerTaskExecutor();

    // 为每个任务开一个线程的线程工厂
    /** Fallback if ForkJoinPool.commonPool() cannot support parallelism */
    static final class ThreadPerTaskExecutor implements Executor {
        public void execute(Runnable r) { new Thread(r).start(); }
    }

    /**
     * Returns a new CompletableFuture that is asynchronously completed
     * by a task running in the {@link ForkJoinPool#commonPool()} after
     * it runs the given action.
     *
     * @param runnable the action to run before completing the
     * returned CompletableFuture
     * @return the new CompletableFuture
     */
    public static CompletableFuture<Void> runAsync(Runnable runnable){
        return asyncRunStage(asyncPool, runnable);
    }
自定义线程池例子
        final Integer AVAILABLE_PROCESSORS = Runtime.getRuntime().availableProcessors();

        void com() throws InterruptedException {
        for (int i=0 ;i<10 ;i++) {
            // JDK 自带
            CompletableFuture.runAsync(() -> {
                try {
                    Thread.sleep(1000);
                } catch (InterruptedException e) {
                    e.printStackTrace();
                }
                log.info(Thread.currentThread().getName());
            }, new ThreadPoolExecutor(AVAILABLE_PROCESSORS, 3 * AVAILABLE_PROCESSORS,
                    10, TimeUnit.SECONDS,
                    new ArrayBlockingQueue<Runnable>(20),
                    Executors.defaultThreadFactory(),
                    new ThreadPoolExecutor.AbortPolicy()));
        }
        Thread.sleep(10000000);
    }
allOf()超时时间
allOf()超时时间不合理的后果,就是引发错误,可能导致OOM
 public static void main(String[] args) {
        List<CompletableFuture> futures = new ArrayList<>(3);
        CompletableFuture first = CompletableFuture.runAsync(() -> {
            try {
                Thread.sleep(5000);
                System.out.println("first");
            } catch (InterruptedException e) {
                e.printStackTrace();
            }
        }).exceptionally(e -> {
            e.printStackTrace();
            return null;
        });
        futures.add(first);
        Long startTime = System.currentTimeMillis();
        log.info("开始等待所有线程结束,时间:{}", startTime);
        try {
            CompletableFuture.allOf(futures.toArray(new CompletableFuture[0])).get(2000, TimeUnit.MILLISECONDS);
        } catch (Exception e) {
            log.error("等待所有线程结束发生异常:", e);
        } finally {
            Long endTime = System.currentTimeMillis();
            log.info("等待结束,时间:{}, 耗时:{}秒", startTime, (endTime-startTime)/1000);
            try {
                log.info(JSONObject.toJSONString(first));
            } catch (Exception e) {
                e.printStackTrace();
            }
        }
    }
输出结果
18:28:48.100 [main] INFO com.enmalvi.Spring_ListenableFuture.ListenableFuture - 开始等待所有线程结束,时间:1661509728099
18:28:51.107 [main] ERROR com.enmalvi.Spring_ListenableFuture.ListenableFuture - 等待所有线程结束发生异常:
java.util.concurrent.TimeoutException: null
	at java.util.concurrent.CompletableFuture.timedGet(CompletableFuture.java:1784)
	at java.util.concurrent.CompletableFuture.get(CompletableFuture.java:1928)
	at com.enmalvi.Spring_ListenableFuture.ListenableFuture.main(ListenableFuture.java:108)
18:28:51.108 [main] INFO com.enmalvi.Spring_ListenableFuture.ListenableFuture - 等待结束,时间:1661509728099, 耗时:3秒
18:28:51.150 [main] INFO com.enmalvi.Spring_ListenableFuture.ListenableFuture - {"cancelled":false,"completedExceptionally":false,"done":false,"numberOfDependents":1}可以看到,设置allof的等待时间(2s)比线程实际执行时间(5s)短,等待超时结束时,线程并没有被杀死,也没有被取消,也没有抛异常,这个线程继续运行着,直到正常结束。
这会有什么问题呢?
如果接口中存在这种代码,大量请求超时返回,但是实际子线程还在运行,接口又接收更多的请求,继续创建子线程(没有使用线程池)或者进入线程池排队,前者会导致 OOM,后者则会加剧接口超时(任务都在排队,等不到执行)导致接口乃至整个服务完全不可用。
实际代码中我们有很多io操作,一般都会设置超时时间(不设置的后果很严重),如果子线程中调用了这些方法,那么allof()方法的超时时间一定要大于最大的超时时间(如果有串行操作,还需要累加。
线程池的DiscardPolicy()导致整个程序卡死
CompletableFuture处理多线程任务时一般建议自定义线程池,线程池有个容量满了的处理策略:
ThreadPoolExecutor.DiscardPolicy()ThreadPoolExecutor.DiscardOldestPolicy()ThreadPoolExecutor.AbortPolicy()ThreadPoolExecutor.CallerRunsPolicy()
拒绝策略的介绍
开始使用jdk8的新API CompletableFuture 之后,CompletableFuture.allOf()方法或者get()方法等待所有CompletableFuture执行完时,如果采用丢弃策略(包括自定义的不抛异常),则allOf()方法和get()方法如果没有设置超时就会无限期的等待下去。
ListenableFuture
ListenableFuture 顾名思义可以监听Future,它是对java原生Future的扩展增强。我们知道Future表示一个异步计算任务,当任务完成时可以得到计算结果。如果我们希望一旦计算完就拿到结果展示给用户或者做另外的计算,就必须使用另一个线程不断的查询计算状态。这样做,代码复杂,而且效率底下。使用ListenableFuture guava帮我们检测Future是否完成了,如果完成了就自动调用回调函数,这样可以减少并发程序的复杂度。
这里的ListenableFuture是Spring提供的,当然Guava包上也有ListenableFuture,其实Spring是抄袭Guava的
我们都知道Future及其唯一实现类FutureTask的作用: 对于具体的Runnable或者Callable任务的执行结果进行取消、查询是否完成、获取结果。必要时可以通过get方法获取执行结果,该方法会阻塞直到任务返回结果。
但是有一些弊端:
它有可能已经完成了计算并返回结果,也有可能至今还没完成。 我们只能手动的判断时候处理完成,以及处理完成后,怎么做。比如:有结果对结果怎么处理?如果出现异常怎么处理?等等。
由此就引入了CompletableFuture和ListenableFuture
而CompletableFuture上面已经讲过了,这里就讲讲ListenableFuture
比较 ListenableFuture 与 Future
org.springframework.util.concurrent.ListenableFuture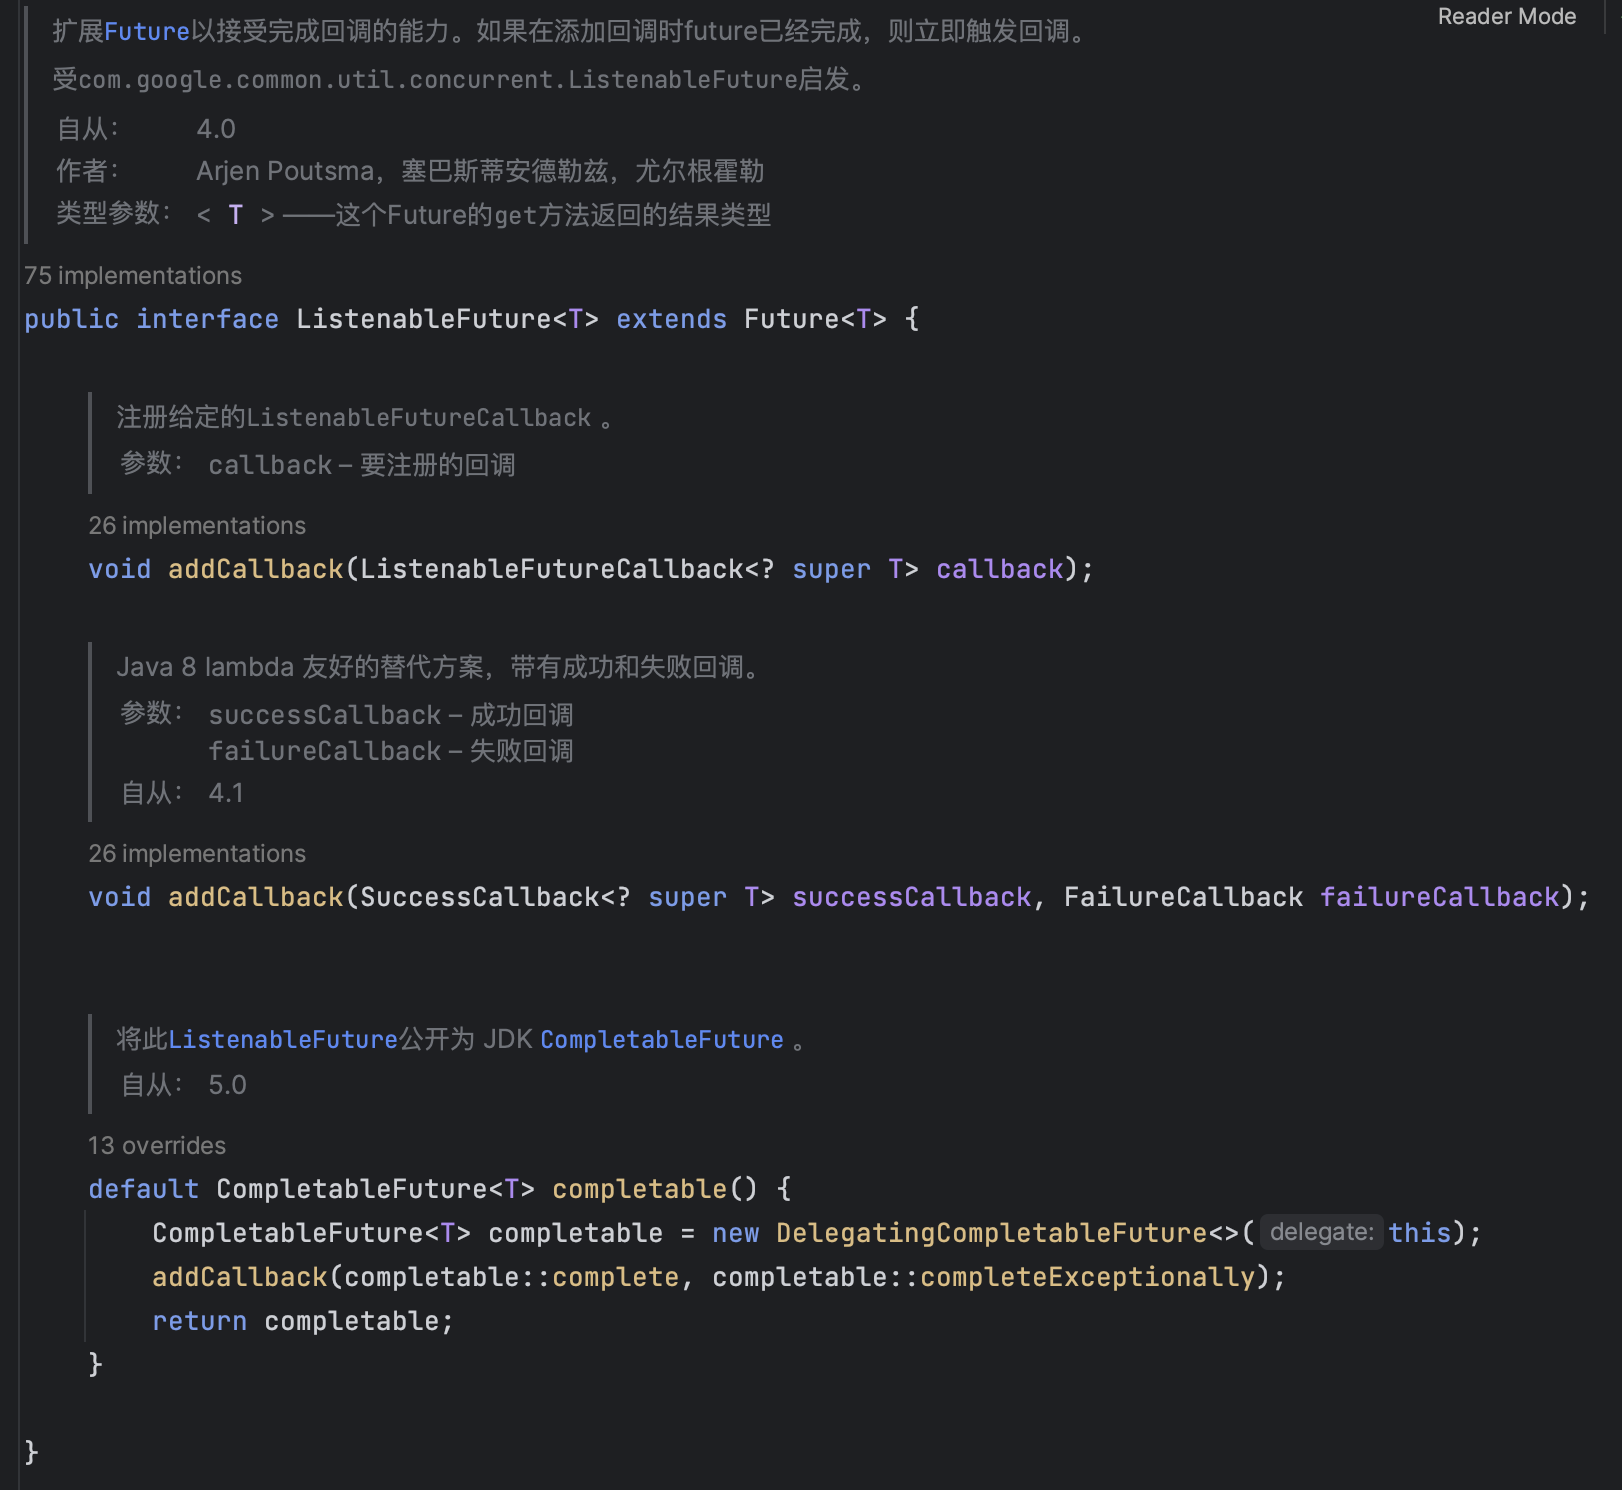
java.util.concurrent.Future这两个类最关键的在于ListenableFuture增加了回调函数
void addCallback(ListenableFutureCallback<? super T> callback);
void addCallback(SuccessCallback<? super T> successCallback, FailureCallback failureCallback);
其实在Spring上还有一个类ThreadPoolTaskExecutor,这个类是 Spring 在 ThreadPoolExecutor 的基础上进行了一层封装。ListenableFuture一般都是和ThreadPoolTaskExecutor搭配起来一起使用的。
java.util.concurrent.ThreadPoolExecutor
org.springframework.scheduling.concurrent.ThreadPoolTaskExecutor
相比 ThreadPoolExecutor,ThreadPoolTaskExecutor 增加了 submitListenable 方法,该方法返回 ListenableFuture 接口对象,该接口完全抄袭了 google 的 guava。
ListenableFuture 接口对象,增加了线程执行完毕后成功和失败的回调方法。从而避免了 Future 需要以阻塞的方式调用 get,然后再执行成功和失败的方法。
ThreadPoolTaskExecutor 中具体的初始化线程池方法如下:
@Override
	protected ExecutorService initializeExecutor(
			ThreadFactory threadFactory, RejectedExecutionHandler rejectedExecutionHandler) {

		BlockingQueue<Runnable> queue = createQueue(this.queueCapacity);

		ThreadPoolExecutor executor;
		if (this.taskDecorator != null) {
			executor = new ThreadPoolExecutor(
					this.corePoolSize, this.maxPoolSize, this.keepAliveSeconds, TimeUnit.SECONDS,
					queue, threadFactory, rejectedExecutionHandler) {
				@Override
				public void execute(Runnable command) {
					Runnable decorated = taskDecorator.decorate(command);
					if (decorated != command) {
						decoratedTaskMap.put(decorated, command);
					}
					super.execute(decorated);
				}
			};
		}
		else {
			executor = new ThreadPoolExecutor(
					this.corePoolSize, this.maxPoolSize, this.keepAliveSeconds, TimeUnit.SECONDS,
					queue, threadFactory, rejectedExecutionHandler);

		}

		if (this.allowCoreThreadTimeOut) {
			executor.allowCoreThreadTimeOut(true);
		}

		this.threadPoolExecutor = executor;
		return executor;
	}
如何使用 ThreadPoolTaskExecutor
public static void main(String[] args) throws Exception {
        /**
         * ThreadPoolExecutor 是 JDK 自带,ThreadPoolTaskExecutor 是 Spring 在 ThreadPoolExecutor 的基础上进行了一层封装。
         * 相比 ThreadPoolExecutor,ThreadPoolTaskExecutor 增加了 submitListenable 方法,该方法返回 ListenableFuture 接口对象,
         * 该接口完全抄袭了 google 的 guava。
         */
        ThreadPoolTaskExecutor executorService = new ThreadPoolTaskExecutor();
        executorService.setCorePoolSize(2);
        executorService.setMaxPoolSize(2);
        executorService.setKeepAliveSeconds(60);
        executorService.setQueueCapacity(Integer.MAX_VALUE);
        executorService.initialize();
        /**
         * 通过 new 获取 ThreadPoolTaskExecutor 对象
         * 通过 setCorePoolSize 等方法可以配置线程池相关参数
         * 最重要的是通过 initialize 方法完成线程池初始化,否则抛出:java.lang.IllegalStateException: ThreadPoolTaskExecutor not initialized 异常
         * 调用 submitListenable 方法返回 ListenableFuture 对象
         * 调用 ListenableFuture 对象的 addCallback 方法增加 成功和失败的回调处理
         * 其中成功的回调对象实现了 SuccessCallback 接口,其中的方法为:void onSuccess(T result)
         * 其中失败的回调对象实现了 FailureCallback 接口,其中的方法为:void onFailure(Throwable ex)
         */

        /**
         * ListenableFuture 接口继承 Future 接口,并增加了如下两个方法:
         * void addCallback(ListenableFutureCallback<? super T> callback);
         * void addCallback(SuccessCallback<? super T> successCallback, FailureCallback failureCallback);
         */

        /**
         * ListenableFuture 接口对象,增加了线程执行完毕后成功和失败的回调方法。
         * 从而避免了 Future 需要以阻塞的方式调用 get,然后再执行成功和失败的方法。
         */
        executorService.submitListenable(() -> {

            // 休息 5 秒,模拟工作的情况
            TimeUnit.SECONDS.sleep(5);
            // 通过抛出 RuntimeException 异常来模拟异常
            //throw new RuntimeException("出现异常");
            return true;

        }).addCallback(data -> log.info("success,result = {}", data), ex -> log.info("**异常信息**:{}"));
    }
ThreadPoolTaskExecutor 的 submitListenable 方法,传入一个 Runnable 或者 Callable 对象,实际上 Runnable 或者 Callable 对象被包装到 ListenableFutureTask 对象中,然后提交到 ExecutorService 对象,最后返回的是 ListenableFutureTask 对象,具体如下
	@Override
	public <T> ListenableFuture<T> submitListenable(Callable<T> task) {
		ExecutorService executor = getThreadPoolExecutor();
		try {
			ListenableFutureTask<T> future = new ListenableFutureTask<>(task);
			executor.execute(future);
			return future;
		}
		catch (RejectedExecutionException ex) {
			throw new TaskRejectedException("Executor [" + executor + "] did not accept task: " + task, ex);
		}
	}
在 ListenableFutureTask 中可以发现其继承了 FutureTask 对象并实现了 ListenableFuture 对象, 其中 FutureTask 对象中的 run 是最终线程执行的方法,具体如下
public void run() {
        if (state != NEW ||
            !UNSAFE.compareAndSwapObject(this, runnerOffset,
                                         null, Thread.currentThread()))
            return;
        try {
            Callable<V> c = callable;
            if (c != null && state == NEW) {
                V result;
                boolean ran;
                try {
                    result = c.call();
                    ran = true;
                } catch (Throwable ex) {
                    result = null;
                    ran = false;
                    setException(ex);
                }
                if (ran)
                    set(result);
            }
        } finally {
            // runner must be non-null until state is settled to
            // prevent concurrent calls to run()
            runner = null;
            // state must be re-read after nulling runner to prevent
            // leaked interrupts
            int s = state;
            if (s >= INTERRUPTING)
                handlePossibleCancellationInterrupt(s);
        }
    }
上面 run 方法中的 set 方法将线程的执行结果通知出去,在 set 方法中可以发现其调用了 finishCompletion 方法,finishCompletion 方法会一直循环判断线程池中的队列的任务是否执行完毕,一旦执行完毕就会调用 done 方法
ListenableFutureTask 重写了 done 方法, 在正常执行完毕的情况下通过 this.callbacks.success(result) 调用成功回调函数,在出现 InterruptedException 异常的情况下既不会调用 成功的回调,也不会调用失败的回调,其他类型的异常出现的时候才会通过 this.callbacks.failure(cause) 调用失败回调函数,ListenableFutureTask 中的 done 方法具体如下:
	@Override
	protected void done() {
		Throwable cause;
		try {
			T result = get();
			this.callbacks.success(result);
			return;
		}
		catch (InterruptedException ex) {
			Thread.currentThread().interrupt();
			return;
		}
		catch (ExecutionException ex) {
			cause = ex.getCause();
			if (cause == null) {
				cause = ex;
			}
		}
		catch (Throwable ex) {
			cause = ex;
		}
		this.callbacks.failure(cause);
}- 从上面的流程分析中,可以发现:因为
FutureTask中重写了 run 方法,所以才实现了线程执行完毕后可以执行回调方法,其中使用了模板方法设计模式。 - 模板方法设计模式的主要特点在于:在接口中定义方法,在抽象类中实现方法,并定义抽象方法,实现的方法中又调用抽象方法,最终的子类中重写抽象方法。
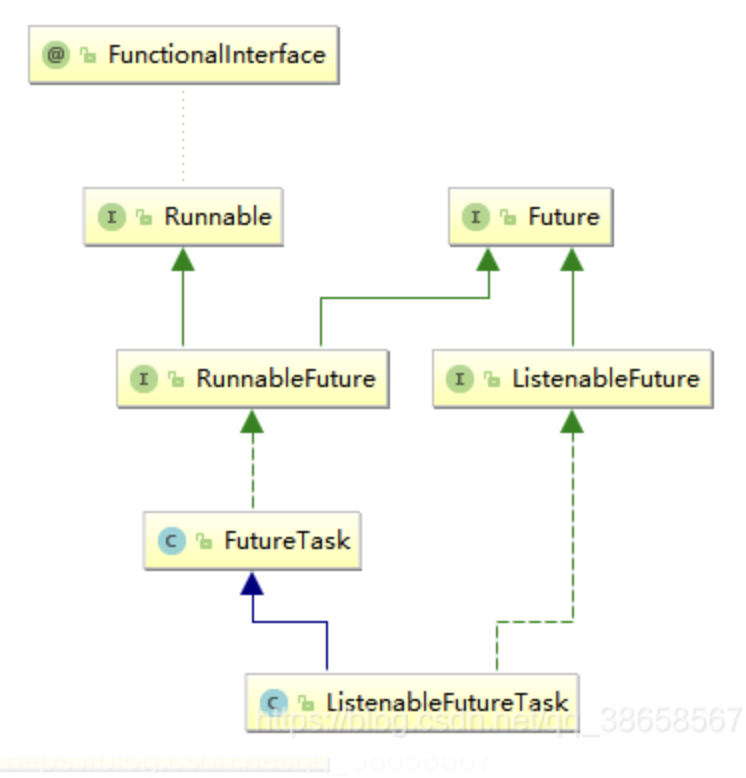
Runnable和ListenableFuture是接口,FutureTask是抽象类,ListenableFutureTask是最终的子类
ListenableFuture 的好处以及 Future 带来的阻塞问题
- ListenableFuture 相比 Future 是不需要知道 执行结果的情况下就可以将 成功或者失败的业务代码 通过回调的方式 预埋,带来的好处就是异步,不需要阻塞当前线程,从而可以提高系统的吞吐量;
- Future 需要通过 get() 方法阻塞当前线程,在获取线程的执行结果后再根据执行结果编写相关的业务代码;
例子来演示下:
通过 1 个线程,循环执行 10000 次,使用 submitListenable 方法
    public static void main(String[] args) {
        ThreadPoolTaskExecutor executorService = new ThreadPoolTaskExecutor();
        executorService.setCorePoolSize(1);
        executorService.setMaxPoolSize(1);
        executorService.initialize();

        long start = System.currentTimeMillis();
        for (int i = 0; i < 10000; i++) {
            ListenableFuture<Boolean> asyncResult = executorService.submitListenable(() -> {

                // 休息5毫秒,模拟执行
                TimeUnit.MILLISECONDS.sleep(5);
                //throw new RuntimeException("出现异常");
                return true;

            });
            asyncResult.addCallback(data -> {
                try {
                    // 休息3毫秒模拟获取到执行结果后的操作
                    TimeUnit.MILLISECONDS.sleep(3);
                } catch (Exception e) {
                    e.printStackTrace();
                }
            }, ex -> log.info("**异常信息**:{}"));
        }
        System.out.println(String.format("总结耗时:%s", System.currentTimeMillis() - start));
    }
通过测试3次,总计耗时在 30 – 60 毫秒之间
通过 1 个线程,循环执行 10000 次,使用 submit 方法和 Future 对象,具体如下:
public static void main(String[] args) {
    ThreadPoolTaskExecutor executorService = new ThreadPoolTaskExecutor();
    executorService.setCorePoolSize(1);
    executorService.setMaxPoolSize(1);
    executorService.initialize();

    long start = System.currentTimeMillis();
    for (int i = 0; i < 10000; i++) {
        Future<Boolean> future = executorService.submit(() -> {
            try {
                // 休息5毫秒,模拟执行
                TimeUnit.MILLISECONDS.sleep(5);
                return true;
            } catch (Exception e) {
                e.printStackTrace();
                return false;
            }
        });

        try {
            // 以阻塞的方式获取执行结果
            Boolean result = future.get();
            // logger.info(String.format("执行结果:%s", result));
            // 休息3毫秒模拟获取到执行结果后的操作
            TimeUnit.MILLISECONDS.sleep(3);
        } catch (Exception e) {
            e.printStackTrace();
        }

    }
    System.out.println(String.format("总结耗时:%s", System.currentTimeMillis() - start));
}
Future只是测试了一次,总结耗时:99377
