
阅读完需:约 5 分钟
还是根据授权码进行改造:
客户端信息我们是直接存储在内存中的,像下面这样:
    //客户端详细信息服务配置
    @Override
    public void configure(ClientDetailsServiceConfigurer clients) throws Exception {
        clients.inMemory()//在内存中
                //用户
                .withClient("xjh")
                //密码
                .secret(passwordEncoder.encode("123"))
                //资源编号
                .resourceIds("res1")
                //授权的赠款类型 authorization_code 授权码模式,refresh_token 刷新Token , implicit 简化模式 , password 密码模式 , 需要哪个模式就配置哪个模式
                .authorizedGrantTypes("authorization_code","refresh_token","implicit","password","client_credentials")
                //范围
                .scopes("all")
                //自动批准
                .autoApprove(true)
                //重定向Uris
                .redirectUris("http://localhost:8082/index.html","http://localhost:8082/password.html");
}然而在实际项目中,这种方式并不可取,一来客户端信息在代码中写死了,以后不好维护,而来我们的客户端信息可能量非常大,都写在代码里那你的代码该有多长呀(想象一下有多少第三方应用接入了微信登录)~
所以我们要将客户端信息存入数据库中。
客户端信息入库涉及到的接口主要是 ClientDetailsService,这个接口主要有两个实现类,如下:
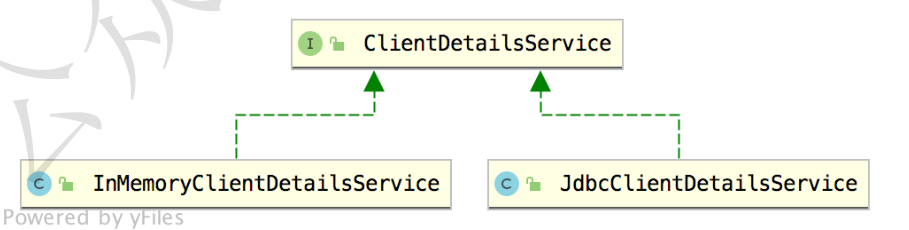
InMemoryClientDetailsService 就不多说了,这是存在内存中的。如果要存入数据库,很明显是JdbcClientDetailsService,我们来大概看下 JdbcClientDetailsService 的源码,就能分析出数据库的结构了:
public class JdbcClientDetailsService implements ClientDetailsService, ClientRegistrationService {
    private static final Log logger = LogFactory.getLog(JdbcClientDetailsService.class);
    private JdbcClientDetailsService.JsonMapper mapper = createJsonMapper();
    private static final String CLIENT_FIELDS_FOR_UPDATE = "resource_ids, scope, authorized_grant_types, web_server_redirect_uri, authorities, access_token_validity, refresh_token_validity, additional_information, autoapprove";
    private static final String CLIENT_FIELDS = "client_secret, resource_ids, scope, authorized_grant_types, web_server_redirect_uri, authorities, access_token_validity, refresh_token_validity, additional_information, autoapprove";
    private static final String BASE_FIND_STATEMENT = "select client_id, client_secret, resource_ids, scope, authorized_grant_types, web_server_redirect_uri, authorities, access_token_validity, refresh_token_validity, additional_information, autoapprove from oauth_client_details";
    private static final String DEFAULT_FIND_STATEMENT = "select client_id, client_secret, resource_ids, scope, authorized_grant_types, web_server_redirect_uri, authorities, access_token_validity, refresh_token_validity, additional_information, autoapprove from oauth_client_details order by client_id";
    private static final String DEFAULT_SELECT_STATEMENT = "select client_id, client_secret, resource_ids, scope, authorized_grant_types, web_server_redirect_uri, authorities, access_token_validity, refresh_token_validity, additional_information, autoapprove from oauth_client_details where client_id = ?";
    private static final String DEFAULT_INSERT_STATEMENT = "insert into oauth_client_details (client_secret, resource_ids, scope, authorized_grant_types, web_server_redirect_uri, authorities, access_token_validity, refresh_token_validity, additional_information, autoapprove, client_id) values (?,?,?,?,?,?,?,?,?,?,?)";
    private static final String DEFAULT_UPDATE_STATEMENT = "update oauth_client_details set " + "resource_ids, scope, authorized_grant_types, web_server_redirect_uri, authorities, access_token_validity, refresh_token_validity, additional_information, autoapprove".replaceAll(", ", "=?, ") + "=? where client_id = ?";
    private static final String DEFAULT_UPDATE_SECRET_STATEMENT = "update oauth_client_details set client_secret = ? where client_id = ?";
    private static final String DEFAULT_DELETE_STATEMENT = "delete from oauth_client_details where client_id = ?";
    private RowMapper<ClientDetails> rowMapper = new JdbcClientDetailsService.ClientDetailsRowMapper();
    private String deleteClientDetailsSql = "delete from oauth_client_details where client_id = ?";
    private String findClientDetailsSql = "select client_id, client_secret, resource_ids, scope, authorized_grant_types, web_server_redirect_uri, authorities, access_token_validity, refresh_token_validity, additional_information, autoapprove from oauth_client_details order by client_id";
    private String updateClientDetailsSql;
    private String updateClientSecretSql;
    private String insertClientDetailsSql;
    private String selectClientDetailsSql;
    private PasswordEncoder passwordEncoder;
    private final JdbcTemplate jdbcTemplate;
private JdbcListFactory listFactory;从这段简单的源码中,我们大概就能分析出表的结构
DROP TABLE IF EXISTS `oauth_client_details`;
CREATE TABLE `oauth_client_details` (
  `client_id` varchar(48) NOT NULL,
  `resource_ids` varchar(256) DEFAULT NULL,
  `client_secret` varchar(256) DEFAULT NULL,
  `scope` varchar(256) DEFAULT NULL,
  `authorized_grant_types` varchar(256) DEFAULT NULL,
  `web_server_redirect_uri` varchar(256) DEFAULT NULL,
  `authorities` varchar(256) DEFAULT NULL,
  `access_token_validity` int(11) DEFAULT NULL,
  `refresh_token_validity` int(11) DEFAULT NULL,
  `additional_information` varchar(4096) DEFAULT NULL,
  `autoapprove` varchar(256) DEFAULT NULL,
  PRIMARY KEY (`client_id`)
) ENGINE=InnoDB DEFAULT CHARSET=utf8;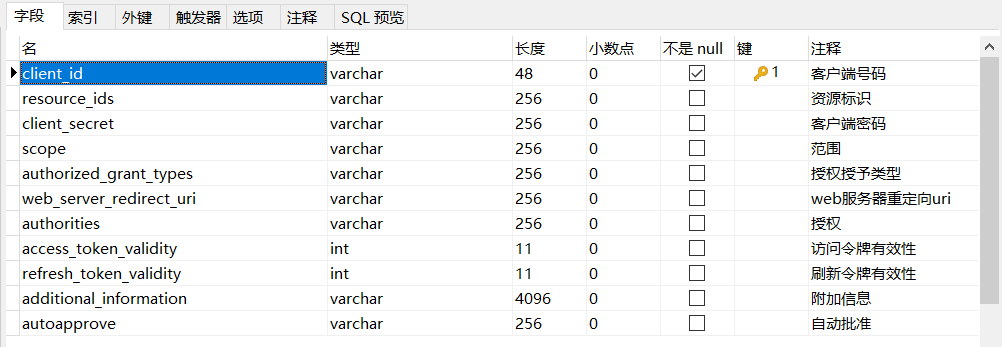
接下来我们将一开始定义的客户端的关键信息存入数据库中,如下:

既然用到了数据库,依赖当然也要提供相应的支持,我们给 auth-server 添加如下依赖:
        <dependency>
            <groupId>org.springframework.boot</groupId>
            <artifactId>spring-boot-starter-jdbc</artifactId>
        </dependency>

        <dependency>
            <groupId>mysql</groupId>
            <artifactId>mysql-connector-java</artifactId>
        </dependency>
然后在 application.properties 中配置一下数据库的连接信息:
spring.datasource.url=jdbc:mysql://127.0.0.1:3306/oauth2?useUnicode=true&characterEncoding=UTF-8&serverTimezone=Asia/Shanghai
spring.datasource.password=123
spring.datasource.username=root
spring.main.allow-bean-definition-overriding=true
这里的配置多了最后一条。这是因为我们一会要创建自己的 ClientDetailsService,而系统已经创建了ClientDetailsService,加了最后一条就允许我们自己的实例覆盖系统默认的实例。
要做改变的地方AuthorizationServerConfig文件:
接下来,我们来提供自己的实例即可:
    /**
      数据源
    */
    @Autowired
    DataSource dataSource;
    @Bean
    ClientDetailsService clientDetailsService(){
        return new JdbcClientDetailsService(dataSource);
    }
@Bean //授权服务器令牌服务
AuthorizationServerTokenServices tokenServices(){
//默认令牌服务
DefaultTokenServices services=new DefaultTokenServices();
//设置客户详细信息服务
services.setClientDetailsService(clientDetailsService()); // 替换成我们的实例 clientDetailsService
//设置支持刷新令牌
services.setSupportRefreshToken(true);
//设置令牌存储
services.setTokenStore(tokenStore);
//设置访问令牌有效性秒数 在数据库里查询了不需要
// services.setAccessTokenValiditySeconds(60*60*2);
//设置刷新令牌有效秒数 在数据库里查询了不需要
// services.setRefreshTokenValiditySeconds(60*60*24*7);
return services;
} //客户端详细信息服务配置
@Override
public void configure(ClientDetailsServiceConfigurer clients) throws Exception {
clients.withClientDetails(clientDetailsService()); //数据库查询
// clients.inMemory()//在内存中
// //用户
// .withClient("xjh")
// //密码
// .secret(passwordEncoder.encode("123"))
// //资源编号
// .resourceIds("res1")
// //授权的赠款类型 authorization_code 授权码模式,refresh_token 刷新Token , implicit 简化模式 , password 密码模式
// .authorizedGrantTypes("authorization_code","refresh_token","implicit","password","client_credentials")
// //范围
// .scopes("all")
// //自动批准
//// .autoApprove(true)
// //重定向Uris
// .redirectUris("http://localhost:8082/index.html","http://localhost:8082/password.html");
}配置完成后,重启 auth-server,走一遍第三方登录流程,和我们前面效果一样。
