
阅读完需:约 11 分钟
Ribbon
Ribbon 是 Netflix 开源的基于 HTTP 和 TCP 的客户端负载均衡器框架,目前也已被 Spring Cloud 团队集成在 spring-cloud-netflix 子项目下,主要用于客户端软负载功能,内部已实现了 随机、轮训、权重、减压(选取压力最小的) 等常见的负载算法,同时也提供了 ILoadBalance 与 IRule 两个接口方便我们自己编写适合自己的负载算法
- 负载均衡
- 容错
- 多协议(HTTP,TCP,UDP)支持异步和反应模型
- 缓存和批处理
中文文档:
https://www.springcloud.cc/spring-cloud-dalston.html#spring-cloud-ribbon
交互图:
Ribbon 模块
| 名 称 | 说 明 |
|---|---|
| ribbon-loadbalancer | 负载均衡模块,可独立使用,也可以和别的模块一起使用。 |
| Ribbon | 内置的负载均衡算法都实现在其中。 |
| ribbon-eureka | 基于 Eureka 封装的模块,能够快速、方便地集成 Eureka。 |
| ribbon-transport | 基于 Netty 实现多协议的支持,比如 HTTP、Tcp、Udp 等。 |
| ribbon-httpclient | 基于 Apache HttpClient 封装的 REST 客户端,集成了负载均衡模块,可以直接在项目中使用来调用接口。 |
| ribbon-example | Ribbon 使用代码示例,通过这些示例能够让你的学习事半功倍。 |
| ribbon-core | 一些比较核心且具有通用性的代码,客户端 API 的一些配置和其他 API 的定义。 |
Try
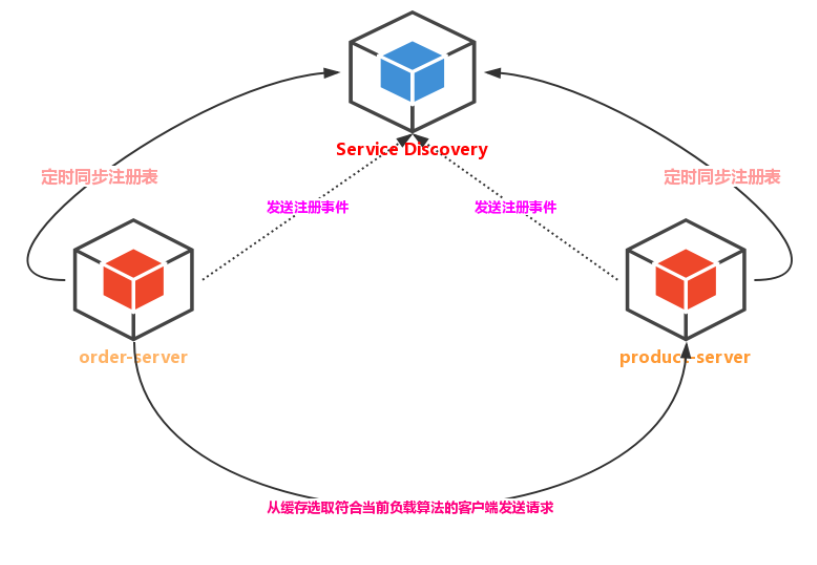
要尝试 Spring Cloud Ribbon 首要的就是准备一个服务注册中心,还不太清楚的可以在回头看看上一章 Eureka ,这里就不做过多赘述了,准备 eureka-server(回顾上一章)、product-server、order-server 三个项目,后面的两个可以理解为上一章的 eureka-client
详情参考相关笔记:
依赖
细心的小伙伴会发现,这和一个普通的 Eureka Client 也没啥区别啊,没任何额外依赖的,那是因为在 spring-cloud-starter-netflix-eureka-client 中已经帮我们依赖过 spring-cloud-starter-netflix-ribbon 了。假如使用 consul、zookeeper、etcd 等容器为服务发现为者时,就必须依赖 spring-cloud-starter-netflix-ribbon 包
<dependencies>
    <dependency>
        <groupId>org.springframework.boot</groupId>
        <artifactId>spring-boot-starter-web</artifactId>
    </dependency>
    <dependency>
        <groupId>org.springframework.cloud</groupId>
        <artifactId>spring-cloud-starter-netflix-eureka-client</artifactId>
    </dependency>
</dependencies>
配置文件
在 src/main/resources 目录下创建一个 bootstrap.yml 的文件,写上 eureka 相关配置信息
server:
  port: 7072
spring:
  application:
    name: order-server
eureka:
  instance:
    prefer-ip-address: true
    instance-id: ${spring.cloud.client.ip-address}:${spring.application.instance_id:${server.port}}
  client:
    service-url:
      defaultZone: http://localhost:7071/eureka/
主函数
各位小伙伴对 Spring Boot 中的 RestTemplate 应该都不陌生,它是由 Spring Boot 提供而不是 Spring Cloud ,无负载功能,为了方便开发者,Spring Cloud 团队提供了一个 @LoadBalanced 注解(默认采用轮训算法)
package com.battcn;

import org.springframework.boot.SpringApplication;
import org.springframework.boot.autoconfigure.SpringBootApplication;
import org.springframework.cloud.client.discovery.EnableDiscoveryClient;
import org.springframework.cloud.client.loadbalancer.LoadBalanced;
import org.springframework.context.annotation.Bean;
import org.springframework.context.annotation.Configuration;
import org.springframework.web.client.RestTemplate;

/**
 * @author Levin
 */
@EnableDiscoveryClient
@SpringBootApplication
public class OrderApplication {

    @Configuration
    class MyConfiguration {
        @LoadBalanced
        @Bean
        RestTemplate restTemplate() {
            return new RestTemplate();
        }
    }

    public static void main(String[] args) {
        SpringApplication.run(OrderApplication.class, args);
    }
}
控制器
客户端(order-server:7702)从 Eureka Server 同步了 product-server:7703 和 product-server:7704 这个时候它是如何知晓注册表中的信息呢?可以通过 DiscoveryClient ,通过它就可以获得注册表中客户端的信息了,下列代码块演示了 DiscoveryClient 的简单用法,更多 API 可以自行尝试
package com.battcn.controller;

import org.springframework.beans.factory.annotation.Autowired;
import org.springframework.cloud.client.ServiceInstance;
import org.springframework.cloud.client.discovery.DiscoveryClient;
import org.springframework.web.bind.annotation.GetMapping;
import org.springframework.web.bind.annotation.RequestMapping;
import org.springframework.web.bind.annotation.RestController;
import org.springframework.web.client.RestTemplate;

import java.util.List;

/**
 * @author Levin
 * @since 2018/9/28 0028
 */
@RestController
@RequestMapping("/orders")
public class OrderController {

    private final RestTemplate restTemplate;
    private final DiscoveryClient discoveryClient;

    @Autowired
    public OrderController(RestTemplate restTemplate, DiscoveryClient discoveryClient) {
        this.restTemplate = restTemplate;
        this.discoveryClient = discoveryClient;
    }

    @GetMapping
    public String query() {
        final List<String> services = discoveryClient.getServices();
        for (String service : services) {
            List<ServiceInstance> list = discoveryClient.getInstances(service);
            for (ServiceInstance instance : list) {
                System.out.println(instance.getUri() + "/" + service + " - " + instance.getServiceId());
            }
        }
        return restTemplate.getForObject("http://PRODUCT-SERVER/products", String.class);
    }
}有的人对上面的内容会存在一些疑问,为什么没有写 IP:PORT 了,而是写了一串字符,它是怎么做到的?
用通俗的概念来说,它就是编码与解码操作,还记得 Eureka Server UI 中 Application 吗?
编码:根据 spring.application.name 设置 serviceId
Server ID:PRODUCT-SERVER
Client A :http://localhost:7073/products
Client B :http://localhost:7074/products

解码:通过 serviceId 找到对应的客户端,
然后根据客户端配置的负载算法从对应集合中
找出符合当前算法条件的结果,最后拼接出相应的 http 地址即可

解码前:http://PRODUCT-SERVER/products
那么将 http://PRODUCT-SERVER 替换成 instance.getUri() 内容是不是就出来了
http://localhost:7073/products 和 http://localhost:7074/products
相关笔记:
常用配置
1. 禁用 Eureka
当我们在 RestTemplate 上添加 @LoadBalanced 注解后,就可以用服务名称来调用接口了,当有多个服务的时候,还能做负载均衡。
这是因为 Eureka 中的服务信息已经被拉取到了客户端本地,如果我们不想和 Eureka 集成,可以通过下面的配置方法将其禁用。
# 禁用 Eureka
ribbon.eureka.enabled=false
当我们禁用了 Eureka 之后,就不能使用服务名称去调用接口了,必须指定服务地址。
2. 配置接口地址列表
上面我们讲了可以禁用 Eureka,禁用之后就需要手动配置调用的服务地址了,配置如下:
# 禁用 Eureka 后手动配置服务地址
ribbon-config-demo.ribbon.listOfServers=localhost:8081,localhost:8083
这个配置是针对具体服务的,前缀就是服务名称,配置完之后就可以和之前一样使用服务名称来调用接口了。
3. 配置负载均衡策略
Ribbon 默认的策略是轮询,从我们前面讲解的例子输出的结果就可以看出来,Ribbon 中提供了很多的策略,这个在后面会进行讲解。我们通过配置可以指定服务使用哪种策略来进行负载操作。
4. 超时时间
Ribbon 中有两种和时间相关的设置,分别是请求连接的超时时间和请求处理的超时时间,设置规则如下:
# 请求连接的超时时间
ribbon.ConnectTimeout=2000
# 请求处理的超时时间
ribbon.ReadTimeout=5000

也可以为每个Ribbon客户端设置不同的超时时间, 通过服务名称进行指定:
ribbon-config-demo.ribbon.ConnectTimeout=2000
ribbon-config-demo.ribbon.ReadTimeout=5000
5. 并发参数
# 最大连接数
ribbon.MaxTotalConnections=500
# 每个host最大连接数
ribbon.MaxConnectionsPerHost=500
配置文件方式配置 Ribbon
除了使用代码进行 Ribbon 的配置,我们还可以通过配置文件的方式来为 Ribbon 指定对应的配置:
<clientName>.ribbon.NFLoadBalancerClassName: Should implement ILoadBalancer(负载均衡器操作接口)
<clientName>.ribbon.NFLoadBalancerRuleClassName: Should implement IRule(负载均衡算法)
<clientName>.ribbon.NFLoadBalancerPingClassName: Should implement IPing(服务可用性检查)
<clientName>.ribbon.NIWSServerListClassName: Should implement ServerList(服务列表获取)
<clientName>.ribbon.NIWSServerListFilterClassName: Should implement ServerListFilter(服务列表的过滤)自定义Ribbon客户端
警告:在FooConfiguration 中使用 @Configuration,需要注意是不是在@ComponentScan主应用程序上下文,否则会被所有的共享@RibbonClients。如果您使用@ComponentScan(或@SpringBootApplication)您需要采取措施避免它被包含(例如将其放在一个单独的,不重叠的包中,或者指定要在其中显式扫描的包@ComponentScan)。
简单点说就是:不要让 @ComponentScan 同时扫描到主程序和自定义的带有@Configuration的文件
FooConfiguration
@Configuration
public class FooConfiguration {
    @Bean
    public IRule ribbonRule(IClientConfig clientConfig) {
        return new RandomRule();
    }
}
BattcnCloudRibbonApplication
@SpringBootApplication
@EnableDiscoveryClient
@RestController
@RibbonClient(name = "battcn-cloud-hello",configuration = FooConfiguration.class)
public class BattcnCloudRibbonApplication  {

    @Bean
    @LoadBalanced
    RestTemplate restTemplate() {
        return new RestTemplate();
    }

    @GetMapping("/ribbon")
    public String findHelloByEmail(String email) {
        // VIP模式,不需要填写 IP+端口 Ribbon会去注册中心获取当前可用服务然后做HTTP请求
        return "server  <<==>>  "+restTemplate().getForObject("http://battcn-cloud-hello/hello?email="+email,String.class);
    }

    public static void main(String[] args) {
        SpringApplication.run(BattcnCloudRibbonApplication.class, args);
    }
}
直接使用Ribbon API
您也可以直接使用LoadBalancerClient。例:
public class MyClass {
    @Autowired
    private LoadBalancerClient loadBalancer;

    public void doStuff() {
        ServiceInstance instance = loadBalancer.choose("stores");
        URI storesUri = URI.create(String.format("http://%s:%s", instance.getHost(), instance.getPort()));
        // ... do something with the URI
    }
}
缓存Ribbon配置
每个Ribbon命名的客户端都有一个相应的子应用程序上下文,Spring Cloud维护,这个应用程序上下文在第一个请求中被延迟加载到命名的客户端。可以通过指定Ribbon客户端的名称,在启动时,可以更改此延迟加载行为,从而热切加载这些子应用程序上下文。
application.yml
ribbon:
  eager-load:
    enabled: true
    clients: client1, client2, client3
重试机制
在集群环境中,用多个节点来提供服务,难免会有某个节点出现故障。用 Nginx 做负载均衡的时候,如果你的应用是无状态的、可以滚动发布的,也就是需要一台台去重启应用,这样对用户的影响其实是比较小的,因为 Nginx 在转发请求失败后会重新将该请求转发到别的实例上去。
由于 Eureka 是基于 AP 原则构建的,牺牲了数据的一致性,每个 Eureka 服务都会保存注册的服务信息,当注册的客户端与 Eureka 的心跳无法保持时,有可能是网络原因,也有可能是服务挂掉了。
在这种情况下,Eureka 中还会在一段时间内保存注册信息。这个时候客户端就有可能拿到已经挂掉了的服务信息,故 Ribbon 就有可能拿到已经失效了的服务信息,这样就会导致发生失败的请求。
这种问题我们可以利用重试机制来避免。重试机制就是当 Ribbon 发现请求的服务不可到达时,重新请求另外的服务。
1. RetryRule 重试
解决上述问题,最简单的方法就是利用 Ribbon 自带的重试策略进行重试,此时只需要指定某个服务的负载策略为重试策略即可:
ribbon-config-demo.ribbon.NFLoadBalancerRuleClassName=com.netflix.loadbalancer.RetryRule2. Spring Retry 重试
除了使用 Ribbon 自带的重试策略,我们还可以通过集成 Spring Retry 来进行重试操作。
在 pom.xml 中添加 Spring Retry 的依赖,代码如下所示。
<dependency>
    <groupId>org.springframework.retry</groupId>
    <artifactId>spring-retry</artifactId>
</dependency>
配置重试次数等信息:
# 对当前实例的重试次数
ribbon.maxAutoRetries=1
# 切换实例的重试次数
ribbon.maxAutoRetriesNextServer=3
# 对所有操作请求都进行重试
ribbon.okToRetryOnAllOperations=true
# 对Http响应码进行重试
ribbon.retryableStatusCodes=500,404,502