
阅读完需:约 12 分钟
服务注册
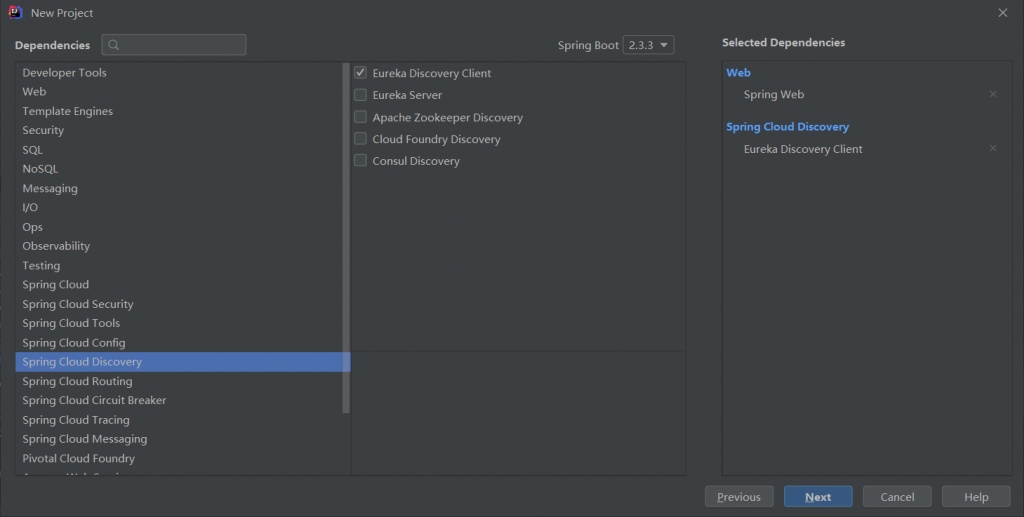
服务注册就是把一个微服务注册到 Eureka Server 上,这样,当其他服务需要调用该服务时,只需要从Eureka Server 上查询该服务的信息即可。这里我们创建一个 provider,作为我们的服务提供者,创建项目时,选择 Eureka Client 依赖,这样,当服务创建成功后,简单配置一下,就可以被注册到 Eureka Server 上了:
在微服务架构中,业务都会被拆分成一个独立的服务,服务之间的通讯是基于http restful的,Ribbon可以很好地控制HTTP和TCP客户端的行为,Spring Cloud有两种调用方式,一种是Ribbon+RestTemplate,另一种是Feign(集成Ribbon+Hystrix),本章主要讲解Ribbon
项目创建成功后,我们只需要在 application.yml 中配置一下项目的注册地址即可。注册地址的配置,和 Eureka Server 集群的配置很像。配置如下:
#服务的名称
spring:
  application:
    name:
      provider
#服务的端口号
server:
  port: 1113
#服务的地址
eureka:
  client:
    service-url:
      defaultZone: http://localhost:1111/eureka
三行配置,分别表示当前服务的名称、端口号以及服务地址。
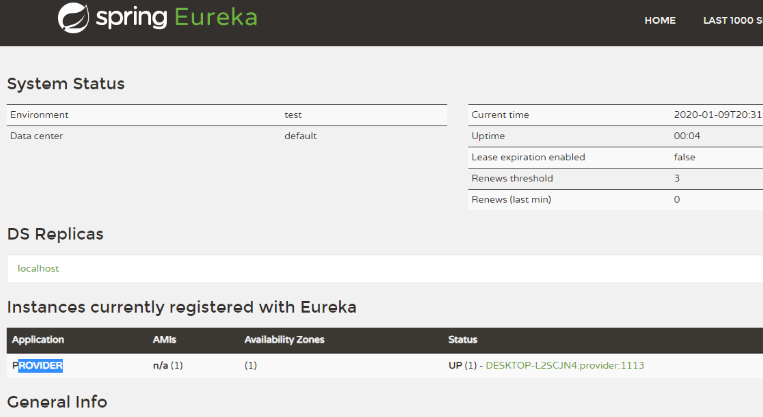
接下来,启动 Eureka Server,待服务注册中心启动成功后,再启动 provider。
两者都启动成功后,浏览器输入http://localhost:1111,就可以查看 provider 的注册信息:
@EnableDiscoveryClient与@EnableEurekaClient
启用服务注册与发现
@SpringBootApplication@EnableDiscoveryClientpublic class ProducerApplication {public static void main(String[] args) {
SpringApplication.run(ProducerApplication.class, args);}}
原本是要写上注解的!但是新版的cloud不需要写这个注解就可以找到注册中心!(那么如果我引入了相关的 jar 包又想禁用服务注册与发现怎么办?设置
eureka.client.enabled=false)
关于这两个注解的区别!
@EnableEurekaClient上有@EnableDiscoveryClient注解,可以说基本就是@EnableEurekaClient有@EnableDiscoveryClient的功能。二者的功能差不多,但是使用的场景有区别。
1、在注册中心为Eureka时,可以使用@EnableEurekaClient也可以使用@EnableDiscoveryClient
2、注册中心为不为Eureka时,比如consul、zookeeper等,只能使用@EnableDiscoveryClient
可见@EnableEurekaClient的使用场景有局限性。
服务消费
结构:
基本用法
首先在 provider 中提供一个接口,然后创建一个新的 consumer 项目,消费这个接口。在 provider 中,提供一个 hello 接口,如下:
@RestController
public class HelloController {
    @GetMapping("/hello")
    public String hello() {
        return "hello javaboy";
    }
}
接下来,创建一个 consumer 项目,consumer 项目中,去消费 provider 提供的接口。consumer 要能够获取到 provider 这个接口的地址,他就需要去 Eureka Server 中查询,如果直接在 consumer 中写死 provider 地址,意味着这两个服务之间的耦合度就太高了,我们要降低耦合度。首先我们来看一个写死的调用。
创建一个 consumer 项目,添加 web 和 eureka client 依赖
创建完成后,我们首先也在 application.yml 中配置
spring:
  application:
    name: consumer
server:
  port: 1115
#服务的地址
eureka:
  client:
    service-url:
      defaultZone: http://localhost:1111/eureka
配置完成后,假设我们现在想在 consumer 中调用 provider 提供的服务,我们可以直接将调用写死, 这样整个过程就不会涉及到Eureka service
    @GetMapping("/hello1")
    public String hello1() throws IOException {
        HttpURLConnection connection=null;
        URL url=new URL("http://localhost:1113/hello");
        connection= (HttpURLConnection) url.openConnection();
        if(connection.getResponseCode()==200){
            BufferedReader bufferedReader = new BufferedReader(new InputStreamReader(connection.getInputStream()));
            String s= bufferedReader.readLine();
            bufferedReader.close();
            return s;
        }
        return "error";
    }
这是一段利用了 HttpUrlConnection 来发起的请求,请求中 provider 的地址写死了,意味着 provider 和 consumer 高度绑定在一起,这个不符合微服务的思想。
要改造它,我们可以借助 Eureka Client 提供的 DiscoveryClient 工具,利用这个工具,我们可以根据服务名从 Eureka Server 上查询到一个服务的详细信息,改造后的代码如下:
    @Autowired
    DiscoveryClient discoveryClient;

    @GetMapping("/hello3")
    public String hello3() {
        List<ServiceInstance> list = discoveryClient.getInstances("provider");
        ServiceInstance instance = list.get(0);
        String host = instance.getHost();
        int port = instance.getPort();
        StringBuffer sb = new StringBuffer();
        sb.append("http://")
                .append(host)
                .append(":")
                .append(port)
                .append("/hello");
        HttpURLConnection con = null;
        try {
            URL url = new URL(sb.toString());
            con = (HttpURLConnection) url.openConnection();
            if (con.getResponseCode() == 200) {
                BufferedReader br = new BufferedReader(new InputStreamReader(con.getInputStream()));
                String s = br.readLine();br.close();return s;
            }
        } catch (MalformedURLException e) {
            e.printStackTrace();
        } catch (IOException e) {
            e.printStackTrace();
        }
        return "error";
    }
注意,DiscoveryClient 查询到的服务列表是一个集合,因为服务在部署的过程中,可能是集群化部署,集合中的每一项就是一个实例。
Spring Cloud Commons 提供的抽象
一开始 服务注册和客户发现抽象 都在DiscoveryClient 随着版本的变迁 服务注册被抽离出来
服务注册抽象
从 DiscoveryClient 中抽离出了 ServiceRegistry 抽象 作为服务注册抽象
客户发现抽象
DiscoveryClient 抽象 负责了 客户发现抽象
• 通过 @EnableDiscoveryClient 注解 去做服务的发现
提供了 LoadBalancerClient 负载均衡 抽象
自动向 Eureka 服务端注册
ServiceRegistry
使用 EurekaServiceRegistry 做Eureka 服务的注册
在 EurekaRegistration 保存注册信息 client 相关的内容
自动配置
EurekaClientAutoConfiguration
EurekaAutoServiceRegistration
• 通过 SmartLifecycle 实现 是spring当中 生命管理周期的一步
做了一个自动的waiter-service向 Eureka 注册的动作
这里我们可以稍微展示一下集群化部署 。
首先,修改 provider 中的 hello 接口:
@RestController
public class HelloController {
    @Value("${server.port}")
    Integer prot;
    @GetMapping("/hello")
    public String hello(){
        return "hello"+prot;
    }
}
一会会启动多个 provider 实例,多个 provider 实例的端口不同,为了区分调用时到底是哪一个provider 提供的服务,这里在接口返回值中返回端口。
修改完成后,对 provider 进行打包。provider 打包成功之后,我们在命令行启动两个 provider 实例:
java -jar provider-0.0.1-SNAPSHOT.jar --server.port=1113
java -jar provider-0.0.1-SNAPSHOT.jar --server.port=1116启动完成后,检查 Eureka Server 上,这两个 provider 是否成功注册上来。注册成功后,在 consumer 中再去调用 provider,DiscoveryClient 集合中,获取到的就不是一个实例了,而是两个实例。这里我们可以手动实现一个负载均衡:
//线性负载均衡
    int count = 0;
    @GetMapping("/hello3")
    public String hello3() {
        List<ServiceInstance> list = discoveryClient.getInstances("provider");
        ServiceInstance instance = list.get(0);
        String host = instance.getHost();
        int port = instance.getPort();
        StringBuffer sb = new StringBuffer();
        sb.append("http://")
                .append(host)
                .append(":")
                .append(port)
                .append("/hello");
        HttpURLConnection con = null;
        try {
            URL url = new URL(sb.toString());
            con = (HttpURLConnection) url.openConnection();
            if (con.getResponseCode() == 200) {
                BufferedReader br = new BufferedReader(new InputStreamReader(con.getInputStream()));
                String s = br.readLine();br.close();return s;
            }
        } catch (MalformedURLException e) {
            e.printStackTrace();
        } catch (IOException e) {
            e.printStackTrace();
        }
        return "error";
    }
在从集合中,获取数据时,通过一个小小举动,就可以实现线性负载均衡。
升级改造
从两个方面进行改造:
- HTTP 调用
- 负载均衡
Http 调用,我们使用 Spring 提供的 RestTemplate 来实现。首先,在当前服务中,提供一个 RestTemplate 的实例:
@SpringBootApplication
public class ConsumerApplication {
    public static void main(String[] args) {
        SpringApplication.run(ConsumerApplication.class, args);
    }
    @Bean
    RestTemplate restTemplateOne(){
        return new RestTemplate();
    }
}
然后,在 Http 调用时,不再使用 HttpUrlConnection,而是直接使用 RestTemplate。
    @Autowired
    RestTemplate restTemplate;
    @Autowired
    DiscoveryClient discoveryClient;
    @GetMapping("/hello2")
    public String hello2() throws IOException {
        List<ServiceInstance> provider = discoveryClient.getInstances("provider");
        ServiceInstance instance=provider.get(0);
        String host =instance.getHost();
        int port =instance.getPort();
        StringBuffer buffer=new StringBuffer();
        buffer.append("http://")
                .append(host)
                .append(":")
                .append(port)
                .append("/hello");
        String s = restTemplate.getForObject(buffer.toString(), String.class);
        return s;
    }
用 RestTemplate ,一行代码就实现了 Http 调用。接下来,使用 Ribbon 来快速实现负载均衡。首先,我们需要给 RestTemplate 实例添加一个 @LoadBalanced 注解,开启负载均衡:
    @LoadBalanced
    @Bean
    RestTemplate restTemplateOne(){
        return new RestTemplate();
    }
此时的 RestTemplate 就自动具备了负载均衡的功能。此时的调用代码如下:
    @Autowired
    @Qualifier("restTemplateOne")
    RestTemplate restTemplateOne;
    @GetMapping("/hello31")
    public String hello31 (){
        return restTemplate.getForObject("http://provider/hello",String.class);
    }
Java 中关于 Http 请求的工具实际上非常多,自带的 HttpUrlConnection,古老的 HttpClient,后起之秀 OkHttp 等,除了这些之外,还有一个好用的工具–RestTemplate,这是 Spring 中就开始提供的Http 请求工具。
使用 LoadBalancerClient
(@ LoadBalanced 就是给 RestTemplate 加上了LoadBalancerClient 的功能)具体看 RestTemplate 笔记!
从LoadBalancerClient接口的命名中,我们就知道这是一个负载均衡客户端的抽象定义,我们就看看如何使用 Spring Cloud 提供的负载均衡器客户端接口来实现服务的消费。
启动类:
初始化RestTemplate,用来发起 REST 请求。
@SpringBootApplication
public class EurekaConsumerApplication {

    @Bean
    public RestTemplate restTemplate() {
        return new RestTemplate();
    }

    public static void main(String[] args) {
        SpringApplication.run(EurekaConsumerApplication.class, args);
    }
}
Controller:
创建一个接口用来消费 provider 提供的接口:
@RequestMapping("/hello")
@RestController
public class HelloController {

    @Autowired
    private LoadBalancerClient client;

    @Autowired
    private RestTemplate restTemplate;

    @GetMapping("/")
    public String hello(@RequestParam String name) {
        name += "!";
        ServiceInstance instance = client.choose("provider");
        String url = "http://" + instance.getHost() + ":" + instance.getPort() + "/hello/?name=" + name;
        return restTemplate.getForObject(url, String.class);
    }

}可以看到这里,我们注入了LoadBalancerClient和RestTemplate,并在hello方法中,先通过loadBalancerClient的choose方法来负载均衡的选出一个eureka-producer的服务实例,这个服务实例的基本信息存储在ServiceInstance中,然后通过这些对象中的信息拼接出访问服务调用者的/hello/接口的详细地址,最后再利用RestTemplate对象实现对服务提供者接口的调用。
另外,为了在调用时能从返回结果上与服务提供者有个区分,在这里我简单处理了一下,name+="!",即服务调用者的 response 中会比服务提供者的多一个感叹号(!)。
关于 RestTemplate 的笔记:
负载均衡
在 Spring Cloud 中,实现负载均衡非常容易,只需要添加 @LoadBalanced 注解即可。只要添加了该注解,一个原本普普通通做 Rest 请求的工具 RestTemplate 就会自动具备负载均衡功能,这个是怎么实现的呢?
整体上来说,这个功能的实现就是三个核心点:
- 从 Eureka Client 本地缓存的服务注册信息中,选择一个可以调用的服
- 根据 1 中所选择的服务,重构请求 URL 地址
- 将 1、2 步的功能嵌入到 RestTemplate 中
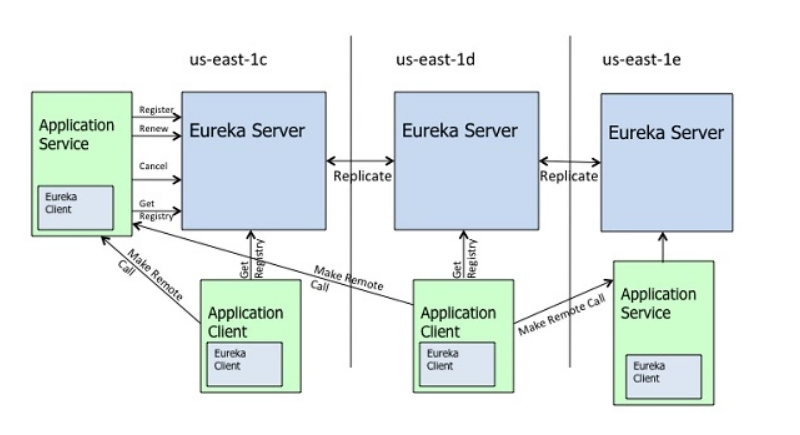
集群关系图:
补充:
前面讲了 RestTemplate , LoadBalancerClient 来进行负载均衡,还有第三种方式:Spring Cloud Feign
Spring Cloud Feign
在实际工作中,我们基本上都是使用 Feign 来完成调用的。我们通过一个例子来展现 Feign 如何方便的声明对 provider 服务的定义和调用。
创建一个基本的 Spring Boot 应用,命名为 provider ,在 pom.xml 中添加如下配置:
<dependency>
    <groupId>org.springframework.boot</groupId>
    <artifactId>spring-boot-starter-web</artifactId>
</dependency>
<dependency>
    <groupId>org.springframework.cloud</groupId>
    <artifactId>spring-cloud-starter-openfeign</artifactId>
</dependency>
<dependency>
    <groupId>org.springframework.cloud</groupId>
    <artifactId>spring-cloud-starter-netflix-eureka-client</artifactId>
</dependency> 在启动类上加上@EnableFeignClients
@EnableFeignClients
@SpringBootApplication
public class EurekaConsumerFeignApplication {

    public static void main(String[] args) {
        SpringApplication.run(EurekaConsumerFeignApplication.class, args);
    }
}
Feign 调用实现
创建一个 Feign 的客户端接口定义。使用@FeignClient注解来指定这个接口所要调用的服务名称,接口中定义的各个函数使用 Spring MVC 的注解就可以来绑定服务提供方的 REST 接口,比如下面就是绑定 provider 服务的/hello/接口的例子:
@FeignClient(name = "eureka-producer")
public interface HelloRemote {

    @GetMapping("/hello/")
    String hello(@RequestParam(value = "name") String name);

}
此类中的方法和远程服务中 Contoller 中的方法名和参数需保持一致。
Controller
修改 Controller,将 HelloRemote 注入到 controller 层,像普通方法一样去调用即可
@RequestMapping("/hello")
@RestController
public class HelloController {

    @Autowired
    HelloRemote helloRemote;

    @GetMapping("/{name}")
    public String index(@PathVariable("name") String name) {
        return helloRemote.hello(name + "!");
    }

}
通过 Spring Cloud Feign 来实现服务调用的方式非常简单,通过@FeignClient定义的接口来统一的声明我们需要依赖的微服务接口。而在具体使用的时候就跟调用本地方法一点的进行调用即可。由于 Feign 是基于 Ribbon 实现的,所以它自带了客户端负载均衡功能,也可以通过 Ribbon 的 IRule 进行策略扩展。另外,Feign 还整合的 Hystrix 来实现服务的容错保护 。
Feign 坑:
想使用 Feign,至少需要以下三个依赖
- spring-boot-starter-web
- spring-cloud-starter-openfeign
- spring-cloud-starter-netflix-eureka-client
