
阅读完需:约 7 分钟
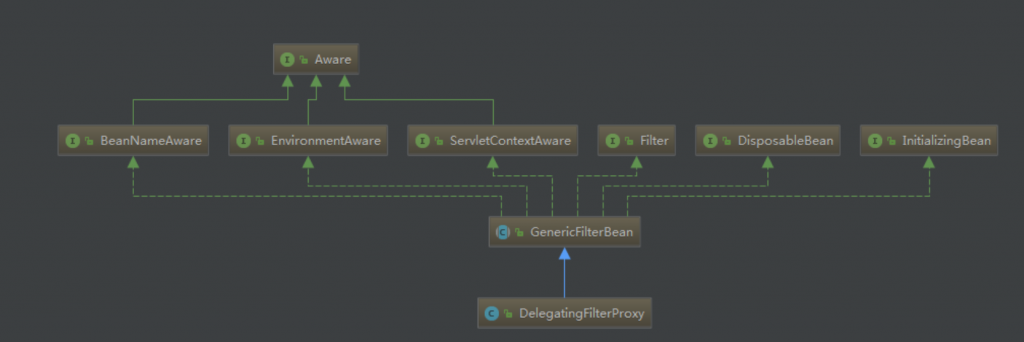
继承的关系:
作用:
DelegatingFilterProxy类存在与spring-web包中,其作用就是一个filter的代理,用这个类的好处是可以通过spring容器来管理filter的生命周期,还有就是,可以通过spring注入的形式,来代理一个filter执行,如shiro,下面会说到;有上图我们可以看到,DelegatingFilterProxy类继承GenericFilterBean,间接实现了Filter这个接口,故而该类属于一个过滤器。那么就会有实现Filter中init、doFilter、destroy三个方法。
Spring web在设计的时候考虑到某些功能的实现是通过Filter来拦截进行实现的,如果直接的简单的实现几个Filter好像也不是不可以(平时我们就是这么用的),但是Spring框架最核心的是IOC容器,和Spring框架最好的实现就是将要实现的Filter功能注册到IOC容器的一个Bean,这样就可以和Spring IOC容器进行完美的融合,所以Spring Web设计了DelegatingFilterProxy。
DelegatingFilterProxy ,在 Spring 中手工整合 Spring Session、Shiro 等工具时都离不开它。
原因:
Spring Security的web架构是完全基于标准的servlet过滤器的。它没有在内部使用servlet或任何其他基于servlet的框架(比如spring mvc),所以它没有与任何特定的web技术强行关联。 它只管处理HttpServletRequest和HttpServletResponse,不关心请求时来自浏览器,web服务客户端,HttpInvoker还是一个AJAX应用。
Spring Security维护了一个过滤器链,每个过滤器拥有特定的功能,过滤器需要服务也会对应添加和删除。过滤器的次序是非常重要的,它们之间都有依赖关系。 如果你已经使用了命名空间配置,过滤器会自动帮你配置, 你不需要定义任何SpringBean,但是有时候你需要完全控制Spring过滤器链,因为你使用了命名空间没有提供的特性,或者你需要使用你自己自定义的类。
当使用servlet过滤器时,你很需要在你的web.xml中声明它们, 它们可能被servlet容器忽略。在SpringSecurity,过滤器类也是定义在xml中的spring bean, 因此可以获得Spring的依赖注入机制和生命周期接口。
spring的DelegatingFilterProxy提供了在 web.xml和applicationcontext之间的联系。
当使用DelegatingFilterProxy,你会看到像web.xml文件中的这样内容:
<filter>
<filter-name>myFilter</filter-name>
<filter-class>org.springframework.web.filter.DelegatingFilterProxy</filter-class>
</filter>
<filter-mapping>
<filter-name>myFilter</filter-name>
<url-pattern>/*</url-pattern>
</filter-mapping> 注意这个过滤器其实是一个DelegatingFilterProxy,这个过滤器里没有实现过滤器的任何逻辑。DelegatingFilterProxy做的事情是代理Filter的方法,从application context里获得bean。这让bean可以获得spring web application context的生命周期支持,使配置较为轻便。bean必须实现javax.servlet.Filter接口,它必须和filter-name里定义的名称是一样的。查看DelegatingFilterProxy的javadoc获得更多信息。
原理:
首先我们看init方法,我们知道当filter初始化时会执行init方法,从源码中我们可以找到具体代码,该方法在GenericFilterBean类中实现,具体功能是,将该类封装成spring特有形式的类,方便spring维护,并且调用initFilterBean方法,该方法放在子类(DelegatingFilterProxy)实现,该方法主要目的是,找到在spring中维护的目标filter,具体实现看下面代码:
public final void init(FilterConfig filterConfig) throws ServletException {
        Assert.notNull(filterConfig, "FilterConfig must not be null");
        this.filterConfig = filterConfig;
       //将该类封装成spring特有的bean形式,方便spring维护
        PropertyValues pvs = new GenericFilterBean.FilterConfigPropertyValues(filterConfig, this.requiredProperties);
        if (!pvs.isEmpty()) {
            try {
                BeanWrapper bw = PropertyAccessorFactory.forBeanPropertyAccess(this);
                ResourceLoader resourceLoader = new ServletContextResourceLoader(filterConfig.getServletContext());
                Environment env = this.environment;
                if (env == null) {
                    env = new StandardServletEnvironment();
                }

                bw.registerCustomEditor(Resource.class, new ResourceEditor(resourceLoader, (PropertyResolver)env));
                this.initBeanWrapper(bw);
                bw.setPropertyValues(pvs, true);
            } catch (BeansException var6) {
                String msg = "Failed to set bean properties on filter '" + filterConfig.getFilterName() + "': " + var6.getMessage();
                this.logger.error(msg, var6);
                throw new NestedServletException(msg, var6);
            }
        }

    // 该方法在子类中实现,我们可以到DelegatingFilterPoxy中去看看,具体完成了那些工作?
  //1、找到要代理bean的id-->targetBeanName
  //2、在spring,bean容器中找到具体被代理的filter-->delegate

        this.initFilterBean();
        if (this.logger.isDebugEnabled()) {
            this.logger.debug("Filter '" + filterConfig.getFilterName() + "' configured for use");
        }

    }
initFilterBean()该方法主要完成两个功能:
1、找到被代理类在spring中配置的id并赋值给targetBeanName。
2、使用找到的id从spring容器中找到具体被代理的类,并赋值给delegate
  protected void initFilterBean() throws ServletException {
        synchronized(this.delegateMonitor) {
            if (this.delegate == null) {
                if (this.targetBeanName == null) {
                    //找到要被代理的filter在spring中配置的id
                    this.targetBeanName = this.getFilterName();
                }

                WebApplicationContext wac = this.findWebApplicationContext();
                if (wac != null) {
                     //找到具体被代理的filter
                    this.delegate = this.initDelegate(wac);
                }
            }

        }
    }
getFilterName()该方法的作用是,获取被代理的filter在spring中配置的id
    @Nullable
    protected String getFilterName() {
        //找到被代理filter在spring中配置的id
        return this.filterConfig != null ? this.filterConfig.getFilterName() : this.beanName;
    }
initDelegate()该方法的作用是,从spring容器中获取到具体被代理的filter
//找到被代理的filter
protected Filter initDelegate(WebApplicationContext wac) throws ServletException {
        String targetBeanName = this.getTargetBeanName();
        Assert.state(targetBeanName != null, "No target bean name set");
        Filter delegate = (Filter)wac.getBean(targetBeanName, Filter.class);
        if (this.isTargetFilterLifecycle()) {
            delegate.init(this.getFilterConfig());
        }

        return delegate;
    }
到这里我们可以看出来,我们要代理的filter其实就是我们配置filter中的filter-name标签中的filterName了
<filter-name>filterName</filter-name>
现在来看看doFilter方法具体实现,该方法主要是使用被代理的filter,并调用invokeDelegate方法
执行被代理filter的doFilter方法,具体实现,请看下面源码:
    public void doFilter(ServletRequest request, ServletResponse response, FilterChain filterChain) throws ServletException, IOException {
         // 得到被代理的filter
        Filter delegateToUse = this.delegate;
        if (delegateToUse == null) {
            synchronized(this.delegateMonitor) {
                delegateToUse = this.delegate;
                if (delegateToUse == null) {
                    WebApplicationContext wac = this.findWebApplicationContext();
                    if (wac == null) {
                        throw new IllegalStateException("No WebApplicationContext found: no ContextLoaderListener or DispatcherServlet registered?");
                    }

                    delegateToUse = this.initDelegate(wac);
                }

                this.delegate = delegateToUse;
            }
        }
         // 执行被代理filter的doFilter方法
        this.invokeDelegate(delegateToUse, request, response, filterChain);
    }
invokeDelegate方法的作用就是执行被代理filter的doFilter方法
    protected void invokeDelegate(Filter delegate, ServletRequest request, ServletResponse response, FilterChain filterChain) throws ServletException, IOException {
        delegate.doFilter(request, response, filterChain);
    }
运用:
注意<filter-name>中配置的name,以name为id在spring的bean配置中找得到对应的bean
<!-- Shiro Security filter-->
  <filter>
      <filter-name>shiroFilter</filter-name>
      <filter-class>org.springframework.web.filter.DelegatingFilterProxy</filter-class>
      <init-param>
          <param-name>targetFilterLifecycle</param-name>
          <param-value>true</param-value>
      </init-param>
  </filter>
  <filter-mapping>
      <filter-name>shiroFilter</filter-name>
      <url-pattern>/*</url-pattern>
      <dispatcher>REQUEST</dispatcher>
      <dispatcher>ERROR</dispatcher>
  </filter-mapping>
spring对于代理filter配置
<bean id="shiroFilter" class="com.auth.SpringShiroFilter"/>