
阅读完需:约 8 分钟
1.HandlerMapping
(PS:处理器即我们平时所见到的 Controller)
HandlerMapping ,中文译作处理器映射器,在 SpringMVC 中,系统提供了很多 HandlerMapping:
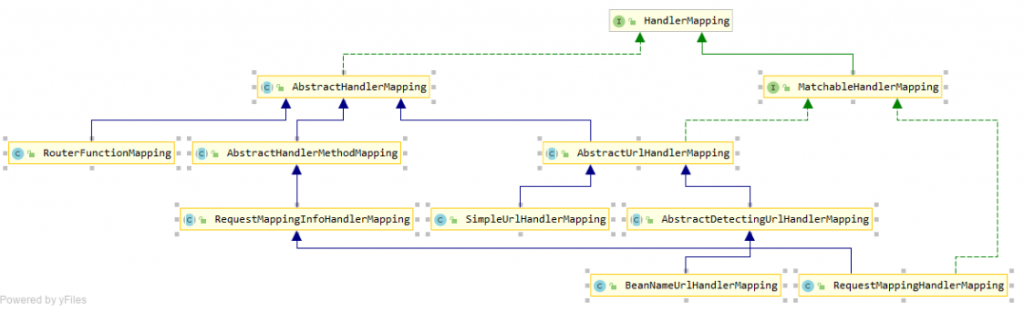
HandlerMapping 是负责根据 request 请求找到对应的 Handler 处理器及 Interceptor 拦截器,将它们封装在 HandlerExecutionChain 对象中返回给前端控制器。
BeanNameUrlHandlerMapping
BeanNameUrl 处理器映射器,根据请求的 url 与 Spring 容器中定义的 bean 的 name 进行匹配,从而从 Spring 容器中找到 bean 实例,就是说,请求的 Url 地址就是处理器 Bean 的名字。
这个 HandlerMapping 配置如下:
<bean class="org.springframework.web.servlet.handler.BeanNameUrlHandlerMapping" id="handlerMapping">
    <property name="beanName" value="/hello"/>
</bean>
写法2:

BeanNameUrlHandlerMapping.class(注册器映射器 bean节点的class属性中用到的,这种方式dean id属性必须要以“/”开头)
SimpleUrlHandlerMapping
SimpleUrlHandlerMapping 是 BeanNameUrlHandlerMapping 的增强版本,它可以将 url 和处理器 bean 的 id 进行统一映射配置:
<bean class="org.springframework.web.servlet.handler.SimpleUrlHandlerMapping" id="handlerMapping">
    <property name="mappings">
        <props>
            <prop key="/hello">myController</prop>
            <prop key="/hello2">myController2</prop>
        </props>
    </property>
</bean>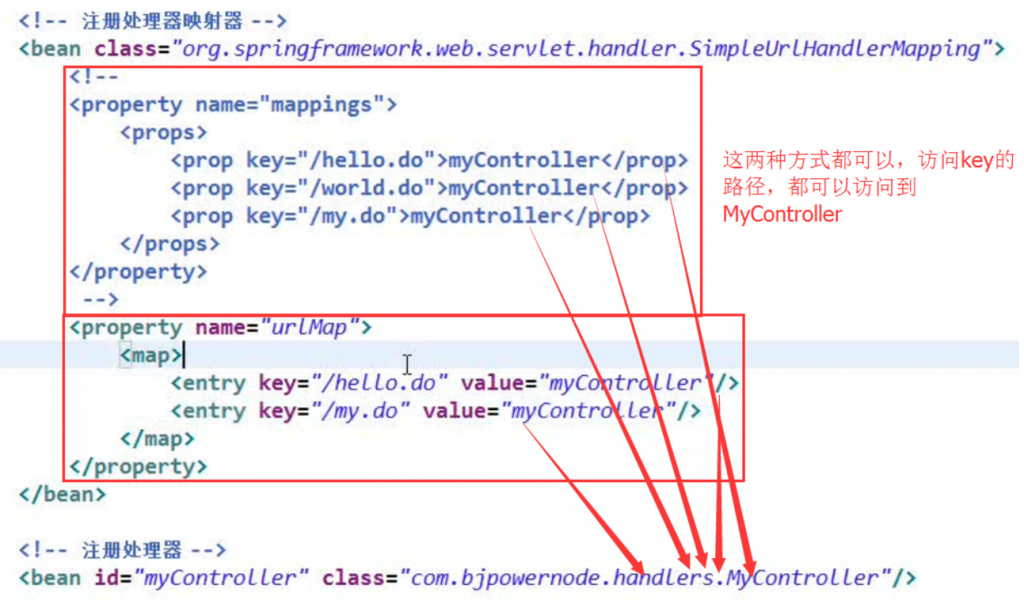
注意,在 props 中,可以配置多个请求路径和处理器实例的映射关系。
2.HandlerAdapter
HandlerAdapter,中文译作处理器适配器。
HandlerAdapter 会根据适配器接口对后端控制器进行包装(适配),包装后即可对处理器进行执行,通过扩展处理器适配器可以执行多种类型的处理器,这里使用了适配器设计模式。
在 SpringMVC 中,HandlerAdapter 也有诸多实现类:

SimpleControllerHandlerAdapter
SimpleControllerHandlerAdapter 简单控制器处理器适配器,所有实现了 org.springframework.web.servlet.mvc.Controller 接口的 Bean 通过此适配器进行适配、执行,也就是说,如果我们开发的接口是通过实现 Controller 接口来完成的(不是通过注解开发的接口),那么 HandlerAdapter 必须是 SimpleControllerHandlerAdapter。
<bean class="org.springframework.web.servlet.mvc.SimpleControllerHandlerAdapter" />HttpRequestHandlerAdapter
HttpRequestHandlerAdapter,http 请求处理器适配器,所有实现了 org.springframework.web.HttpRequestHandler 接口的 Bean 通过此适配器进行适配、执行。
例如存在如下接口:
@Controller
public class MyController2 implements HttpRequestHandler {
    public void handleRequest(HttpServletRequest request, HttpServletResponse response) throws ServletException, IOException {
        System.out.println("-----MyController2-----");
    }
}
<bean class="org.springframework.web.servlet.handler.SimpleUrlHandlerMapping" id="handlerMapping">
<property name="mappings">
<props>
<prop key="/hello2">myController2</prop>
</props>
</property>
</bean>
<bean class="org.springframework.web.servlet.mvc.HttpRequestHandlerAdapter" id="handlerAdapter"/>具体实践
- 组件自动扫描
web 开发中,我们基本上不再通过 XML 或者 Java 配置来创建一个 Bean 的实例,而是直接通过组件扫描来实现 Bean 的配置,如果要扫描多个包,多个包之间用 , 隔开即可:
<context:component-scan base-package="org.sang"/>- HandlerMapping
正常情况下,我们在项目中使用的是 RequestMappingHandlerMapping,这个是根据处理器中的注解,来匹配请求(即 @RequestMapping 注解中的 url 属性)。因为在上面我们都是通过实现类来开发接口的,相当于还是一个类一个接口,所以,我们可以通过 RequestMappingHandlerMapping 来做处理器映射器,这样我们可以在一个类中开发出多个接口。
- HandlerAdapter
对于上面提到的通过 @RequestMapping 注解所定义出来的接口方法,这些方法的调用都是要通过 RequestMappingHandlerAdapter 这个适配器来实现。
例如我们开发一个接口:
@Controller
public class MyController3 {
    @RequestMapping("/hello3")
    public ModelAndView hello() {
        return new ModelAndView("hello3");
    }
}
要能够访问到这个接口,我们需要 RequestMappingHandlerMapping 才能定位到需要执行的方法,需要 RequestMappingHandlerAdapter,才能执行定位到的方法,修改 springmvc 的配置文件如下:
<?xml version="1.0" encoding="UTF-8"?>
<beans xmlns="http://www.springframework.org/schema/beans"
       xmlns:xsi="http://www.w3.org/2001/XMLSchema-instance"
       xmlns:context="http://www.springframework.org/schema/context"
       xsi:schemaLocation="http://www.springframework.org/schema/beans http://www.springframework.org/schema/beans/spring-beans.xsd http://www.springframework.org/schema/context https://www.springframework.org/schema/context/spring-context.xsd">

    <context:component-scan base-package="org.javaboy.helloworld"/>

    <bean class="org.springframework.web.servlet.mvc.method.annotation.RequestMappingHandlerMapping" id="handlerMapping"/>
    <bean class="org.springframework.web.servlet.mvc.method.annotation.RequestMappingHandlerAdapter" id="handlerAdapter"/>
    <!--视图解析器-->
    <bean class="org.springframework.web.servlet.view.InternalResourceViewResolver" id="viewResolver">
        <property name="prefix" value="/jsp/"/>
        <property name="suffix" value=".jsp"/>
    </bean>
</beans>
然后,启动项目,访问 /hello3 接口,就可以看到相应的页面了。
- 继续优化
由于开发中,我们常用的是 RequestMappingHandlerMapping 和 RequestMappingHandlerAdapter ,这两个有一个简化的写法,如下:
<mvc:annotation-driven> 可以用这一行配置,代替 RequestMappingHandlerMapping 和 RequestMappingHandlerAdapter 的两行配置。
<?xml version="1.0" encoding="UTF-8"?>
<beans xmlns="http://www.springframework.org/schema/beans"
       xmlns:xsi="http://www.w3.org/2001/XMLSchema-instance"
       xmlns:context="http://www.springframework.org/schema/context"
       xmlns:mvc="http://www.springframework.org/schema/mvc"
       xsi:schemaLocation="http://www.springframework.org/schema/beans http://www.springframework.org/schema/beans/spring-beans.xsd http://www.springframework.org/schema/context https://www.springframework.org/schema/context/spring-context.xsd http://www.springframework.org/schema/mvc https://www.springframework.org/schema/mvc/spring-mvc.xsd">

    <context:component-scan base-package="org.javaboy.helloworld"/>

    <mvc:annotation-driven/>
    <!--视图解析器-->
    <bean class="org.springframework.web.servlet.view.InternalResourceViewResolver" id="viewResolver">
        <property name="prefix" value="/jsp/"/>
        <property name="suffix" value=".jsp"/>
    </bean>
</beans>
访问效果和上一步的效果一样。这是实际开发中,最终配置的形态。
关于 <mvc:annotation-driven> 补充:
有时候我们没有写这个 <mvc:annotation-driven > 程序还是可以运行没有报错这是为什么呢?
这个在springmvc选中的配置不是不是必须的。这个注解驱动主要是配置RequestMappingHandlerMapping和RequestMappingHandlerAdapter。但是springmvc容器启动是会加载默认的DefaultAnnotationHandlerMapping和AnnotationMethodHandlerAdapter如图:
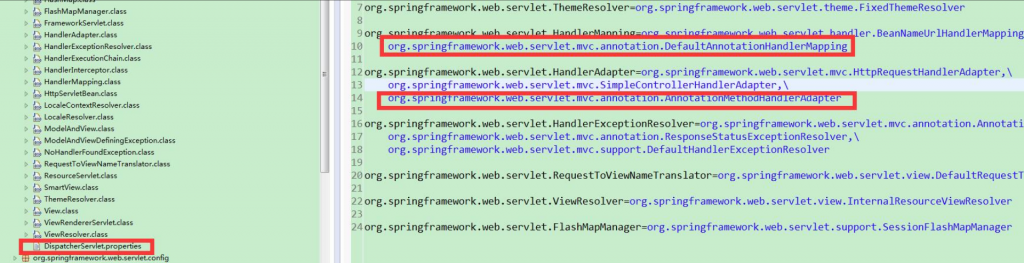
所以不配置也是不影响项目的启动的。但是这连个默认的方法又是过时的方法看源代码如图:

所以过时的方法虽然可用,但是我们一般会配置新的代替的方法。然后中又包含所代替的方法。所以不配置不会影响项目,但是我们一般都会配置。
最重要的前两个组件配置已包含在spring的默认配置文件中,所以可以不用配置也能正常运行。但spring一旦检测到用户配置了相关组件就不会再使用默认配置。
RequestMappingHandlerMapping
这个是项目中写jar包时遇到的问题,通过这个类解决!
关系梳理
- spring ioc 是spring的核心,用来管理spring bean的生命周期
- MVC 是一种使用 MVC(Model View Controller 模型-视图-控制器)设计创建 Web 应用程序的模式
- spring mvc 是spring的一个独立的模块,就像AOP一样
在spring mvc中把web框架和spring ioc融合在一起,是通过ContextLoaderListener监听servlet上下文的创建后来加载父容器完成的,然后通过配置一个servlet对象DispatcherServlet,在初始化DispatcherServlet时来加载具体子容器
关于我们今天要讲的RequestMappingHandlerMapping也是在DispatcherServlet的初始化过程中自动加载的,默认会自动加载所有实现HandlerMapping接口的bean,且我们可以通过serOrder来设置优先级,系统默认会加载RequestMappingHandlerMapping、BeanNameUrlHandlerMapping、SimpleUrlHandlerMapping 并且按照顺序使用
RequestMappingHandlerMapping实现了InitializingBean接口,在其初始化时执行afterPropertiesSet方法。在此方法中其遍历ApplicationContext中所有Bean,通过反射判断其类型Class上是否有@Controller或@RequestMapping注解。
若Class上有此类注解说明这个Bean是Controller。则执行detectHandlerMethods(beanName)方法,反射(clazz.getMethods())并遍历此Bean的Method[],通过反射method.getAnnotation(RequestMapping)判断并获取方法上标注的@RequestMapping配置信息。将@RequestMapping信息封装成RequestMappingInfo,将此method封装成HandlerMethod。注册到RequestMappingHandlerMapping的mappingRegistry中。
