
阅读完需:约 15 分钟
JUnit是一款优秀的开源Java单元测试框架,也是目前使用率最高最流行的测试框架,开发工具Eclipse和IDEA对JUnit都有很好的支持,JUnit主要用于白盒测试和回归测试。
- 白盒测试:把测试对象看作一个打开的盒子,程序内部的逻辑结构和其他信息对测试人
员是公开的; - 回归测试:软件或环境修复或更正后的再测试;
- 单元测试:最小粒度的测试,以测试某个功能或代码块。一般由程序员来做,因为它需要知道内部程序设计和编码的细节;
检测JUnit依赖
// SpringBoot2.2.X 以下
<dependency>
    <groupId>org.springframework.boot</groupId>
    <artifactId>spring-boot-starter-test</artifactId>
    <scope>test</scope>
</dependency>
简单的测试代码
@RunWith(SpringRunner.class)
@SpringBootTest
public class SimpleTest {
    @Test
    public void doTest() {
        int num = new Integer(1);
        Assert.assertEquals(num, 1);
    }
}
注解说明
- @RunWith:标识为JUnit的运行环境;
- @SpringBootTest:获取启动类、加载配置,确定装载Spring Boot;
- @Test:声明需要测试的方法;
- @BeforeClass:针对所有测试,只执行一次,且必须为static void;
- @AfterClass:针对所有测试,只执行一次,且必须为static void;
- @Before:每个测试方法前都会执行的方法;
- @After:每个测试方法前都会执行的方法;
- @Ignore:忽略方法;
超时测试
给Test设置timeout属性即可,时间单位为毫秒:
@Test(timeout = 1000)
断言测试
断言测试也就是期望值测试,是单元测试的核心也就是决定测试结果的表达式,Assert对象中的断言方法:
- Assert.assertEquals 对比两个值相等
- Assert.assertNotEquals 对比两个值不相等
- Assert.assertSame 对比两个对象的引用相等
- Assert.assertArrayEquals 对比两个数组相等
- Assert.assertTrue 验证返回是否为真
- Assert.assertFlase 验证返回是否为假
- Assert.assertNull 验证null
- Assert.assertNotNull 验证非null
@Test
public void doTest() {
    String[] string1 = {"1", "2"};
    String[] string2 = string1;
    String[] string3 = {"1", "2"};

    Assert.assertEquals(string1, string2);
    Assert.assertEquals(string2, string3);
    Assert.assertSame(string1, string2);
    Assert.assertSame(string2, string3); //验证不通过,string2、string3指向的引用不同
}
Web模拟测试
在Spring Boot项目里面可以直接使用JUnit对web项目进行测试,Spring 提供了“TestRestTemplate”对象,使用这个对象可以很方便的进行模拟请求。
Web测试只需要进行两步操作:
- 在@SpringBootTest注解上设置“ebEnvironment = SpringBootTest.WebEnvironment.RANDOM_PORT”随机端口;
- 使用TestRestTemplate进行post或get请求;
示例代码如下:
@RunWith(SpringRunner.class)
@SpringBootTest(webEnvironment = SpringBootTest.WebEnvironment.RANDOM_PORT)
public class UserControllerTest {
    @Autowired
    private TestRestTemplate restTemplate;
    @Test
    public void getName() {
        String name = restTemplate.getForObject("/name", String.class);
        System.out.println(name);
        Assert.assertEquals("Adam", name);
    }
}
其中getForObject的含义代表执行get请求,并返回Object结果,第二个参数设置返回结果为String类型,更多的请求方法:
- getForEntity:Get请求,返回实体对象(可以是集合);
- postForEntity:Post请求,返回实体对象(可以是集合);
- postForObject:Post请求,返回对象;
数据库测试
在测试数据操作的时候,我们不想让测试污染数据库,也是可以实现的,只需要添加给测试类上添加“@Transactional”即可,这样既可以测试数据操作方法,又不会污染数据库了。
示例代码如下:
@Test
@Transactional
public void saveTest() {
    User user = new User();
    user.setName("Adam");
    user.setAge(19);
    user.setPwd("123456");
    userRepository.save(user);
    System.out.println("userId:" + user.getId());
    Assert.assertTrue(user.getId()>0);
}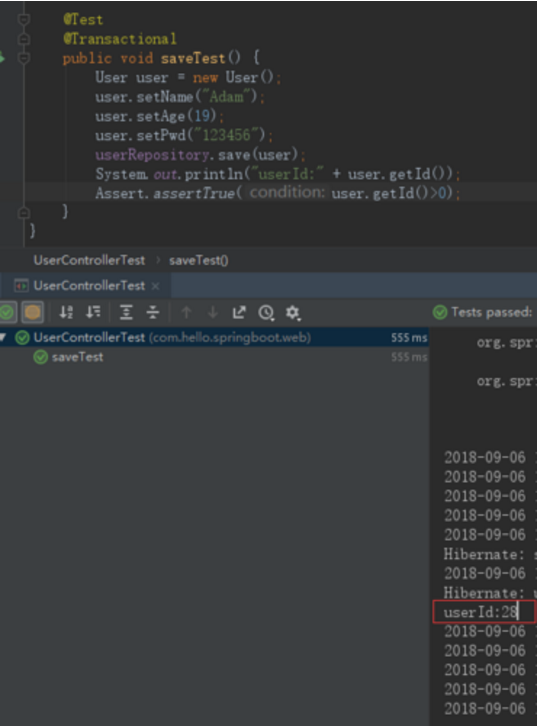
我们可以看到Id有了,也测试通过了,说明数据是添加是正常的,但查看数据库发现数据里面是没有这条数据的。
如果把“@Transactional”去掉的话,数据库就会正常插入了。
更多内容:
JUnit 5
在Spring Boot 2.2.X以后使用Junit5
import org.junit.jupiter.api.Test;
在Spring Boot 2.2.x之前使用Junit4
import org.junit.Test;Spring Boot 2.2.X之后的Junit5
<dependency>
    <groupId>org.springframework.boot</groupId>
    <artifactId>spring-boot-starter-test</artifactId>
    <scope>test</scope>
    <exclusions>
        <exclusion>
            <groupId>org.junit.vintage</groupId>
            <artifactId>junit-vintage-engine</artifactId>
        </exclusion>
    </exclusions>
</dependency>
Junit5测试类
import org.junit.jupiter.api.Test;
import org.springframework.boot.test.context.SpringBootTest;
@SpringBootTest
class DemoApplicationTests {
    @Test
    void contextLoads() {
    }
}
Spring Boot 2.2.X之前的Junit4
<dependency>
    <groupId>org.springframework.boot</groupId>
    <artifactId>spring-boot-starter-test</artifactId>
    <scope>test</scope>
</dependency>
Junit4测试类
import org.junit.Test;
import org.junit.runner.RunWith;
import org.springframework.boot.test.context.SpringBootTest;
import org.springframework.test.context.junit4.SpringRunner;
@RunWith(SpringRunner.class)
@SpringBootTest
public class Demo1ApplicationTests {
    @Test
    public void contextLoads() {
    }
}
JUnit5在先前版本上演化出来,功能改进和提供新特性,为了更好的服务于测试。一般使用而言:只需更新依赖项即可。
JUnit5提供了Vintage库运行JUnit4的测试而无需对测试用例做任何修改。
junit-vintage-engine 是 JUnit 4 中使用的测试引擎
junit-jupiter-engine 是 JUnit 5 中使用的测试引擎
- 使用了java语言高版本的特性,如lambda函数。使得测试更强大也更易于维护;
- 为描述、组织、执行测试添加了一些非常有用的新特性,例如,测试可以获得更好的显示名称,并且可以分层组织;
- 按照特性分成独立的依赖包,使用中只需导入需要的特性依赖即可,如使用Maven和Gradle构建的工程,导入依赖是很方便的;
- 可以同时使用多个扩展,而JUnit4一次只能使用一个runner,这意味着可以很容易的将Spring扩展和其他扩展结合起来;
从JUnit4切换到JUnit5不是很麻烦,对不使用新特性而言,一般无需对旧的测试用例做多少更改,切换步骤如下:
- 更新依赖项(maven或gradle的配置文件),注意要保留
junit-vintage-engine依赖以运行JUnit4的测试用例; - 新的测试用例可以使用JUnit5构建编写了;
JUnit 5 = JUnit Platform + JUnit Jupiter + JUnit Vintage
JUnit Platform: Junit Platform是在JVM上启动测试框架的基础,不仅支持Junit自制的测试引擎,其他测试引擎也都可以接入。
JUnit Jupiter: JUnit Jupiter提供了JUnit5的新的编程模型,是JUnit5新特性的核心。内部 包含了一个测试引擎,用于在Junit Platform上运行。
JUnit Vintage: 由于JUint已经发展多年,为了照顾老的项目,JUnit Vintage提供了兼容JUnit4.x,Junit3.x的测试引擎。

主要区别
注解
注解@Test不再有参数,参数移到方法体中。
如JUnit4中测试预期抛出异常样例:
@Test(expected = Exception.class)
public void testThrowsException() throws Exception {
    // ...
}
在JUnit5中,使用如下:
@Test
void testThrowsException() throws Exception {
    Assertions.assertThrows(Exception.class, () -> {
        //...
    });
}
同样的,常用参数timeout在JUnit4中如下:
@Test(timeout = 10)
public void testFailWithTimeout() throws InterruptedException {
    Thread.sleep(100);
}
在JUnit5中,使用如下:
@Test
void testFailWithTimeout() throws InterruptedException {
    Assertions.assertTimeout(Duration.ofMillis(10), () -> Thread.sleep(100));
}
常用注解变动如下:

@Rule 和 @ClassRule 使用 @ExtendWith 和 @RegisterExtension 替代。
断言
JUnit5中断言路径是org.junit.jupiter.api.Assertions。多数常见断言,如assertEquals(),assertNotNull(),虽然看起来没变,但是存在一些变动:
- 参数中错误信息移到最后,如
assertEquals("error msg", 1, 2)变成assertEquals(1, 2, "error msg") - 多数断言支持lambda形式的错误信息,在断言失败的时候调用;
-
assertTimeout()和assertTimeoutPreemptively()取代JUnit4中的@Timeout注解(JUnit5中的@Timeout注解功能作用和JUnit4中的@Timeout是不一样的).
JUnit5提供了新的断言,如下:
- assertIterableEquals() 对
Iterable<?>遍历equals(),如果元素是Iterable递归继续; - assertLinesMatch() 对字符列表(list,stream)匹配;
- assertAll() 所有断言一起执行,失败的不影响其他执行;
- assertThrows() 和assertDoesNotThrow() 替代注解
@Test里的expected property
@Nested
允许你有一个内部类,它本质上是一个测试类,允许你在下面组合几个测试类相同的父级(具有相同的初始化,如:使用displayname在测试报告中描述测试的目的以及结构关系)
@DisplayName("Verify MyClass")
class MyClassTest {
    MyClass underTest;

    @Test
    @DisplayName("can be instantiated")
    public void testConstructor() throws Exception {
        new MyClass();
    }
    @Nested
    @DisplayName("with initialization")
    class WithInitialization {
        @BeforeEach
        void setup() {
            underTest = new MyClass();
            underTest.init("foo");
        }

        @Test
        @DisplayName("myMethod returns true")
        void testMyMethod() {
            assertTrue(underTest.myMethod());
        }
    }
}
@ParameterizedTest
JUnit4中已经存在,内置的如JUnit4Parameterized或者第三方的JUnitParams。而在JUnit5中,借鉴两者好的特性以此完全内置了。如下:
@ParameterizedTest
@ValueSource(strings = {"foo", "bar"})
@NullAndEmptySource
void myParameterizedTest(String arg) {
    underTest.performAction(arg);
}
形式看起来类似JUnitParams,参数直接传递给测试方法。需要注意测试的值可以来自多个不同的源。例子中只用了一个参数,所以@ValueSource很方便。还有@EmptySource空字符,@NullSource空值,其他的还有如@EnumSource、@ArgumentsSource,多参数的如@MethodSource、@CsvSource
另一个添加的测试类型是@RepeatedTest,一个测试重复执行指定次数。
参数化测试
利用 @ValueSource等注解,指定入参,我们将可以使用不同的参数进行多次单元测试,而不需要每新增一个参数就新增一个单元测试,省去了很多冗余代码。
@ValueSource: 为参数化测试指定入参来源,支持八大基础类以及String类型,Class类型
@NullSource: 表示为参数化测试提供一个null的入参
@EnumSource: 表示为参数化测试提供一个枚举入参
@ParameterizedTest
@ValueSource(strings = {"one", "two", "three"})
@DisplayName("参数化测试1")
public void parameterizedTest1(String string) {
    System.out.println(string);
    Assertions.assertTrue(StringUtils.isNotBlank(string));
}
当然如果参数化测试仅仅只能做到指定普通的入参还达不到让我觉得惊艳的地步。让我真正感到他的强大之处的地方在于他可以支持外部的各类入参。如:CSV,YML,JSON 文件甚至方法的返回值也可以作为入参。只需要去实现ArgumentsProvider接口,任何外部文件都可以作为它的入参。
@CsvFileSource:表示读取指定CSV文件内容作为参数化测试入参
@MethodSource:表示读取指定方法的返回值作为参数化测试入参(注意方法返回需要是一个流)
/**
 * csv文件内容:
 * shawn,24
 * uzi,50
 */
@ParameterizedTest
@CsvFileSource(resources = "/test.csv")  //指定csv文件位置
@DisplayName("参数化测试-csv文件")
public void parameterizedTest2(String name, Integer age) {
    System.out.println("name:" + name + ",age:" + age);
    Assertions.assertNotNull(name);
    Assertions.assertNotNull(age);
}

@ParameterizedTest
@MethodSource("method")    //指定方法名
@DisplayName("方法来源参数")
public void testWithExplicitLocalMethodSource(String name) {
    System.out.println(name);
    Assertions.assertNotNull(name);
}

static Stream<String> method() {
    return Stream.of("apple", "banana");
}
重复测试
JUnit5为提供了 @RepeatedTest注解,允许某个单元测试执行多次。其实现在我也并不是很理解为什么要将一个单元测试运行多遍。目前我个人理解是因为单元测试是需要有可重复执行性的,而多次运行单元测试可以更加保证测试的准确性,防止一些随机性。
@RepeatedTest(10) //表示重复执行10次
@DisplayName("重复测试")
public void testRepeated() {
    Assertions.assertTrue(1 == 1);
}
动态测试
JUnit5允许我们动态的创建单元测试,通过 @TestFactory注解,会在运行时生成单元测试。需要注意的是 @TestFactory修饰的方法本身并不是单元测试,他只是负责生成单元测试。我们只需要返回 DynamicTest的迭代器甚至是流即可生成不同的单元测试。
@TestFactory
@DisplayName("动态测试")
Iterator<DynamicTest> dynamicTests() {
    return Arrays.asList(
            dynamicTest("第一个动态测试", () -> assertTrue(true)),
            dynamicTest("第二个动态测试", () -> assertEquals(4, 2 * 2))
    ).iterator();
}
条件执行
JUnit5提供了ExecutionCondition扩展api来有条件的启用或停用一个测试或类。如同在测试上使用注解@Disabled一样,这里提供了判断条件。内置的条件如下:
- @EnabledOnOs 和@DisabledOnOs: 指定的操作系统
- @EnabledOnJre and @DisabledOnJre: 指定的jre版本
- @EnabledIfSystemProperty: 如果满足JVM系统属性值启用
- @EnabledIf: 如果If条件满足启用
假设
假设的包路径是org.junit.jupiter.api.Assumptions。支持先前的假设及使用,同时提供了支持BooleanSupplier及Hamcrest matchers匹配条件,支持条件匹配上执行lambda表达式。如JUnit4中的一个例子:
@Test
public void testNothingInParticular() throws Exception {
    Assume.assumeThat("foo", is("bar"));
    assertEquals(...);
}
在JUnit5中可以写成如下:
@Test
void testNothingInParticular() throws Exception {
    Assumptions.assumingThat("foo".equals(" bar"), () -> {
        assertEquals(...);
    });
}
JUnit的扩展
在JUnit4中,一般使用注解@RunWIth指定运行环境,是JUnit提供给其他框架测试环境接口扩展。使用多个运行器是有问题的,通常需要chaining或者注解@Rule。在JUnit5中对扩展进行了简化和改进。
在JUnit4中使用spring框架构建测试如下:
@RunWith(SpringJUnit4ClassRunner.class)
public class MyControllerTest {
    // ...
}
@Retention(RetentionPolicy.RUNTIME)
@Target({ElementType.TYPE})
@Inherited
public @interface RunWith {
    Class<? extends Runner> value();
}
在JUnit5中使用Spring extension替代:
@ExtendWith(SpringExtension.class)
class MyControllerTest {
    // ...
}
@Target({ElementType.TYPE, ElementType.METHOD})
@Retention(RetentionPolicy.RUNTIME)
@Documented
@Inherited
@Repeatable(Extensions.class)
@API(
    status = Status.STABLE,
    since = "5.0"
)
public @interface ExtendWith {
    Class<? extends Extension>[] value();
}
注解@ExtendWith是可重复的, 意味着多个扩展可以方便的组合在一起。
如何自定义扩展呢?
通过实现包org.junit.jupiter.api.extension里的一个或多个接口,然后使用注解@ExtendWith添加到测试样例中。
换成JUnit5
将JUnit4测试用例转换到JUnit5,对多数用例而言一般步骤如下:
- 修改包名路径,移除JUnit4,换成JUnit5。如注解
@Test的路径,Asserts改成Assertions等; - 全局替换注解和类名,如
@Before换成@BeforeEach,就使用IDE工具而言,更换了依赖后,旧的注解或类名会有错误提示的; - 注意
assertions(消息参数移到最后),timeout,expected exceptions,具体见上文说明; - 更新
assumptions; - 用注解
@ExtendWith替换@RunWith、@Rule或@ClassRule,以及解决替换后的问题;
定义描述信息
可以在类或方法中使用注解@DisplayName定义描述信息,使得描述测试的目的和追踪失败更容易,如:
@DisplayName("Test MyClass")
class MyClassTest {
    @Test
    @DisplayName("Verify MyClass.myMethod returns true")
    void testMyMethod() throws Exception {
        // ...
    }
}
@Target({ElementType.TYPE, ElementType.METHOD})
@Retention(RetentionPolicy.RUNTIME)
@Documented
@API(
    status = Status.STABLE,
    since = "5.0"
)
public @interface DisplayName {
    String value();
}
官方:
